“A gardener’s recipe: One part soil, two parts water, three parts wishful thinking.”
If you love a beautiful landscape but your thumbs are less than green, low maintenance landscaping may be for you. Many novice gardeners are surprised to learn how many low maintenance options exist for those lacking the time or the skill for complicated gardening.
Low maintenance landscaping ideas will vary depending on where you live. Certain low maintenance landscaping ideas, such as xeriscaping, can be tweaked to work in any climate. Scroll through our low maintenance landscaping gallery and start dreaming again of creating your ideal garden.
[view_toc]
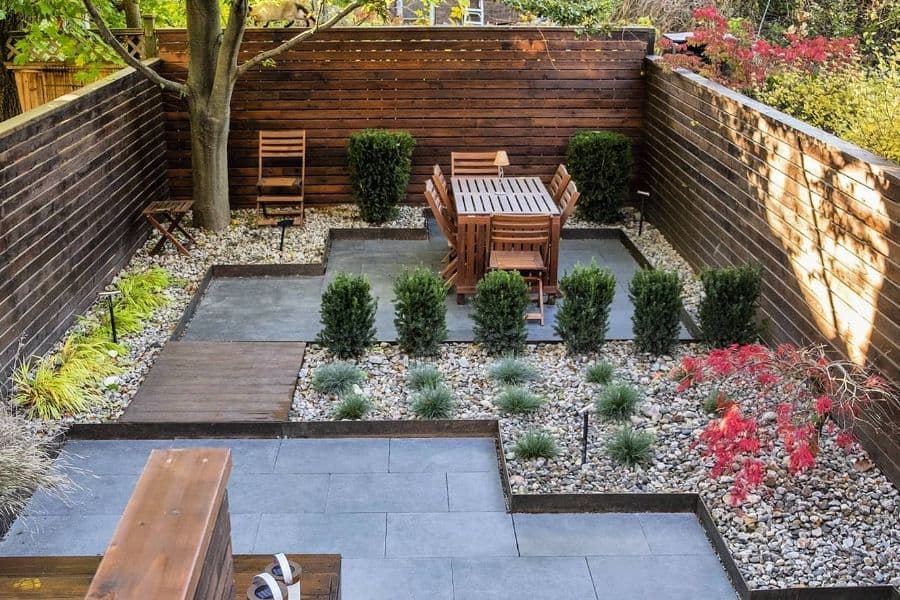
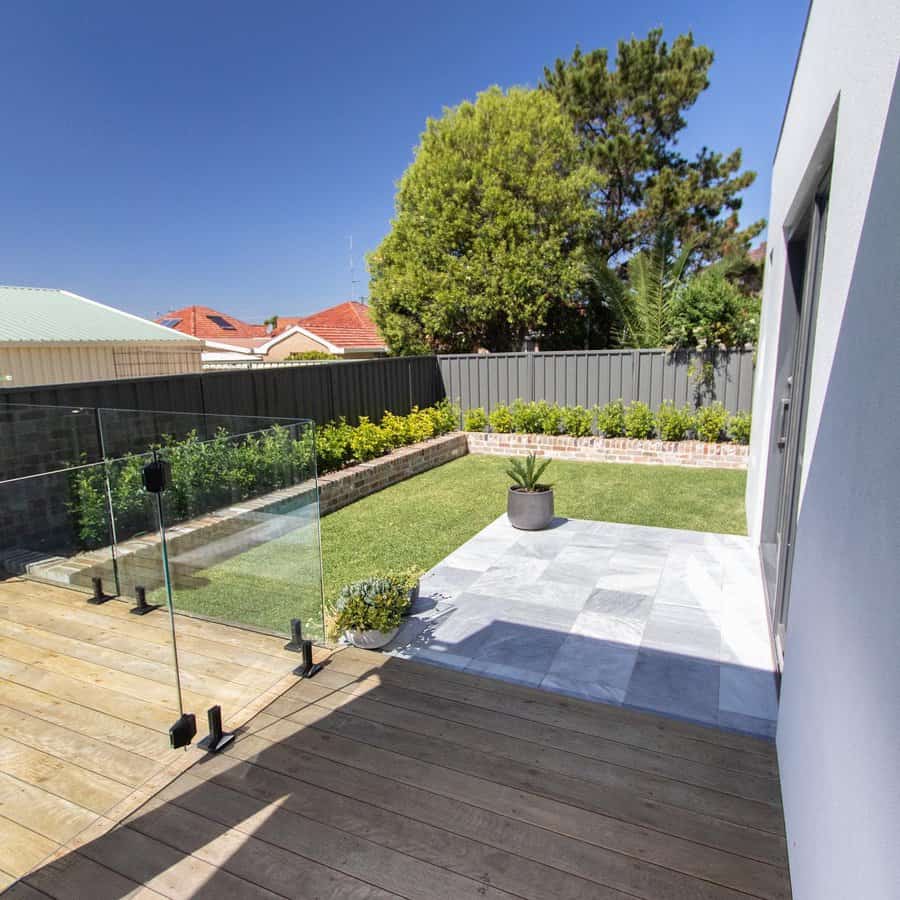
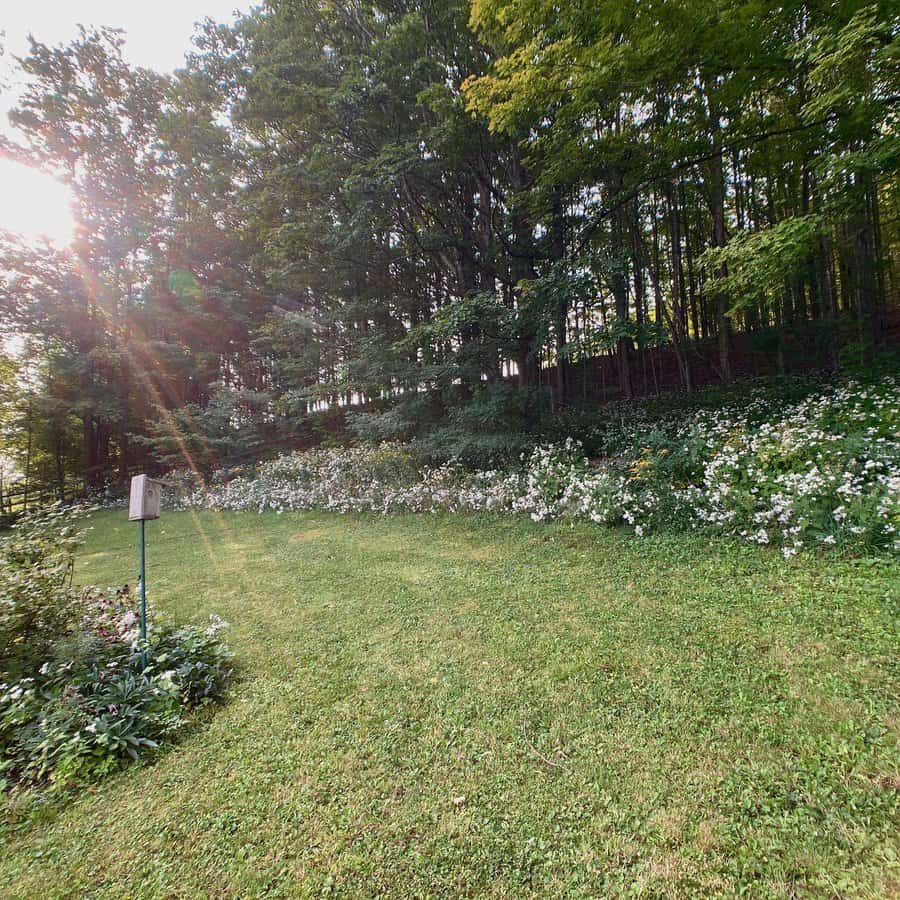
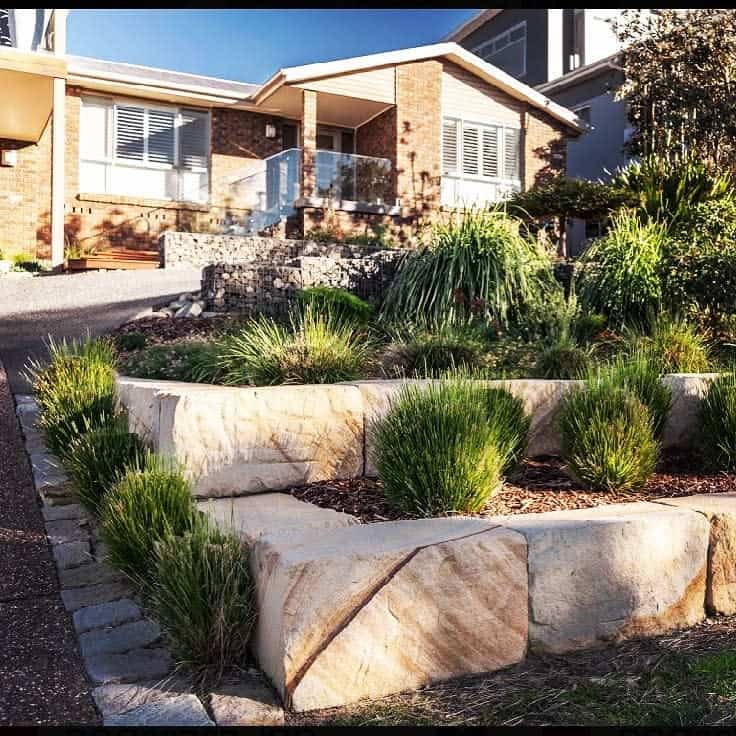
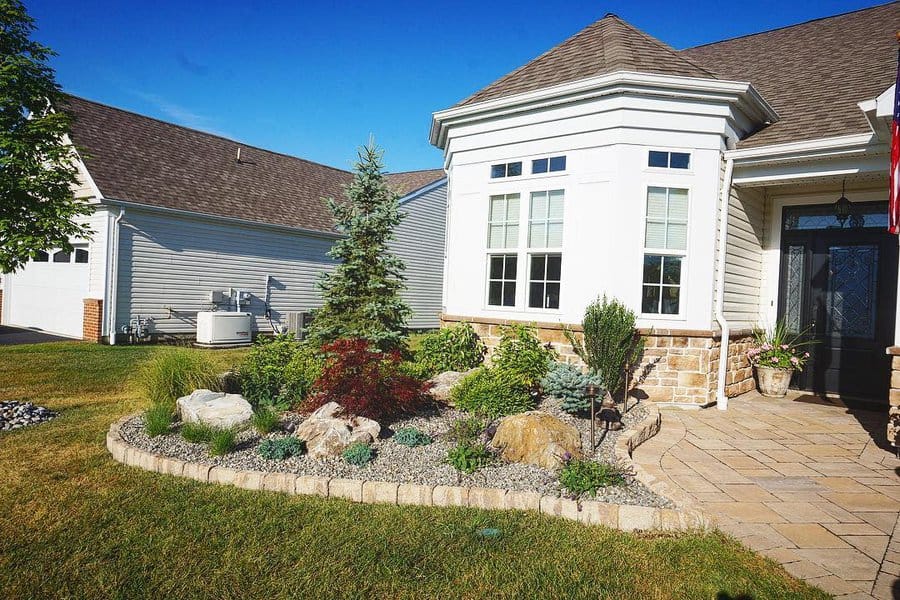
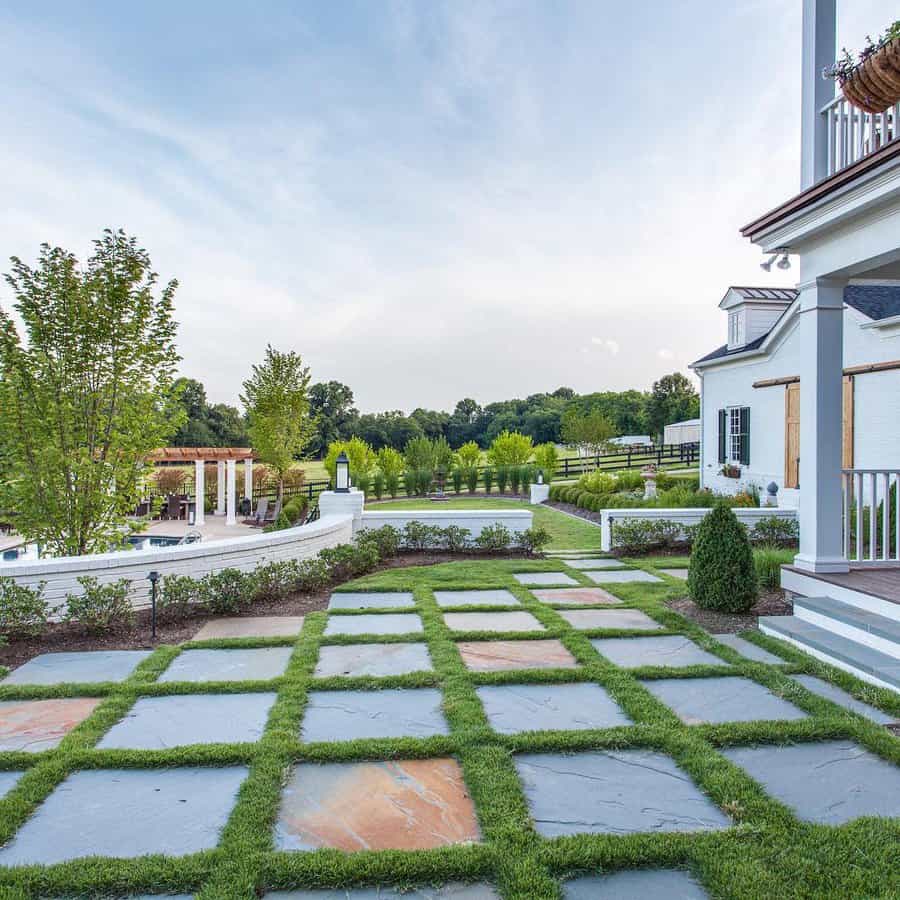
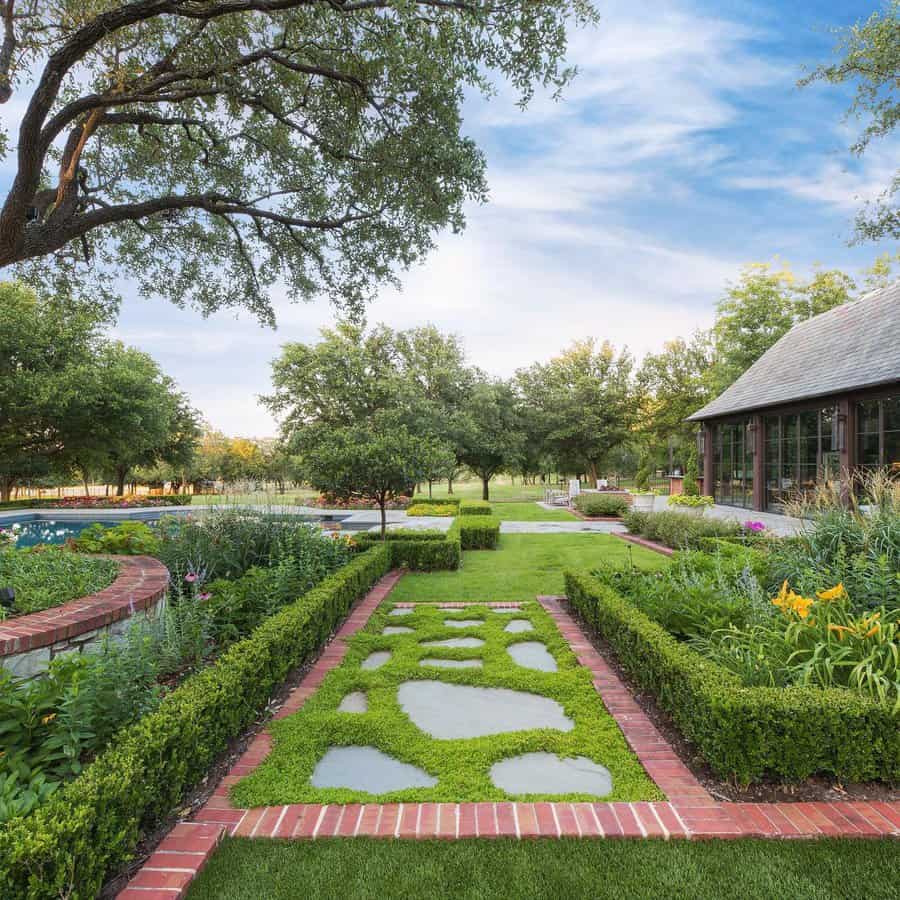
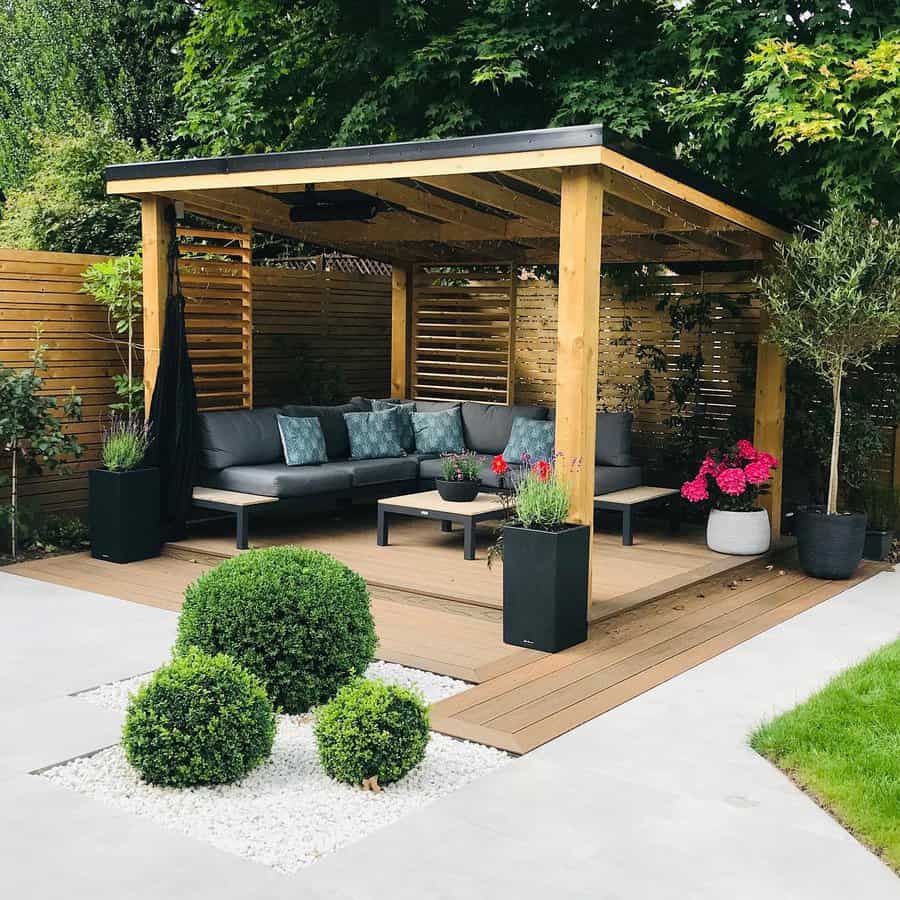
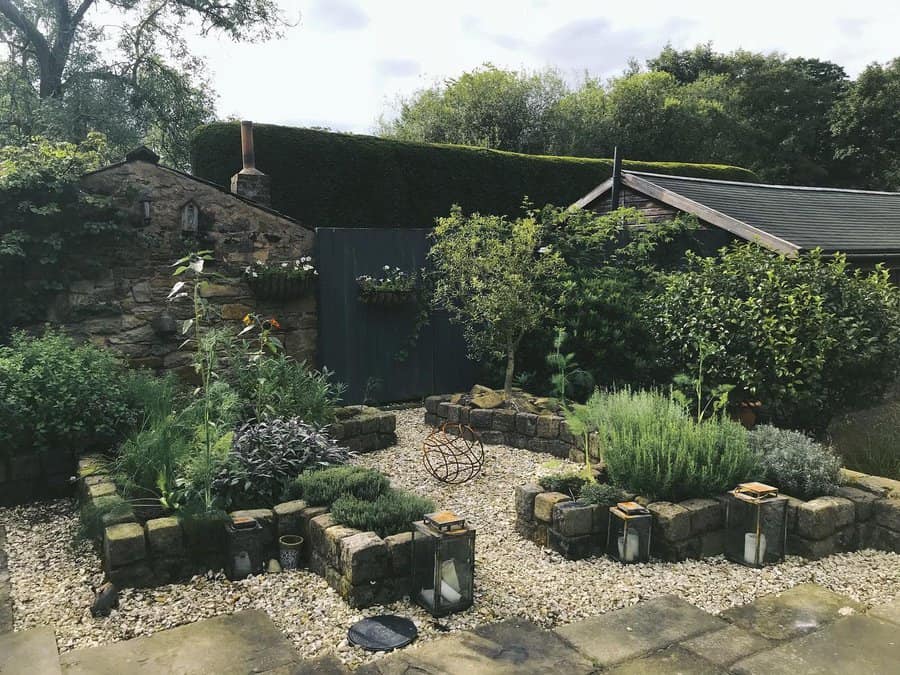
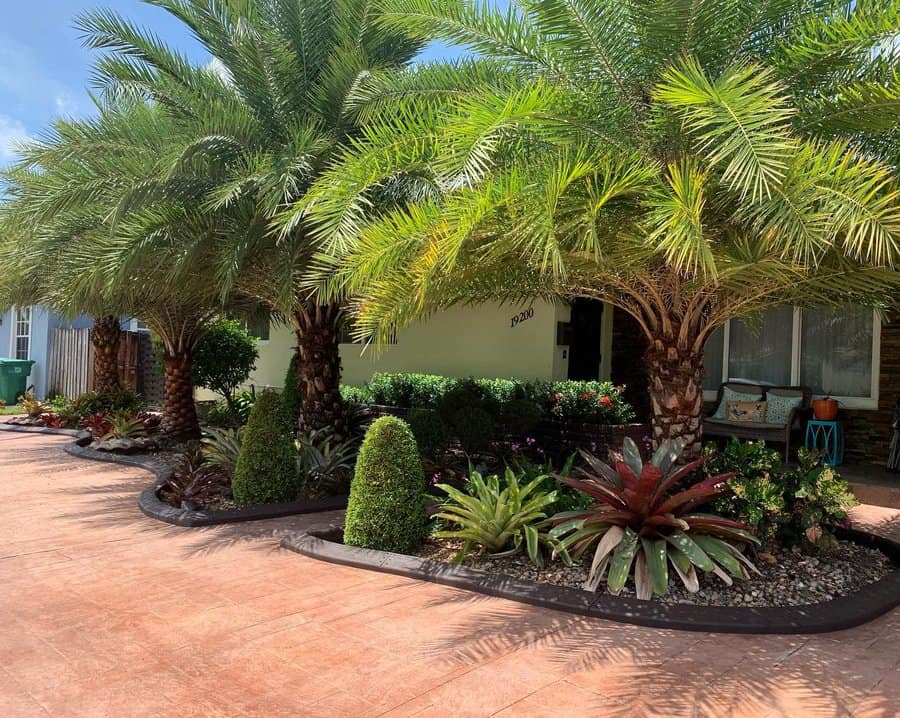
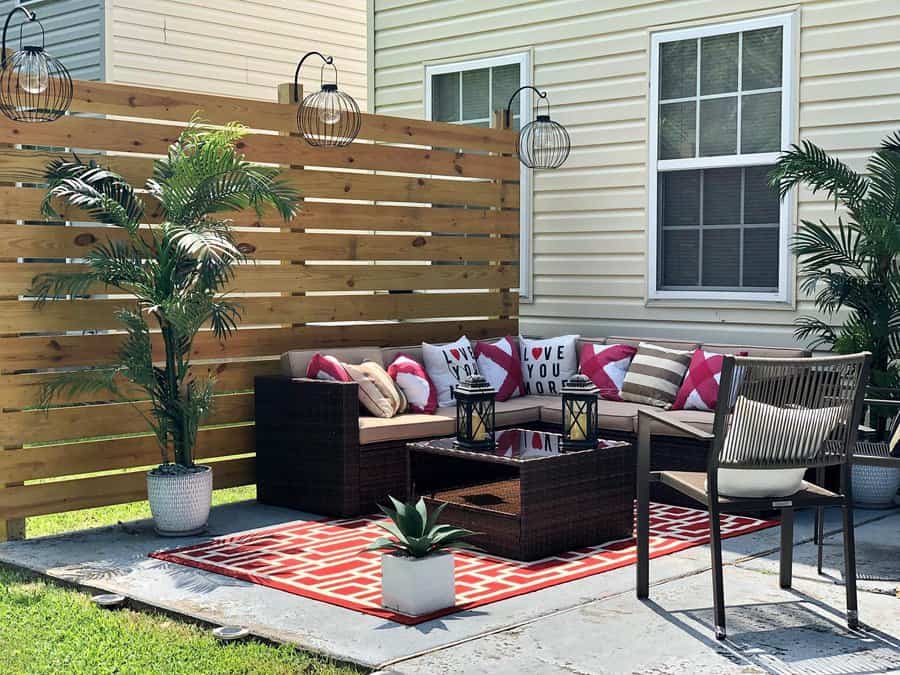
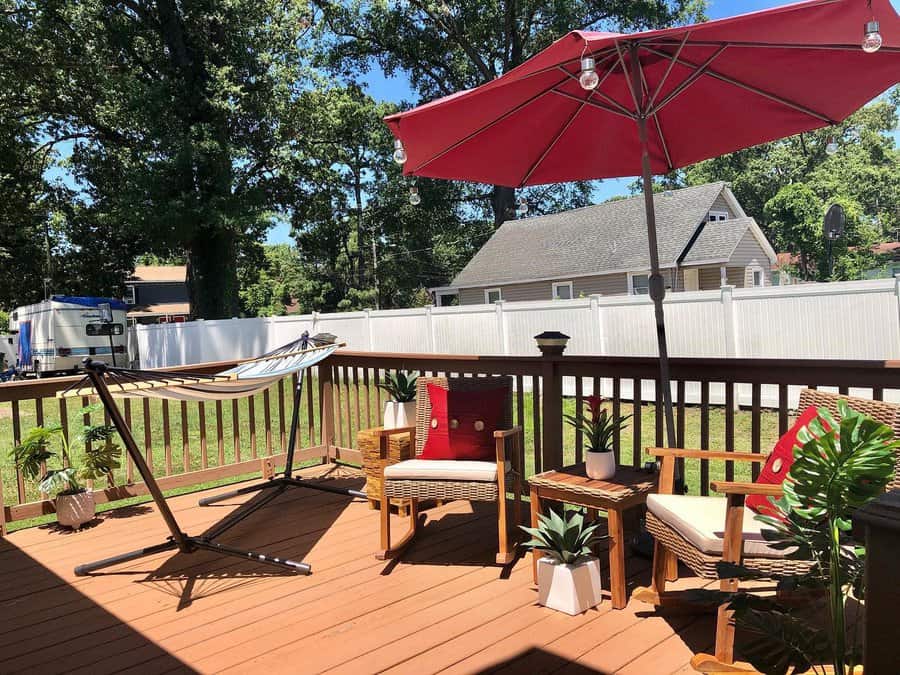
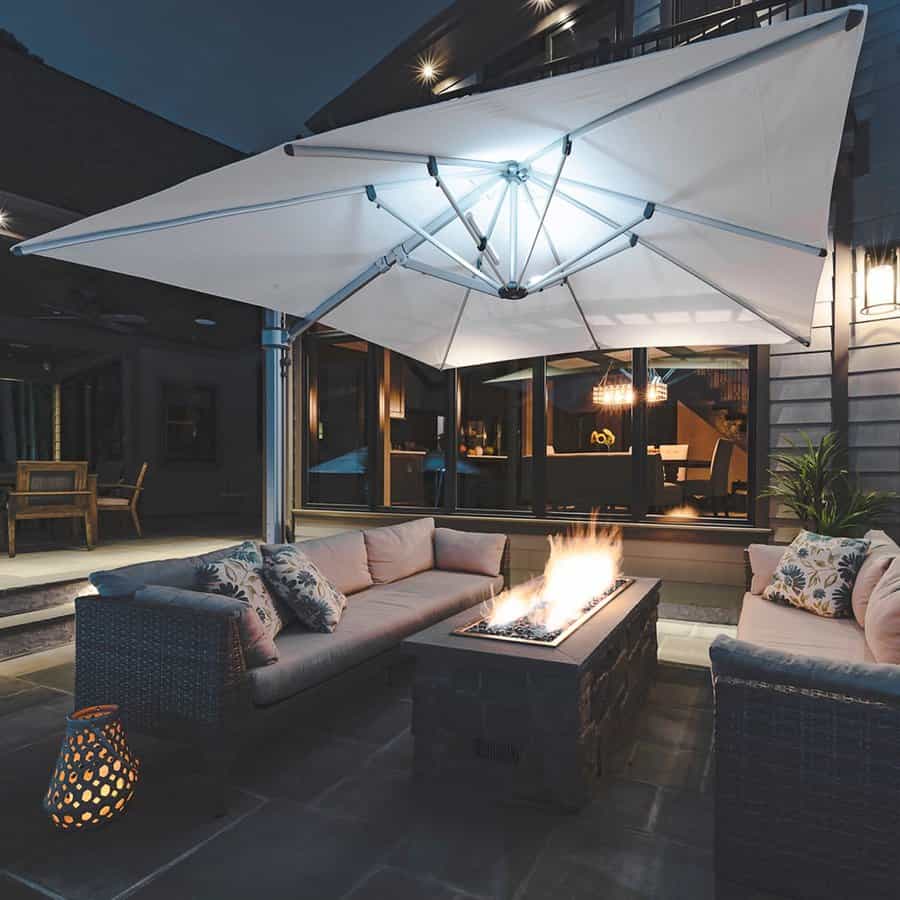
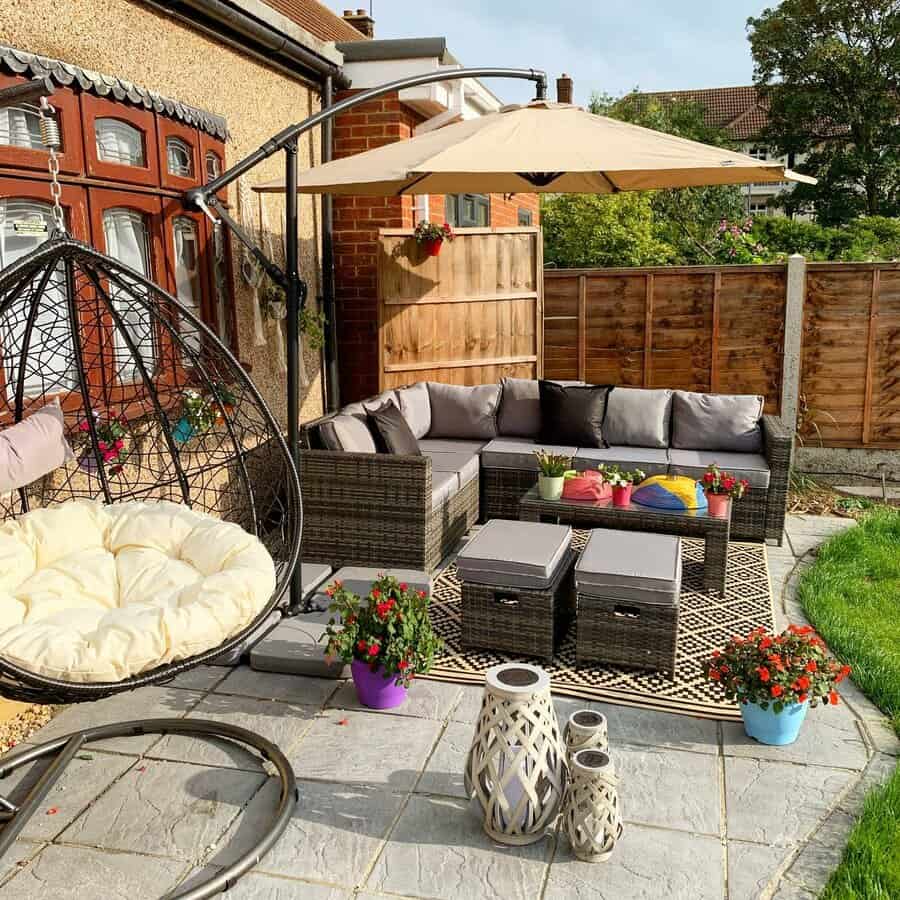
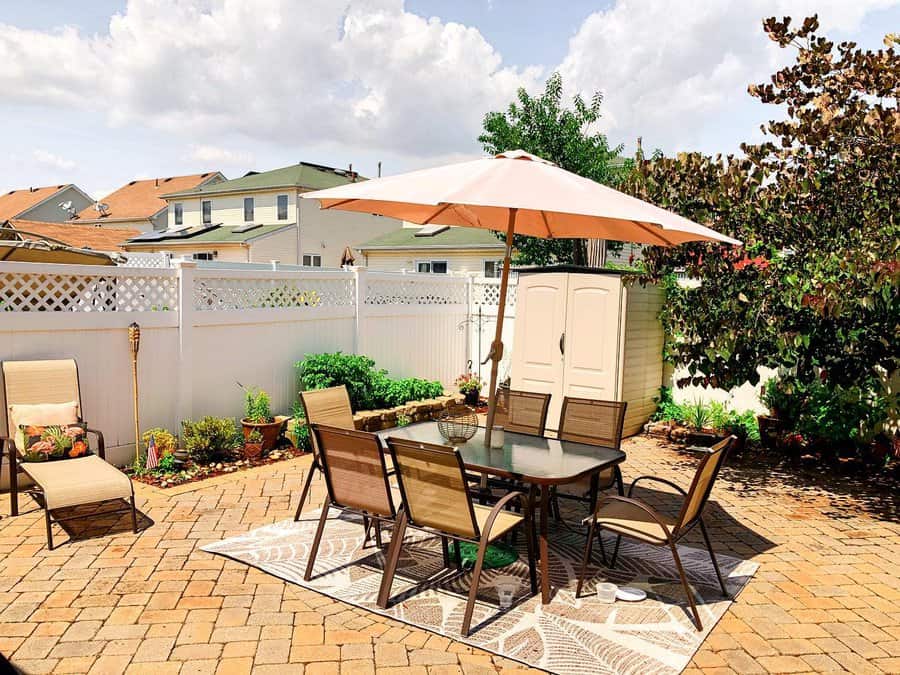
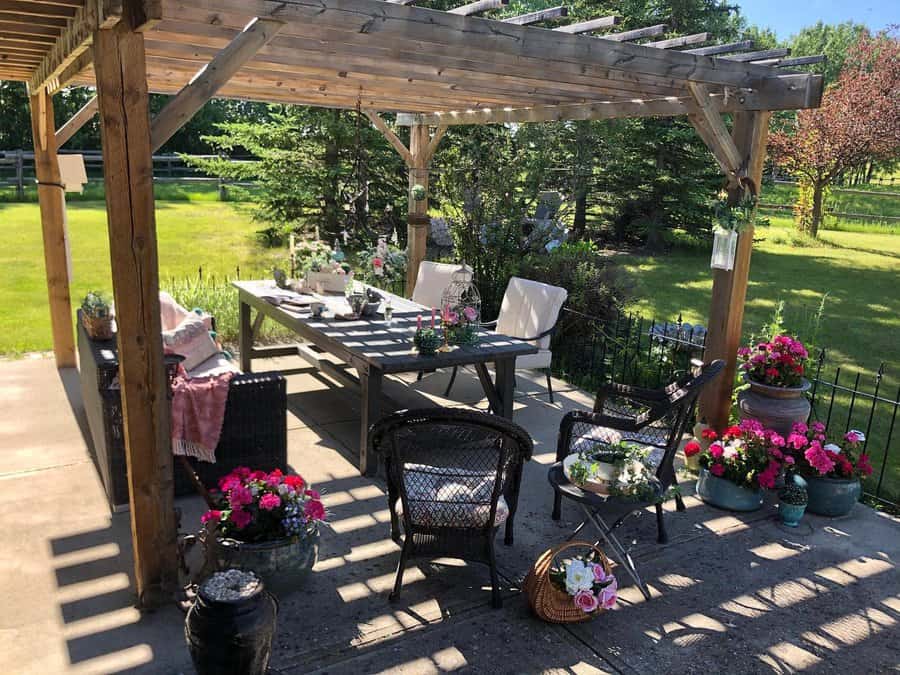
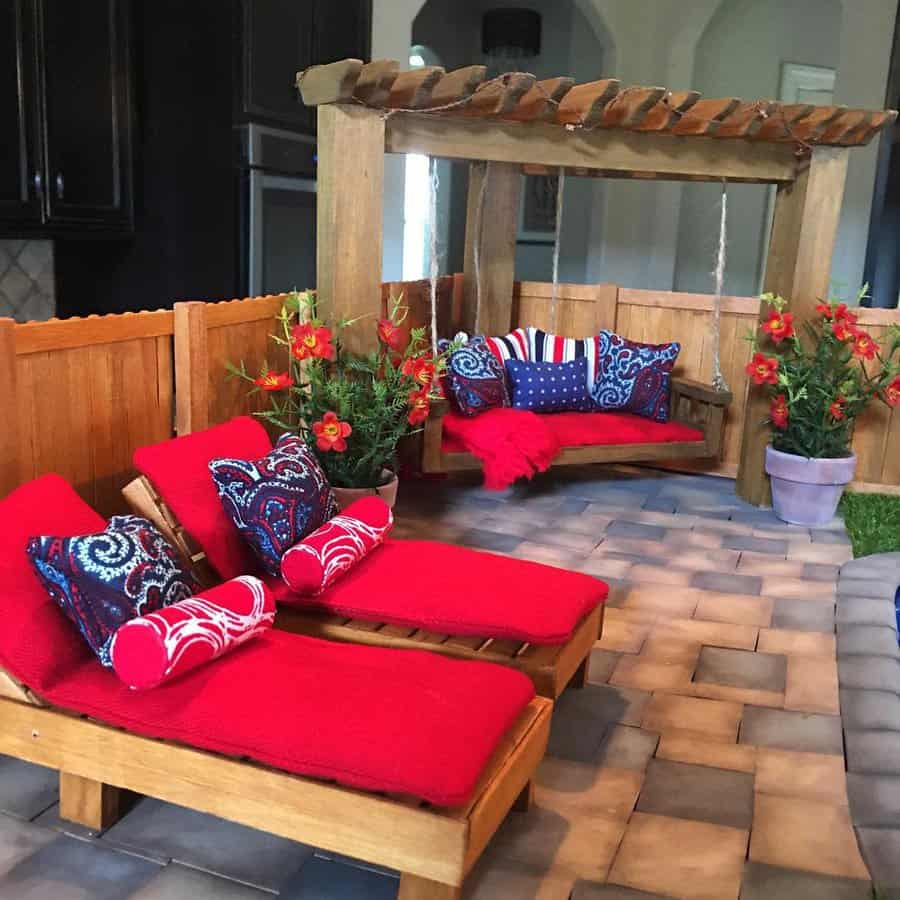
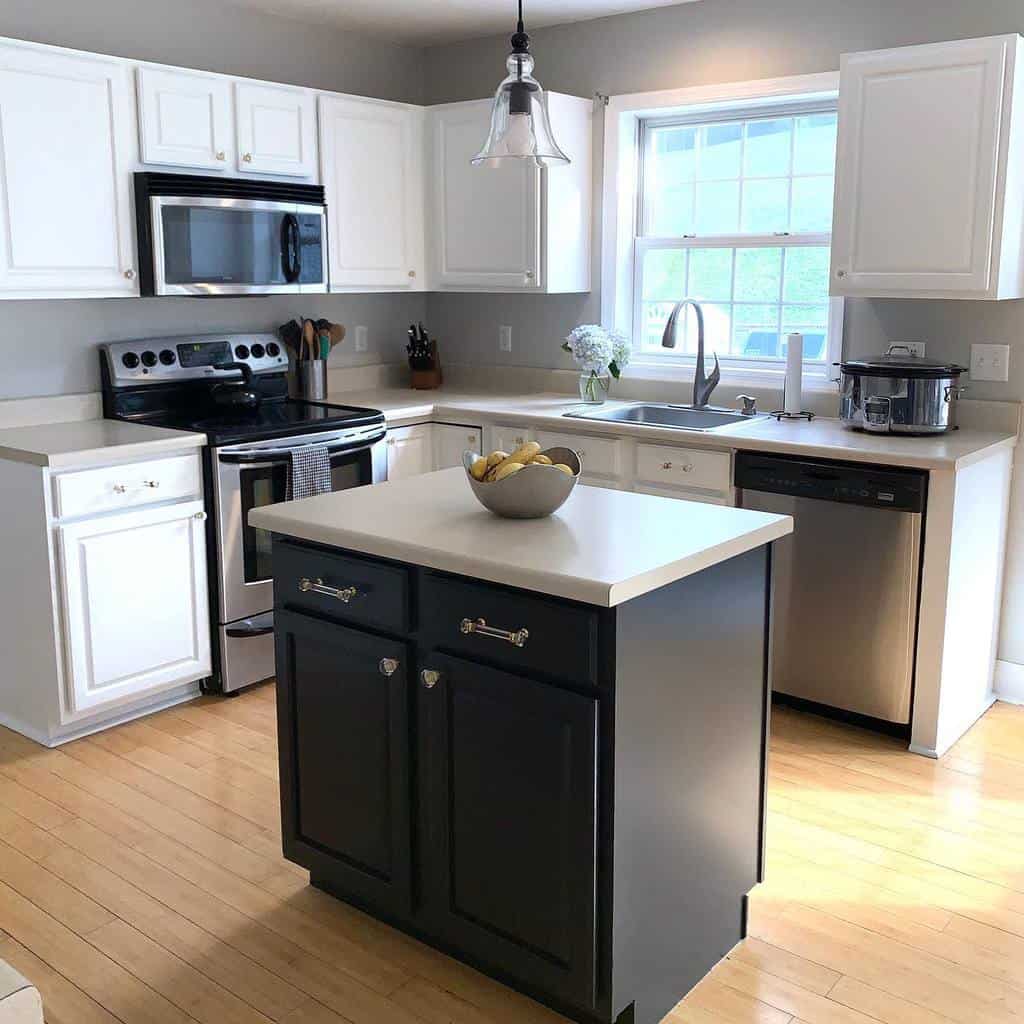
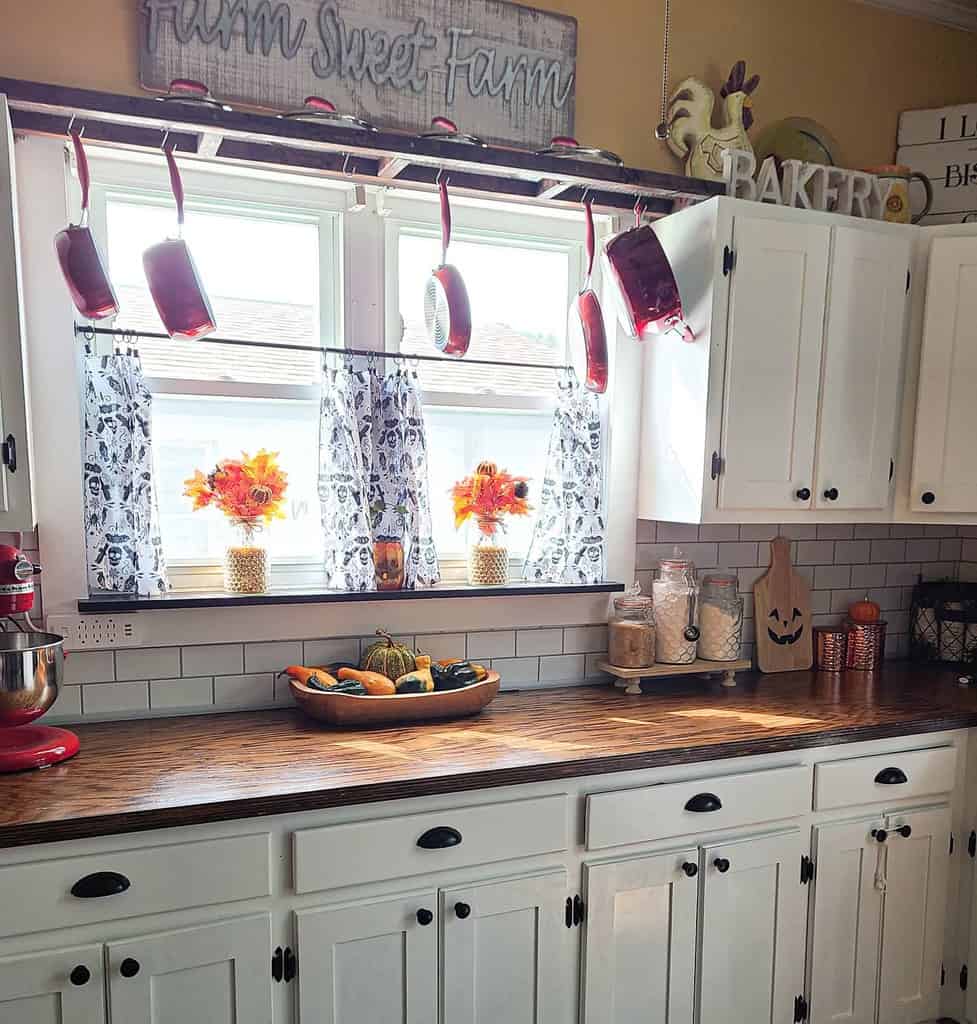
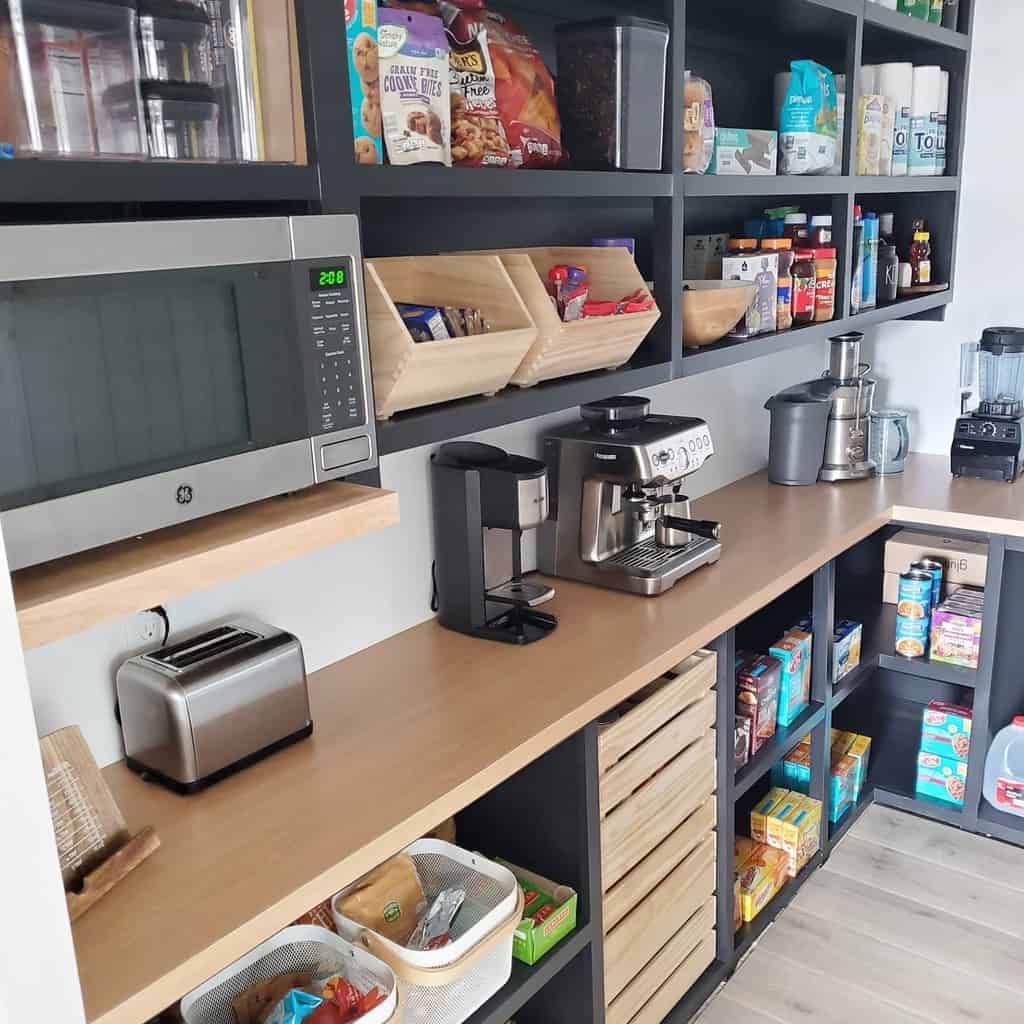
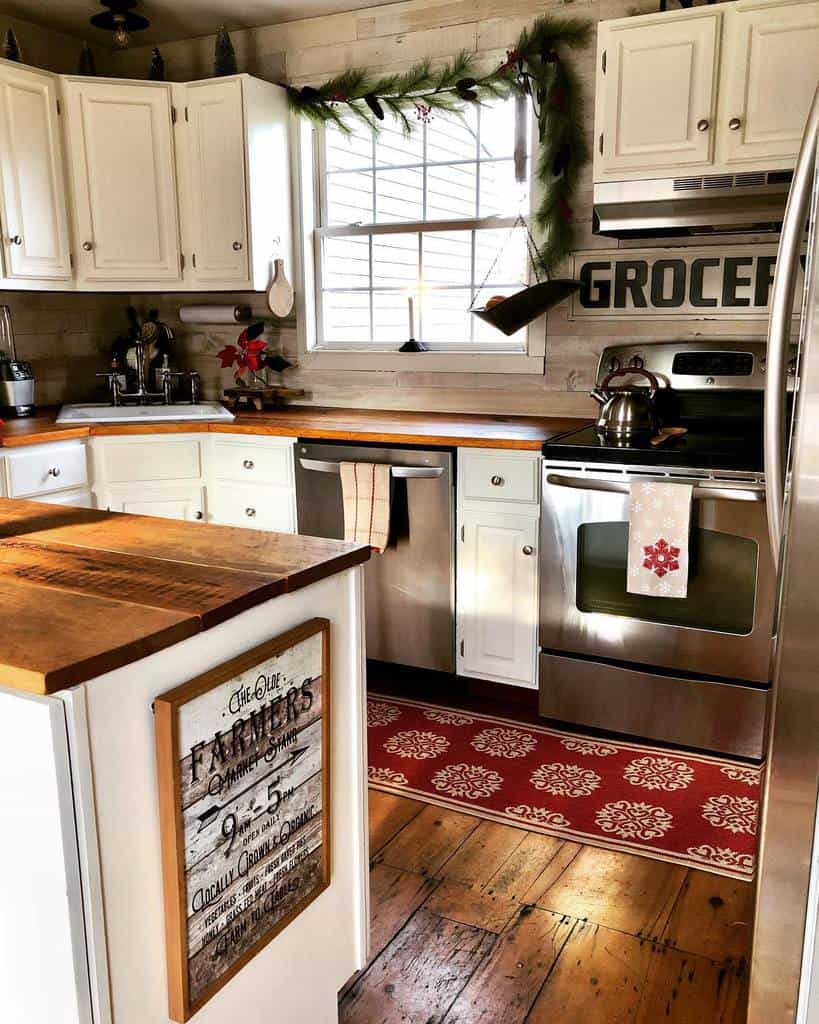
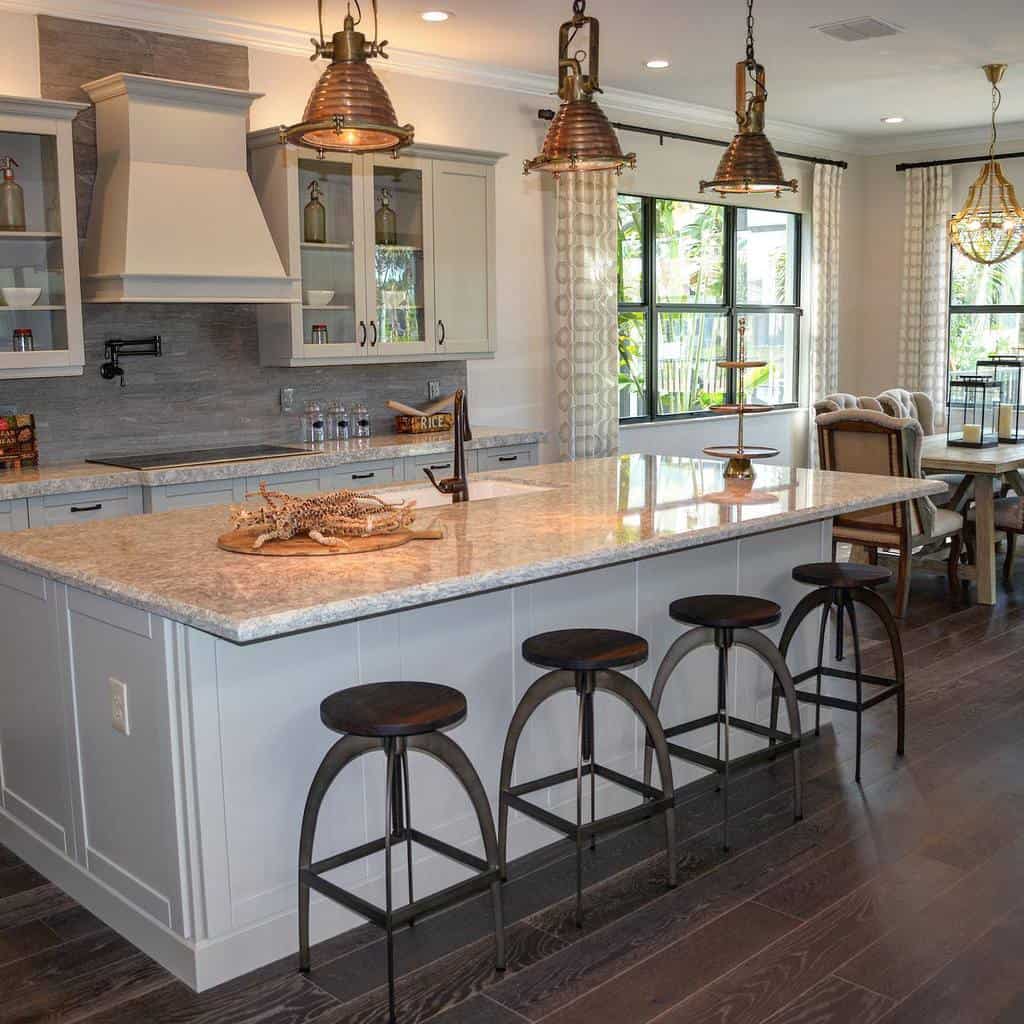
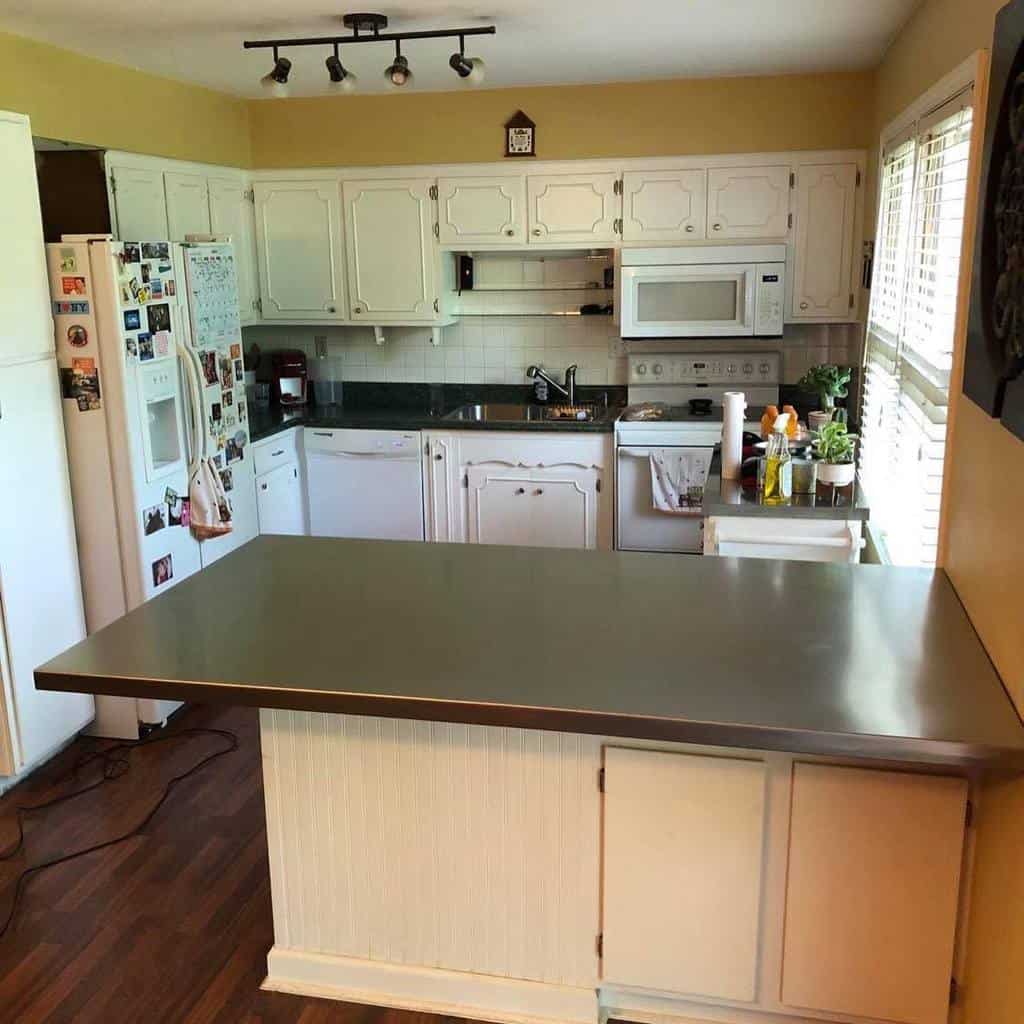
1. Backyard Oasis: Low Maintenance Designs
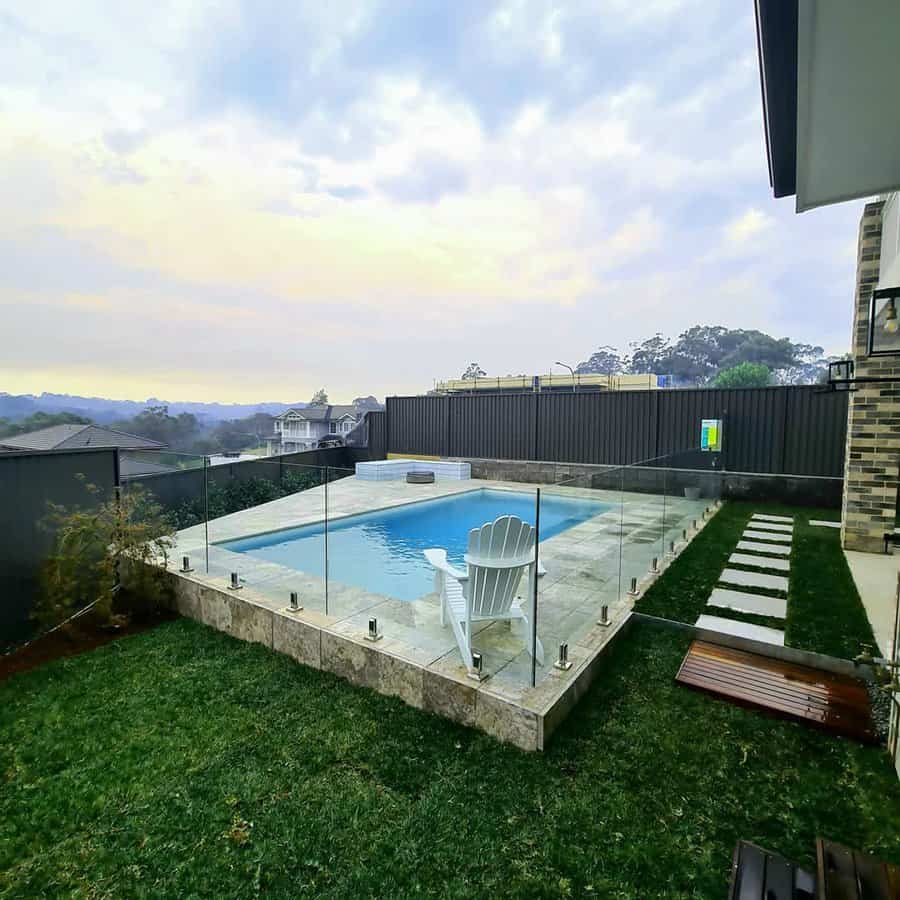
The best way to create a low maintenance backyard is to convert as much of it as possible into outdoor living spaces.
A large stone patio means you’ll spend less time mowing grass and more time relaxing. Instead of maintaining a flower bed, keep a large shade tree as the backyard focal point. Build a deck around it and add a few low maintenance potted plants.
Source: @earthandsole via InstagramSource: @greenjaylandscaping via InstagramSource: @jael.prothro via InstagramSource: @kerenabu.mecontracting via InstagramSource: @louasisliving via InstagramSource: @mrs.caragay via Instagram
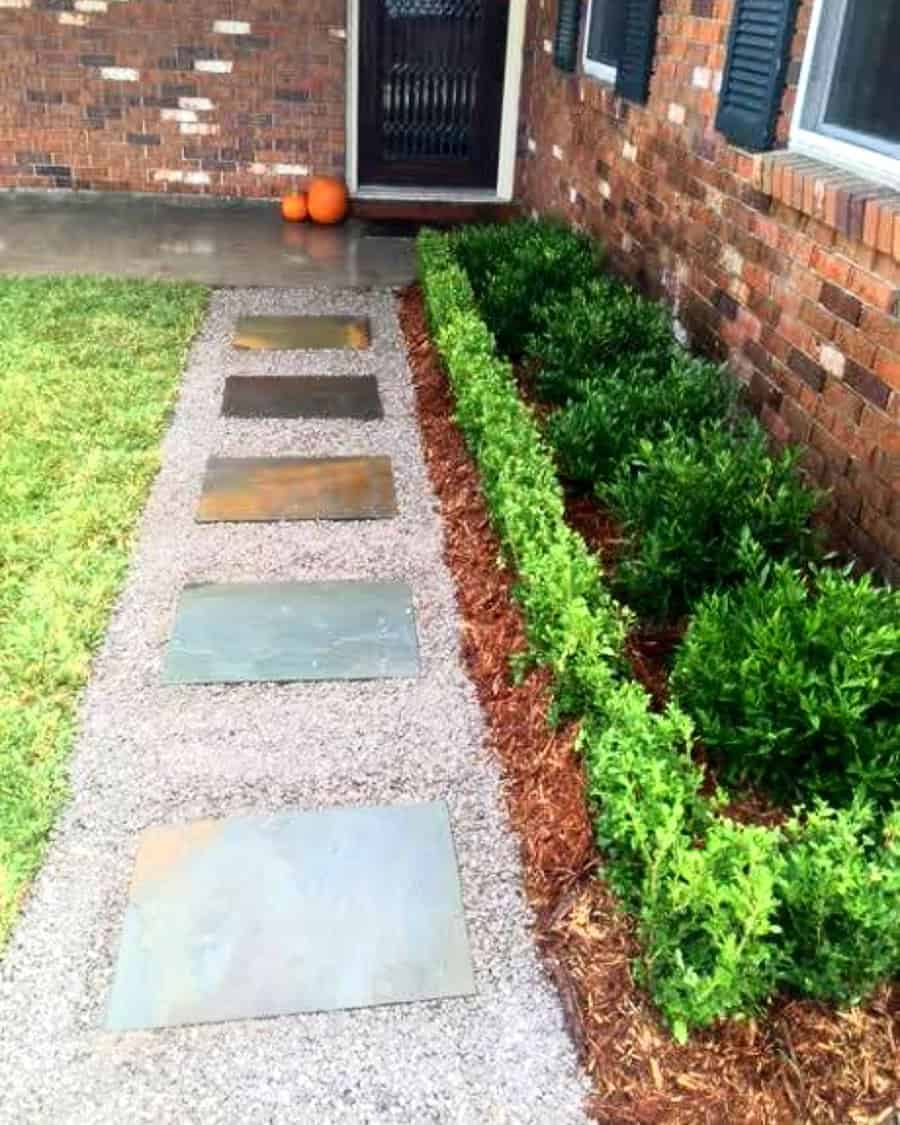
Surround your patio or paving stones with mulch instead of planting grass. Mulch is delightfully low maintenance, especially if you spread it over a good quality weed barrier material.
It’s an inexpensive way to cover a lot of ground and usually only needs replacing each spring. Rubber mulch can look as attractive as the real thing but won’t break down like wood mulch.
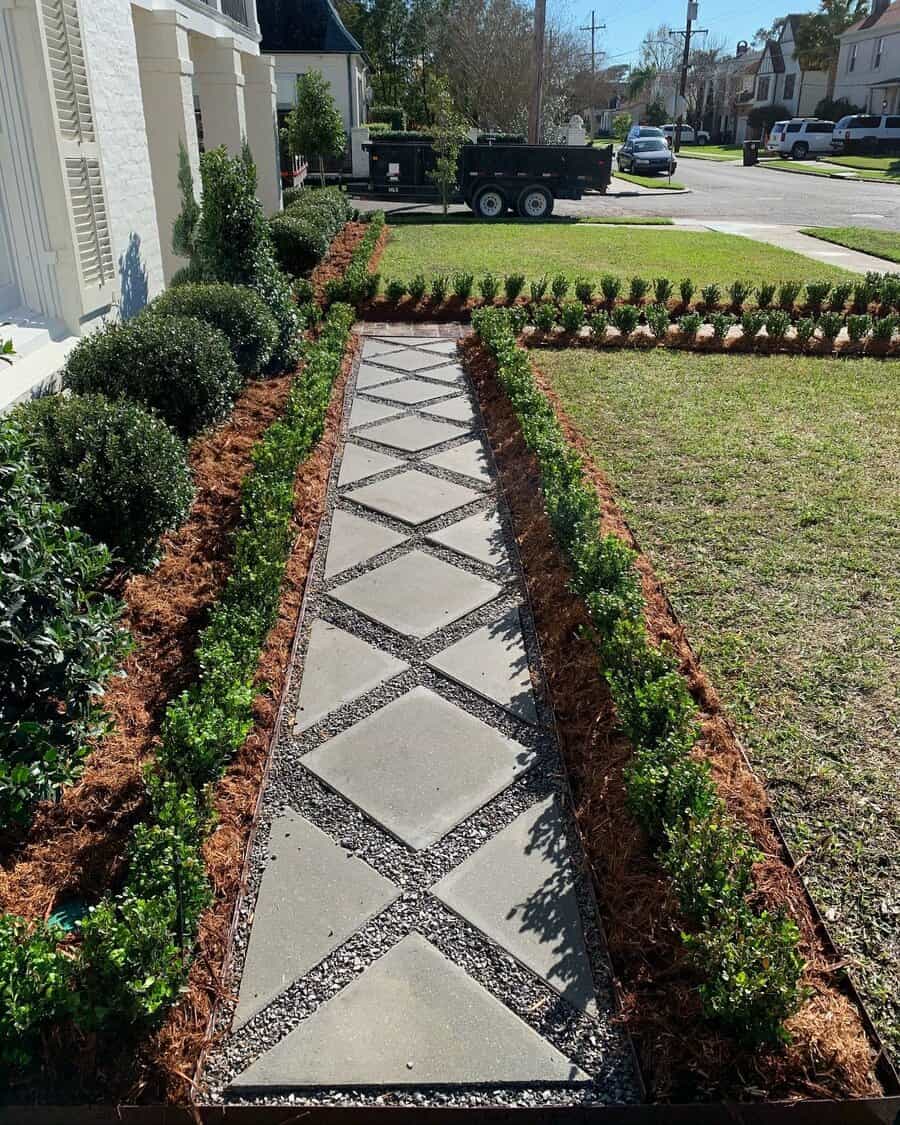
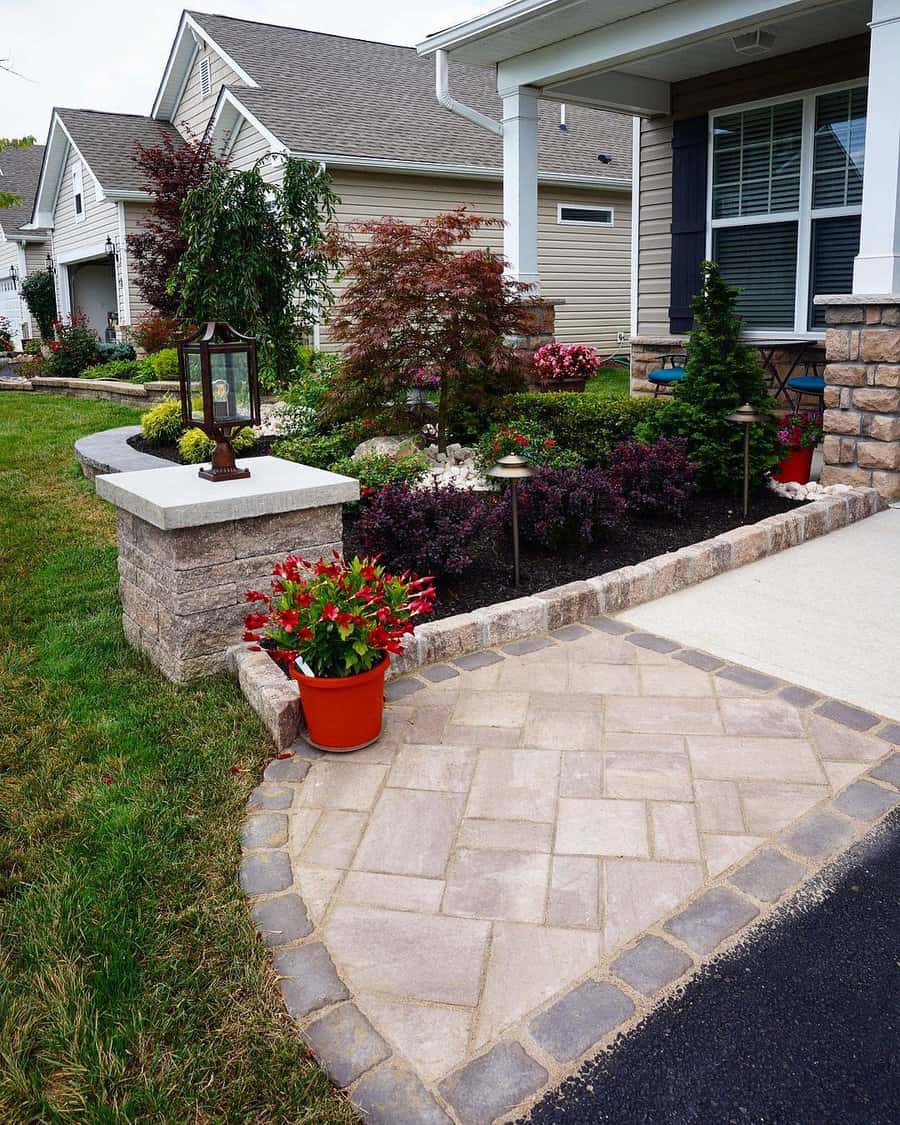
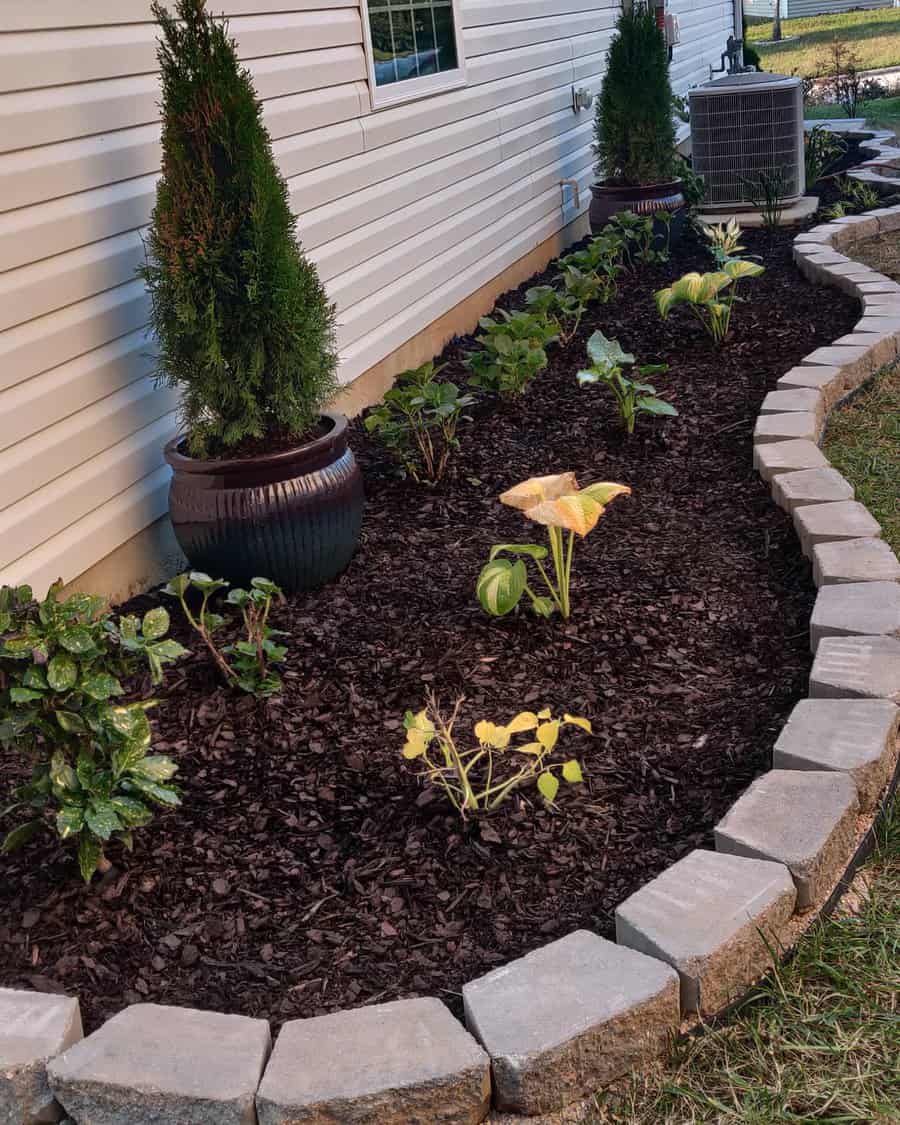
2. Creative Corner Landscaping Solutions
The corners of your yard are great places to cut down on landscape maintenance by planting evergreens. These often slow growing plants stay green year-round and add beautiful texture to your garden.
Evergreen plant hues vary from pale green to silvery blue, making them an excellent way to add color variety to the yard without increasing your workload.
Source: @creativelandscapingnirrigation via InstagramSource: @creativelandscapingnirrigation via InstagramSource: @shawlandscapegroup via InstagramSource: @smartchoicelandscapesandpools via InstagramSource: @smartchoicelandscapesandpools via InstagramSource: @wilshereinterior via Instagram
Clumping monkey grass does well wrapped around corners and along borders. It is hardy and grows well in most climates and soil types.
Design a low maintenance but high curb appeal corner on each side of your front steps by laying a curved line of brick pavers. Fill it with crushed stone, monkey grass and dwarf evergreen shrubs.
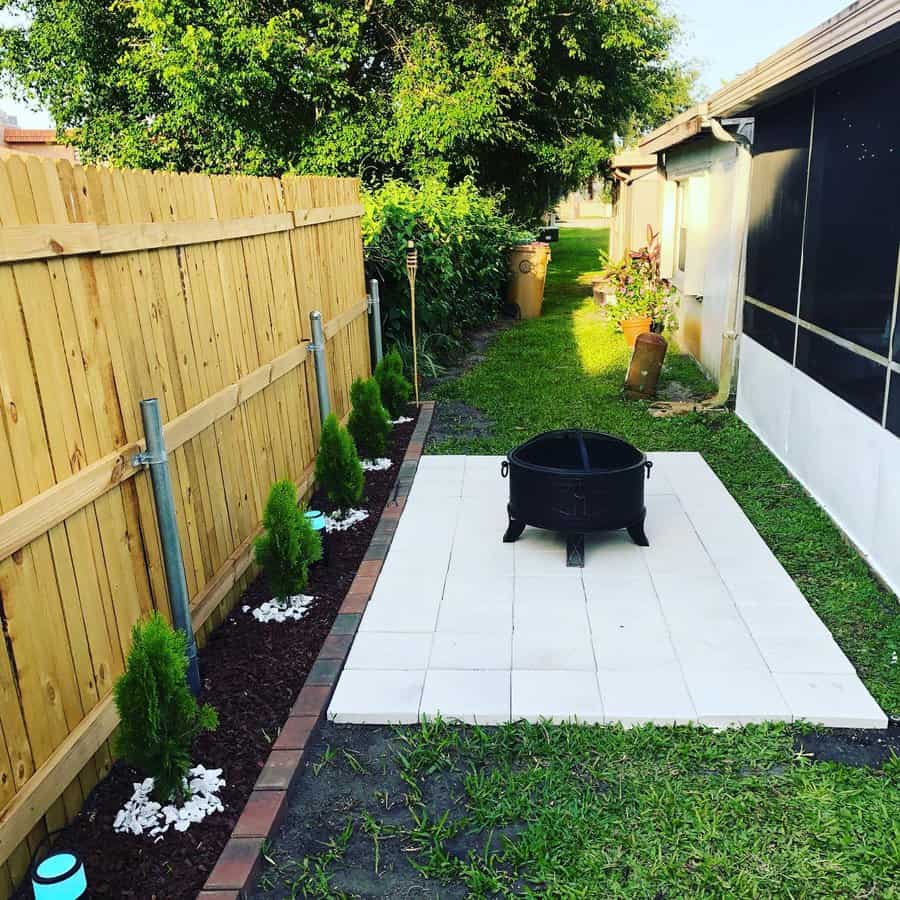
3. Effortless Country Style Landscaping
Country dwellers with large acreage may wonder how to cut down on mowing, watering, and other time-consuming landscaping tasks.
By converting more areas into low maintenance landscaping zones, even rural homeowners can reclaim more hours of relaxation each weekend.
Source: @wilshereinterior via InstagramSource: @aubynlandscapes via InstagramSource: @aubynlandscapes via InstagramSource: @greenjaylandscaping via Instagram
Plant creeping groundcover on sloped areas of your property, and don’t be in a rush to clear wooded areas. Be generous with the amount of land you allot for a patio or a deck, as hardscaping equals less grass to maintain.
If your country home doesn’t feel like home without flowers, opt for carefree perennials such as penstemon or brilliant blue-violet pasque flower.
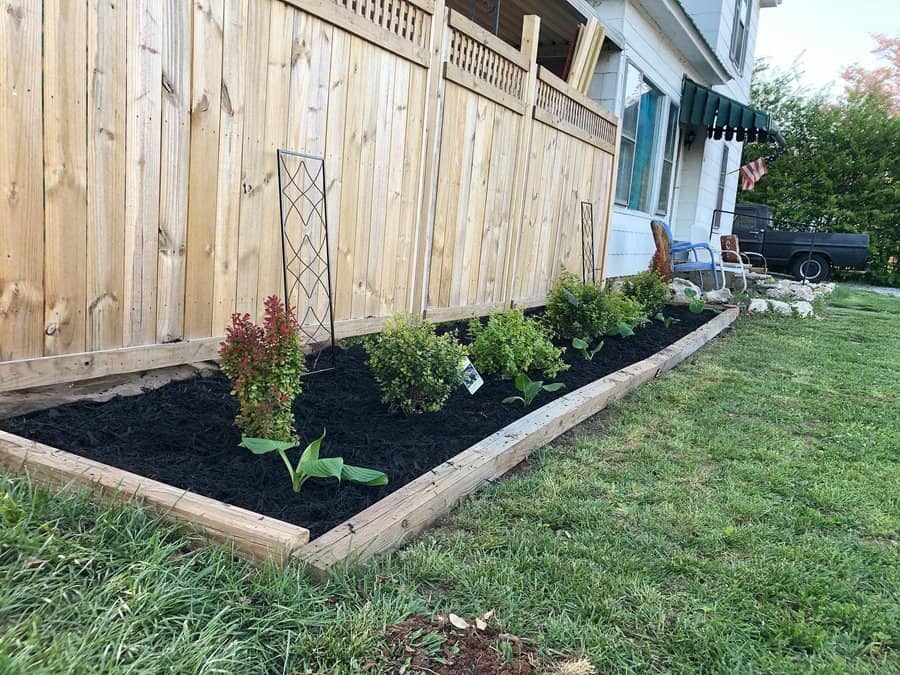
4. DIY Low Maintenance Garden Projects
If you want to DIY a hassle-free garden, start by learning which low maintenance landscaping plants thrive in your area. A few minutes on a search engine will provide you with dozens of ideas to DIY a low maintenance garden guaranteed to grow in your yard.
Source: @bexx_home via InstagramSource: @iamyannyreyes via InstagramSource: @oldfortfarmhouse via Instagram
Advancements in artificial grass production have resulted in a product that looks and feels more like real grass than ever. Although it is an expensive carefree landscaping idea—around $10 per square foot—just think of all the time you’ll save on mowing the grass!
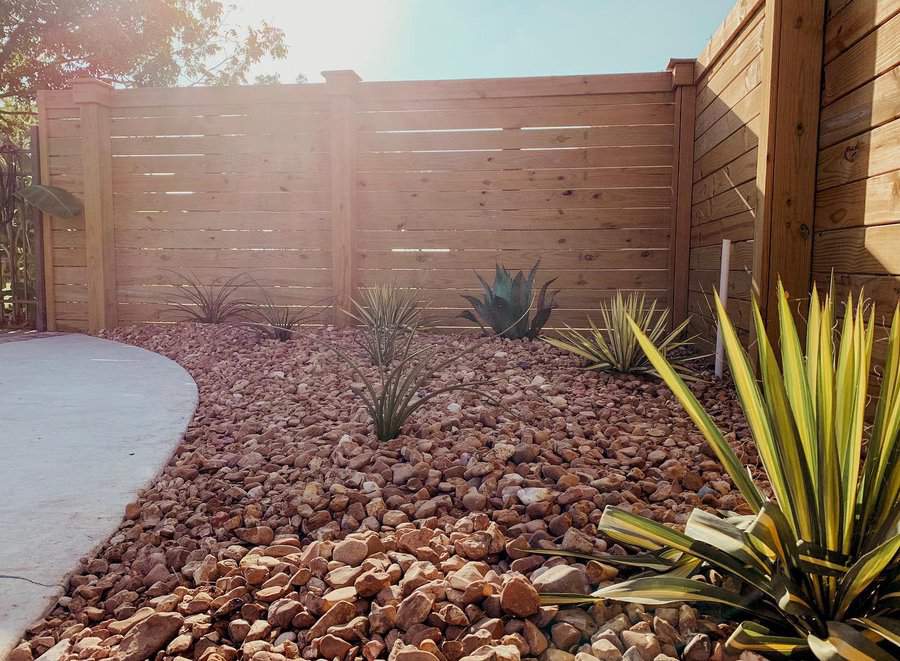
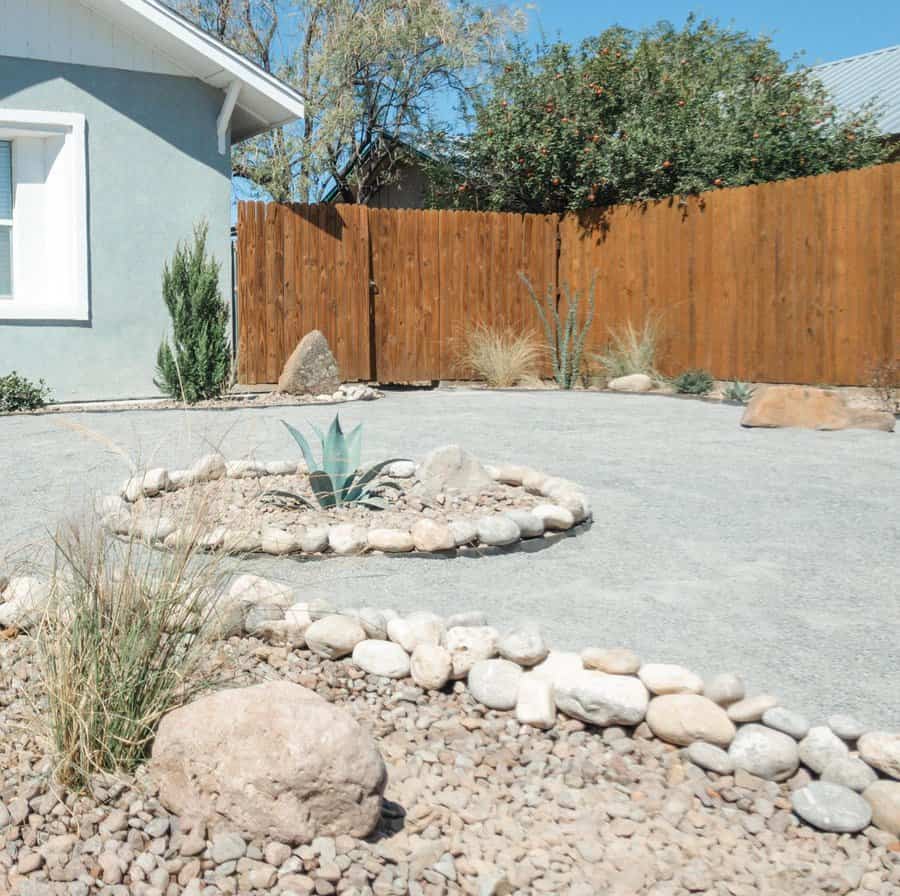
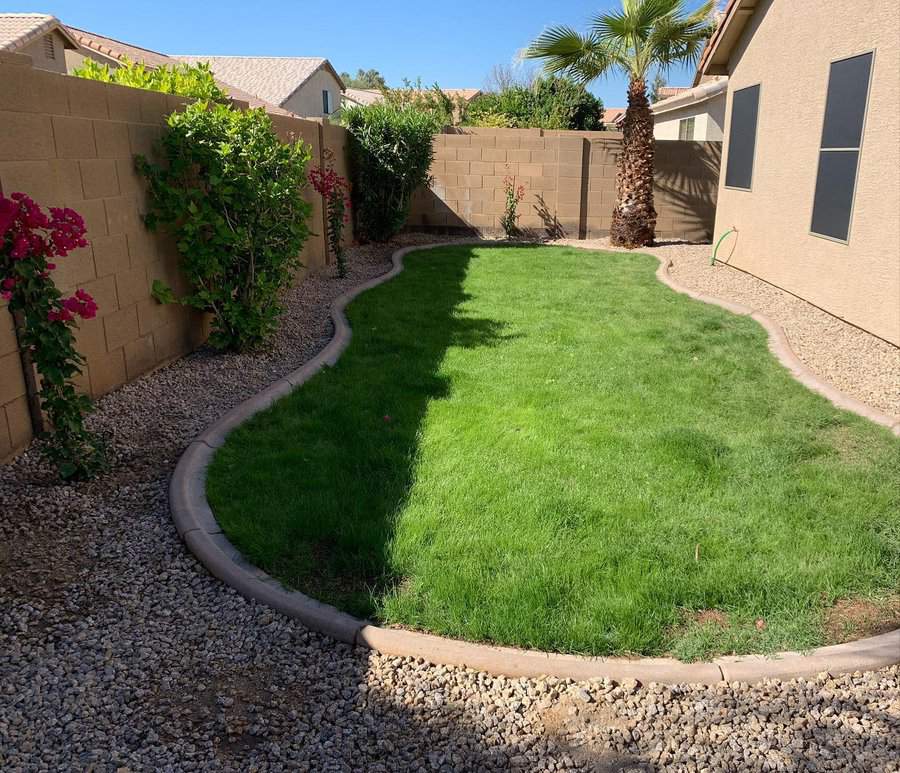
5. Desert Landscaping
A desert landscape with native plant selections might be the original low maintenance landscape. Desert plants are well adapted to their environment and have minimal watering requirements. While there are still desert gardens that include grass, more and more people are choosing natural xeriscape garden options.
Source: @everlastlandscapes via InstagramSource: @richard_party_of_10 via InstagramSource: @rochelles_canterbury via InstagramSource: @sampearsongardenprojects via InstagramSource: @scandichomeseriemas via Instagram
Succulents, including cacti, come in a dizzying array of shapes, sizes and colors. In the proper desert climate, all you need is a variety of succulents and crushed rock mulch to create a colorful, low maintenance yard.
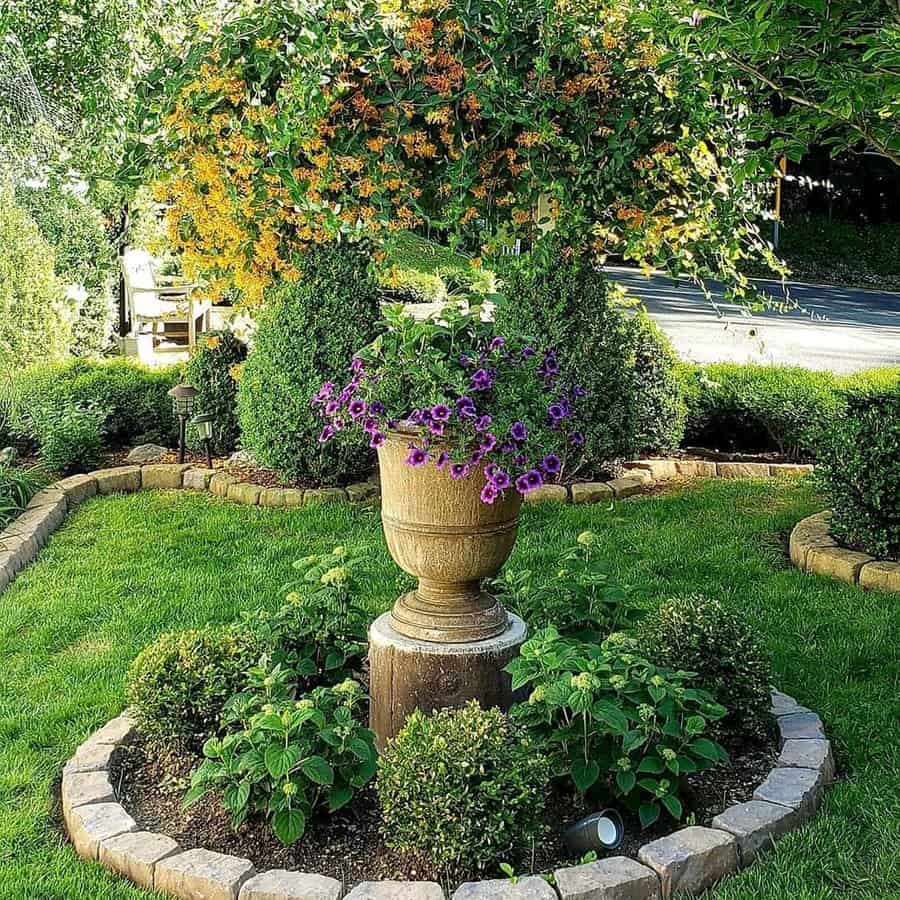
6. Front Yard Beauty with Minimal Upkeep
A beautiful landscape doesn’t have to be complicated. A tidy front yard may consist of a shade tree or two and some shrub clusters surrounded by mulch.
You’ll need to rake leaves in the fall, and trim shrubs occasionally, but the mulch will cut down on weeds and watering. Organic mulch also adds a nice woody fragrance to your yard.
Source: @cantellano_inc via InstagramSource: @chaseslandscapeservices via InstagramSource: @creativedesignandmaintenance via InstagramSource: @jennxt via InstagramSource: @samgrowsfoodandflowers via InstagramSource: @truenorthenterprises via InstagramSource: @truenorthenterprises via InstagramSource: @truenorthenterprises via InstagramSource: @waisgarden via InstagramSource: @waisgarden via InstagramSource: @creativedesignandmaintenance via Instagram
If you decide you need a burst of color in the front yard, plant lavender. These durable perennial plants return year after year and spread over time. Unlike many flowering plants, lavender only needs watering once or twice a week, and their strong fragrance is a pleasant natural bug repellant.
Whether your yard is large, average, or small, the same tips apply if you wish to have a low maintenance garden experience. Add a firepit with seating, a large deck, and a gazebo to add more living space and less plant space in a large yard.
Source: @adapt_landscapes via InstagramSource: @trincanodedo via InstagramSource: @vernichinteriors via Instagram
If you just can’t live without annuals and perennials that require frequent watering, you can use a drip irrigation system to help them thrive without direct assistance. A sprinkler system can make lawn maintenance easier, especially if you have a large grass yard.
8. Modern Minimalist Garden Ideas
Low maintenance landscaping can be ideal surrounding a modern home, where less is always more. A rock garden in many shades of grey is a modern welcoming touch, especially when accented with a gazing ball or modern-designed fountain or sculpture.
Source: @boland_garden_solutions via InstagramSource: @costachristmedia via InstagramSource: @earthandsole via InstagramSource: @gardencat2020 via InstagramSource: @inside_no_8 via InstagramSource: @oklahliving via Instagram
Oversized square concrete pavers follow the simple lines and angles of modern architecture. Create paths with them across your backyard, connecting the patio and other living areas. Simple trees, unfussy hedges, and crushed rock borders in black or white come together in an impressive contemporary garden.
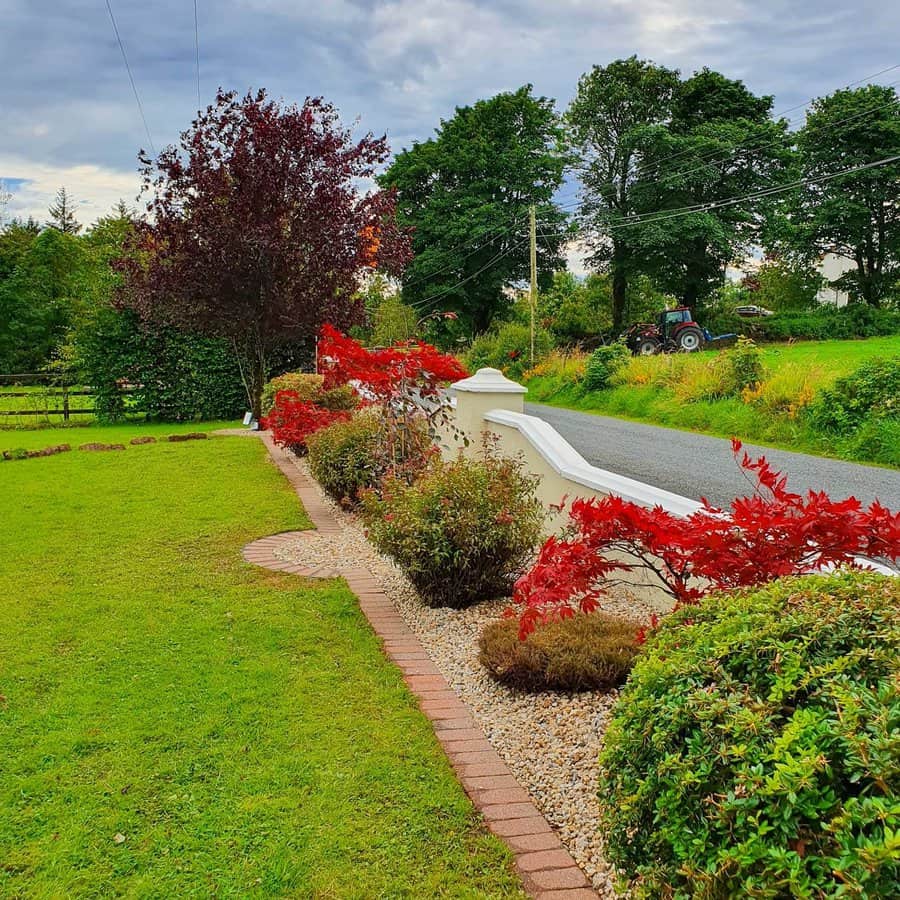
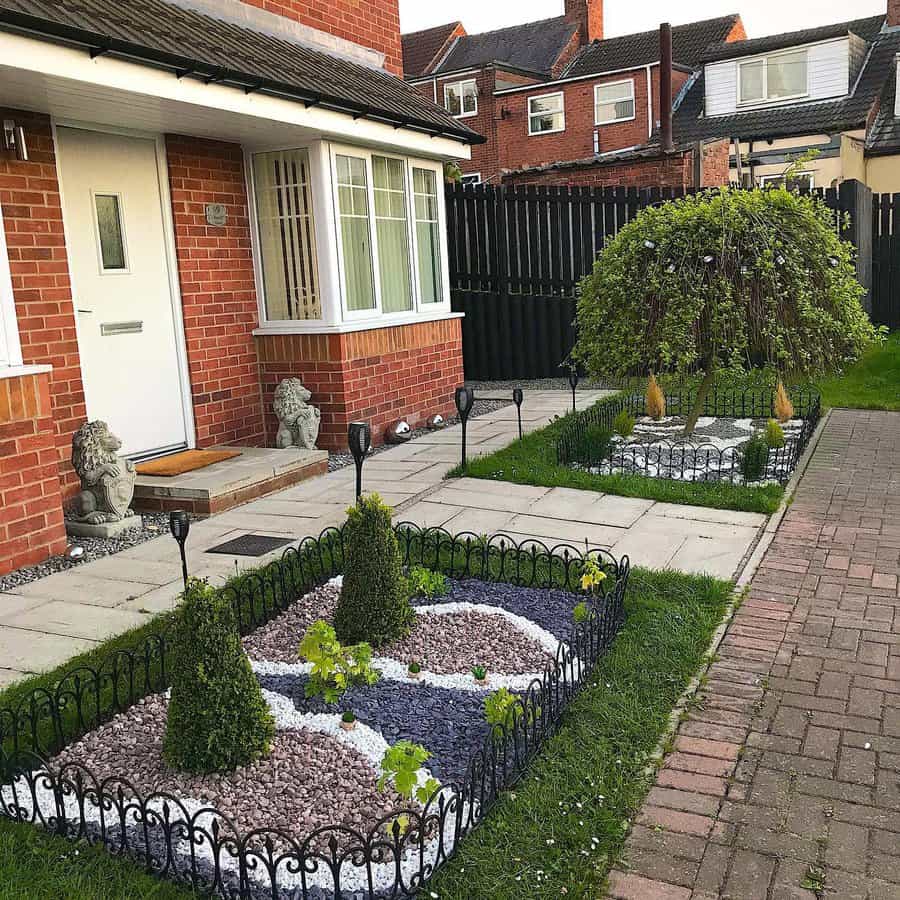
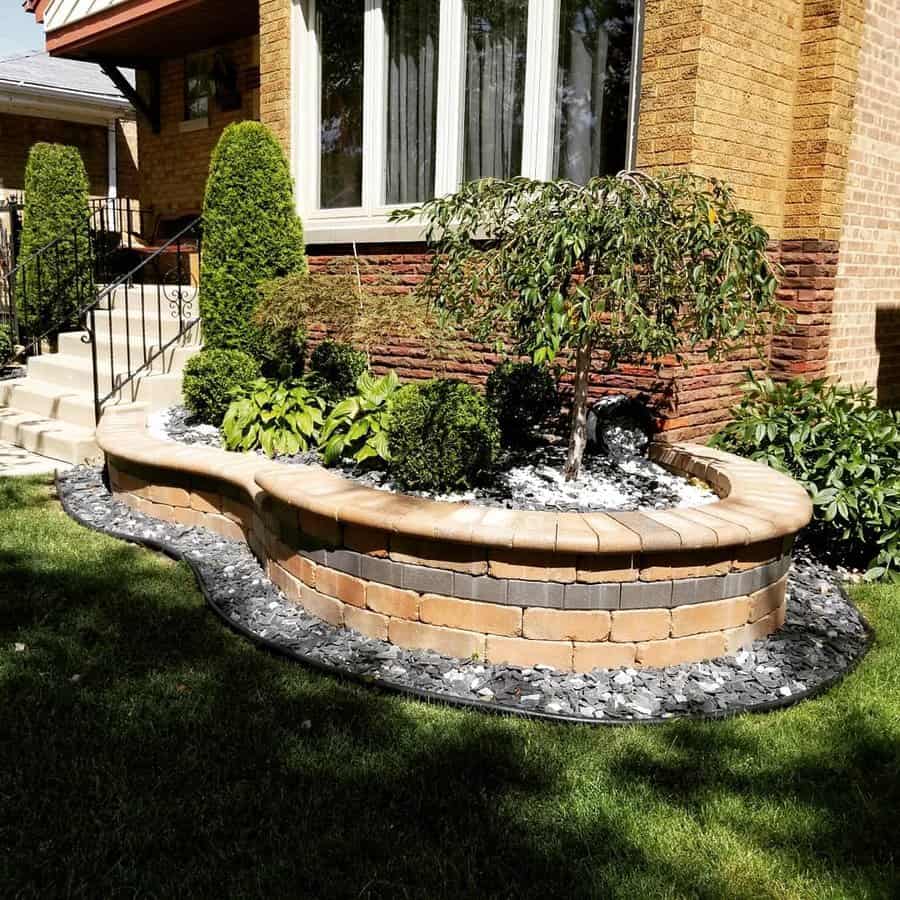
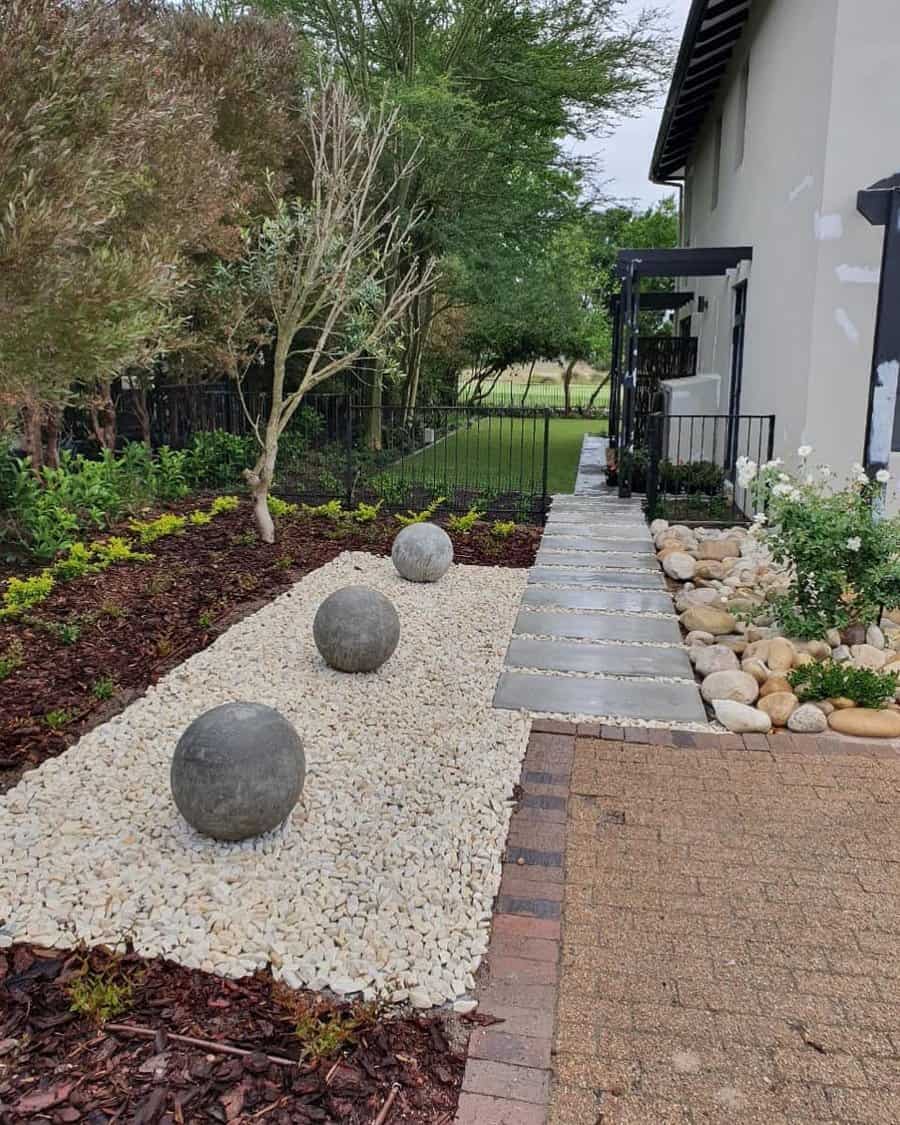
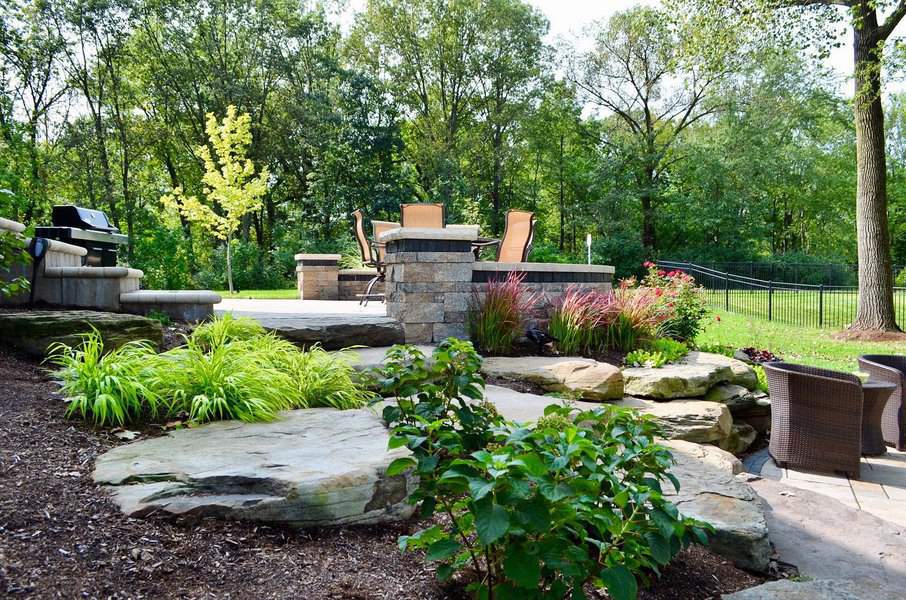
9. Rock Landscaping for Easy Care
Natural stone is an ideal material for a low maintenance landscaping. Not only is it attractive year round, rock never needs replacing. You may have to pull the occasional weed out of a crushed stone garden bed but using a strong weed barrier beneath the gravel keeps that task to a minimum.
Source: @a_service_for_every_season via InstagramSource: @dibarkerinteriors via InstagramSource: @landscape_josh via InstagramSource: @landscapecreationsdupage via InstagramSource: @locolandscapedesign via InstagramSource: @lori_laing via InstagramSource: @riogracellc via Instagram
Consider a rock garden to add dimension to a dull or flat area of the yard. Although you can add some ornamental grass or low maintenance plants, the easiest rock gardens are made from only hardscape materials.
Vary rock colors, textures, and sizes for visual interest. Surround paving stones with pebbles and outline different areas of the garden with river stones in complementary colors.
10. Shady Retreats: Simple Landscaping Tips
Shady garden zones don’t have to remain barren to qualify as low maintenance. Climbing ivy is a great plant to use in a shady, low maintenance garden. Plant ivy along a dividing wall or long fence to create a living barrier that will not require much attention from you. Mix variegated and solid color varieties to make it interesting.
Source: @riogracellc via InstagramSource: @earthandsole via InstagramSource: @kreatyve.gardenista via Instagram
Many evergreen varieties thrive in shady garden areas, including hemlock, boxwood, holly, yew, and nandina.
Many of these come in full size and dwarf size varieties, allowing you to add a variety of heights and textures to the shady parts of your yard. Plant shade-loving, lower maintenance perennials such as spiderwort, viola, astilbe, and hosta.
11. Simplifying Garden Design for Easy Care
You may feel that roses and other flowering plant varieties are out of reach if you need a lower maintenance garden. However, there are types that require less care than others. For example, Knock-Out roses are known for their ability to bloom with little attention. Their simple beauty can launch a garden from basic to beautiful.
Source: @cascadelandscapes via InstagramSource: @chaseslandscapeservices via InstagramSource: @chris_refined via InstagramSource: @creativedesignandmaintenance via InstagramSource: @londongardendesign via InstagramSource: @mapleridgelandscapes via InstagramSource: @miamiexclusiveborders via InstagramSource: @miamiexclusiveborders via InstagramSource: @smallhomegarden via InstagramSource: @the_brickdoctor via Instagram
Keep your garden simple by only choosing plants that do well in your USDA hardiness zone. Replace grass with no-effort ground covers like moss and low-growing clover. You’ll still enjoy a blanket of green in the yard, but you won’t have to mow it, ever.
“Art enables us to find ourselves and lose ourselves at the same time.” – Thomas Merton
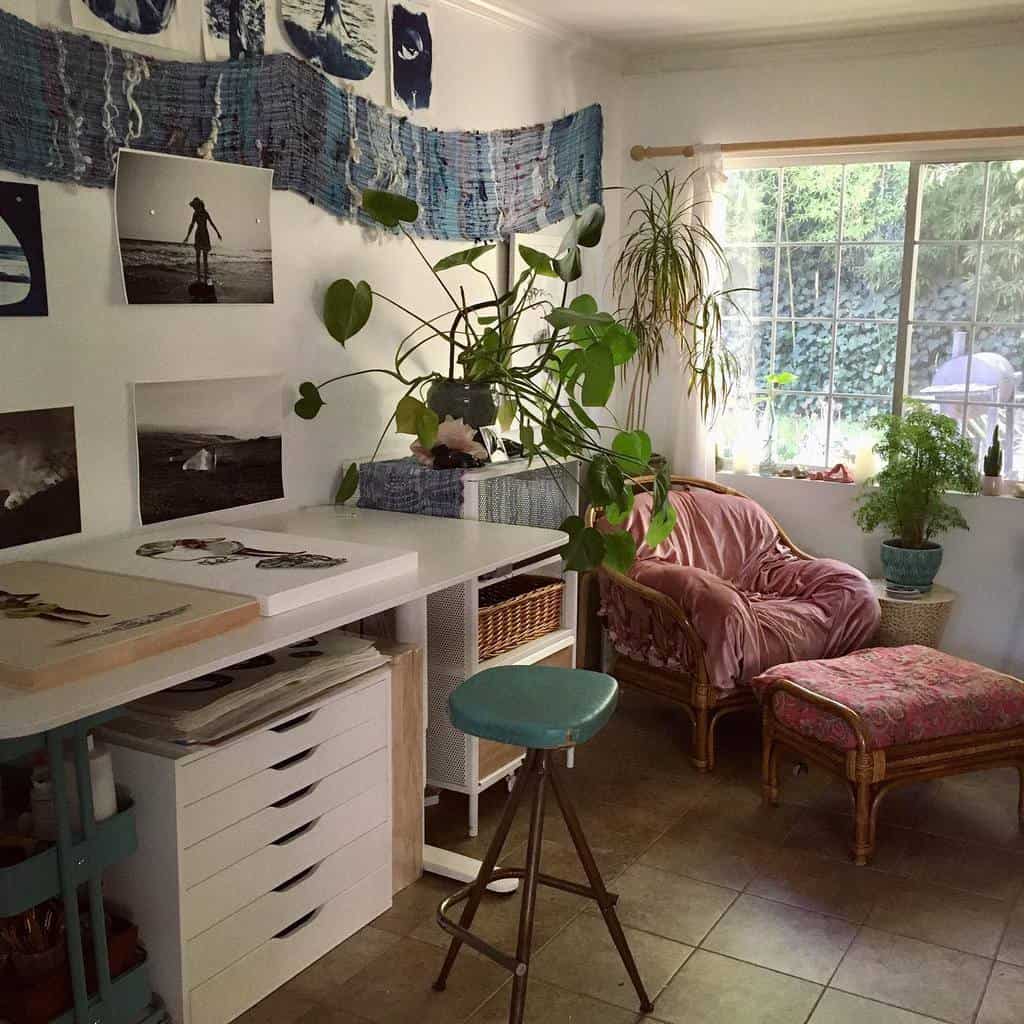
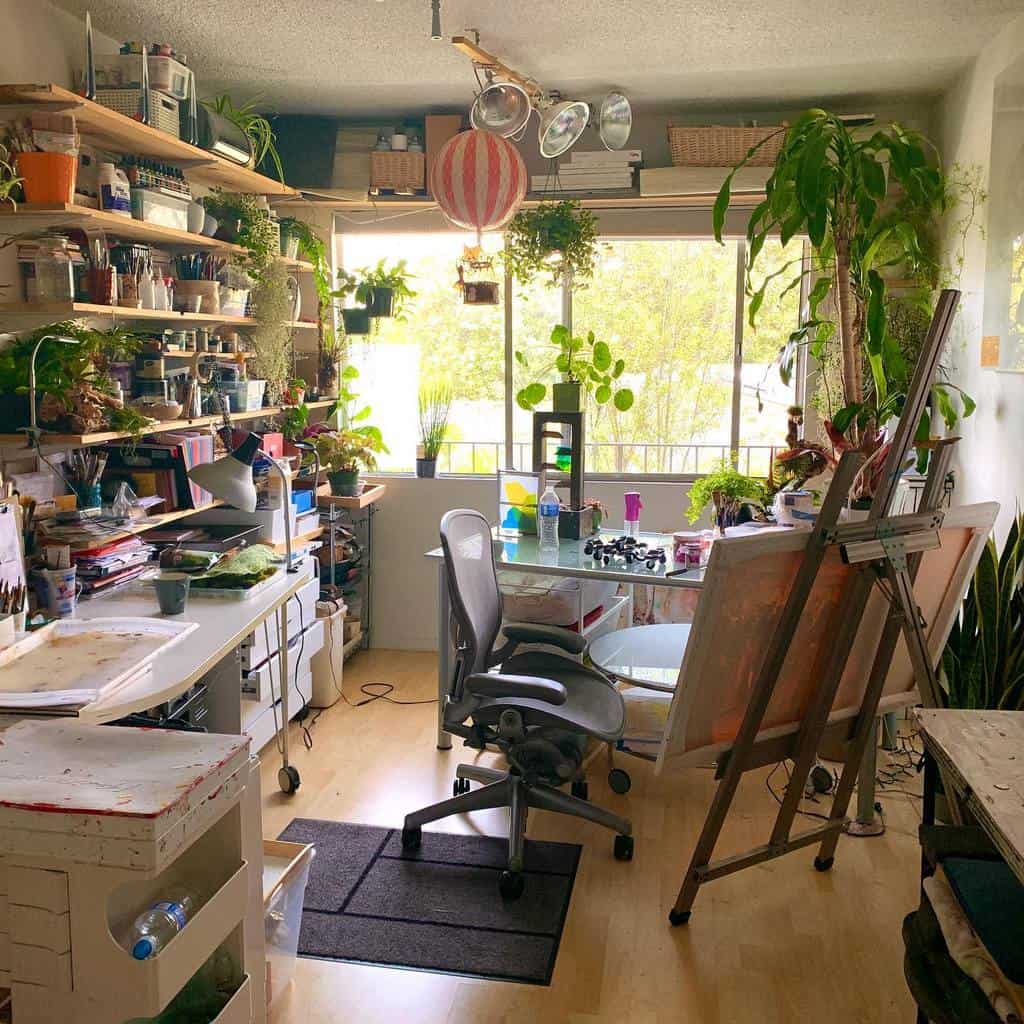
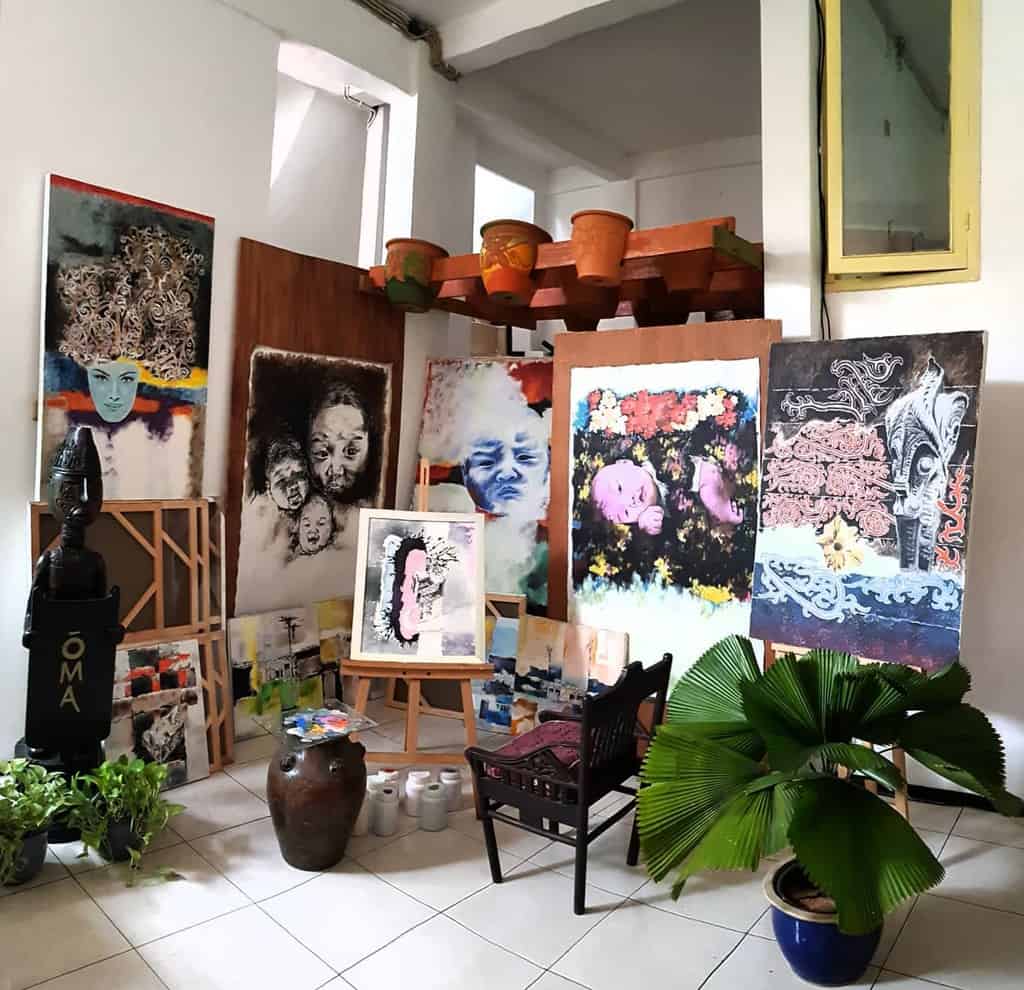
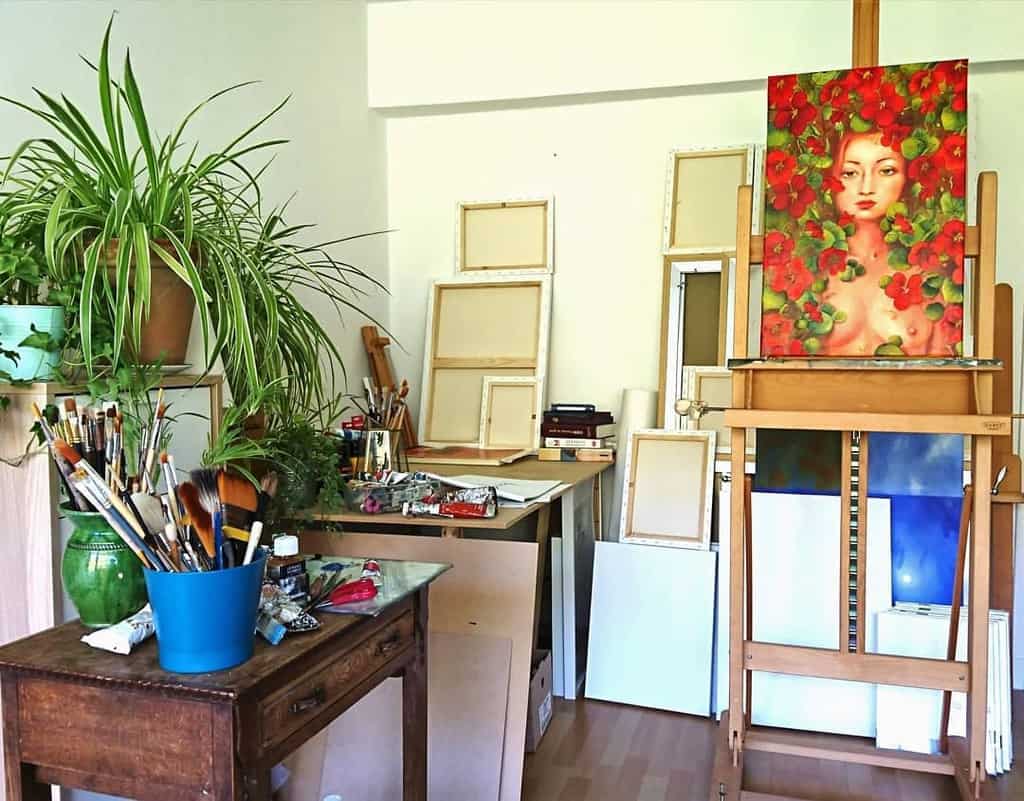
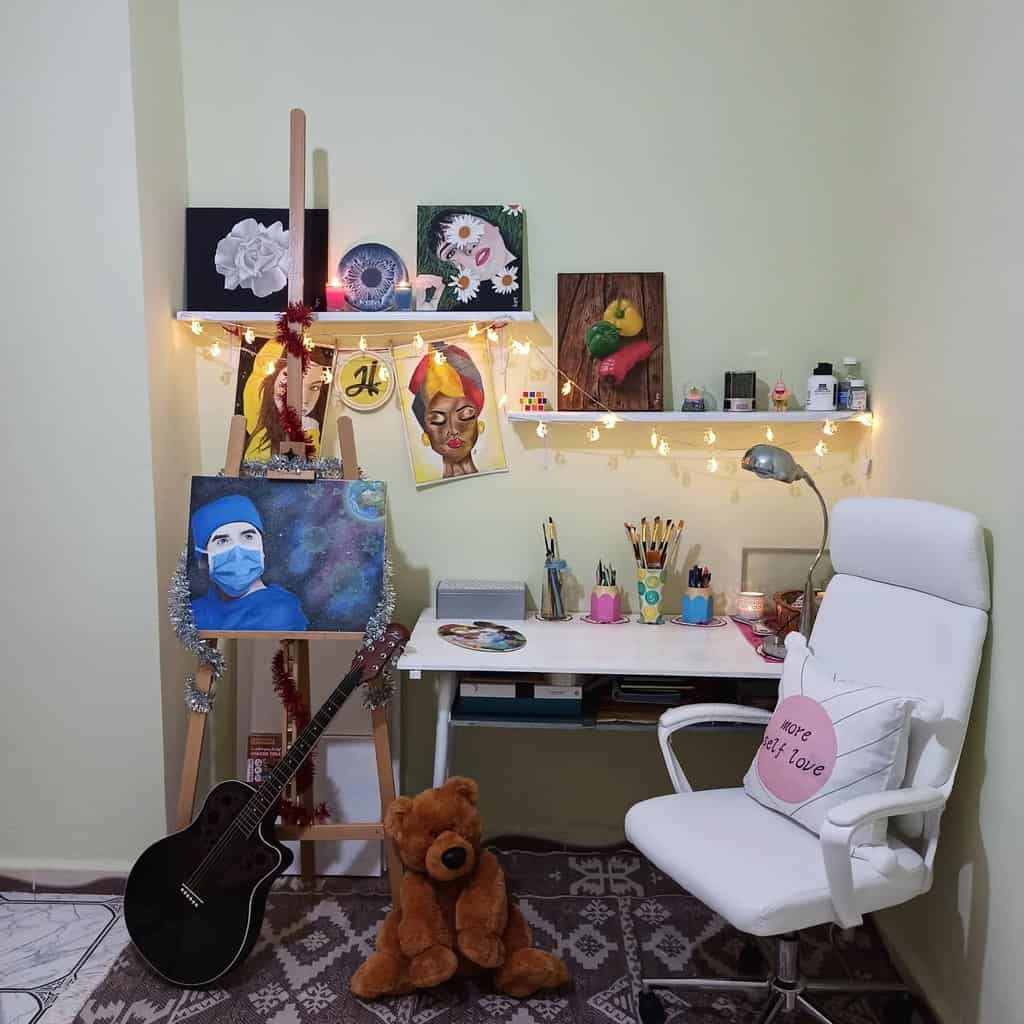
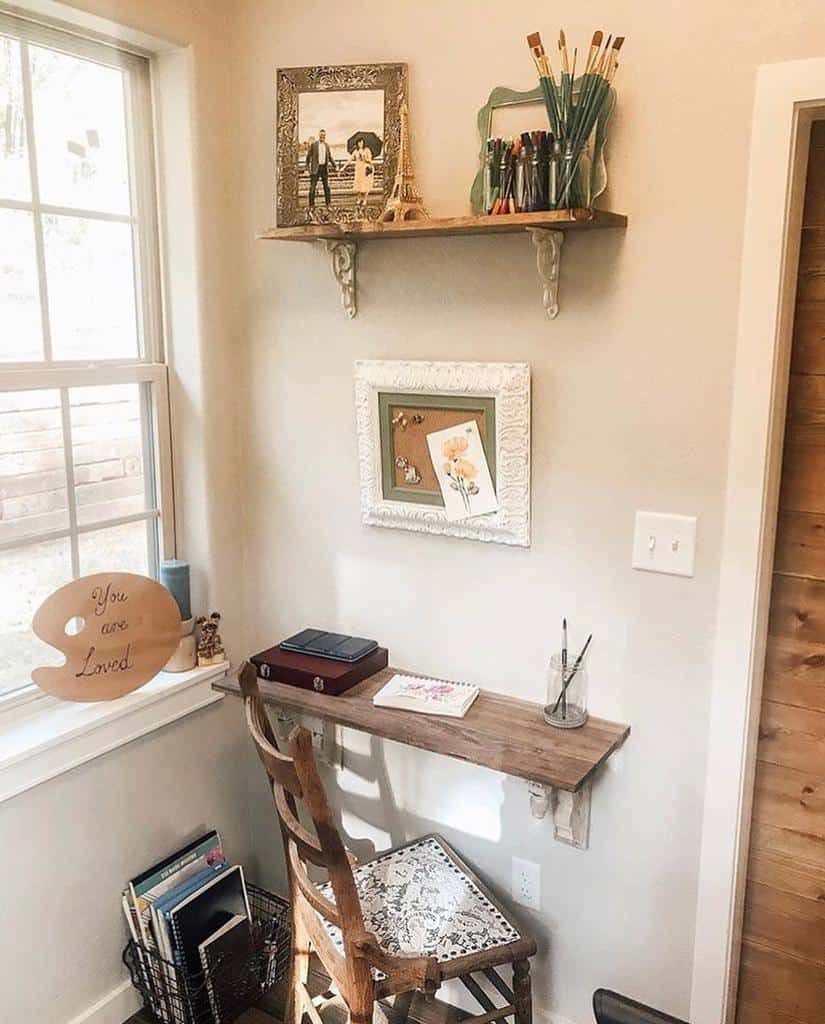
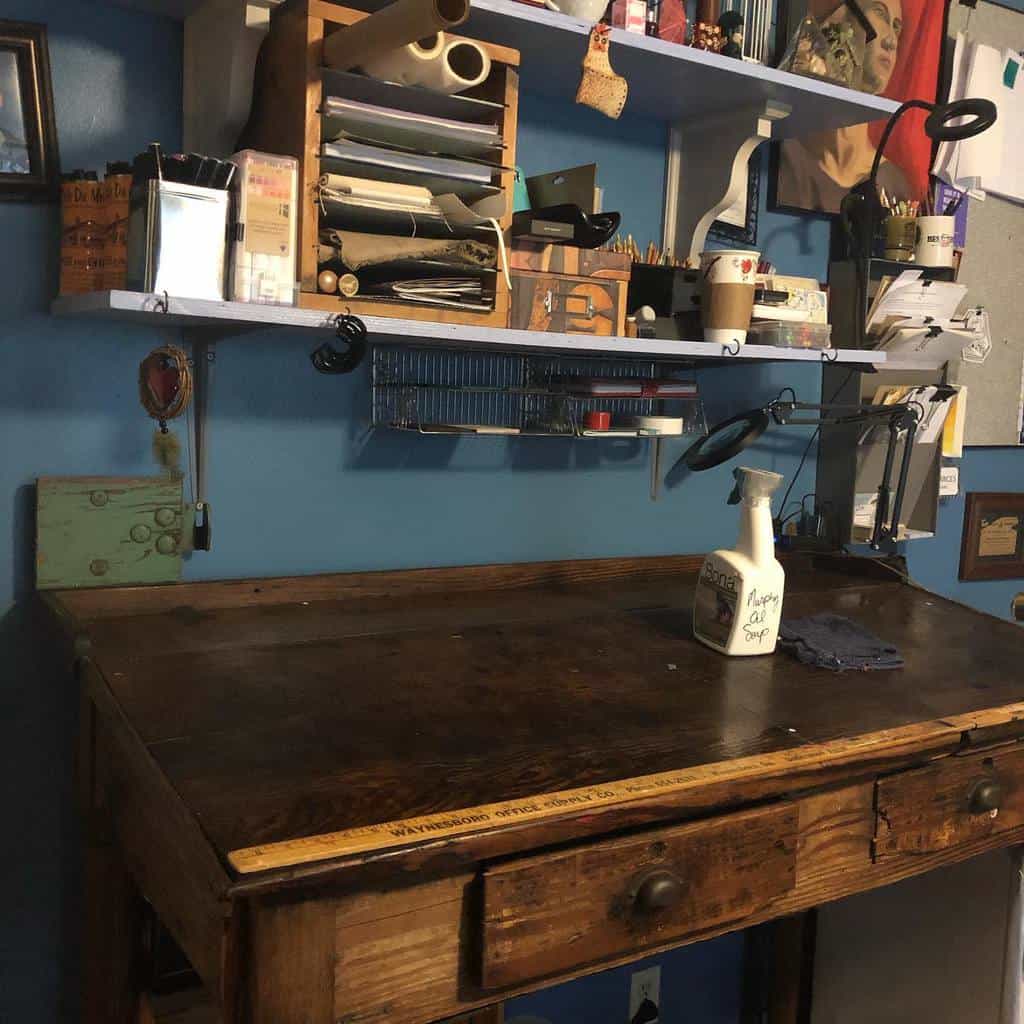
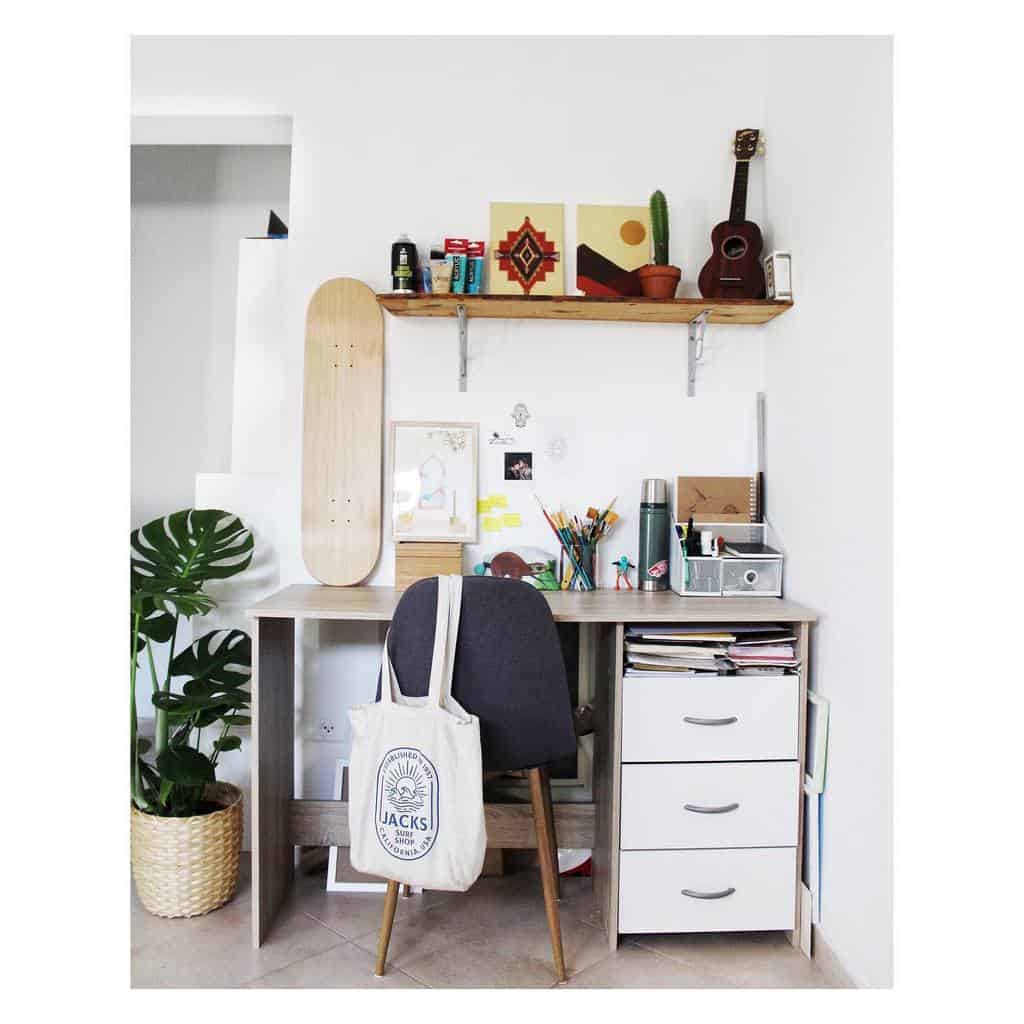
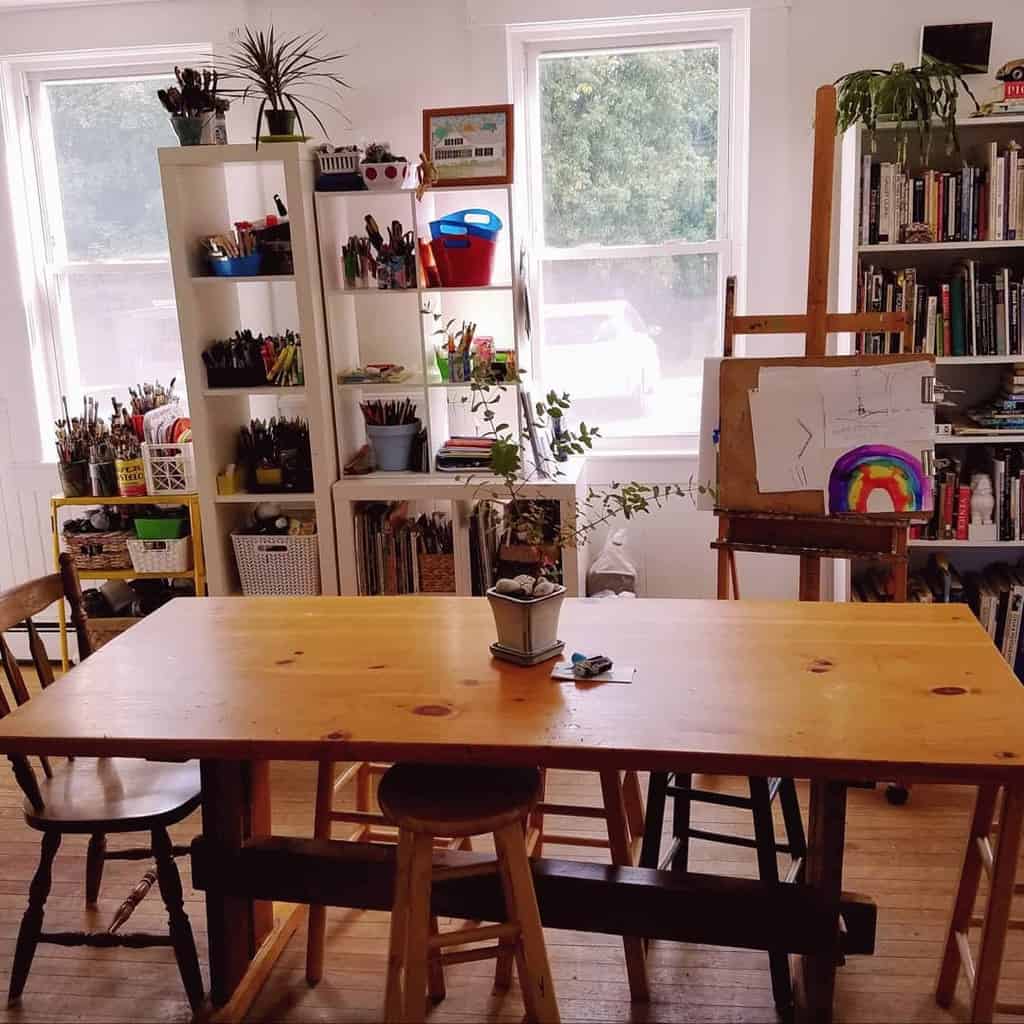
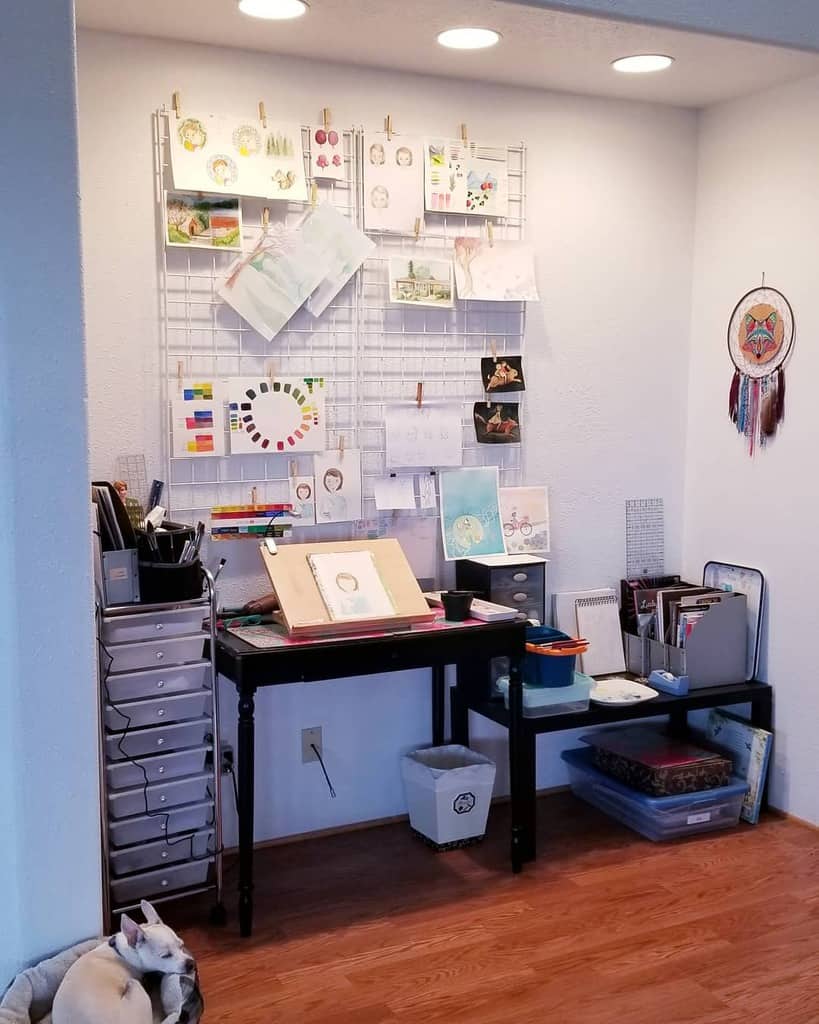
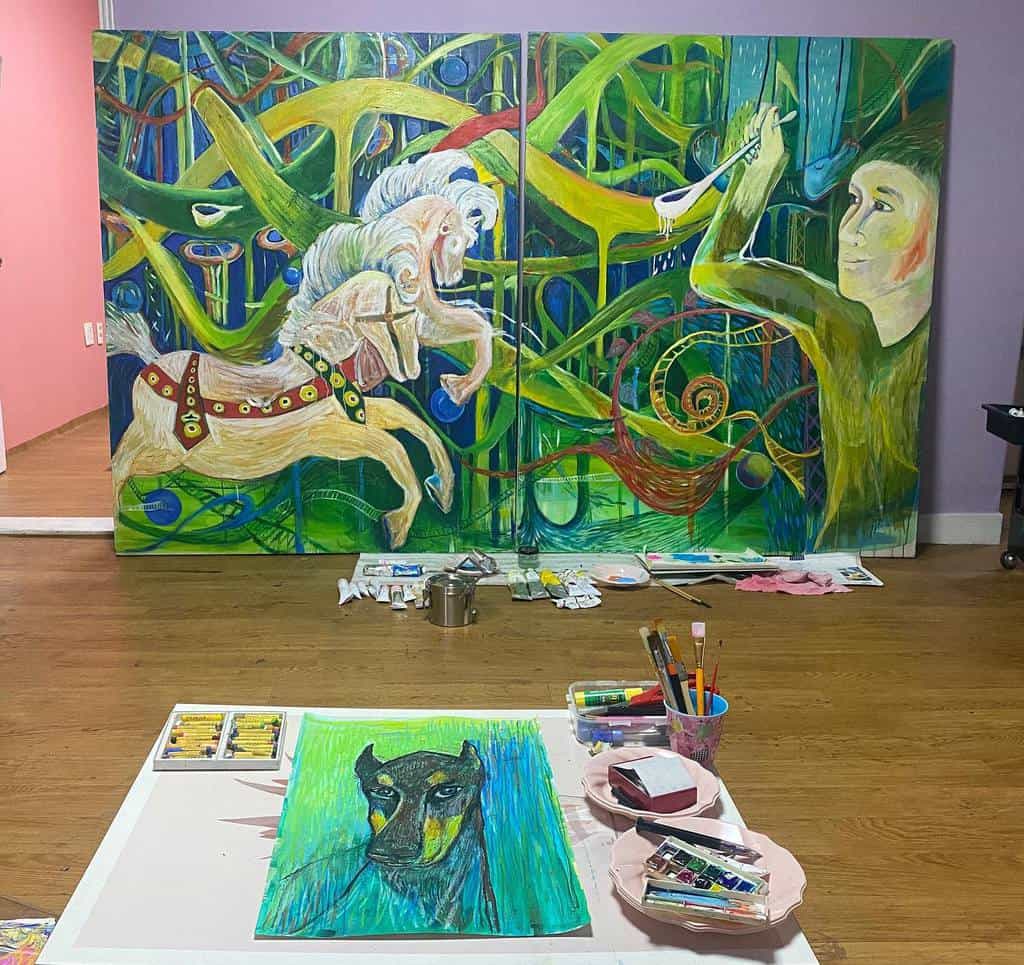
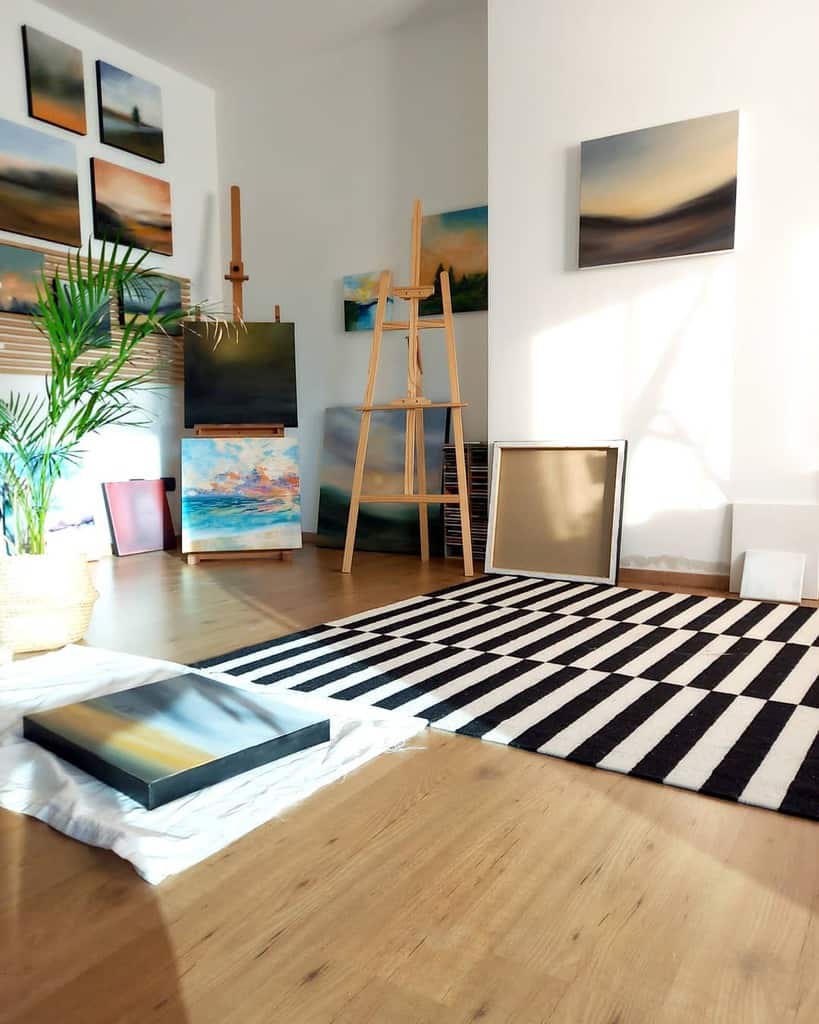
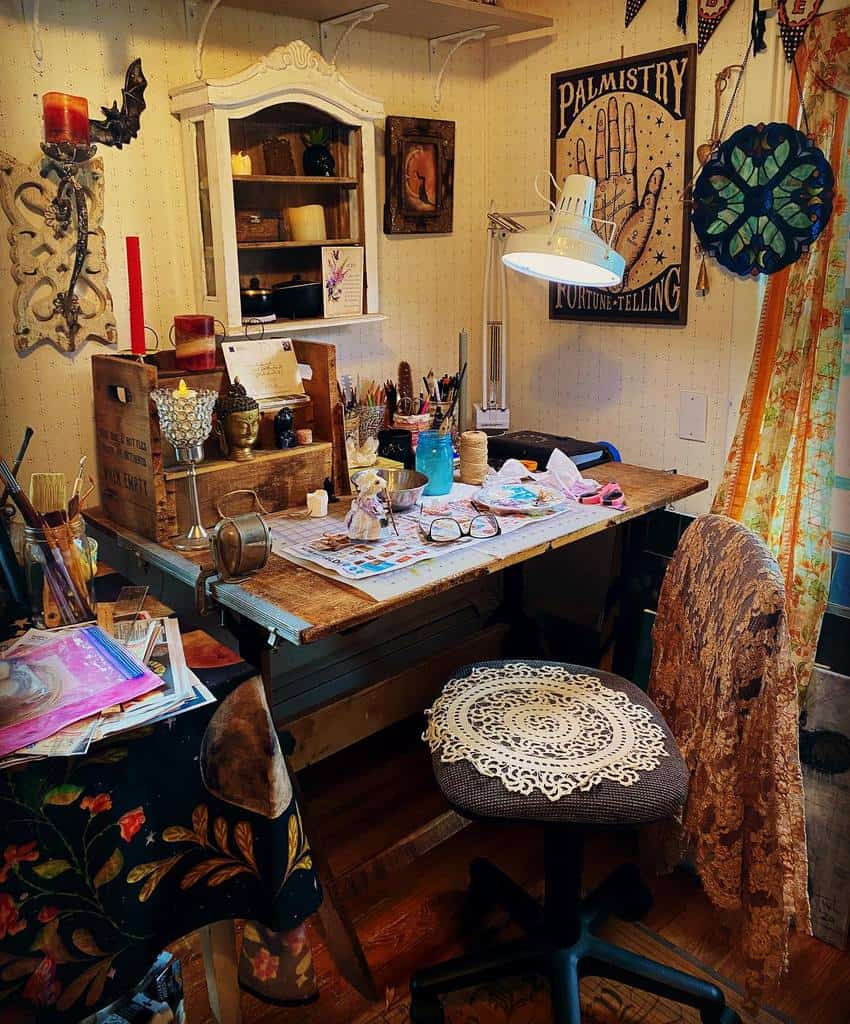
Every artist dreams of having a studio all their own, a place that brightly inspires the creative process. In addition to being beautiful, an art studio must be functional. As any artist can attest, one of the best things about a studio is that you can leave projects and materials out until your work is complete.
Excellent storage is also a must, as art supplies multiply quickly. Great lighting, easy-to-clean surfaces, and a sense of privacy are other necessary elements for creating a welcoming space to create art. Scroll through our best art studio ideas and learn how you can bring your own creative oasis to life.
[view_toc]
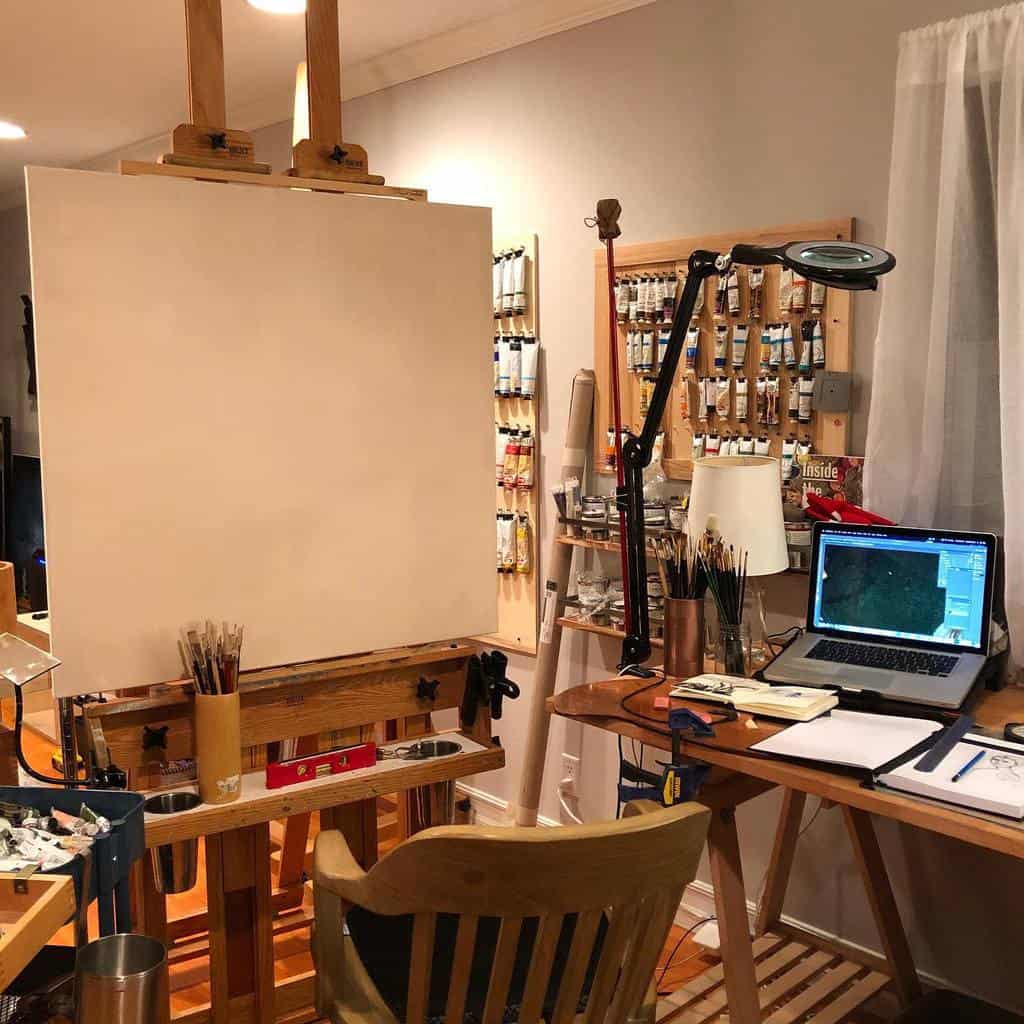
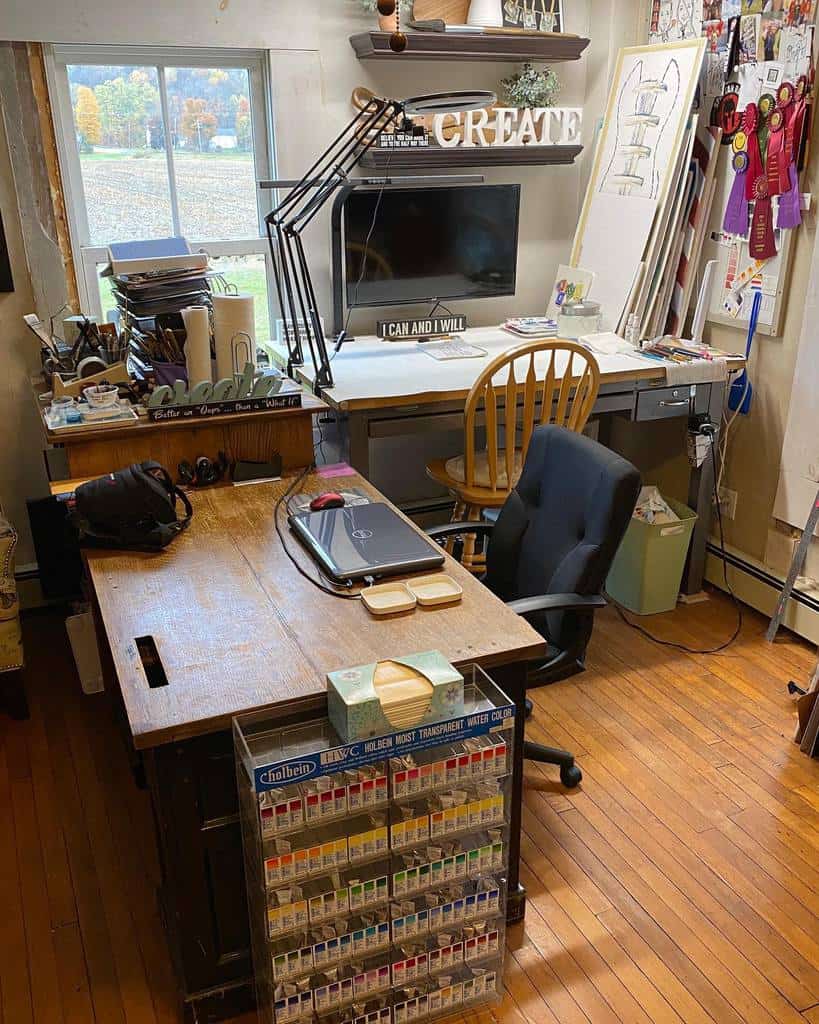
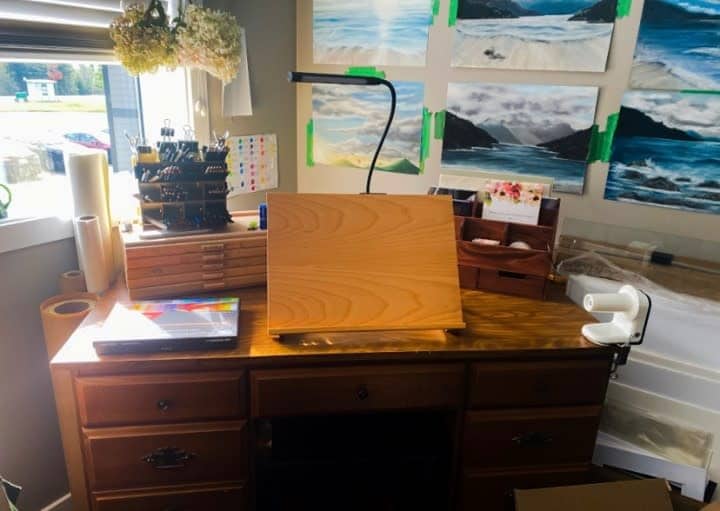
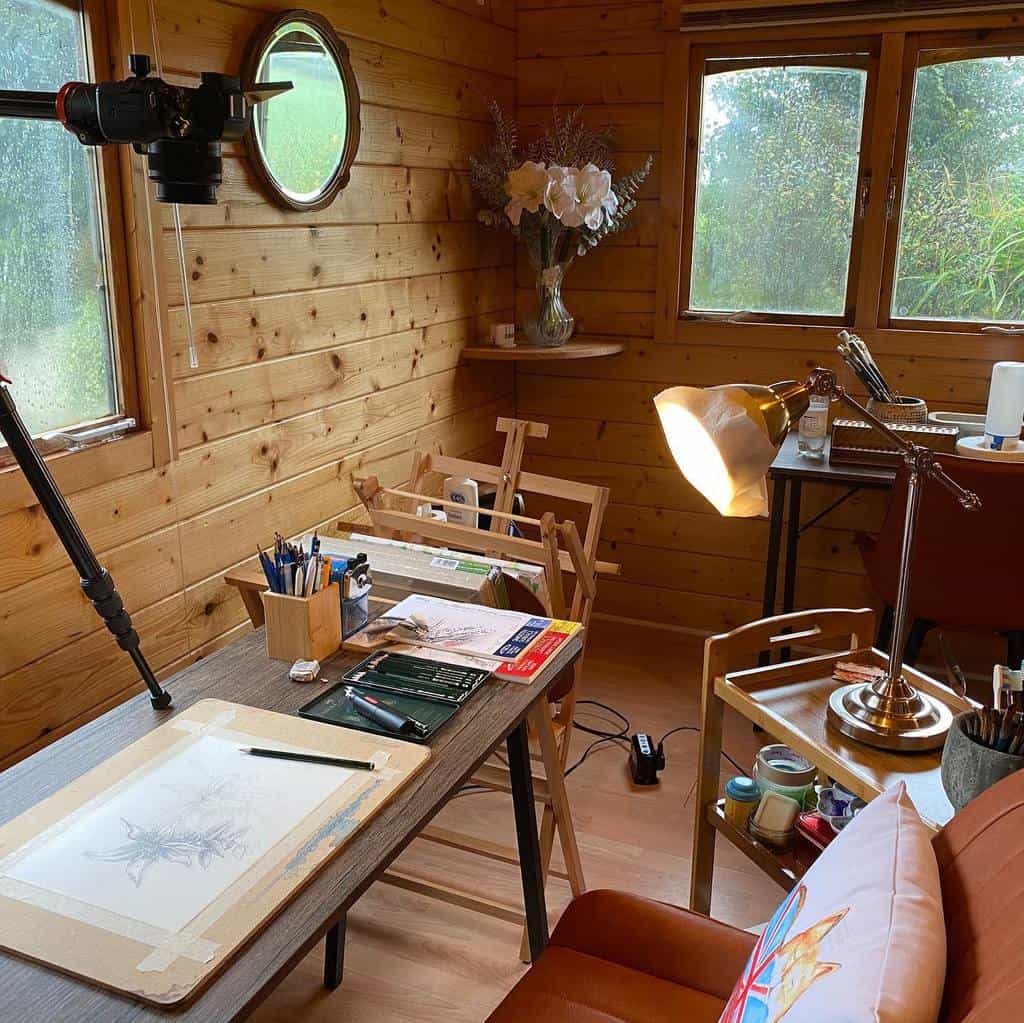
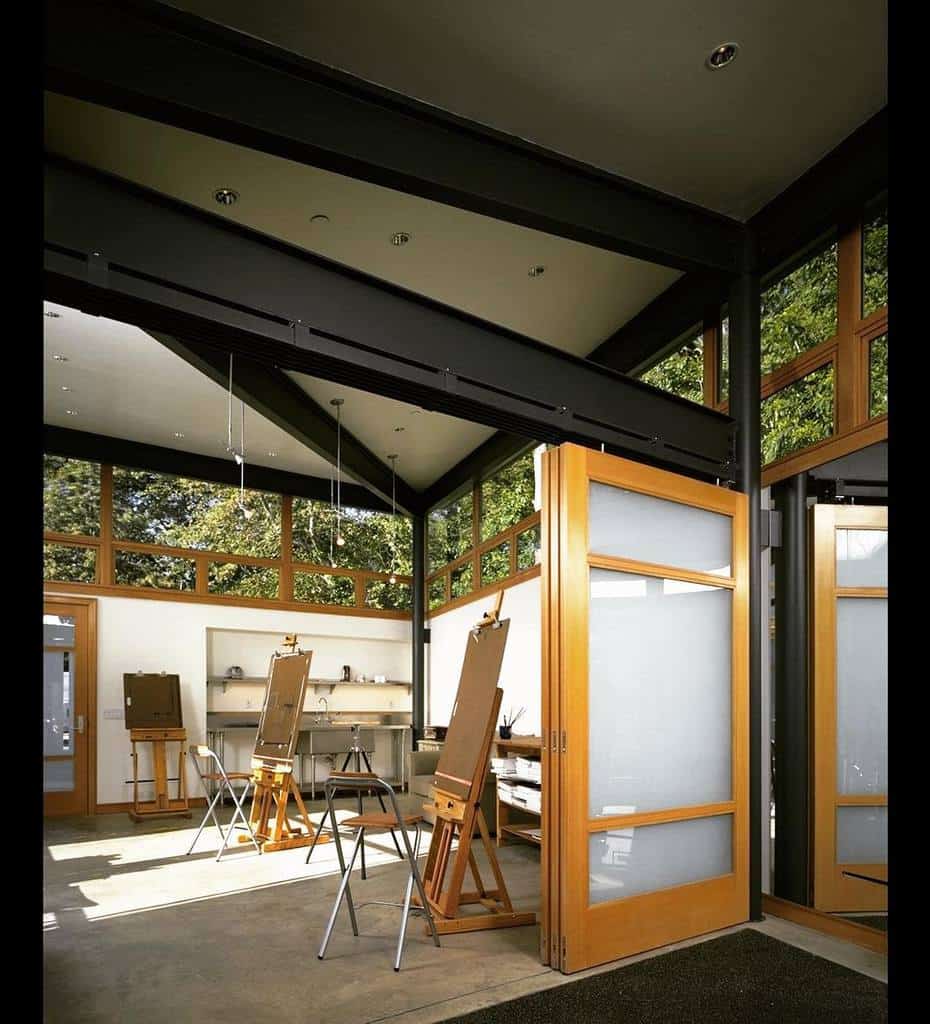
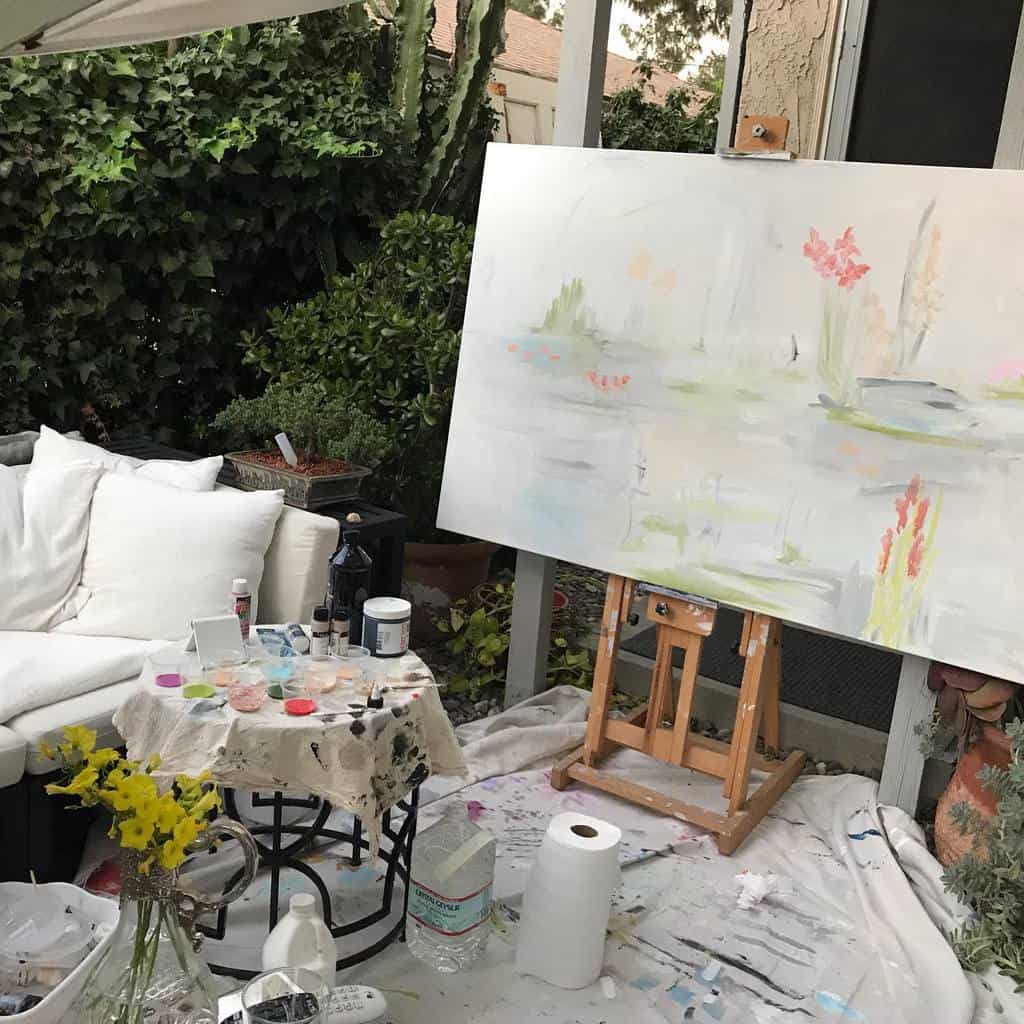
1. Set Up an Ergonomic Art Station
Prioritize comfort and productivity in your art studio by selecting a chair and desk that support good posture. Consider adjustable chairs and desks to fit a variety of body types and working styles. Proper lighting, both natural and artificial, is also crucial to reduce eye strain.
Source: @anatmstudio via InstagramSource: @chris.creations.art_ via InstagramSource: @mulenga_mubanga065 via InstagramSource: @cdeart_365 via InstagramSource: @artbytulio via Instagram
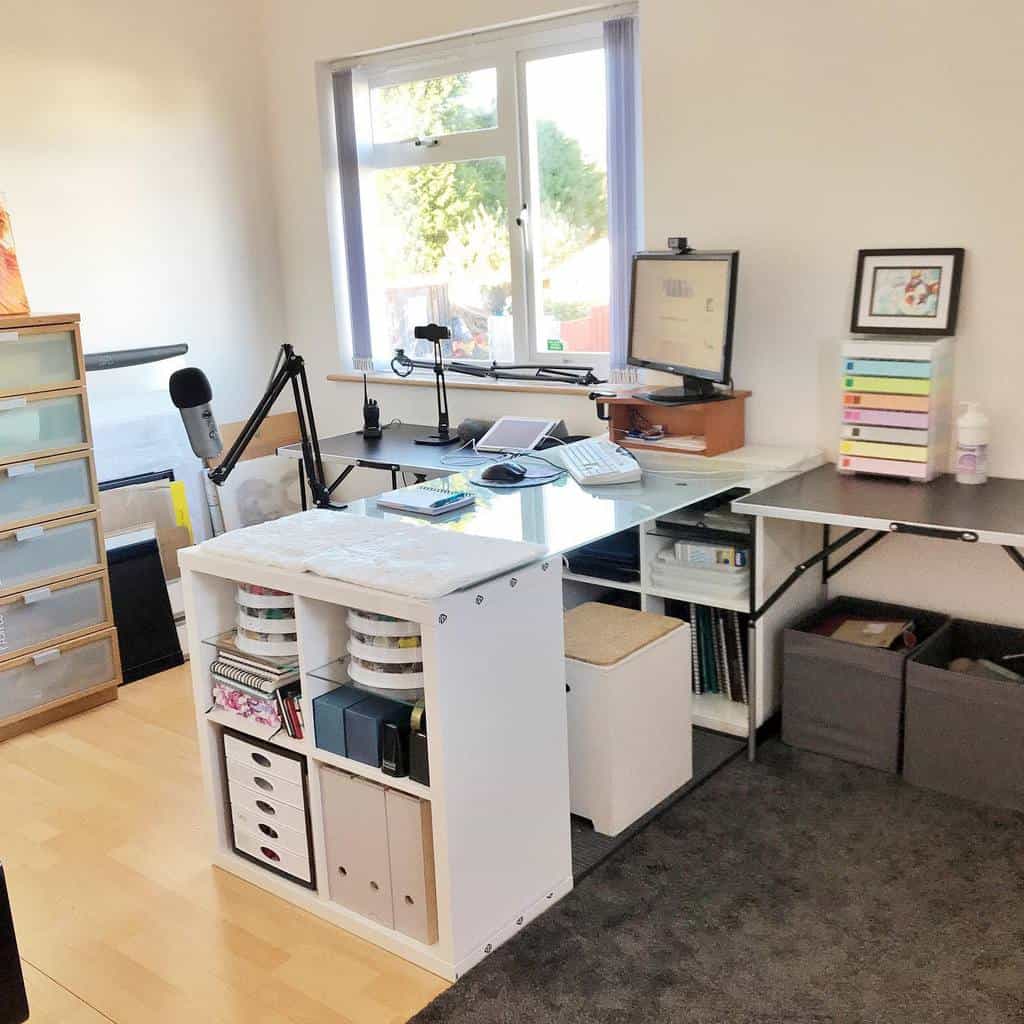
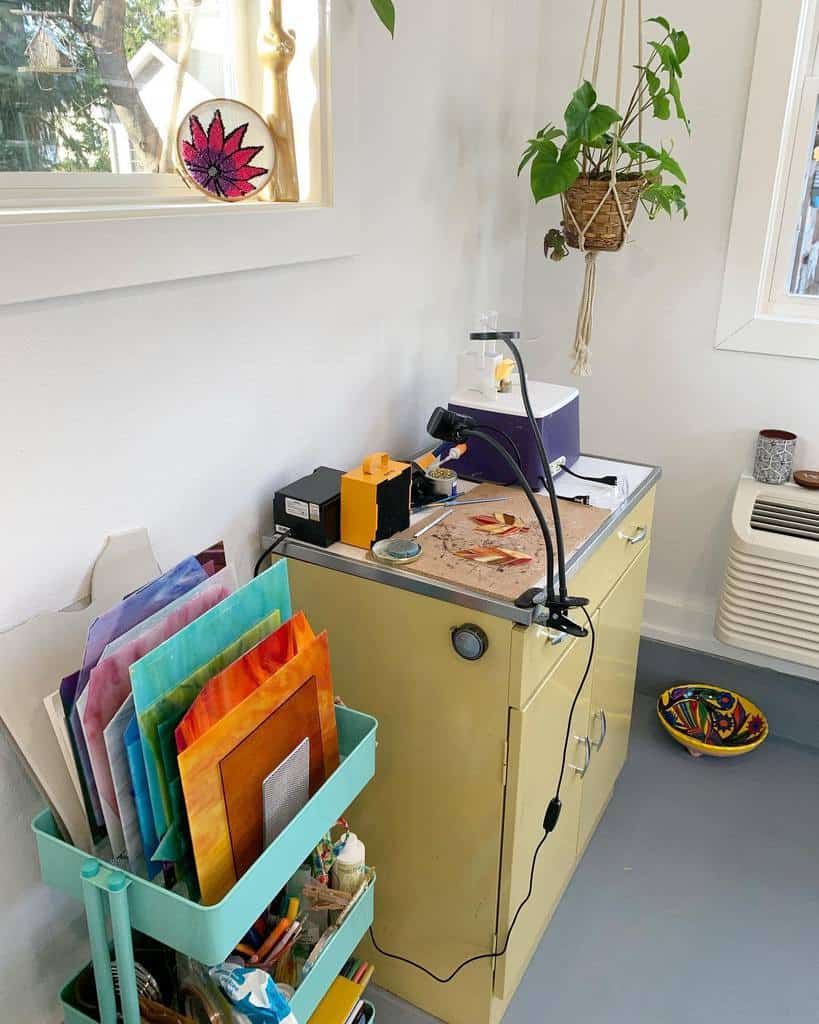
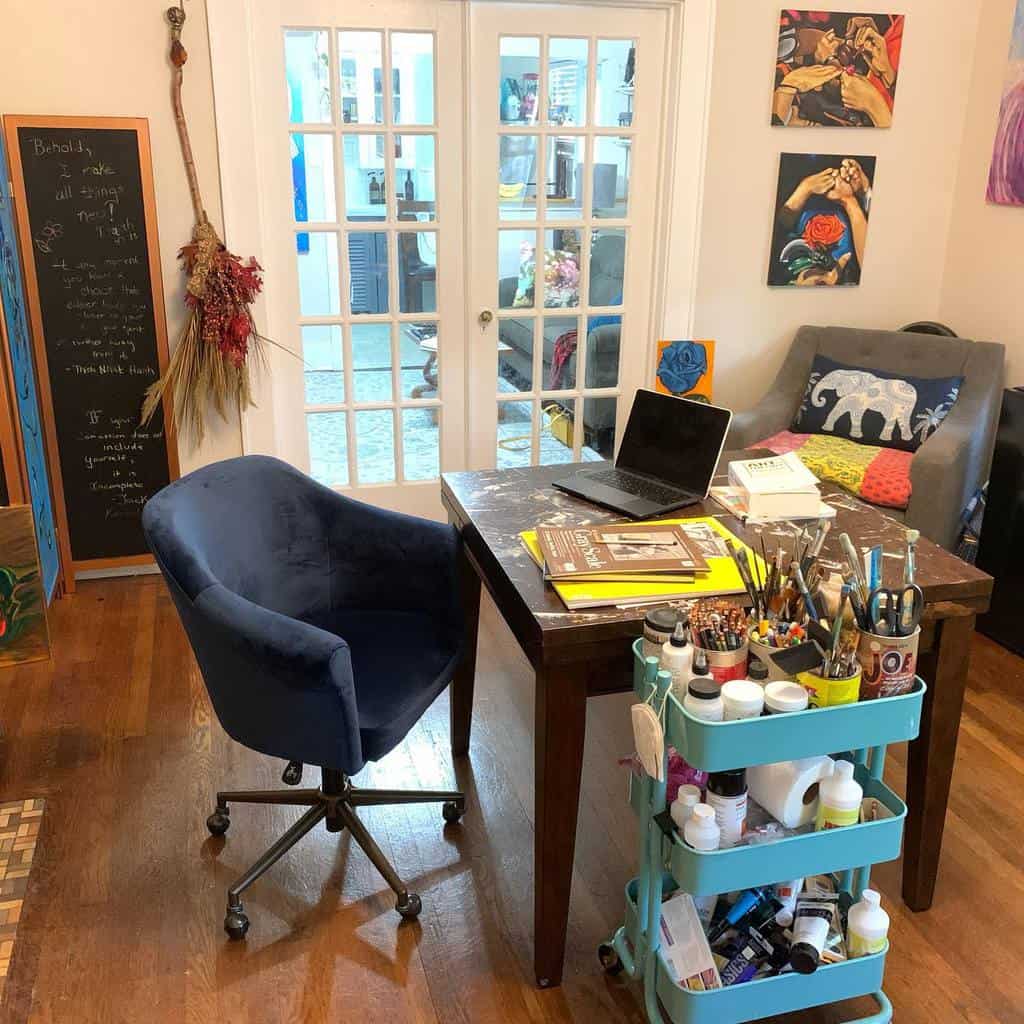
2. Organize with a Mobile Supply Caddy
A mobile storage caddy is ideal for organizing and accessing art supplies. Look for options with multiple compartments and drawers to sort items based on frequency of use. A caddy with wheels offers the flexibility to move supplies as needed throughout the studio.
Source: @brainwavecult via Instagram
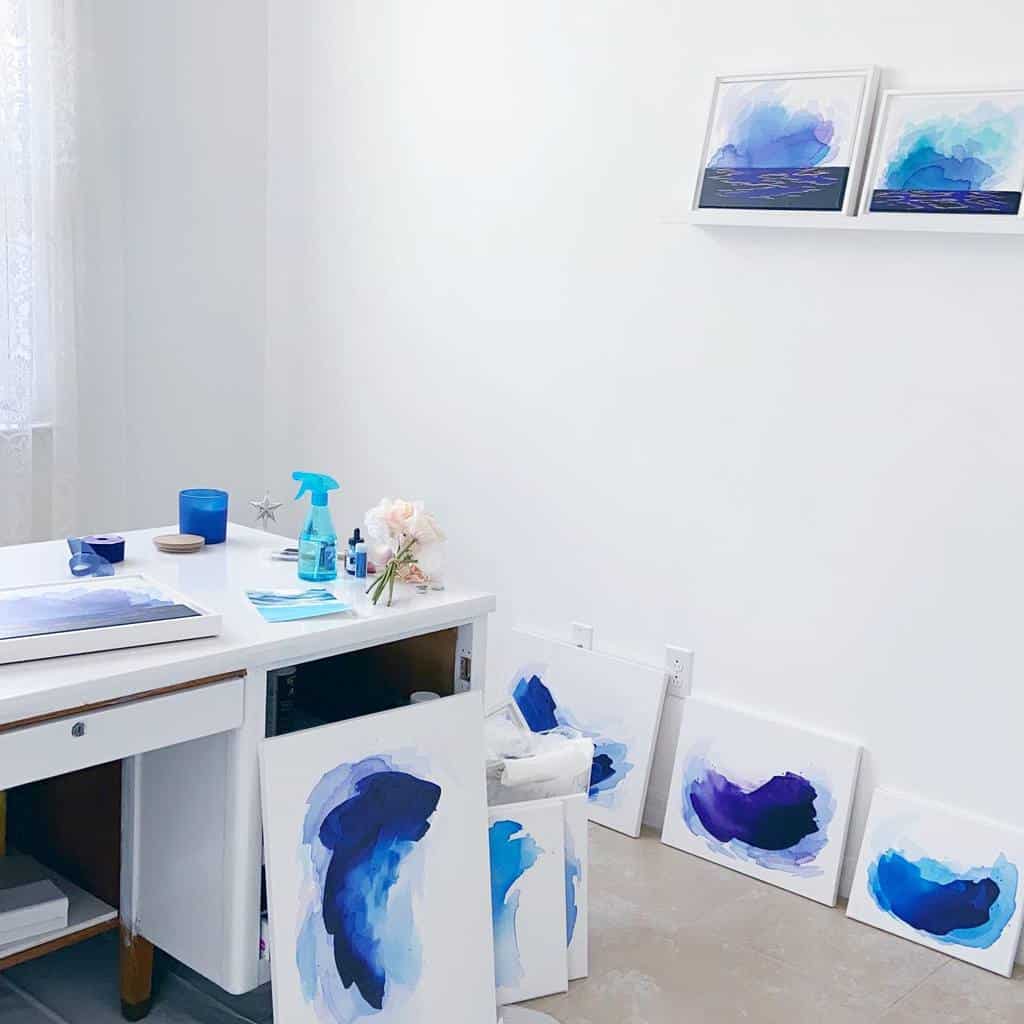
3. Enhance with Indoor Greenery
Introduce potted plants to create a serene and inspiring environment. Choose low-maintenance species that thrive indoors and consider their placement for both aesthetic and air-purifying benefits. Plants can also act as dynamic subjects or inspiration for artwork.
Source: @calethiadecontostudio via InstagramSource: @nature__artstudio via InstagramSource: @ituuuuut_huwae via InstagramSource: @pauline_dubisy via Instagram
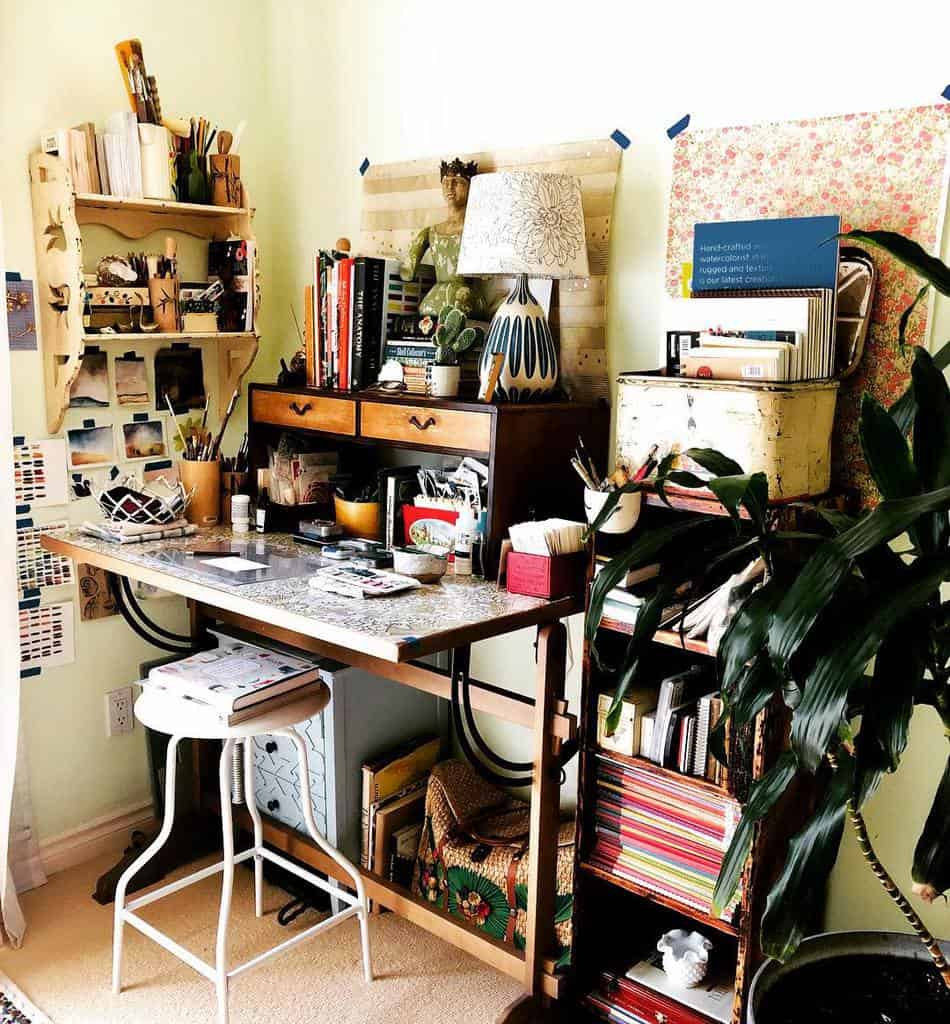
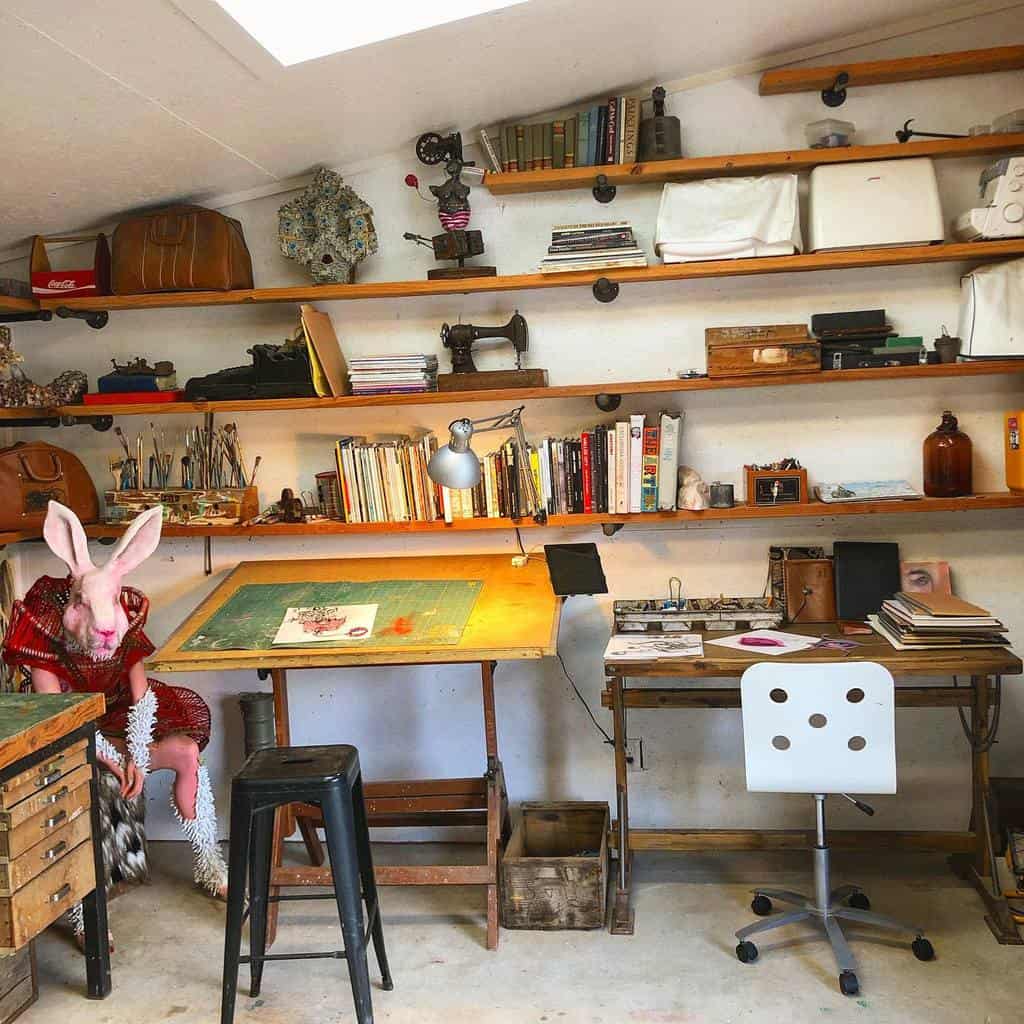
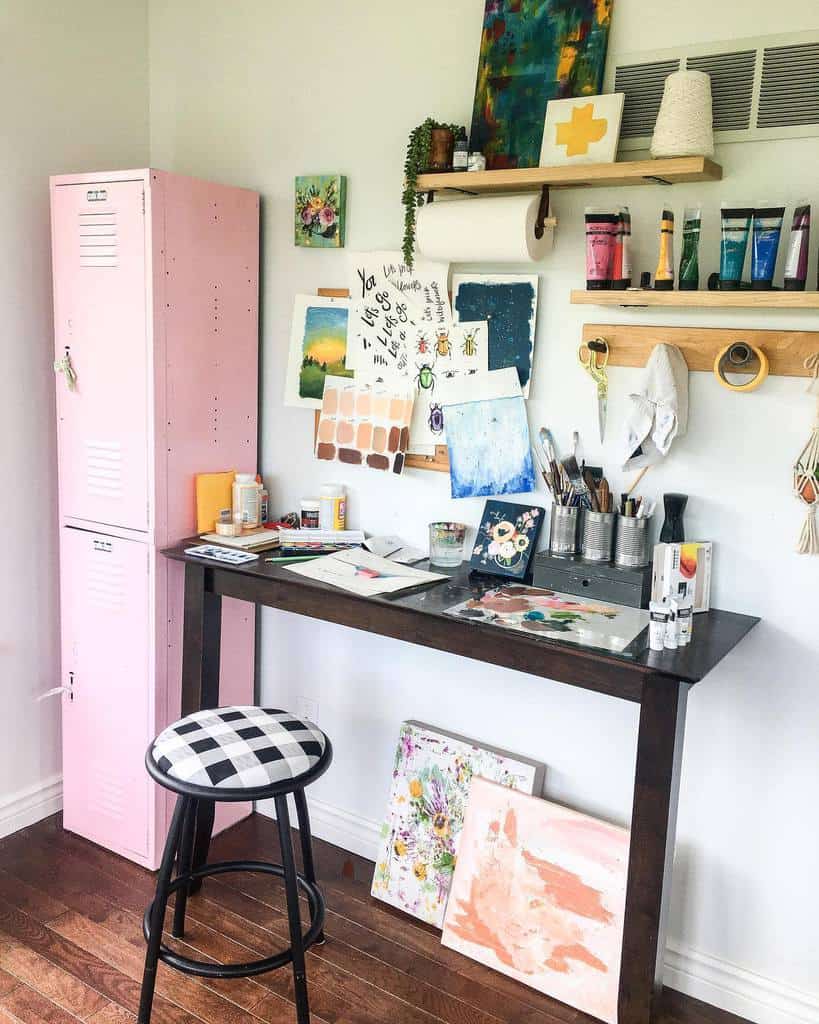
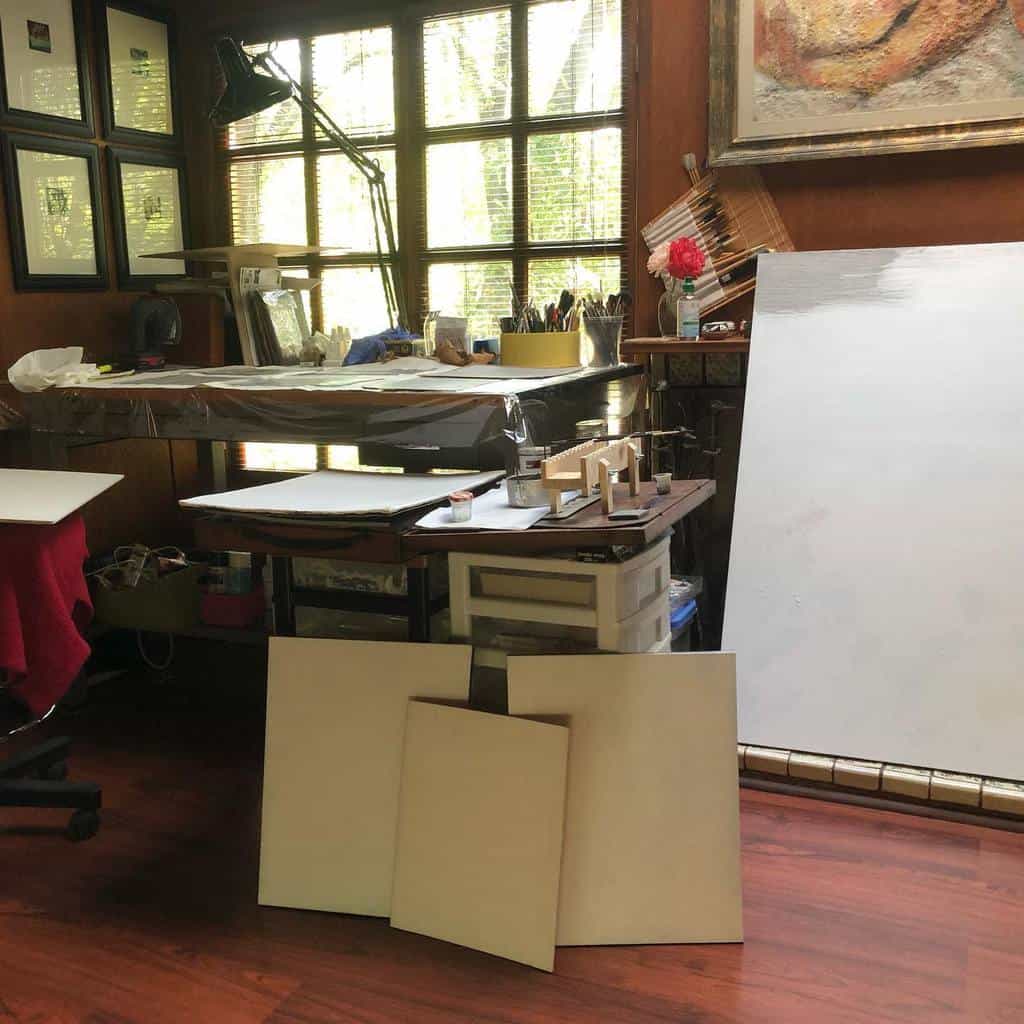
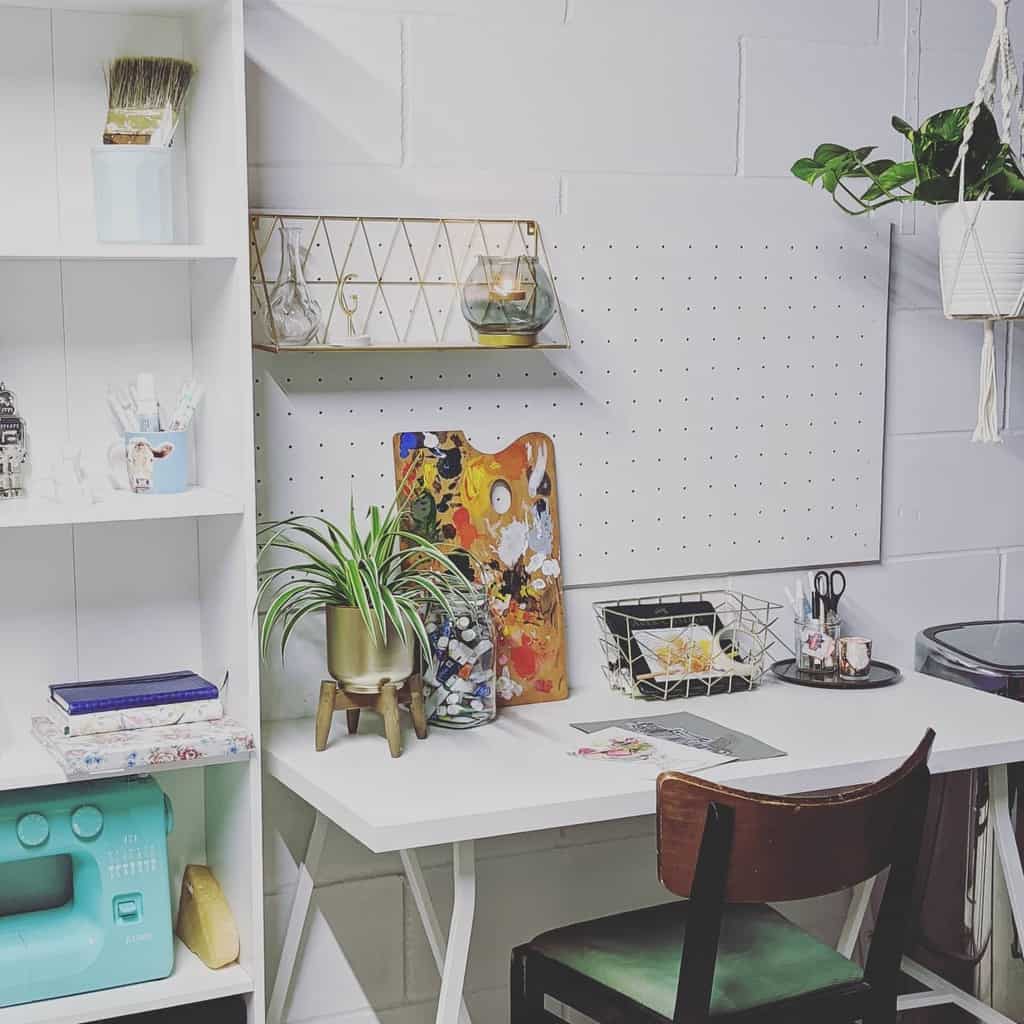
4. Maximize Space with Floating Shelves
Utilize vertical space with floating shelves to store and display art supplies and works-in-progress. This not only saves floor space but also keeps essential items within easy reach. Vary the shelf heights to accommodate items of different sizes.
Source: @hadjer_djebbouri_art via InstagramSource: @jmrobinsondesigns via InstagramSource: @frances_byrd_art via InstagramSource: @no.ita_ via InstagramSource: @lynndprattpaint via InstagramSource: @nataliemyers via InstagramSource: @katielockhart.art_ via Instagram
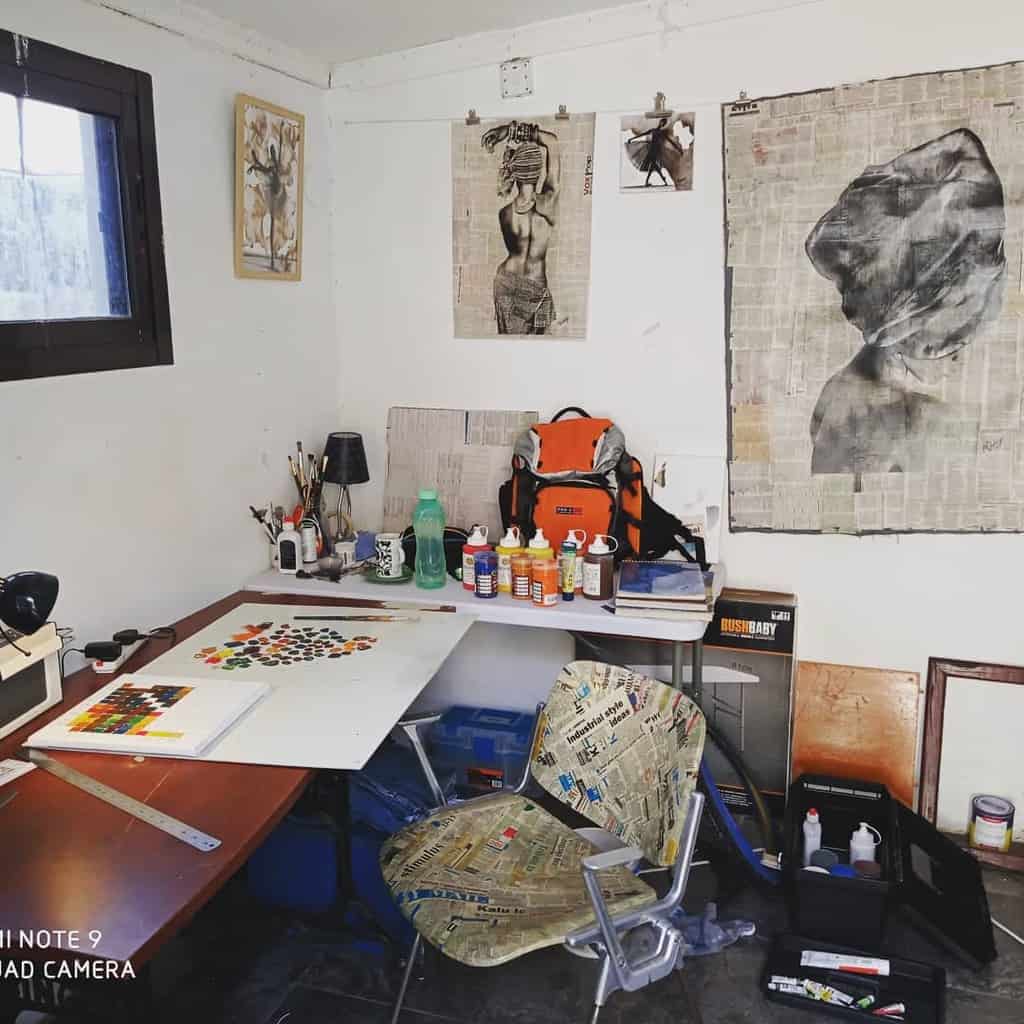
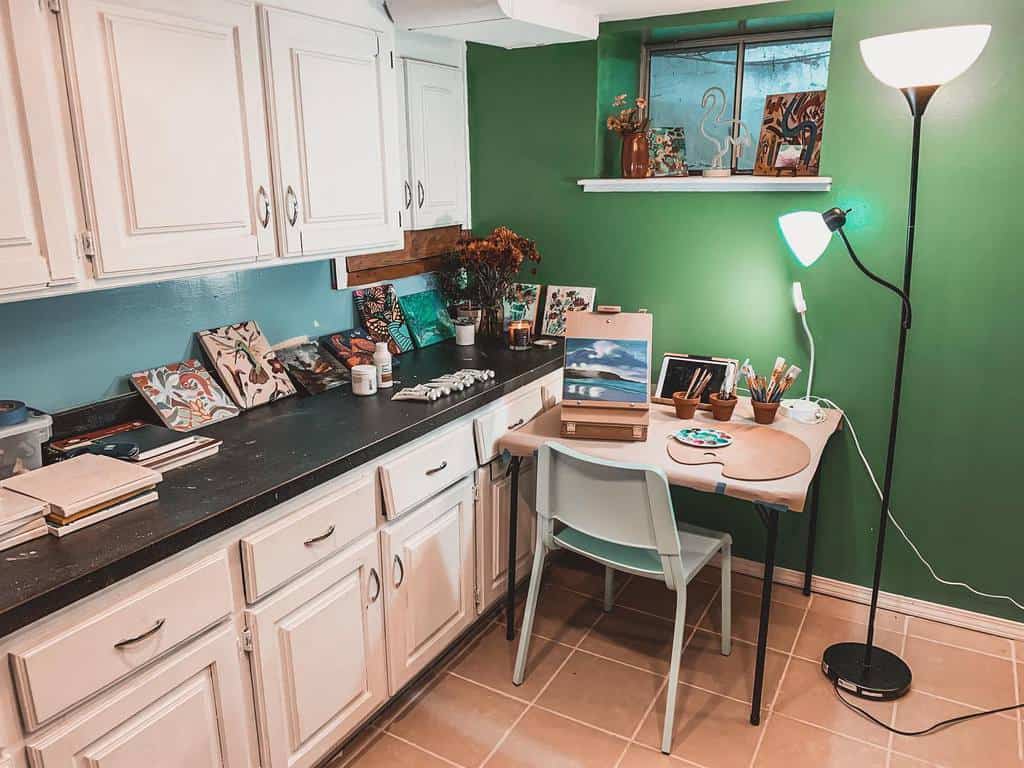
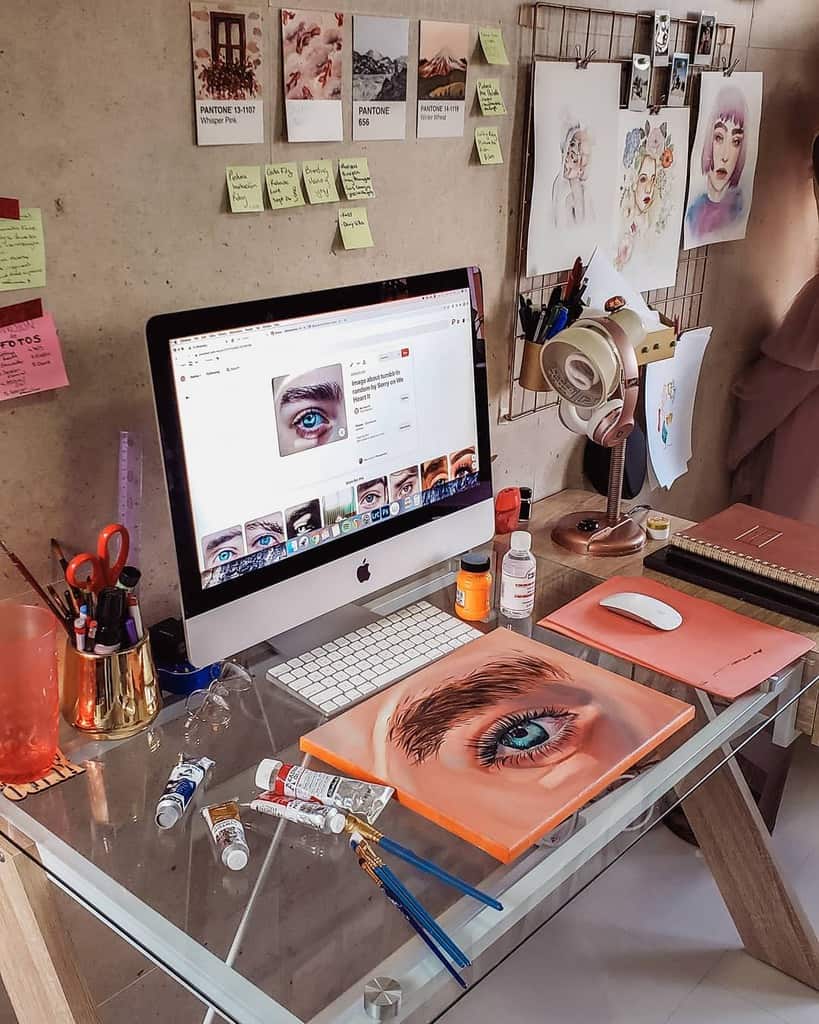
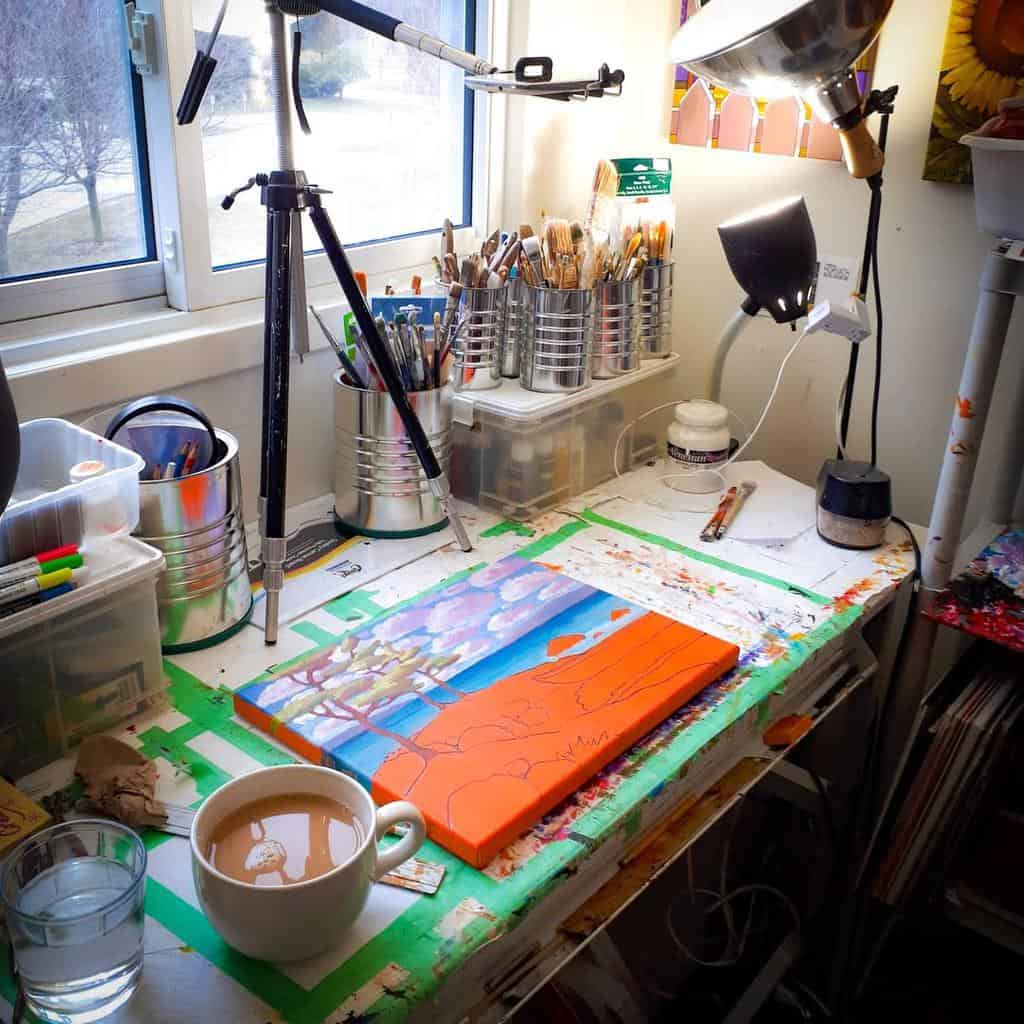
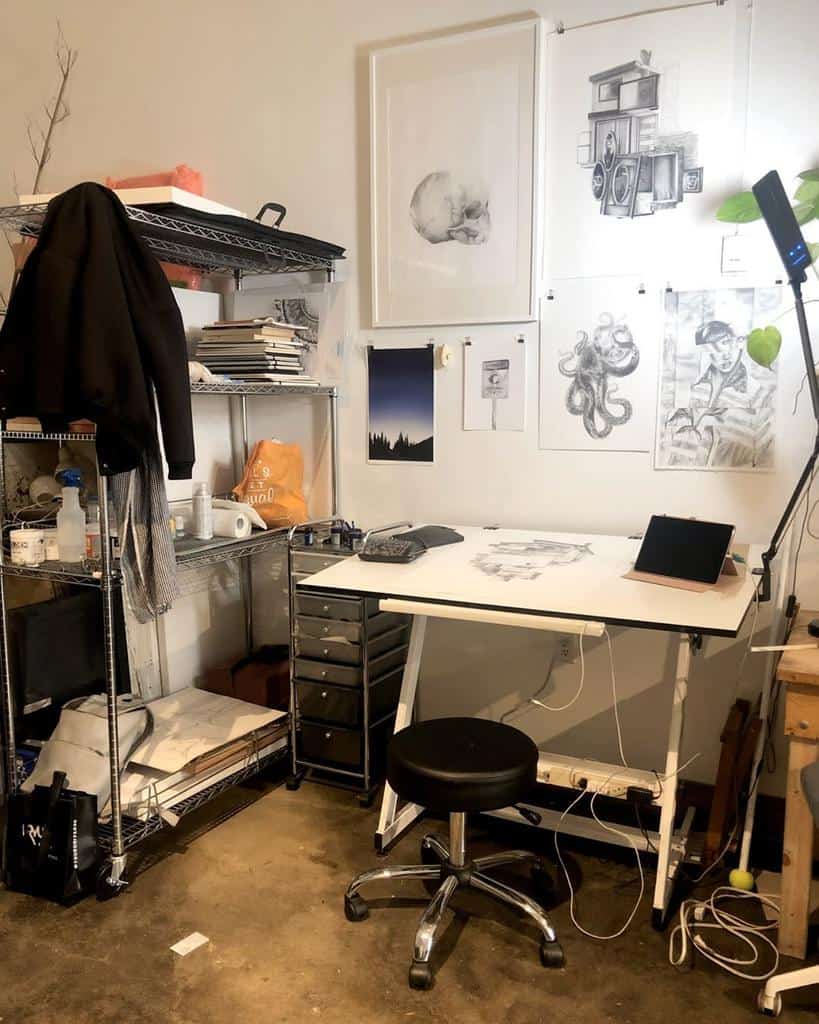
5. Create a Focused Art Desk Zone
Dedicate a specific desk for certain activities like sketching or digital work. Ensure ample surface area and include organizers or trays to keep tools orderly. This creates a focused zone that can help boost productivity.
Source: @alifya_lifestyle via InstagramSource: @northcoastbcartist via InstagramSource: @elliehintze.art_ via InstagramSource: @gdixxmigliaart via InstagramSource: @hellomelikeyy via InstagramSource: @helenefarrar via Instagram
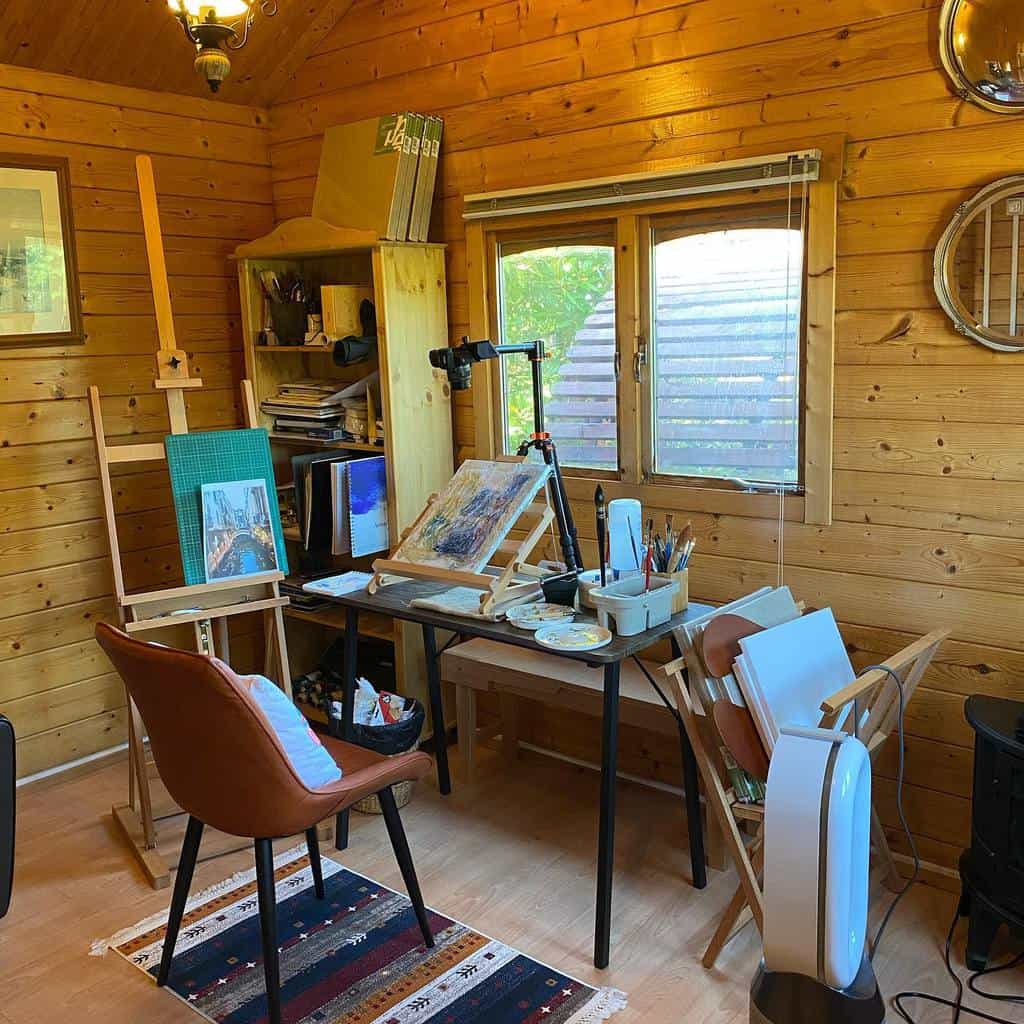
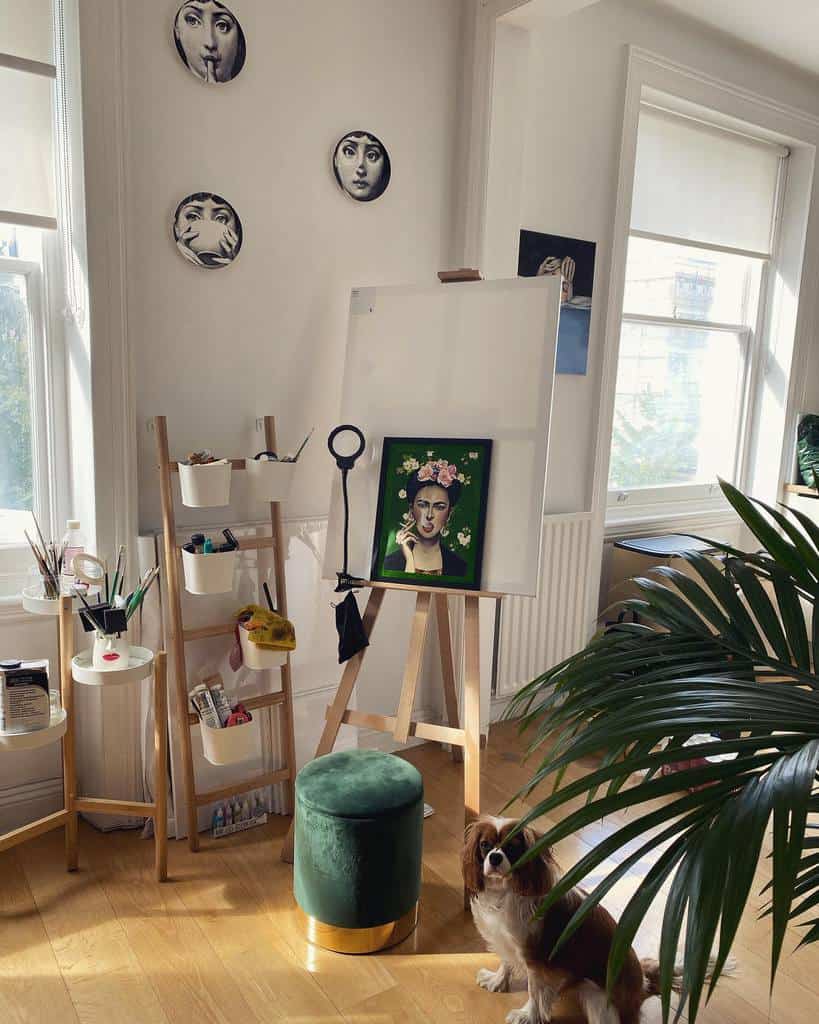
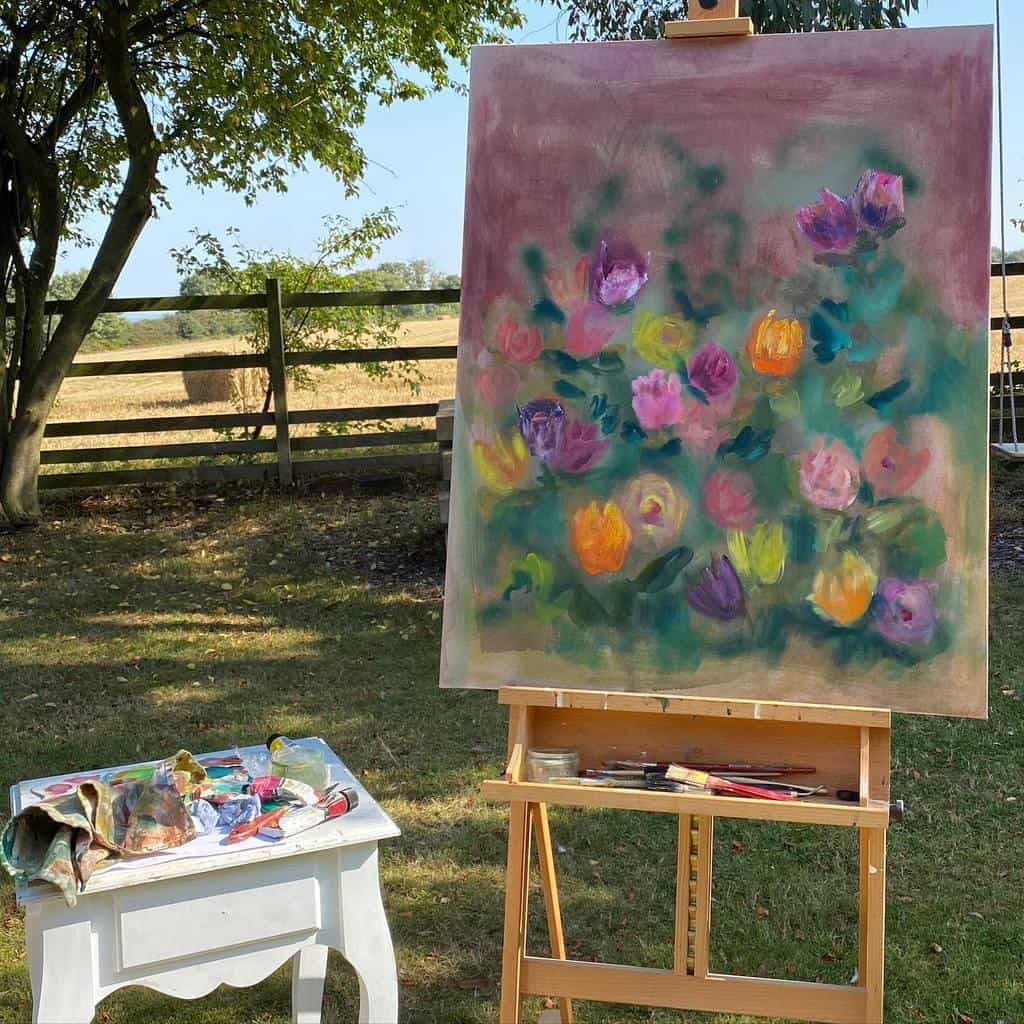
6. Choose Adjustable Easels and Displays
Select easels that adjust to different angles and heights for various types of art creation. Additionally, have display stands that can showcase artwork in progress or completed pieces, offering a dynamic view of your creative process.
Source: @carmeljenkin via InstagramSource: @alimourabetartworks via InstagramSource: @gabrieleartist via InstagramSource: @samanthakaplanart via InstagramSource: @shelleyhockhamart via InstagramSource: @gabrieleartist via InstagramSource: @tessreidart via InstagramSource: @corbettstudio via Instagram
7. Design an Art Photography Corner
Create a corner with proper lighting and backdrop for photographing your art or filming process videos. Adjustable studio lights and a clean, neutral background can greatly improve the quality of your digital showcases.
Source: @hakanhingisartchannel via InstagramSource: @hakanhingisartchannel via InstagramSource: @cathyhorvathbuchanan via InstagramSource: @denamarshallfineart via Instagram
8. Utilize a Mesh Grid for Inspiration
A mesh grid panel is an excellent tool for organizing and displaying inspiration items, sketches, and small tools. Attach clips, hooks, or shelves to customize your grid according to your needs.
Source: @jenyarose via Instagram
9. Efficiently Organize with a Pegboard
Install a pegboard for a customizable and space-efficient way to store and organize tools and materials. You can rearrange hooks and shelves as your tool collection evolves or as different projects demand.
Source: @piawhiteillustration via InstagramSource: @gemma_morgan_art via Instagram
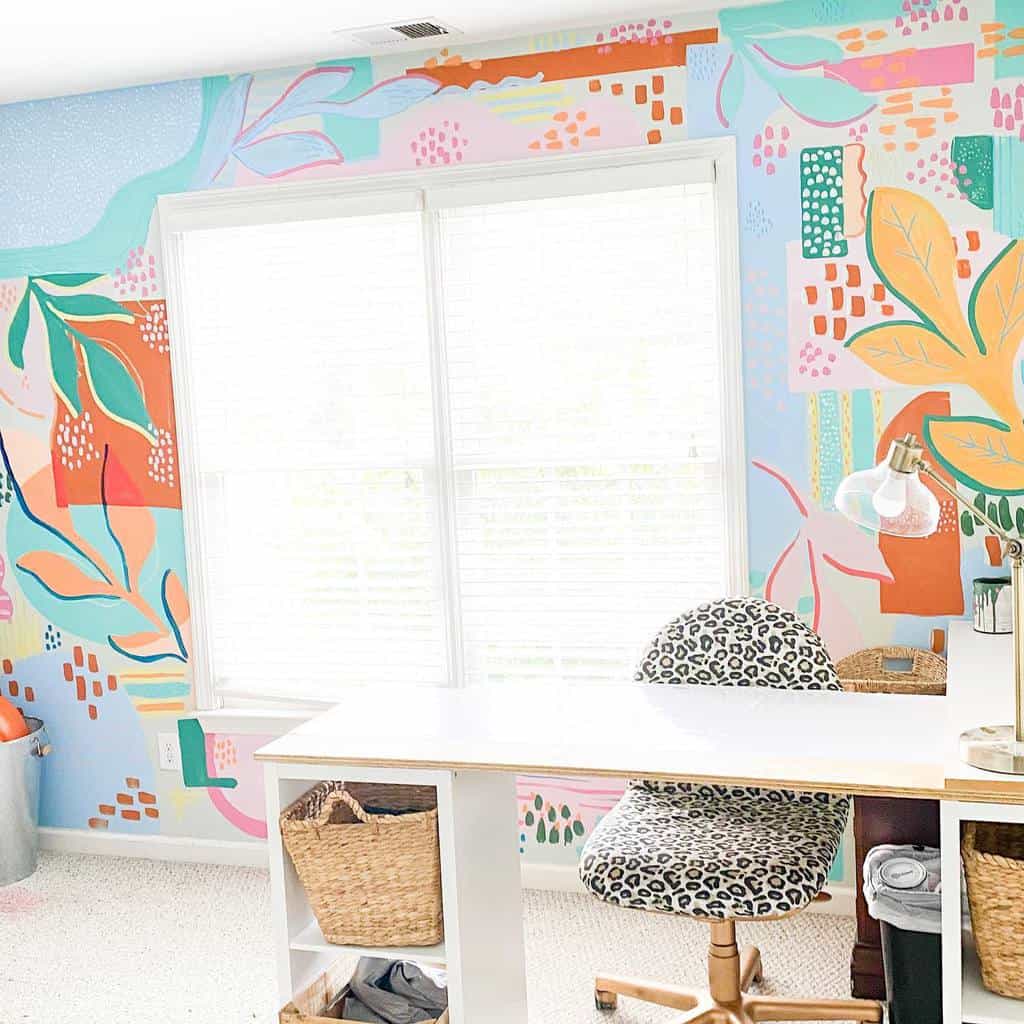
10. Personalize with Inspiring Wall Decor
Transform your walls into a canvas for inspiration. Use color, texture, or wall art to set the tone of your workspace. This visual stimulation can be a source of inspiration and creativity.
Source: @ambertonway via Instagram
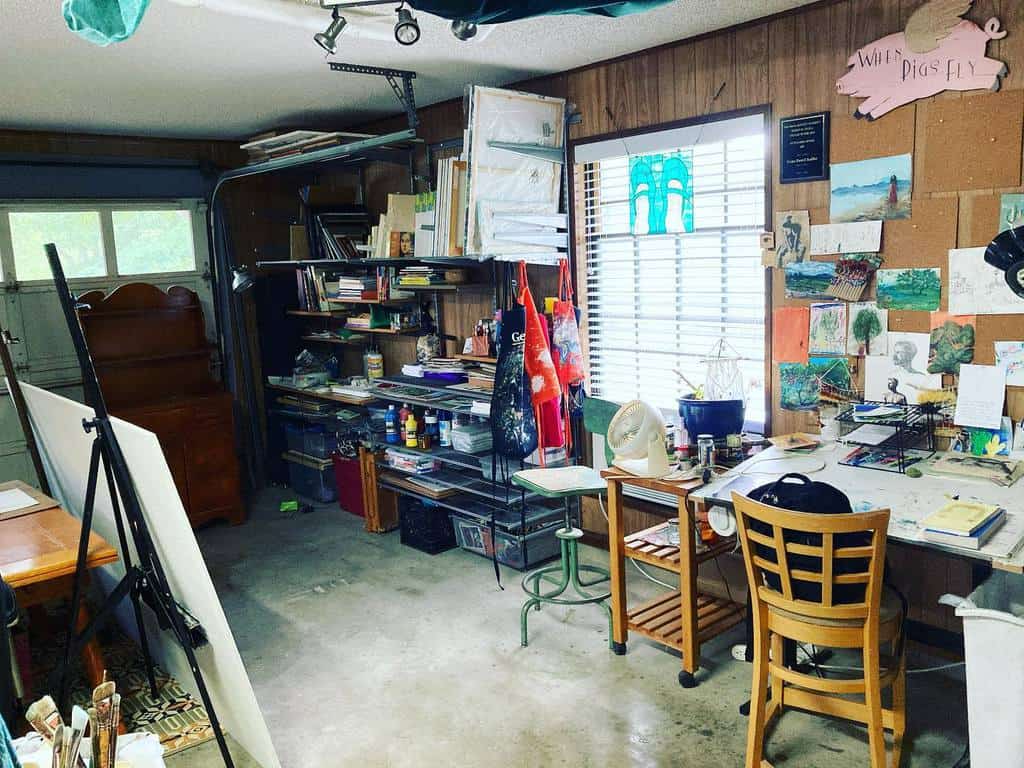
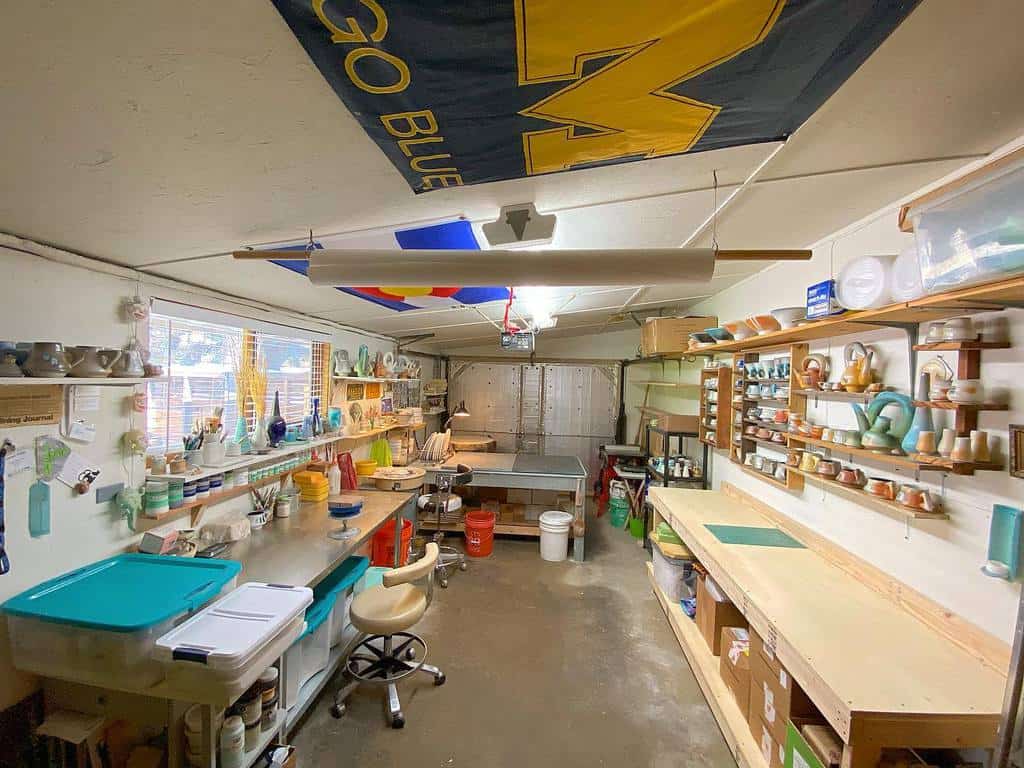
11. Transform Your Garage into an Art Studio
Convert a garage into a functional art studio with proper insulation for temperature control and adequate ventilation. Utilize the spacious area for larger projects and install good lighting for clarity in detailed work.
Source: @gena.destri via InstagramSource: @joe.kral_ via InstagramSource: @redbeardceramics via Instagram
12. Ease Movement with Rolling Carts
Invest in rolling carts to easily transport supplies across the studio. These can be used to hold a variety of materials and are especially useful in larger studios or when working on multiple projects simultaneously.
Source: @creativestudioongrand via InstagramSource: @stephanielarsenart via InstagramSource: @brainwavecult via Instagram
14. Innovate with Ladder Storage Solutions
A repurposed ladder can serve as a unique storage solution, offering shelves for placing supplies or hanging artwork. This adds a rustic charm while being functional for organizing different items.
Source: @kisas_muse via Instagram
15. Install a Space-Saving Wall Desk
For space-saving efficiency, a wall-mounted desk is ideal. It can be folded away when not in use, maximizing floor space. Ensure it’s sturdy enough to support your work and accessible in height.
Source: @marta_ds_art via Instagram
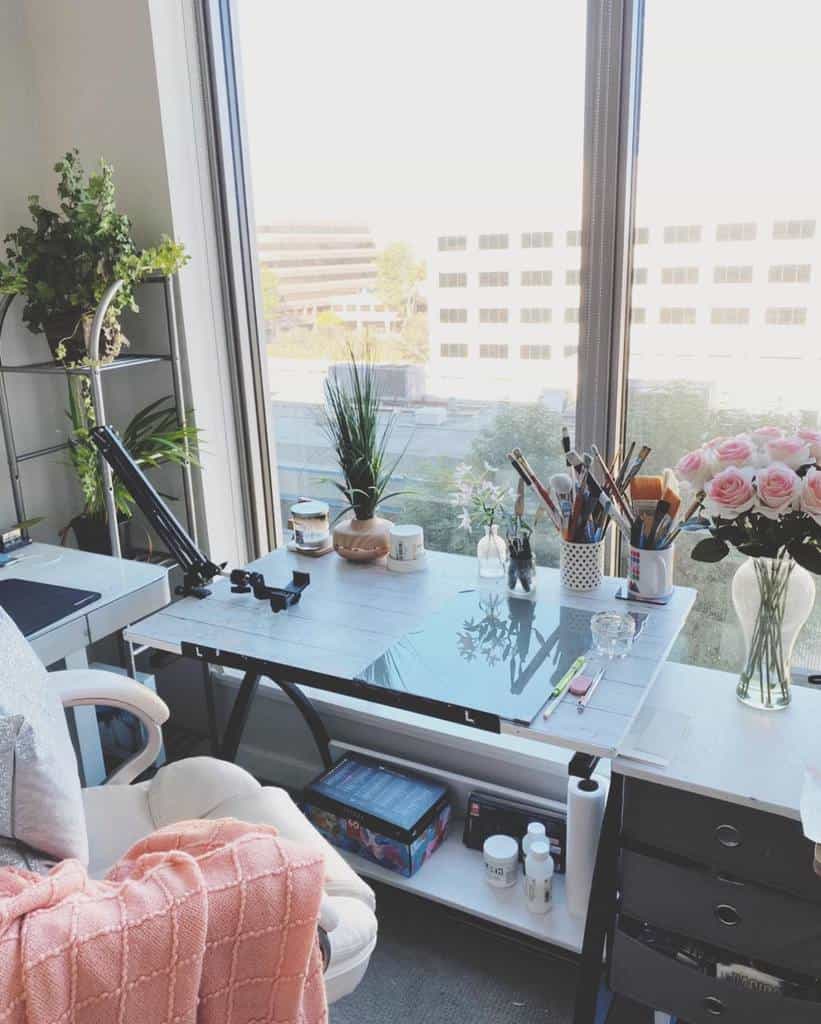
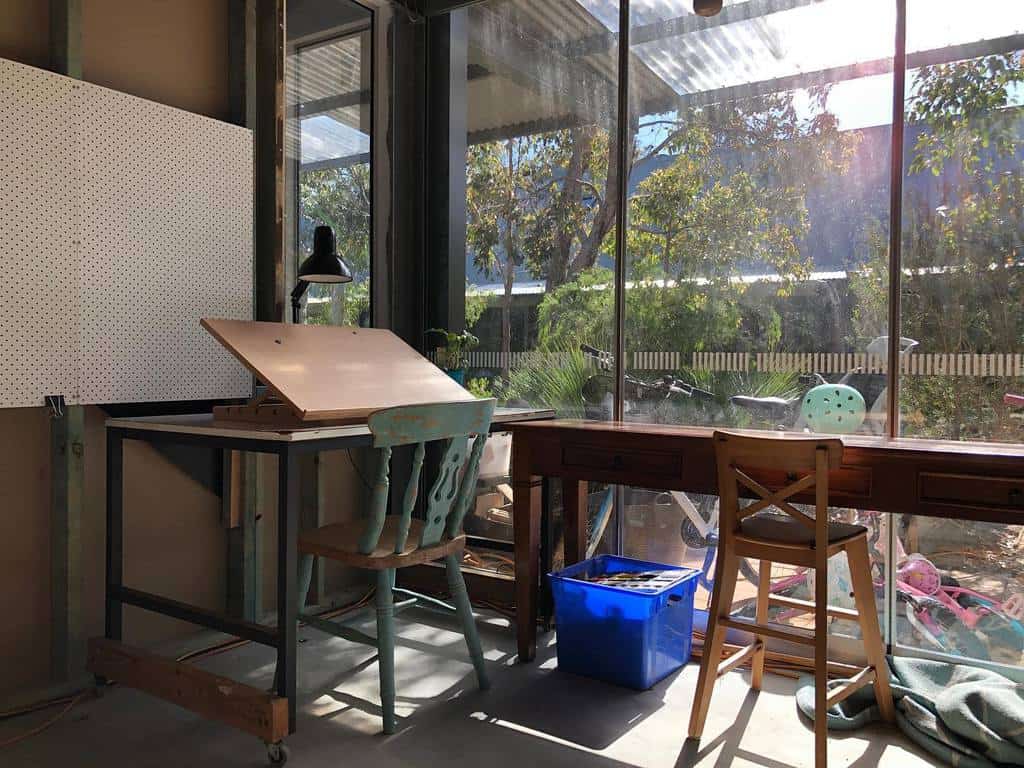
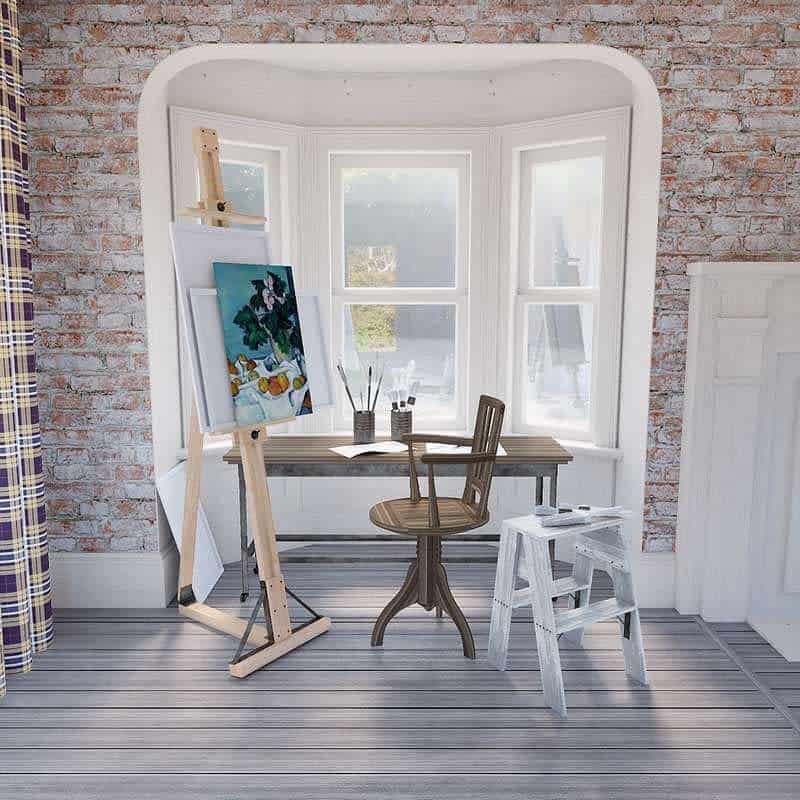
16. Make the Most of a Bay Window Desk
Position your workdesk near a bay window to make the most of natural light. This setup offers a calming view and can be a source of inspiration, while the additional sill space can serve for plant or tool display.
Source: @vassofishes via Instagram
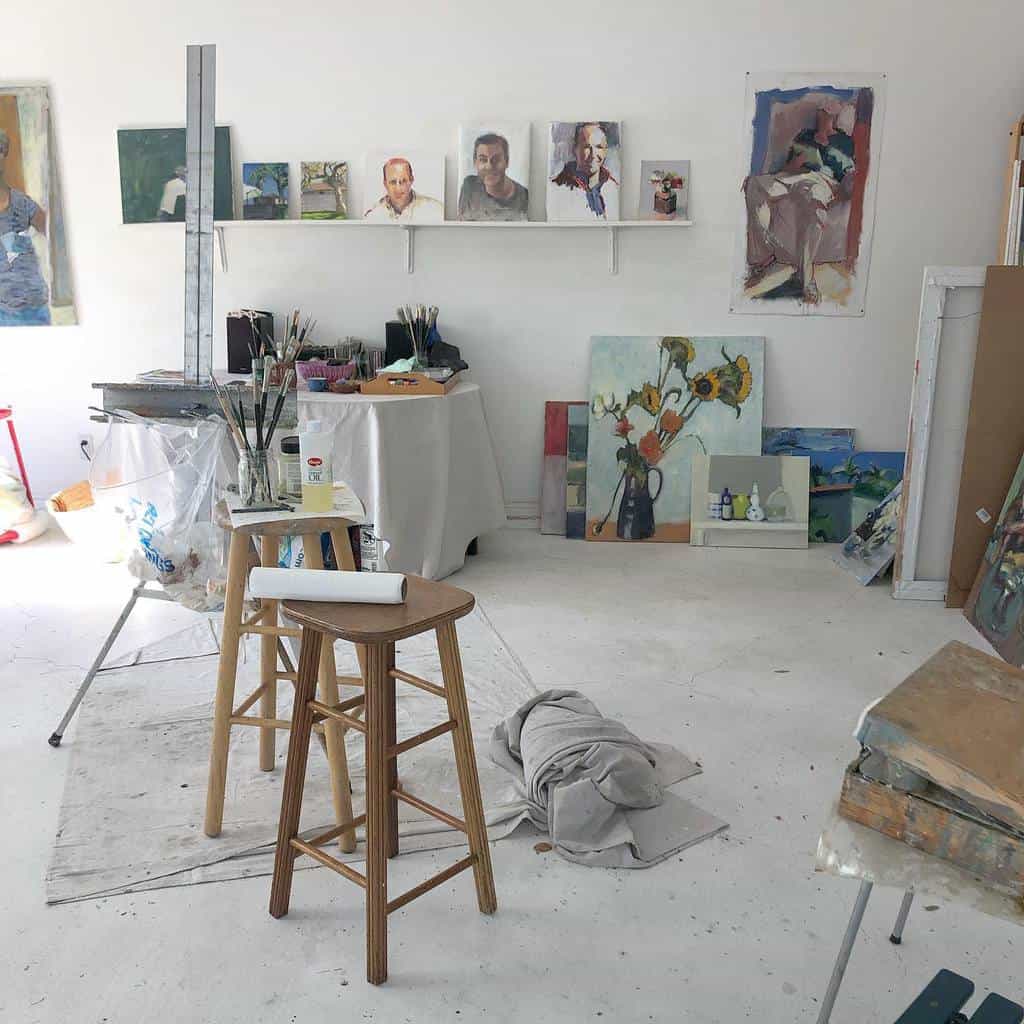
17. Prioritize Ample Creative Floor Space
Maintain an open floor plan to allow free movement and flexibility in your creative process. This space is vital for large-scale projects or when multiple people are working in the studio.
Source: @mari2toucher via InstagramSource: @sophielongart via InstagramSource: @nasoomee3697 via Instagram
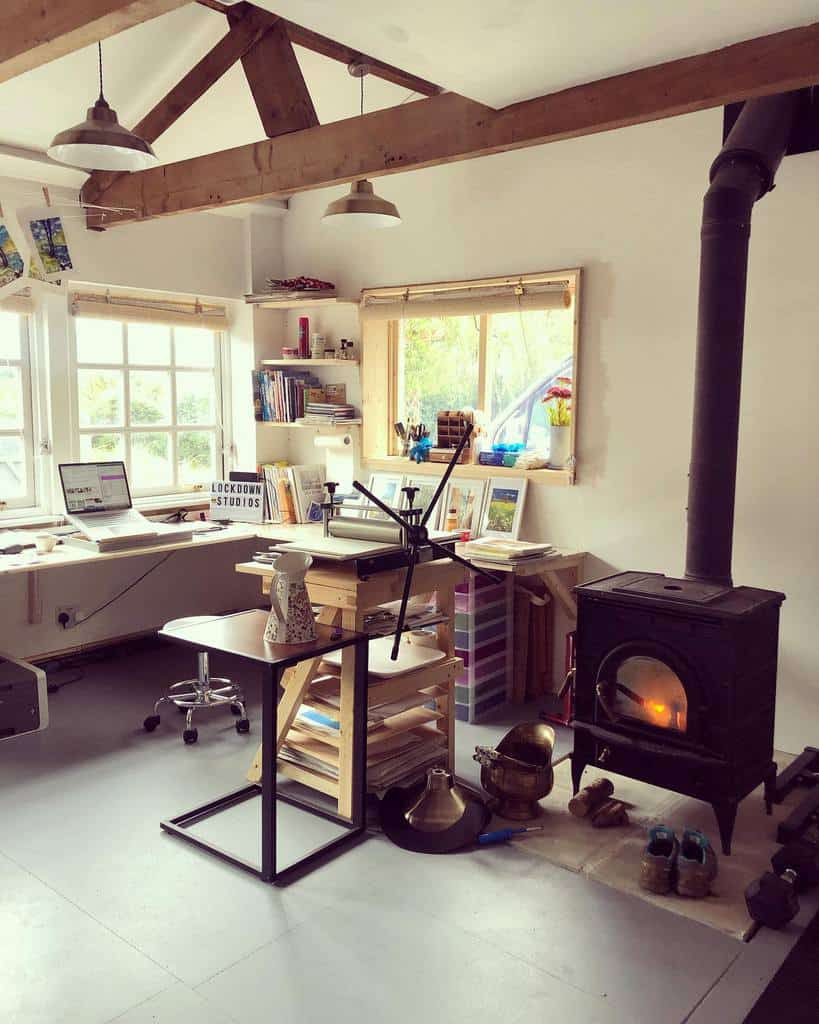
18. Equip a Hands-On Workshop Studio
Design your studio as a workshop for hands-on projects. Include tables and chairs, proper ventilation for materials like wood or metal, and organize tools for easy accessibility.
Source: @finne_architects via InstagramSource: @easeltown via InstagramSource: @thelittleforestart via Instagram
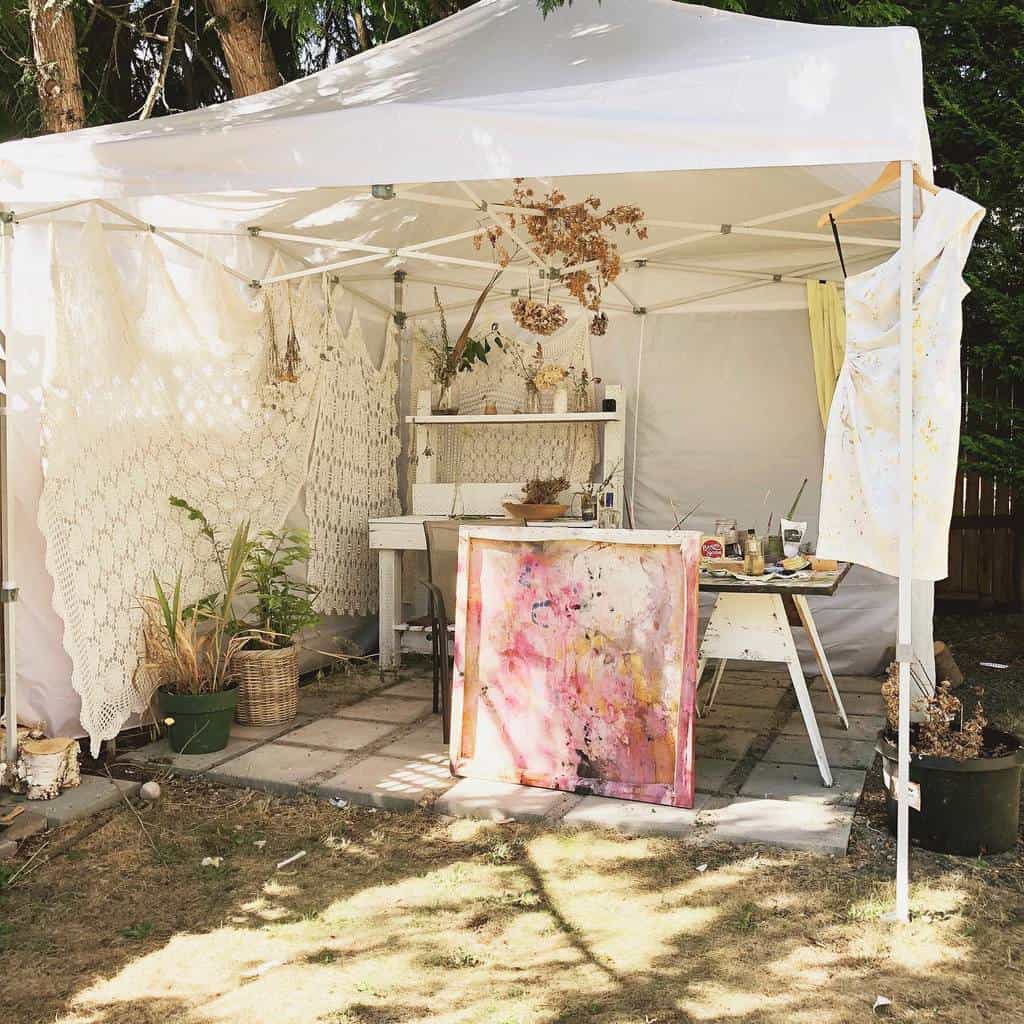
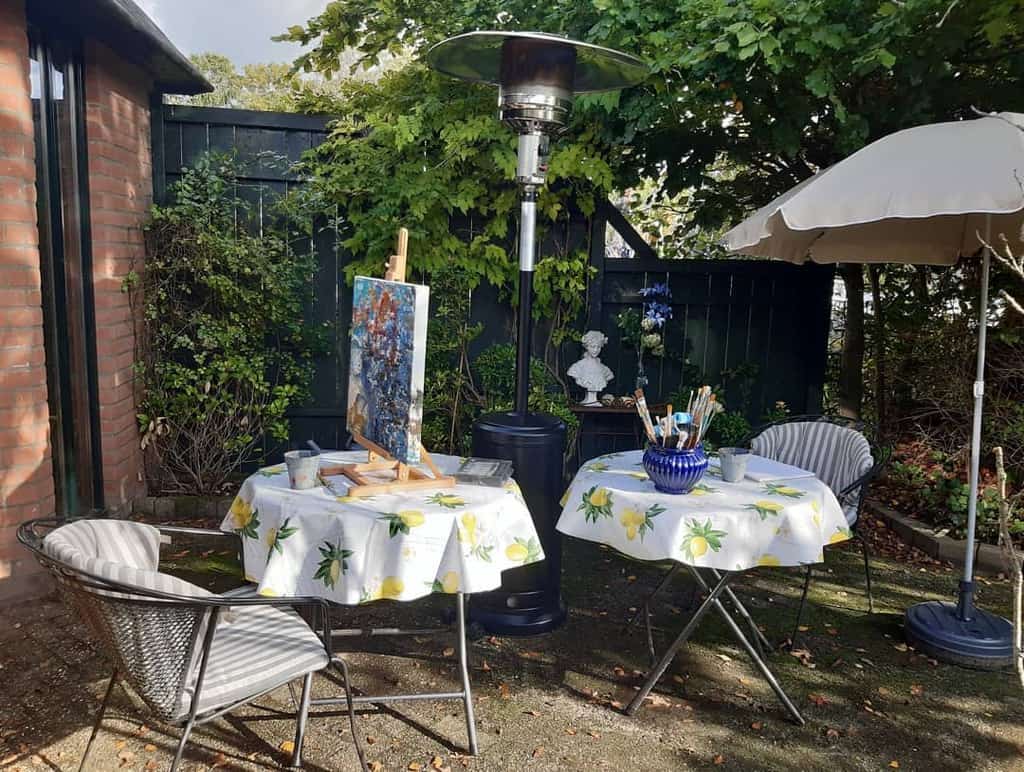
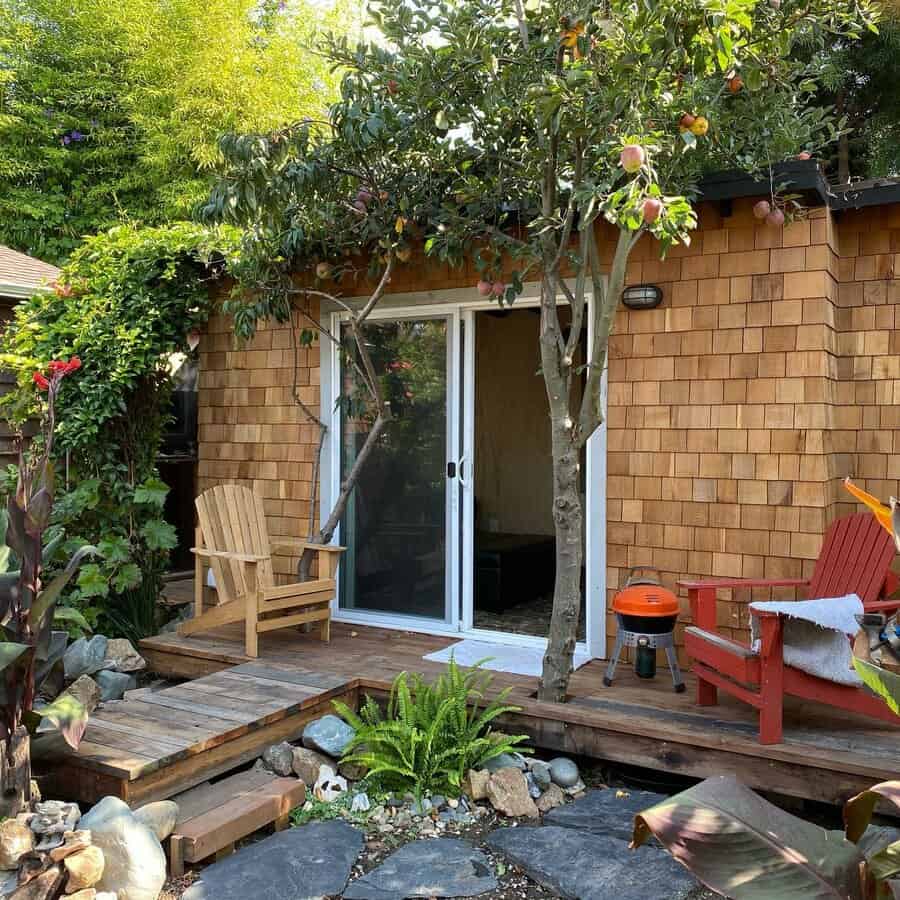
19. Embrace Nature in an Outdoor Studio
Create an outdoor studio in your backyard for a change of scenery and natural inspiration. Ensure it’s weatherproof and secure for storing art supplies and works-in-progress.
Source: @jkcalladine via InstagramSource: @kristinbrin via InstagramSource: @meganrose_artist via InstagramSource: @miriamramirezart via InstagramSource: @petratool via Instagram
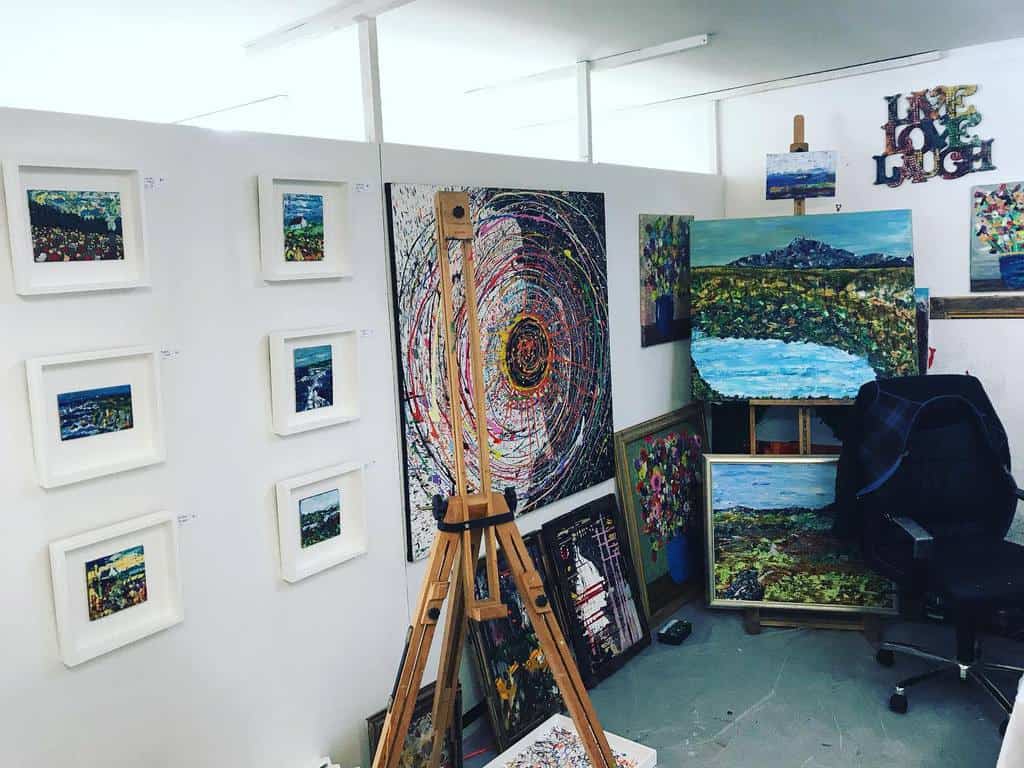
20. Showcase Art in a Personal Gallery
Dedicate a wall or section of your studio as a gallery to display finished works. This not only celebrates your achievements but also serves as a visual portfolio for visitors.
Source: @chaneldurante via InstagramSource: @jamiebanks_artist via InstagramSource: @artbyisla via Instagram
21. Select a Comfortable Swivel Chair
Choose a swivel chair with adjustable height for flexibility and mobility around your workstation. Ensure it’s comfortable for long periods of sitting, with proper lumbar support.
Source: @christinajamesart via InstagramSource: @figblossomart via Instagram
22. Convert the Attic into a Creative Haven
Transform an attic space into a cozy art studio. Make sure it’s well-insulated and ventilated. Skylights can provide excellent natural light, enhancing the ambiance for creative work.
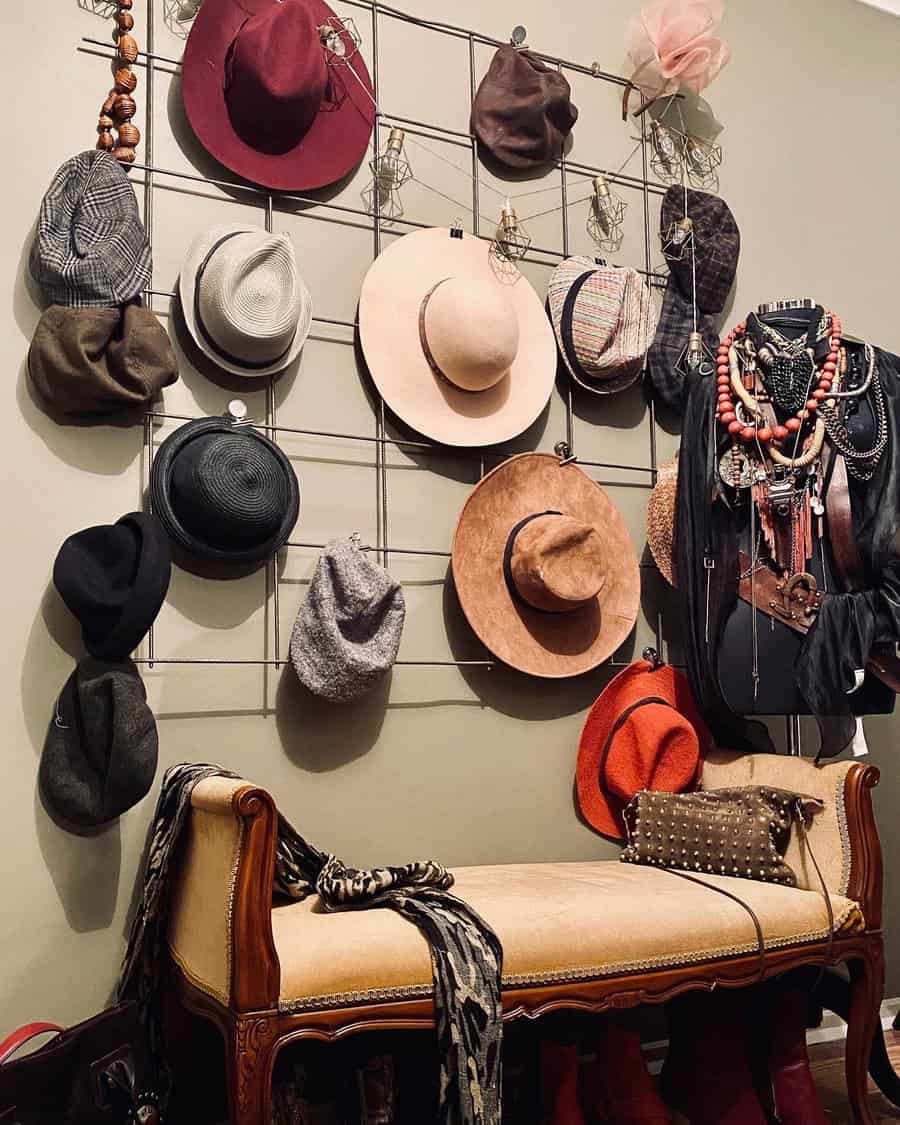
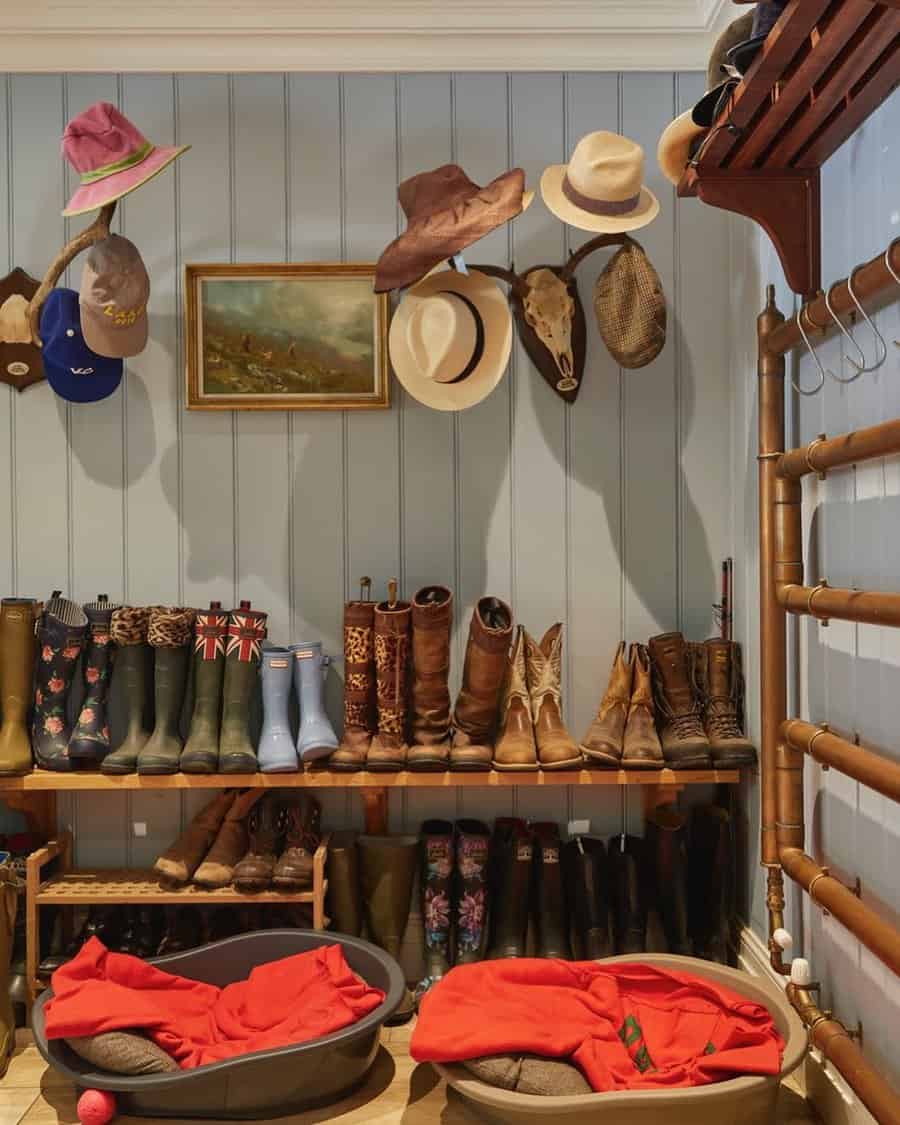
Hats are one of the most commonly collected items of clothing. Whether you have enough baseball caps to cover the entire MLB, or a fabulous variety of fine fedoras, you need a place to store them. Many people enjoy displaying their hats for all to see, while others prefer to keep their head covers under cover.
Whether you want to showcase your cowboy hats or need a dust-free place to organize a ballcap collection, our creative hat rack idea gallery will inspire you.
[view_toc]
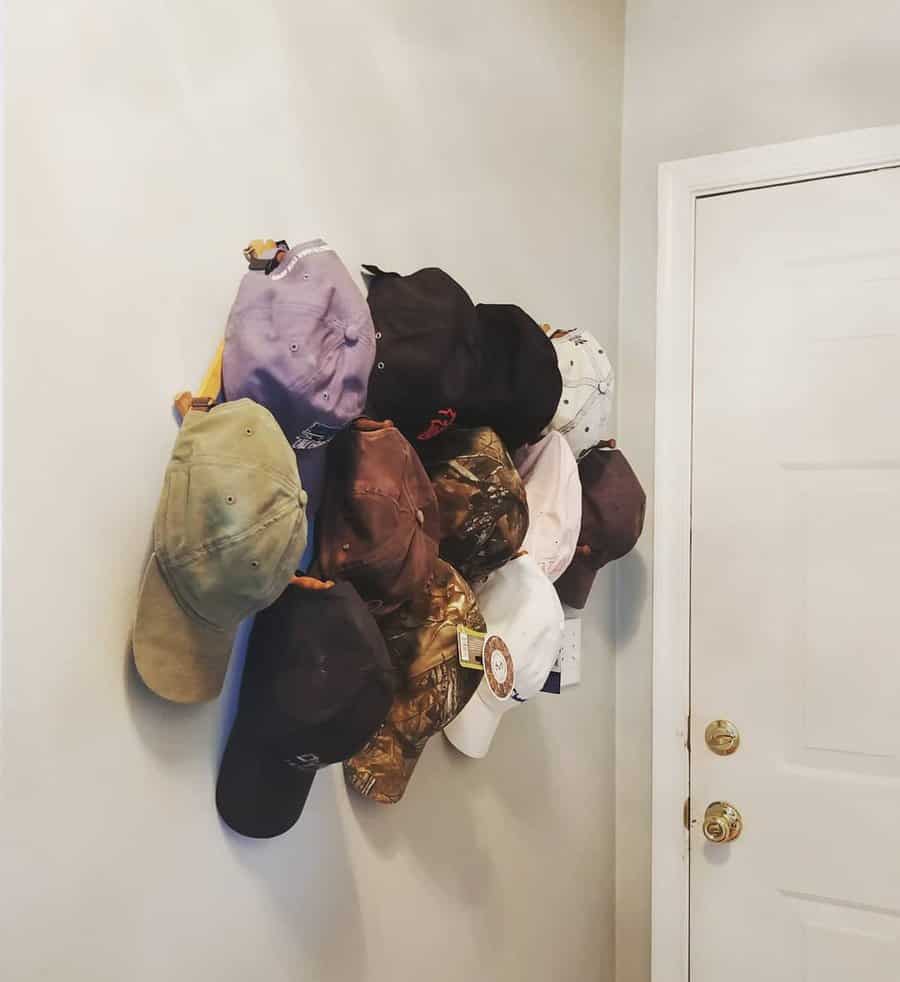
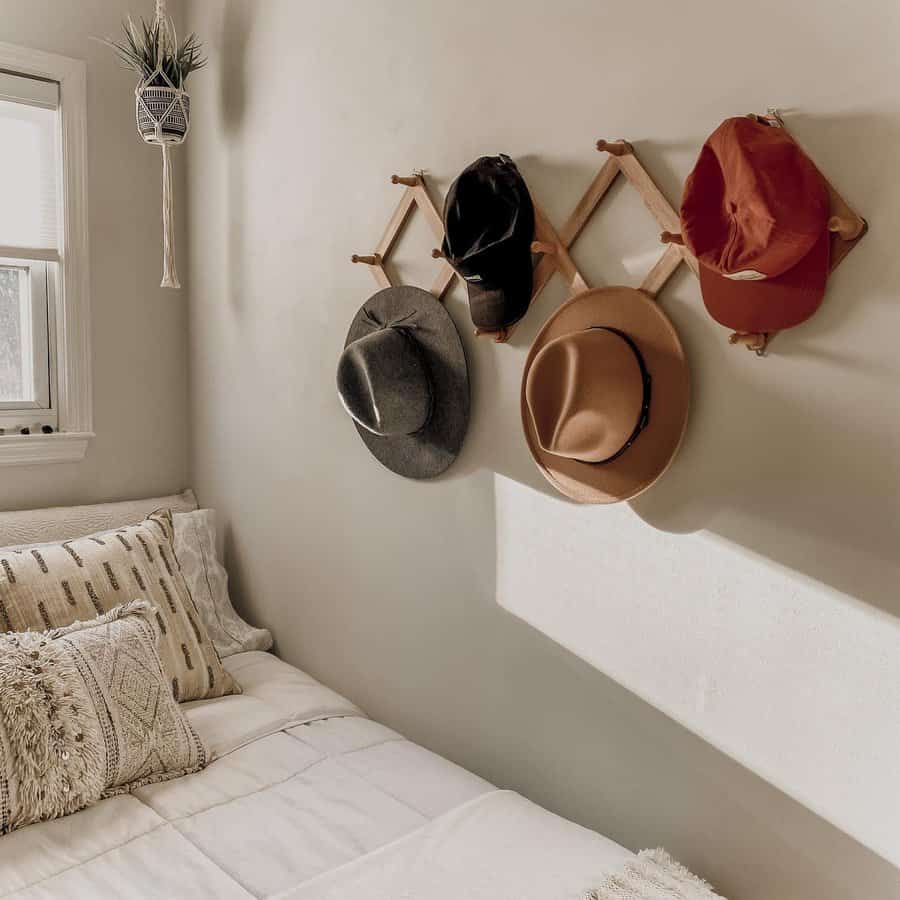
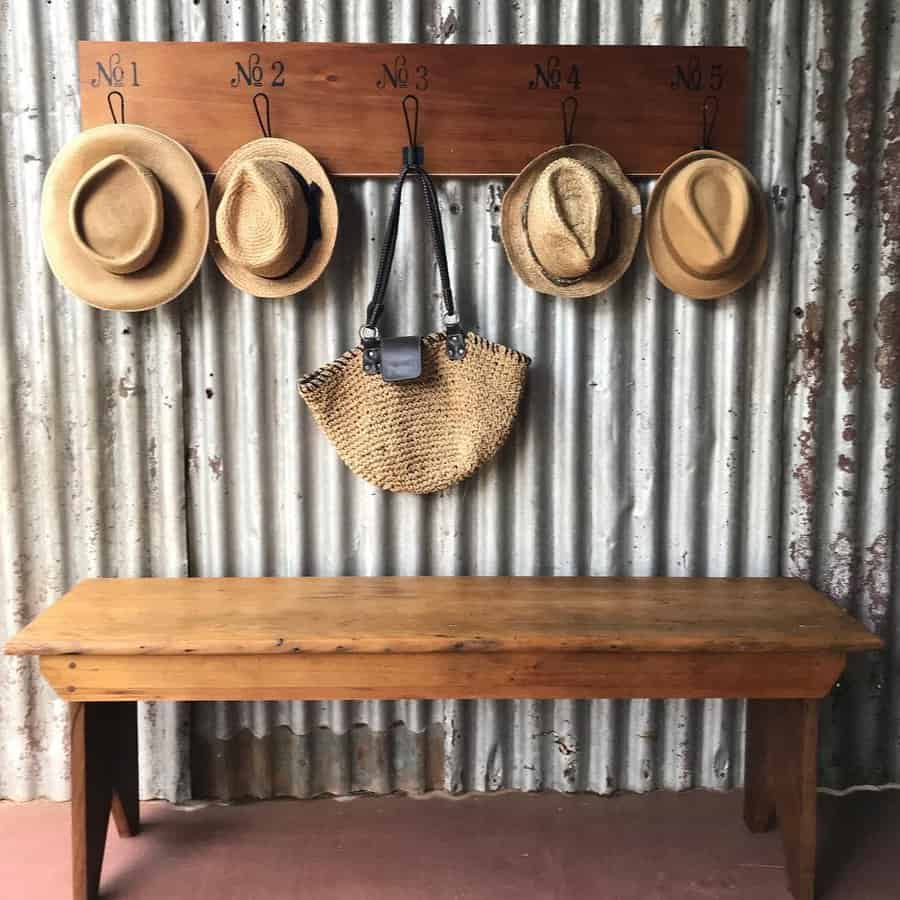
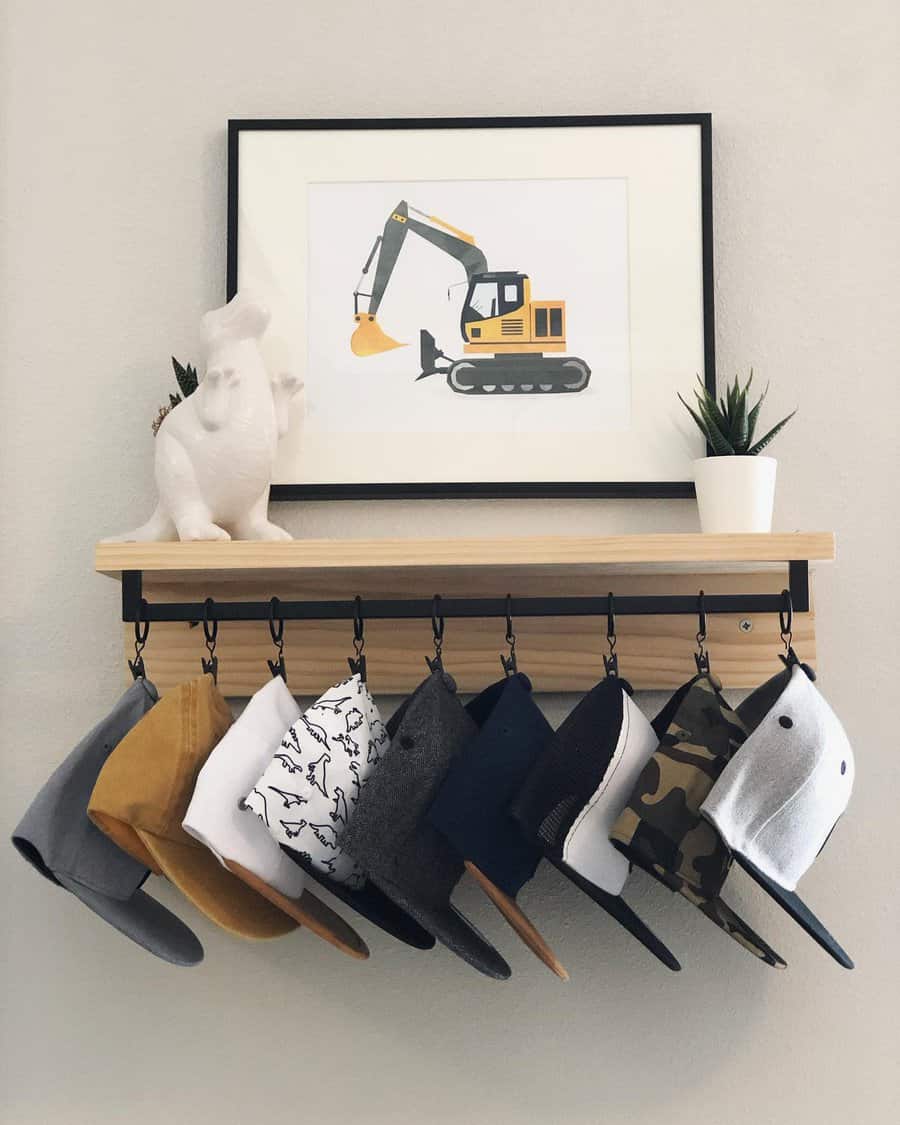
1. Create A Wall Decor For Baseball Hats
A hat rack is more than just an ordinary storage tool; it can become a part of your wall decor too! You can hang it on any wall and use it to showcase each hat like an art piece, making sure there’s enough white space for each hat so that it stands out prominently.
Not only does this look great, but it gives you the opportunity to organize and display all of your hat collection for everyone to see. Plus, with this handy hat rack, you won’t ever have to worry about mixing up or losing hats again!
Source: @crit_25 via InstagramSource: @epicwoodworx via InstagramSource: @thehousethatdiybuilt via InstagramSource: @monhoss via Instagram
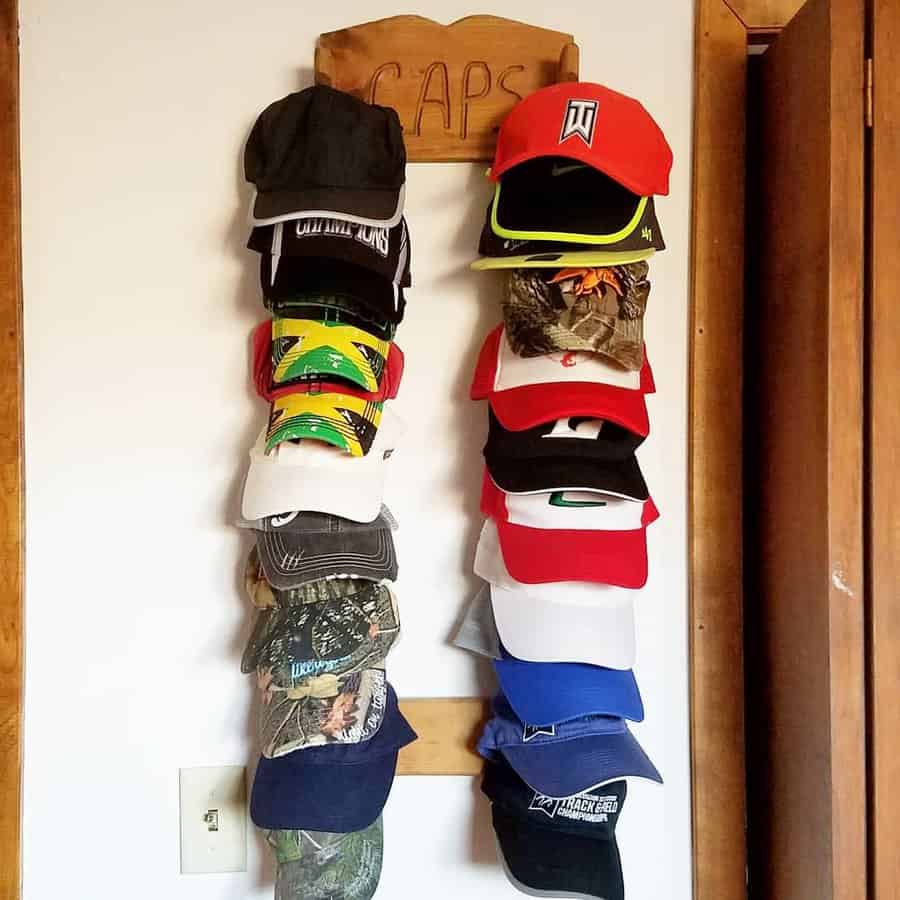
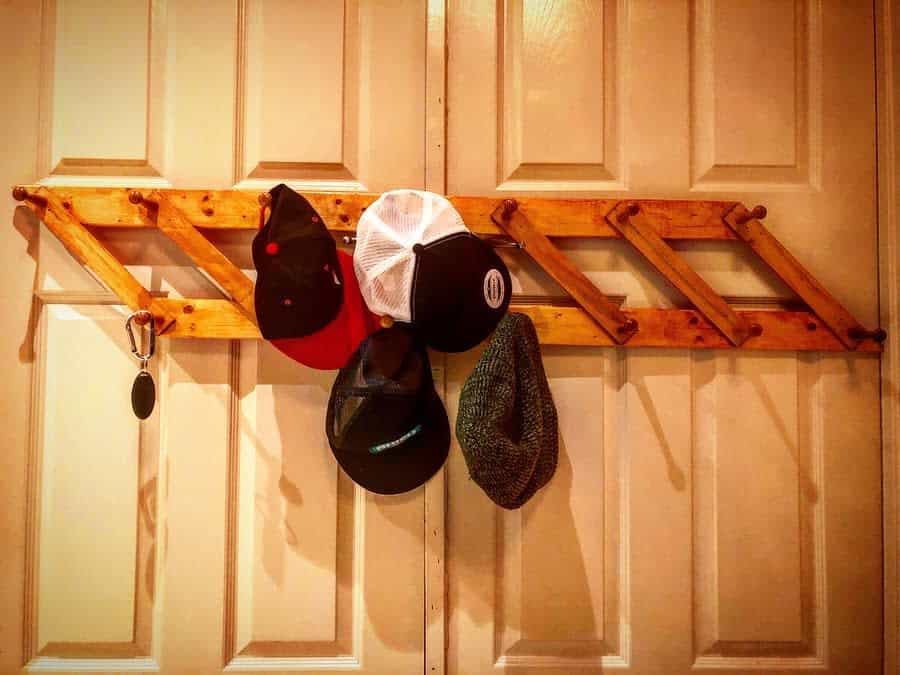
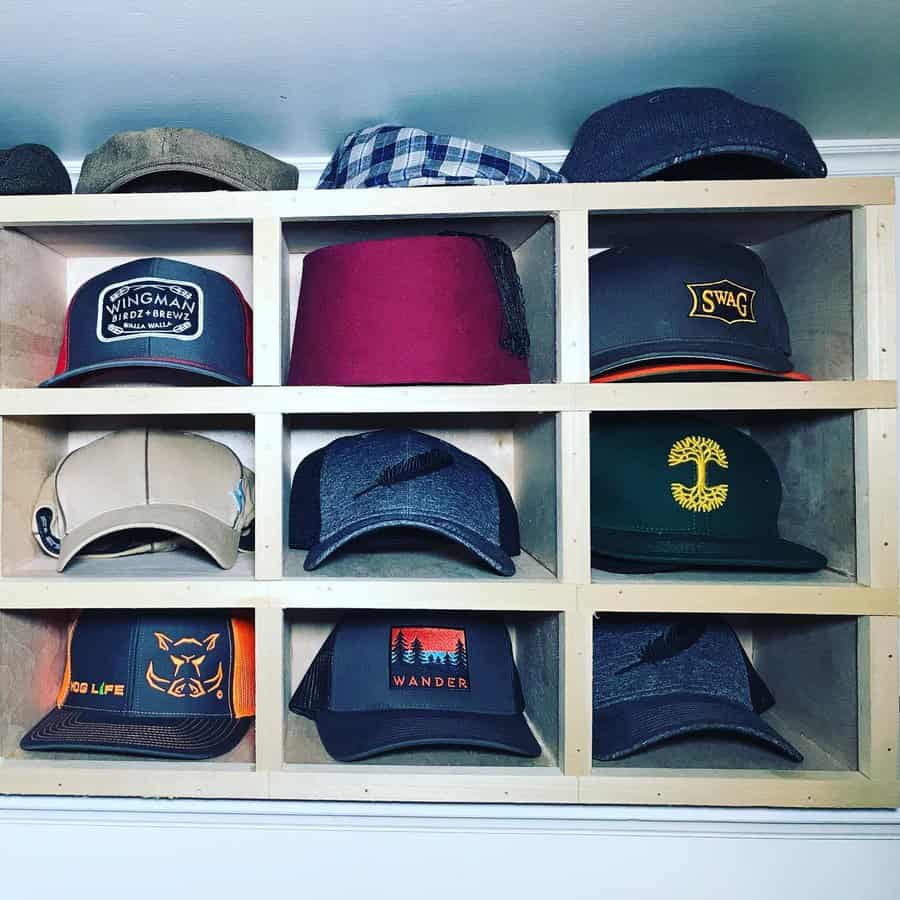
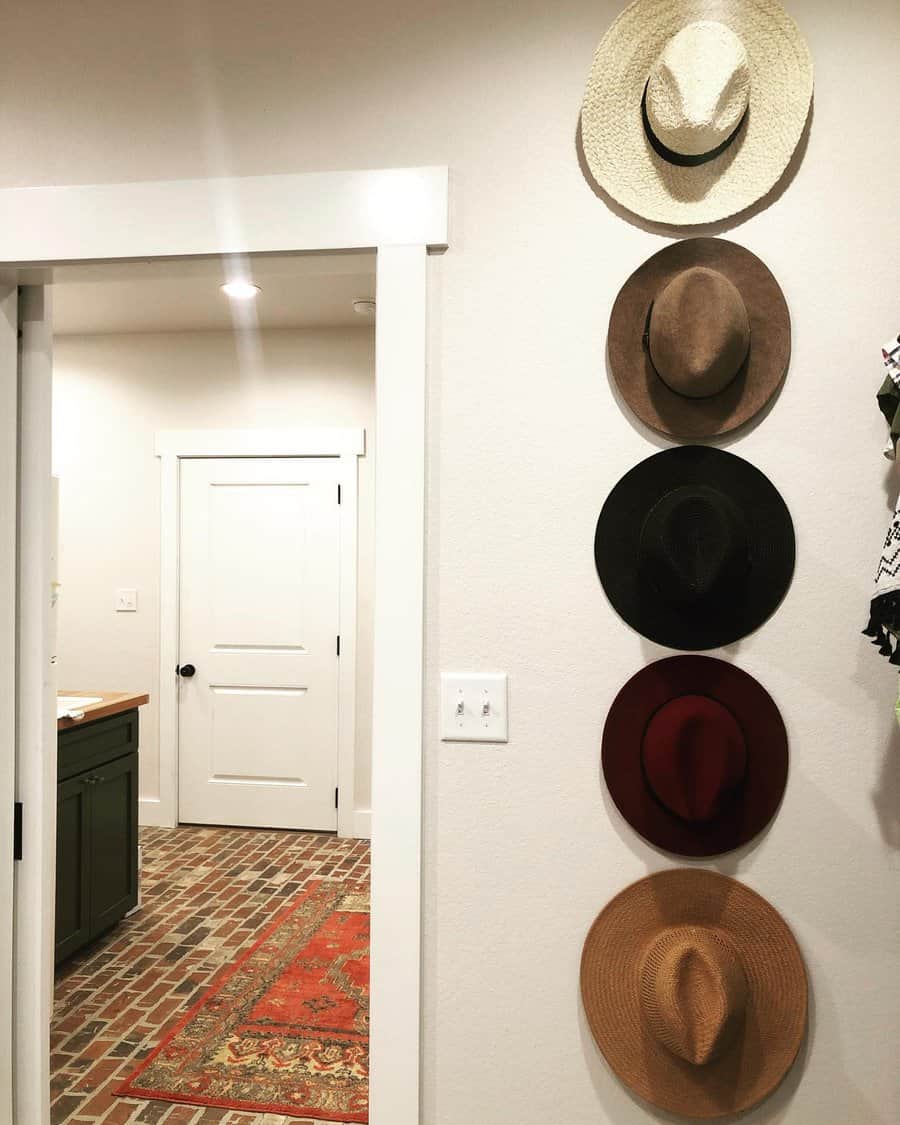
2. Store Multiple Hats Vertically
Displaying hats on wall-mounted hat racks is a stylish option that adds a creative, fashionable touch to your interior. For those of you who love collecting hats, the tiered and layered wall-mounted hat rack is perfect for storing multiple hats in one place with ease.
Not only does it help keep hats organized, but it gives your wall the delightful pop of color and texture that will bring your wall to life. With its unique design and extraordinary storage capacity, this vertical hat rack is an ideal choice for any home.
Source: @thisorganizedspace via Instagram
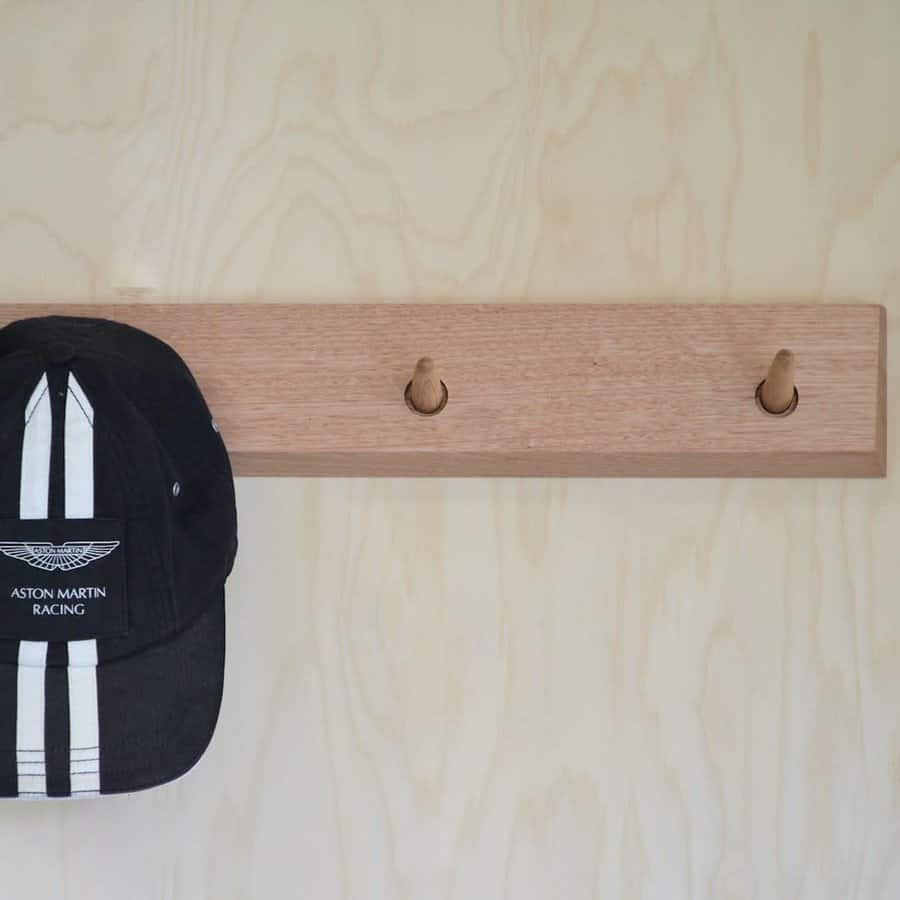
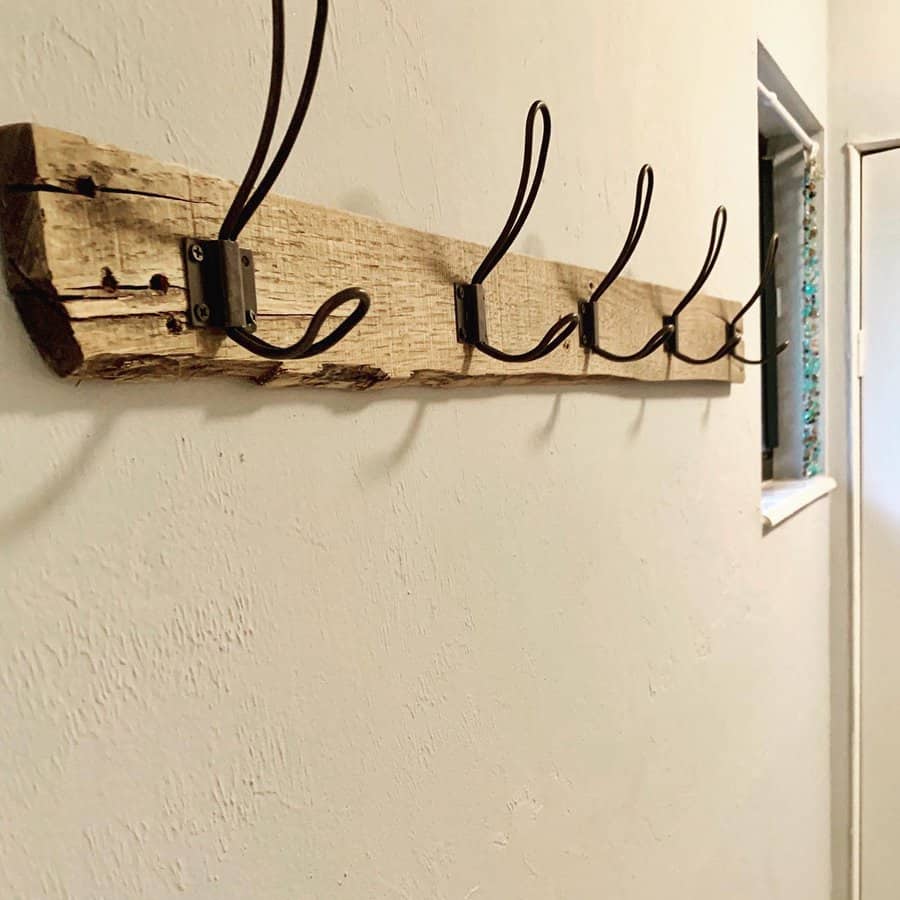
3. Keep It Simple
Looking for a place to store your hats? Why not make a wall-mounted hat rack with nail hooks? This simple and minimalist DIY project can add some spunk to any wall while creating convenient storage. With just a few nails a hook’s throw away, you can install the wall-mounted hat rack in no time and give your hats the structure they deserve.
And when guests come over and show off their impressive hat collection, you’ll have the perfect place for each one!
Source: @13thfloorvintage via Instagram
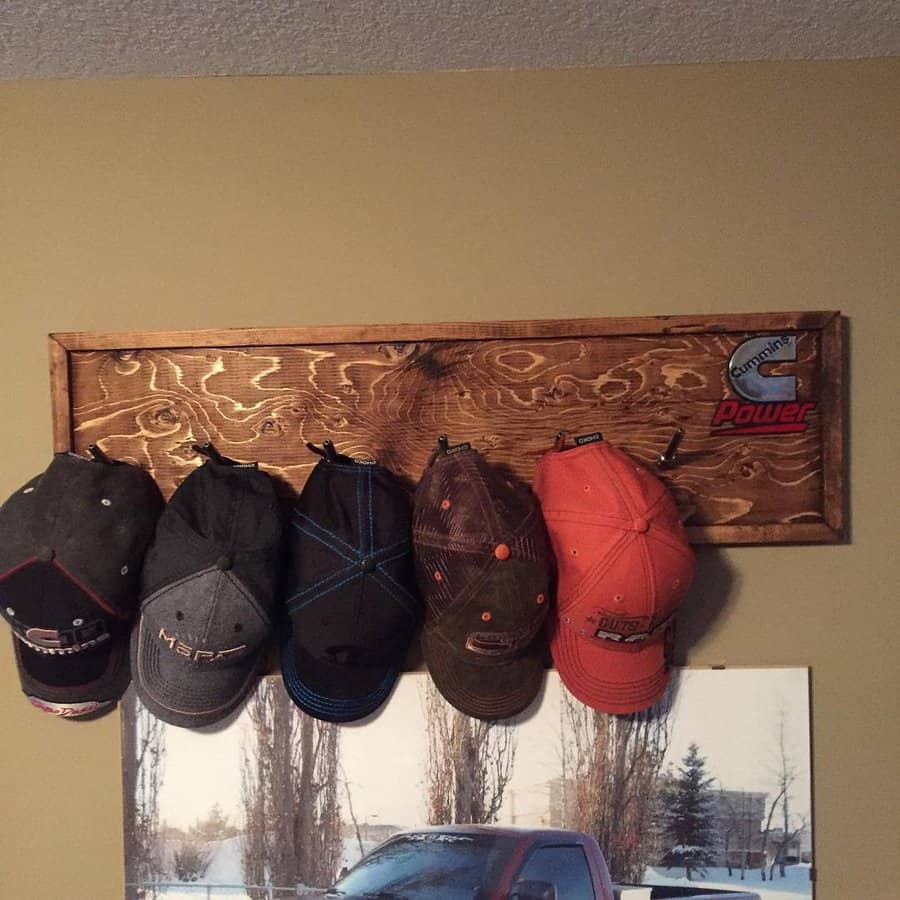
4. Create A Hat Peg Board
Adorning a metal rack with an array of stylish hats and caps can add a touch of flair to any room in the house. Not only do hat racks provide a fashionable way to organize and display headwear, but they are also surprisingly multipurpose.
An ordinary metal rack is perfect for hanging scarves, jackets, and umbrellas. A pegboard is suitable for hats of all sizes and fedoras as well. Get creative with how you use your hat rack, from storing toys to gardening tools; the possibilities are truly endless!
Source: @clarke.andco via Instagram
5. Attach An All-Purpose Wall Rack
A hat rack is a great all-purpose wall rack for all of your storage needs. Rather than the generic wall-mount rack that does one specialized job, a hat rack will keep all of your hats neat, tidy, and easy to find.
A great way to bring an artistic touch to your room, a beautiful hat rack can be customized with your favorite patterns and colors so you can show off both your unique style and all of the amazing headwear in your collection.
Source: @collaborativerevisions via InstagramSource: @hords_at_home via InstagramSource: @kangaroo_sofa via InstagramSource: @prairiebazaar via InstagramSource: @_valeriaann via InstagramSource: @warwarvision via Instagram
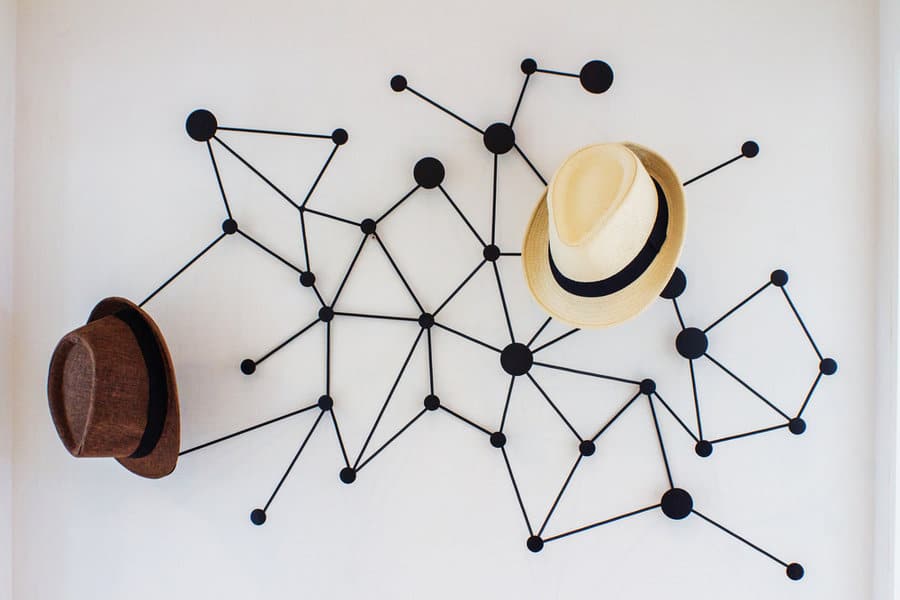
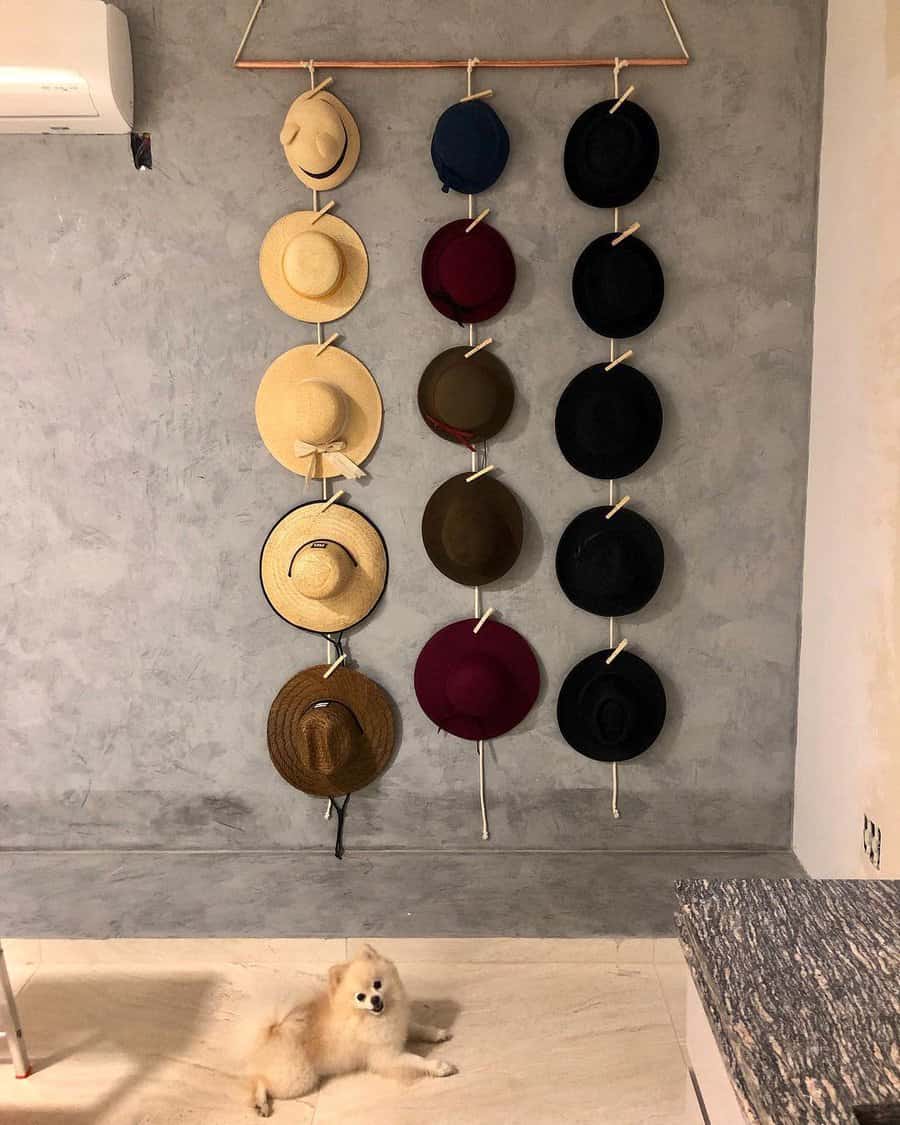
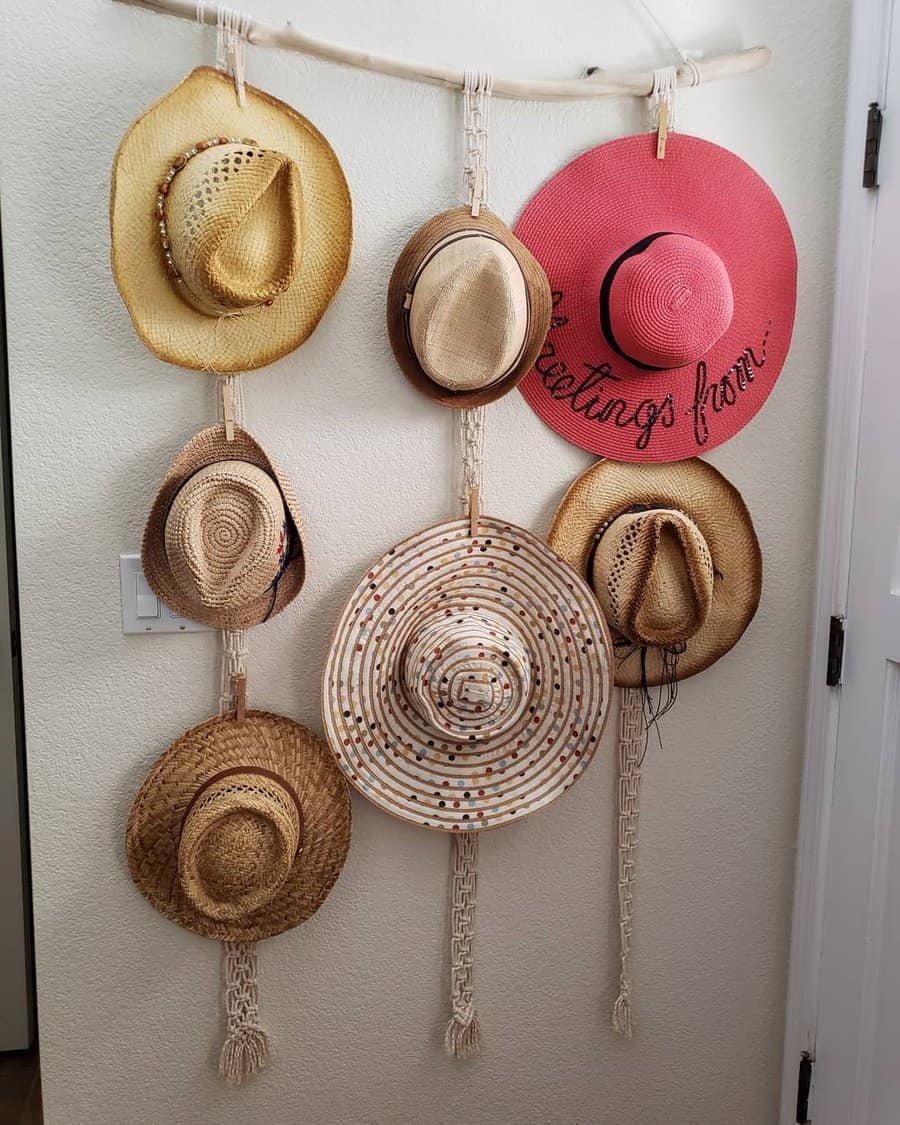
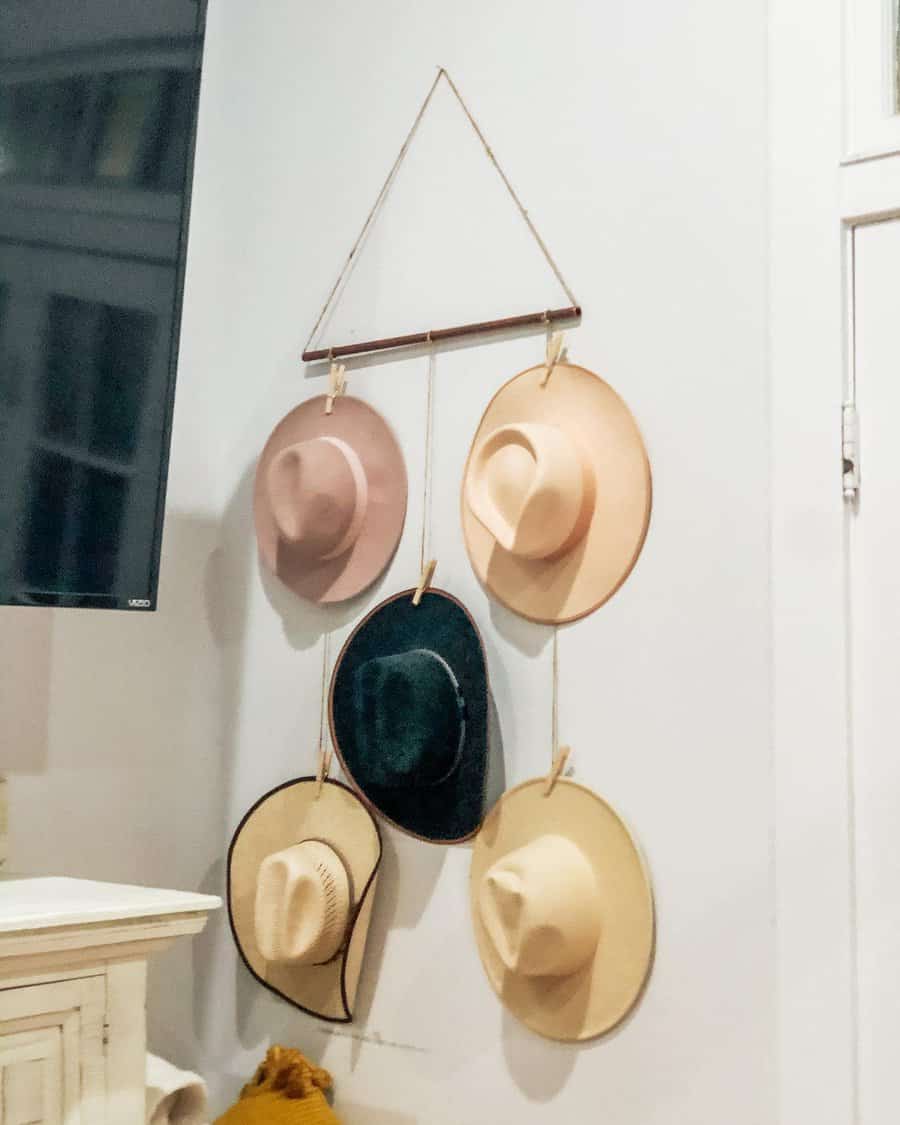
6. Be Creative With Macrame
Who said hat racks have to be boring? Macrame hat racks offer a creative and beautiful way to display hats, while adding texture to a rustic or bohemian interior.
Wood and rope blend in harmoniously together to make macrame hat racks that are sturdy and unique. Imagine seeing a macrame-style hat rack hanging in your living room or hallway, with its intricate details – an eye-catching addition that is sure to create a wonderful atmosphere.
Source: @artesanei_ via InstagramSource: @davia_at_home via InstagramSource: @knotty_gramma via InstagramSource: @therenodueaux via Instagram
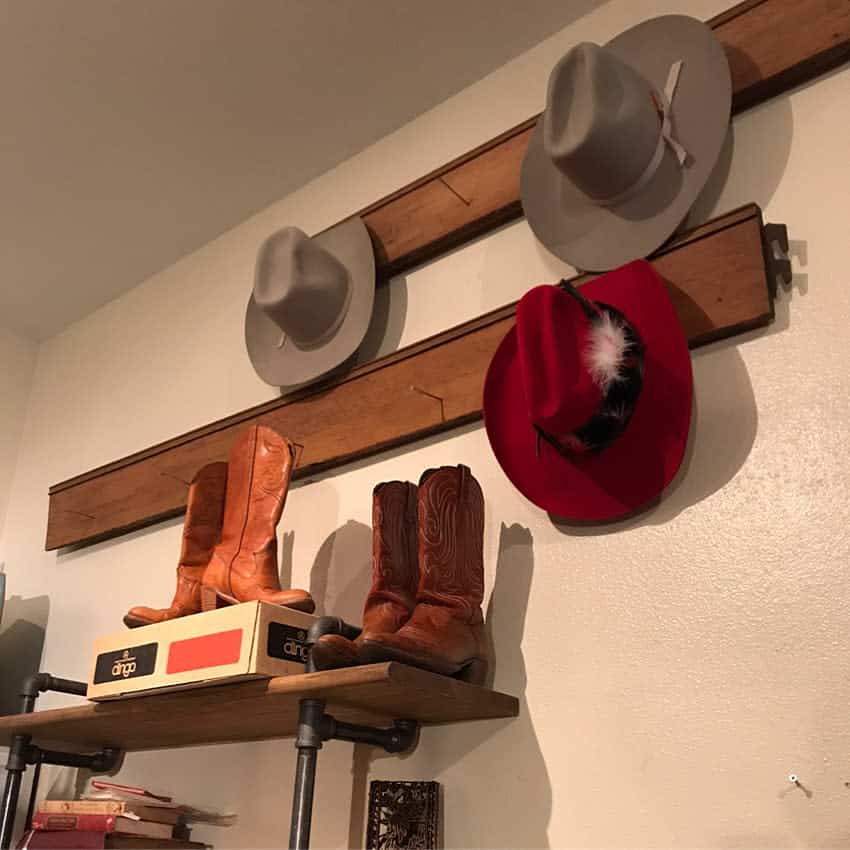
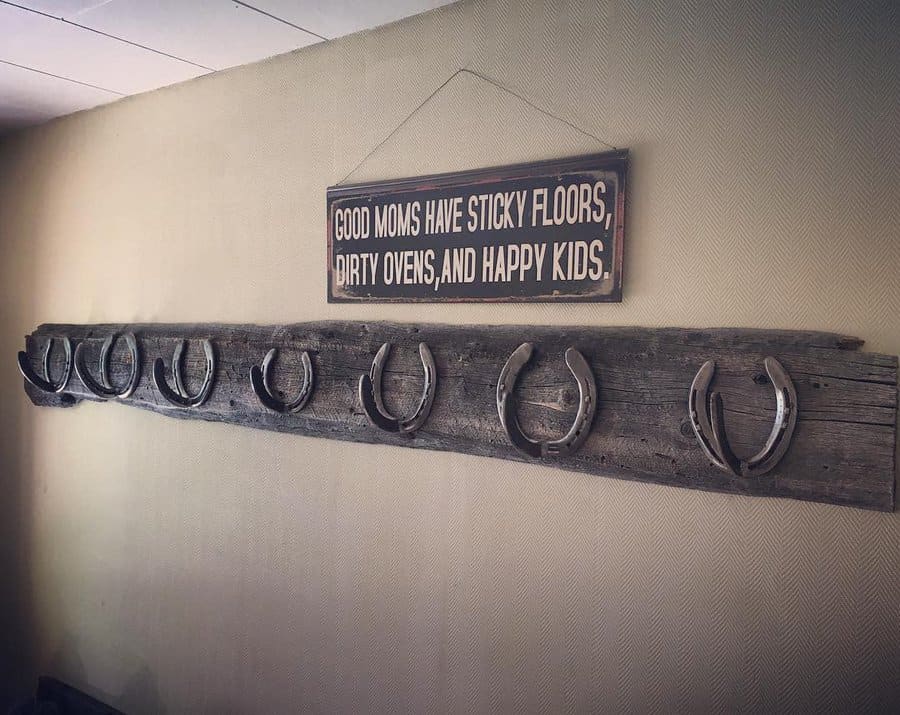
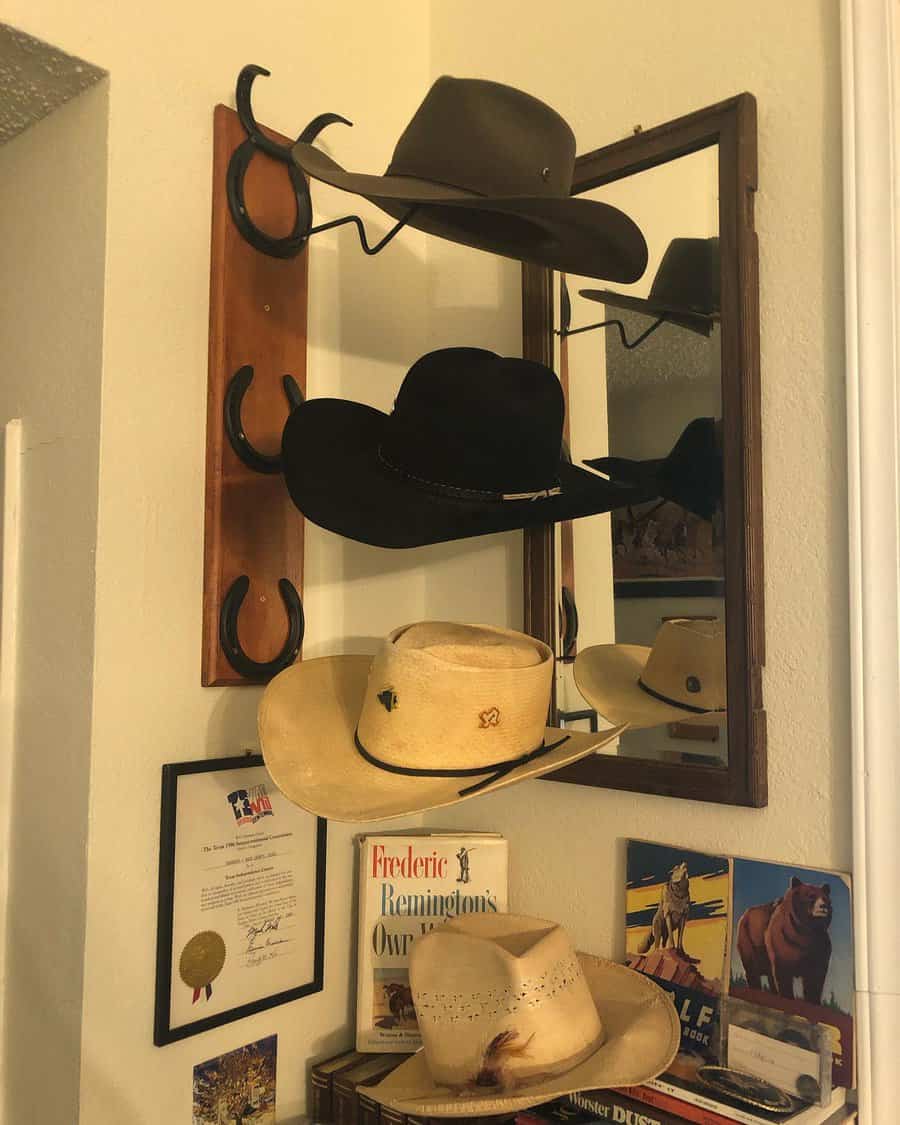
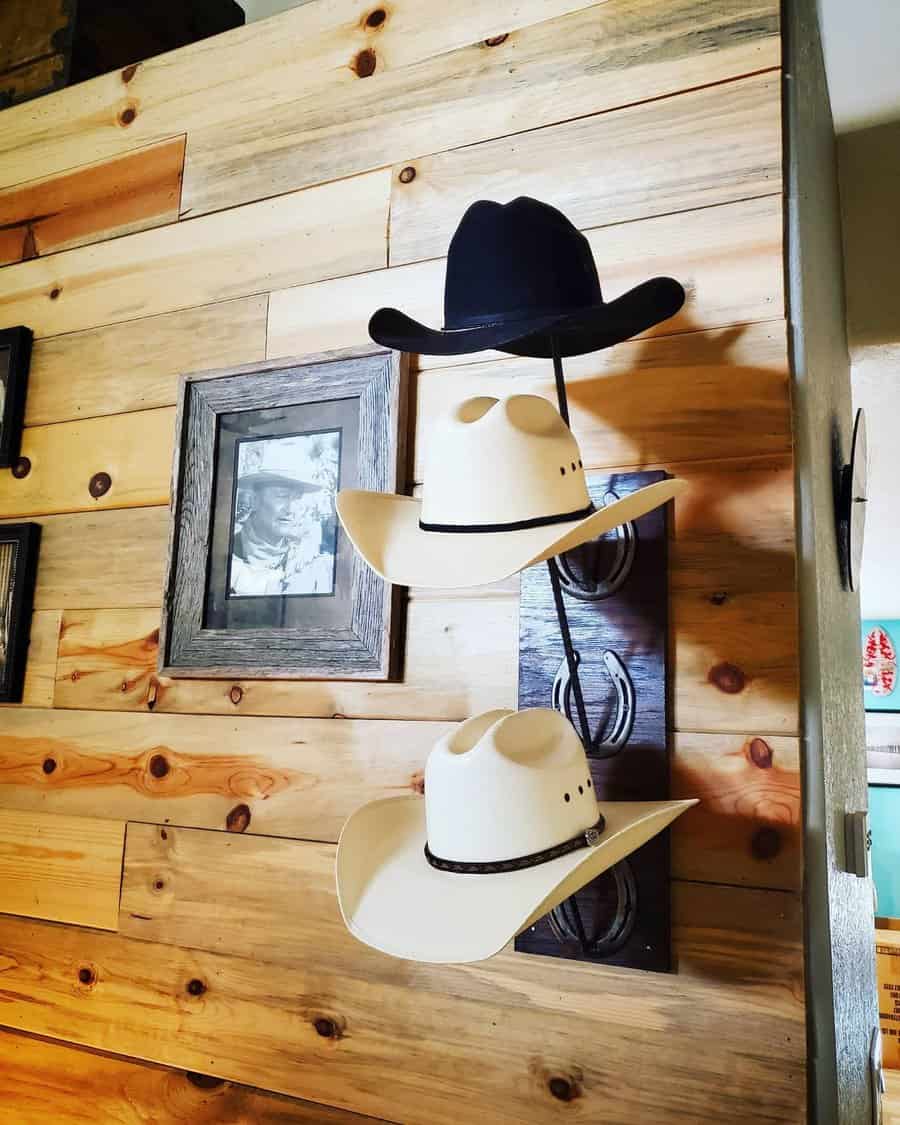
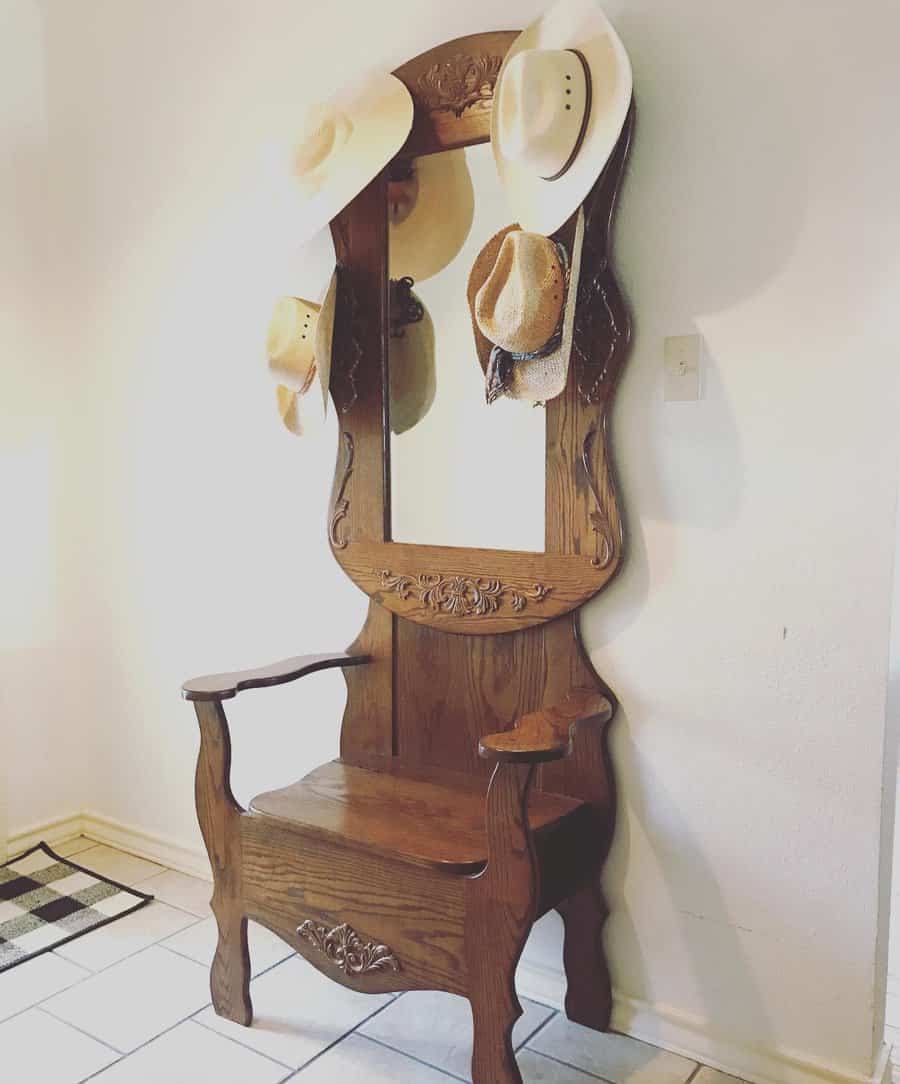
6. Add Horseshoe Elements For Cowboy Hats
If you’re looking to add a rustic touch of country charm to your home, try a hat rack with horseshoe details. Perfectly designed for cowboy hats, this hat rack will bring the look and feel of the Wild West into any room in your home.
Crafted from wood and adorned with horseshoe accents, a cowboy hat rack is sure to put some twang in any space while keeping your hats safe and clean!
Source: @rusticwrench via InstagramSource: @callahanclutter via InstagramSource: @az_maidenmetal via InstagramSource: @thirdbluffshop via Instagram
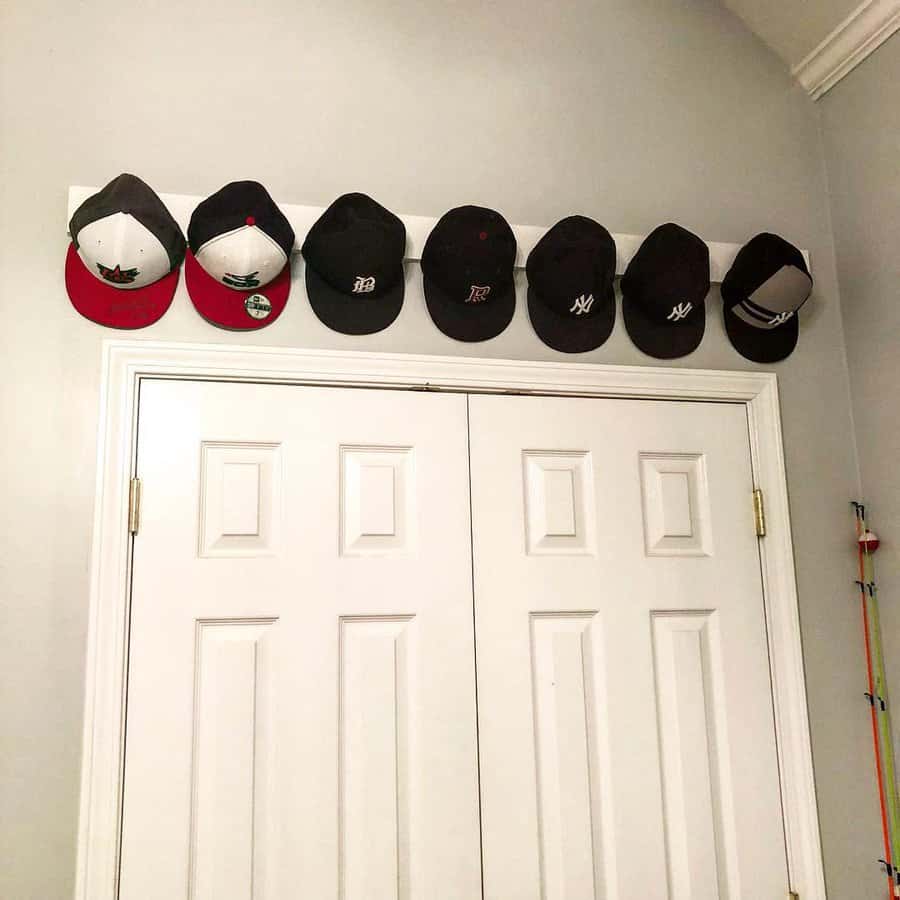
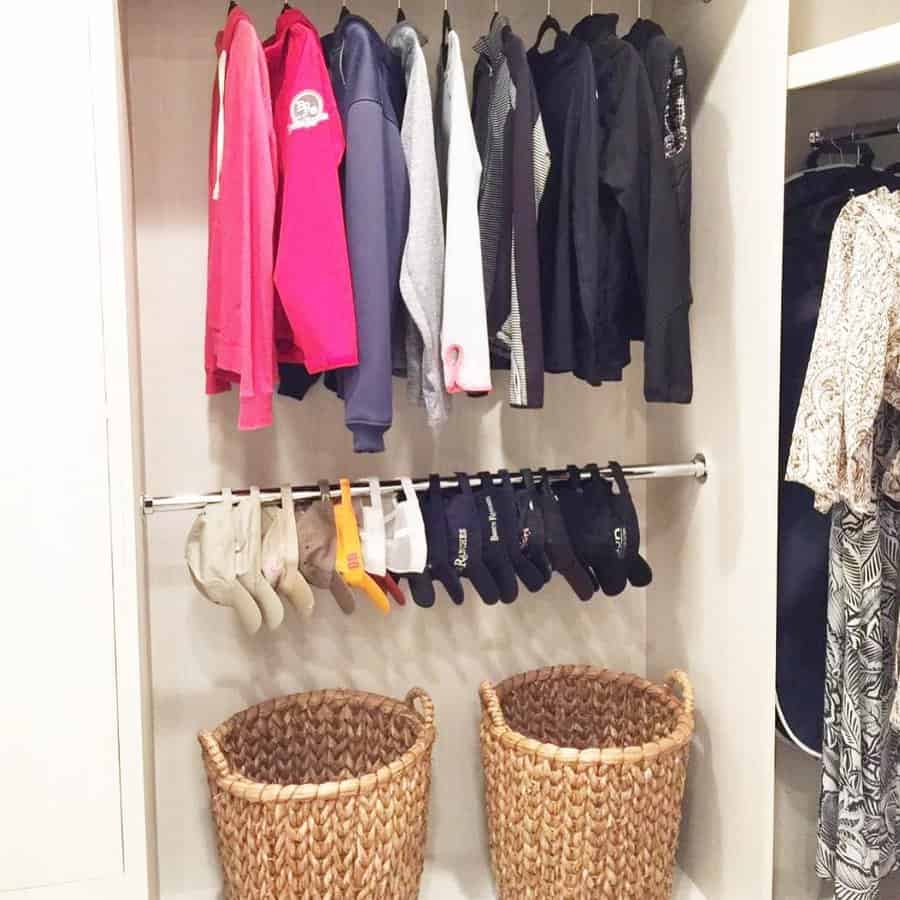
7. Utilize Your Closet
The space-saving benefits of a closet hat rack are undeniable. Instead of cluttering your shelves or room with loose hats and other accessories, you can utilize hangers and poles to provide the space you desperately need in your closet.
Not only will it provide the space for the things that are essential to keeping up with the latest trends, but it will also help keep your wardrobe organized and looking clean. The convenient design of a closet hat rack allows it to fit even in the smallest spaces, so don’t let space limit your style.
Source: @ocdaz via InstagramSource: @lizhollemanorganizingsolutions via Instagram
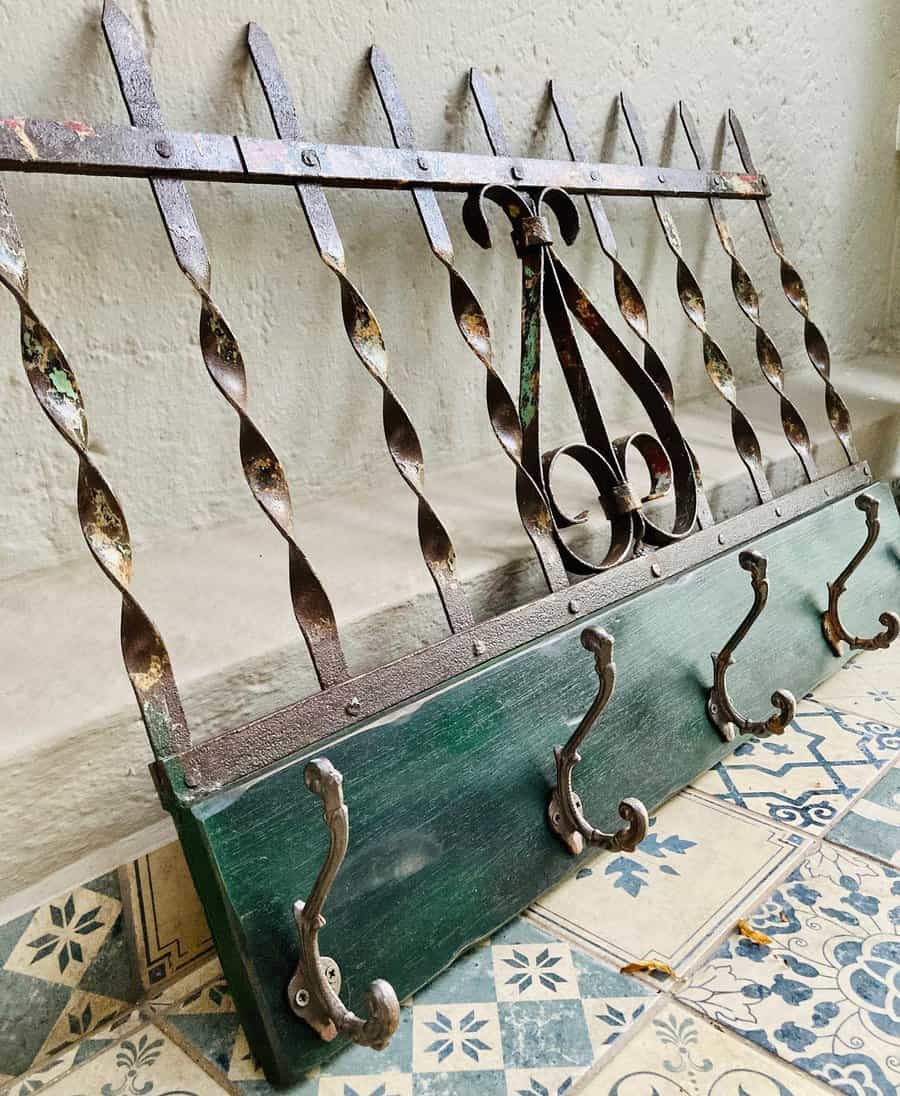
8. Repurpose Materials For An Artistic Look
If you’re looking to give your home a unique, rustic touch, why not repurpose an old hat rack? Such a repurposed accessory can draw the eye from anywhere in a room and add an interesting look to your decor.
With distressed and reclaimed wood, you can create something that looks as if it comes straight out of yesteryear. Whether you use it to store hats or simply fill the empty space, repurposing a hat rack is sure to make your home feel more cohesive and inviting.
Source: @darrenscottdesign via InstagramSource: @out_standing_in_the_shop via InstagramSource: @gccustomcharacter via InstagramSource: @bh_weld_repair_rebuild via InstagramSource: @luluandjessvintage via InstagramSource: @sheredecor via InstagramSource: @jdmcclurg via InstagramSource: @rockwooddesigns_tonycurtis via Instagram
9. Go For Rustic Charm
Stepping into a living room adorned with a distressed wood rustic hat rack is like taking a step back in time. This vintage style is an ideal way to keep your hats safe and secure while adding oodles of charm to your space.
The distressed finish adds the perfect lived-in and cozy look that complements any style, modern or classic, country or suburban – you name it. Add some hooks for coats and scarves, too; it’s the perfect rustic storage solution!
Source: @intentionalrust via InstagramSource: @mopar_mackay via InstagramSource: @texasrusticdecor via Instagram
10. Set Up A Wall-Mounted Rack
A wall-mounted hat rack can be a necessity in any abode, allowing for easy storage and convenient access to your favorite hats. But why settle for basic wall-mounted options when you can get creative and opt for a wall-mounted hat rack with hooks and shelves?
These wall mounts not only look chic but also provide extra functionality to keep all your hats looking neat and tidy. Plus, the shelf comes in handy for storing jewelry or other small accessories to complete your look. Get yours now to enjoy convenient storage year-round!
Source: @sawdust_creations_south_africa via InstagramSource: @lohanwoodworkingco via Instagram
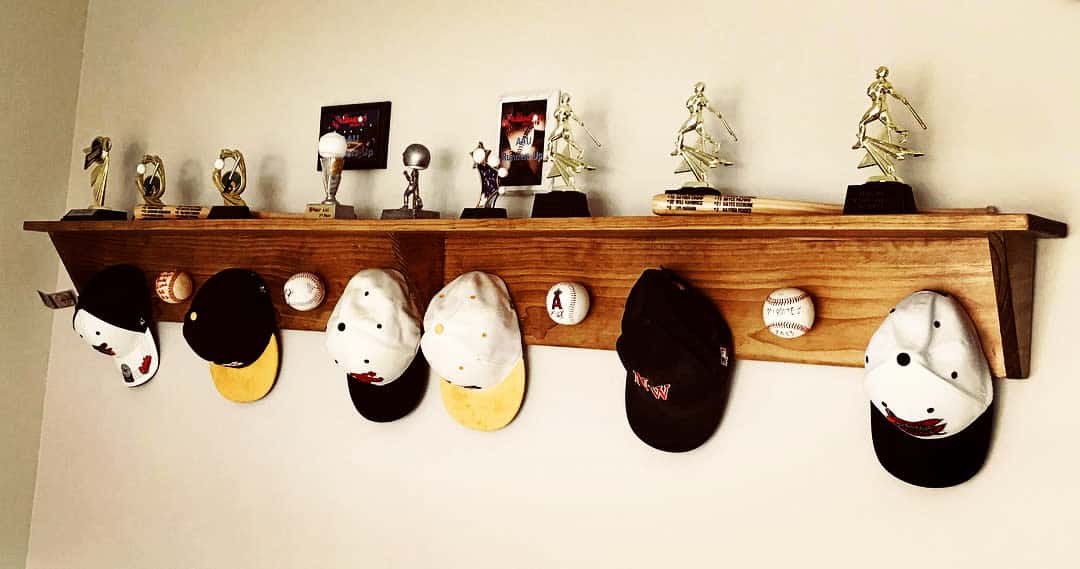
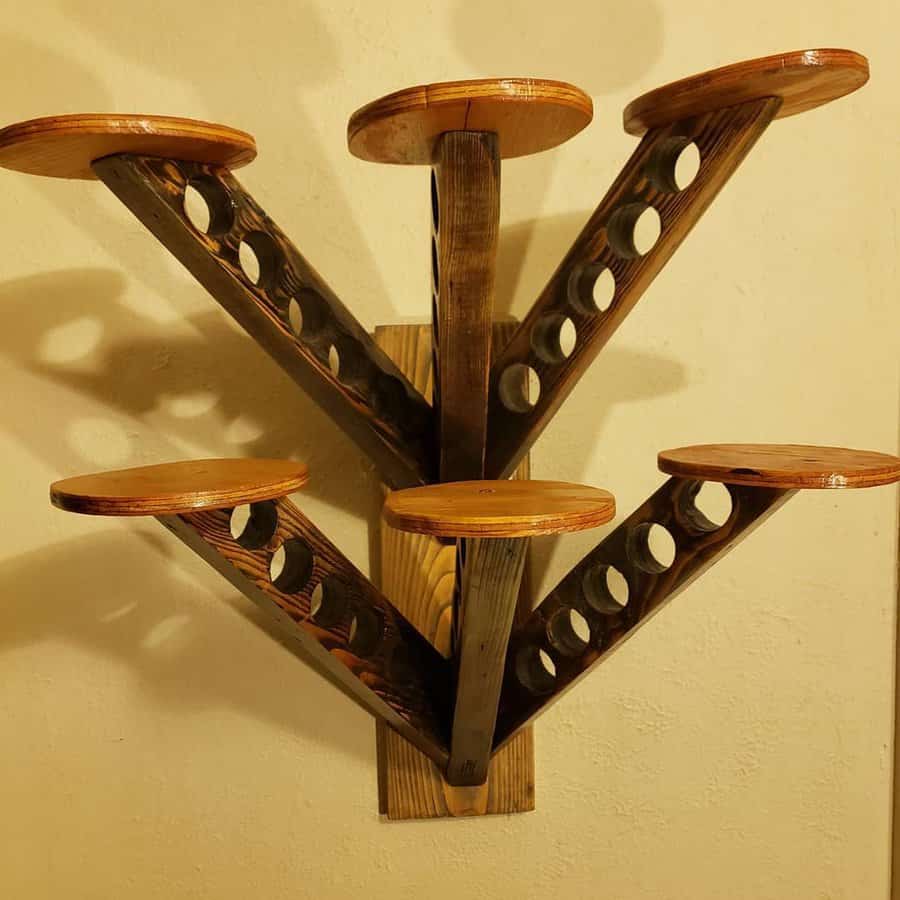
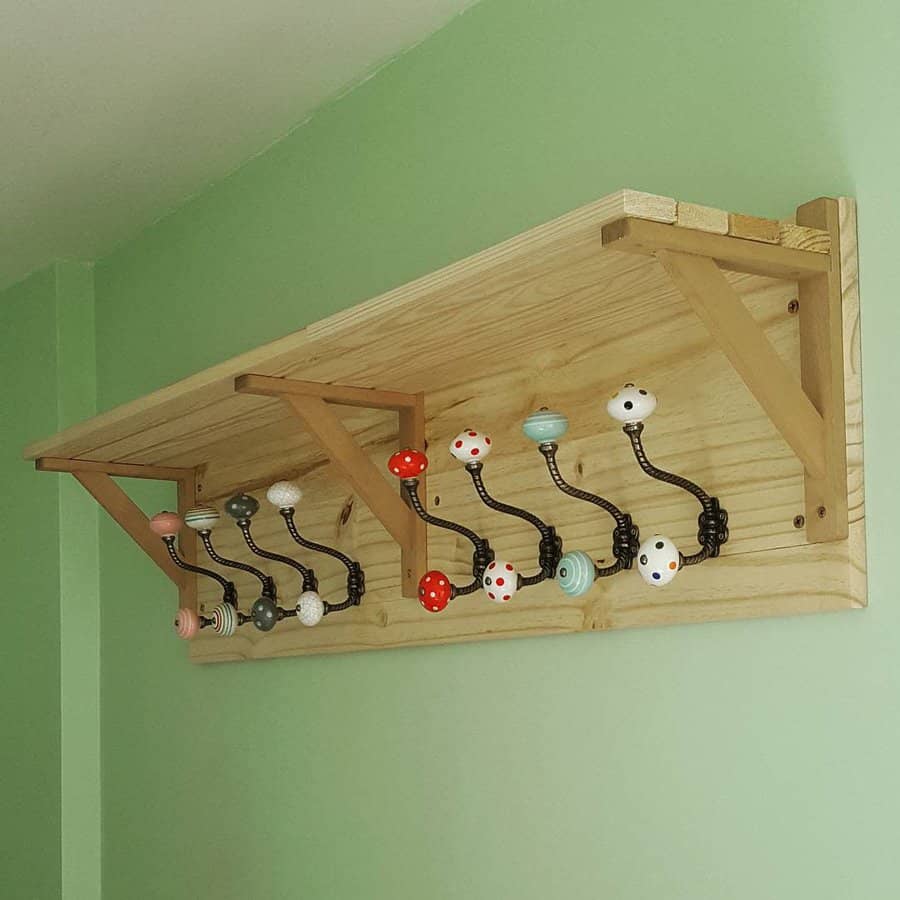
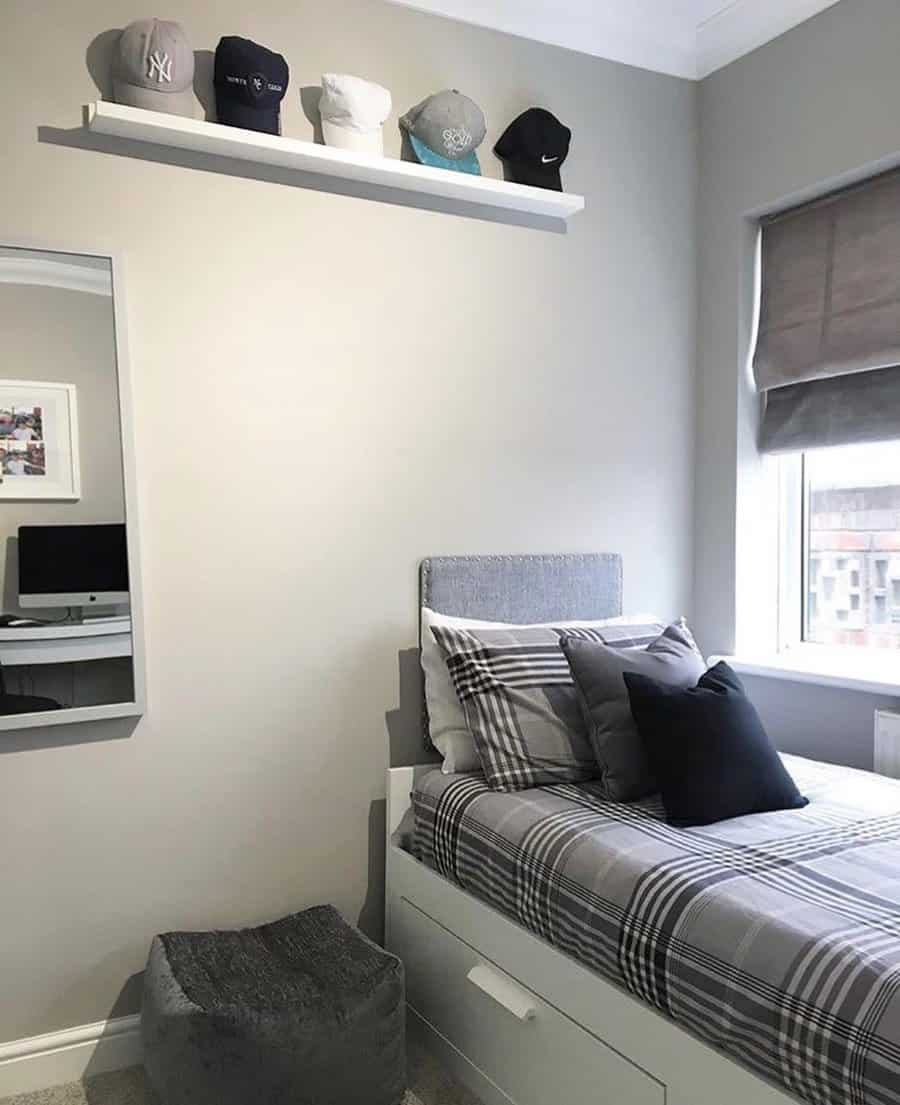
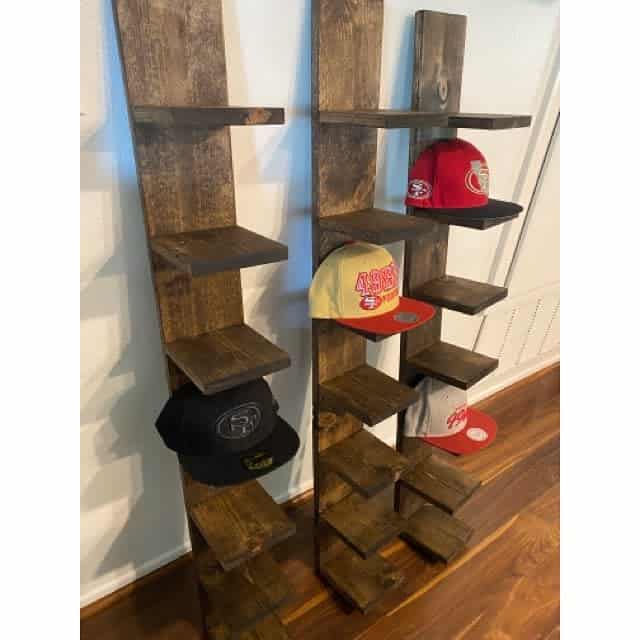
11. DIY A Hat Shelf
A hat shelf is a great way to add an element of practicality and style to any room. Not only does it provide easy organization for all your favorite hats, but because it’s movable, you can easily change the look of your decor whenever needed.
Its streamlined design brings modern functionality to any space. Whether you want a hat handy by the door or just need a convenient place to store your collection, hat shelves are the perfect solution.
Source: @mattofmanytrades via InstagramSource: @timmyfreshbrand via InstagramSource: @indisneny via InstagramSource: @michellevalentinem via InstagramSource: @vargas.farmhouse_funiture via Instagram
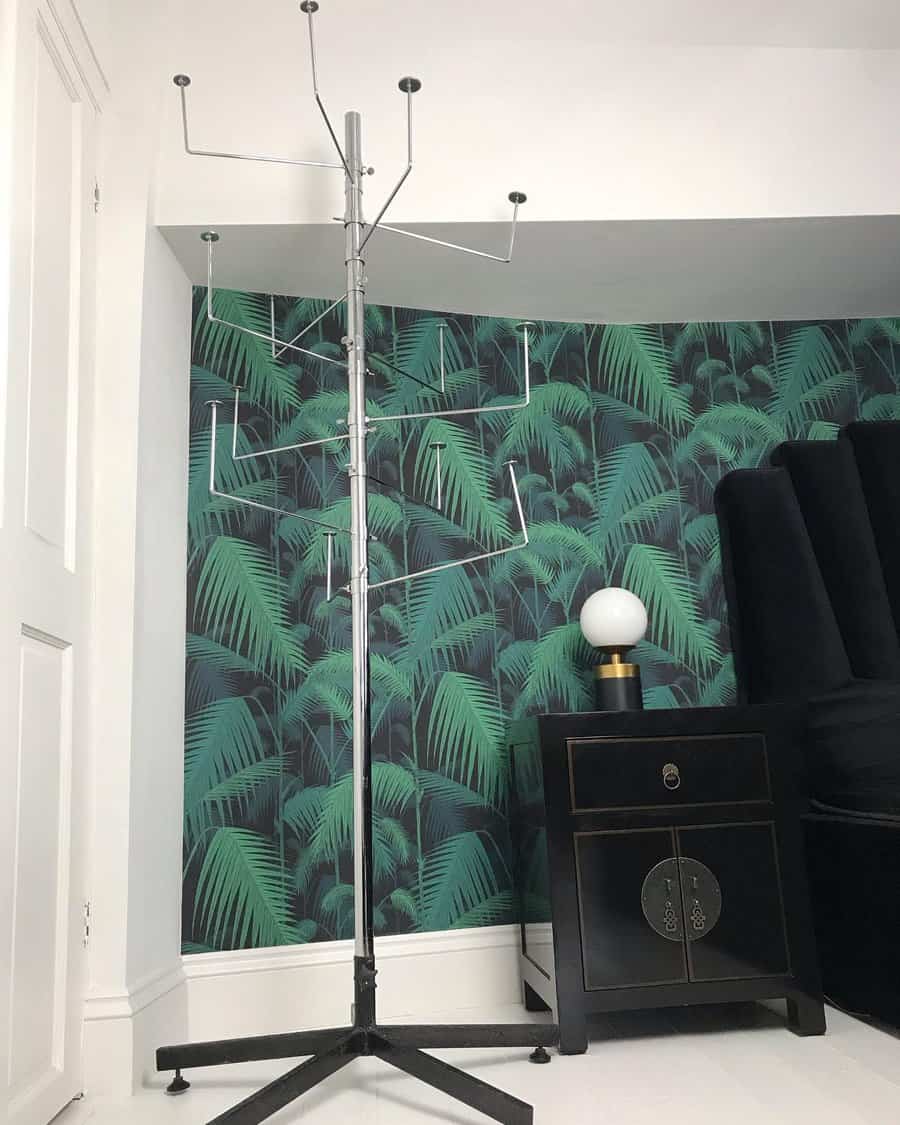
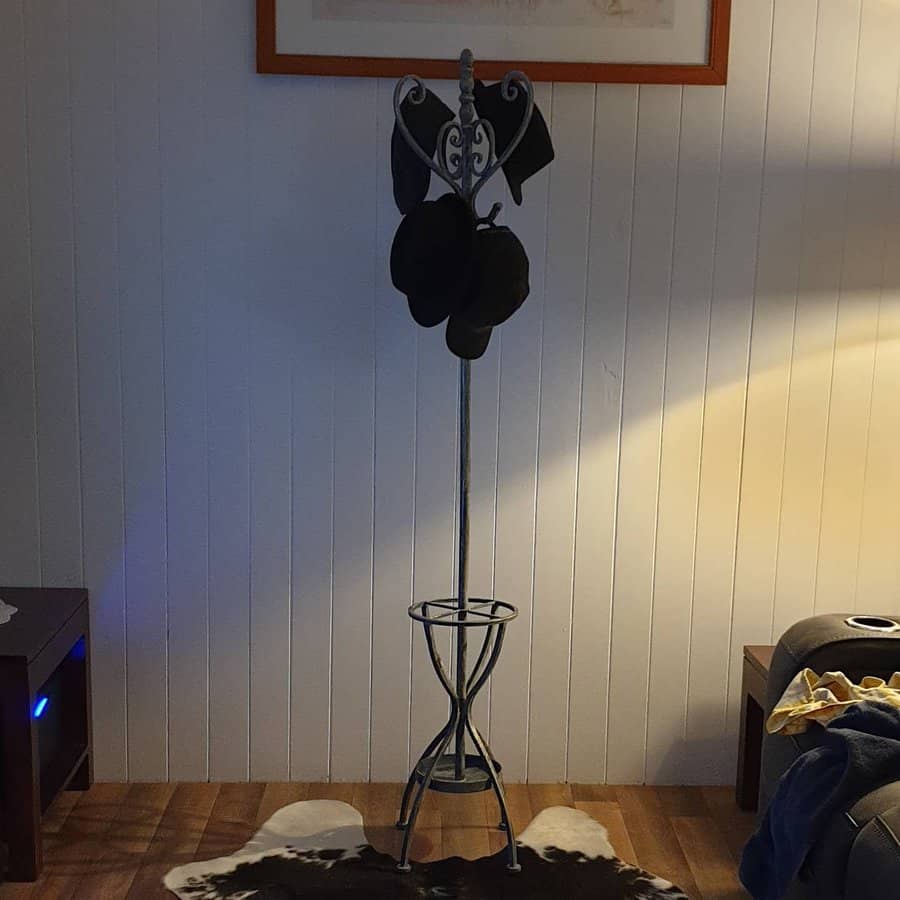
12. Opt For A Movable Stand
For those looking for an effective way to organize and stylishly display their favorite hats, a movable hat rack stand is the perfect solution. A movable hat stand can provide easy access and convenience while allowing the wearer to keep multiple types of hats well-organized with the help of its multiple hooks.
Not only that, but these stands can also be easily moved when necessary, making them ideal for storing hats away during transitioning seasons or while undertaking any changes in your home décor.
So if you want a statement piece to bring together your headwear collection, why not make it a movable hat rack stand?
Source: @atomicgoose.decor via InstagramSource: @lisajwaddo via Instagram
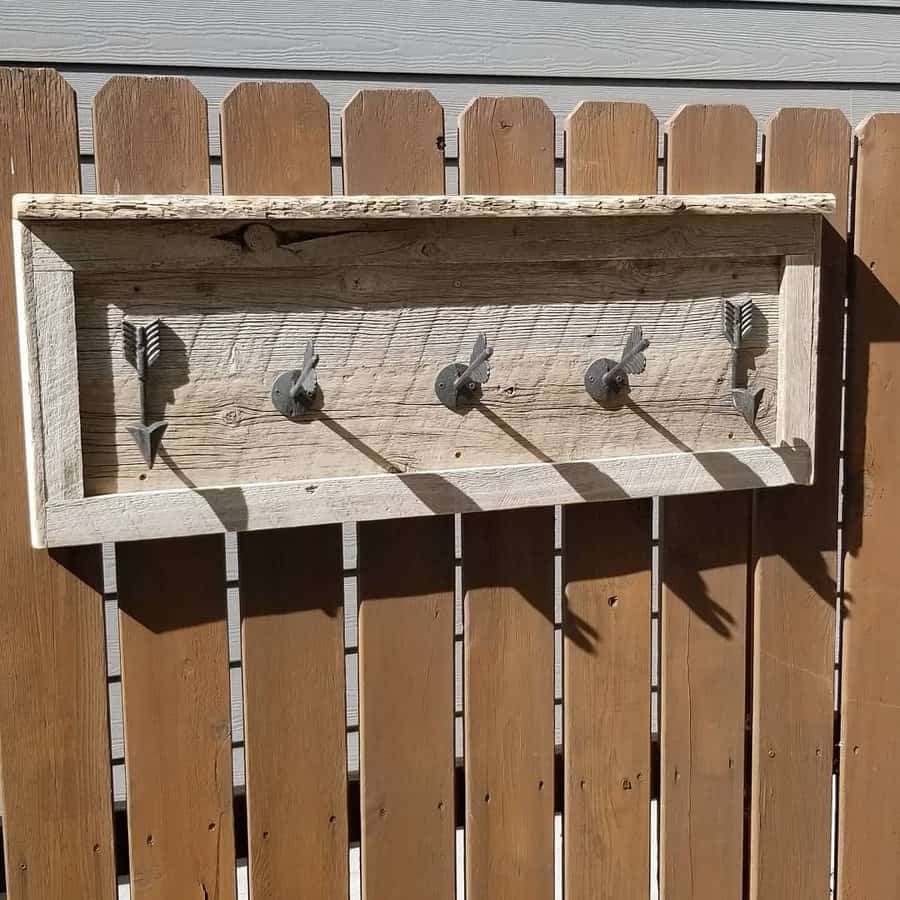
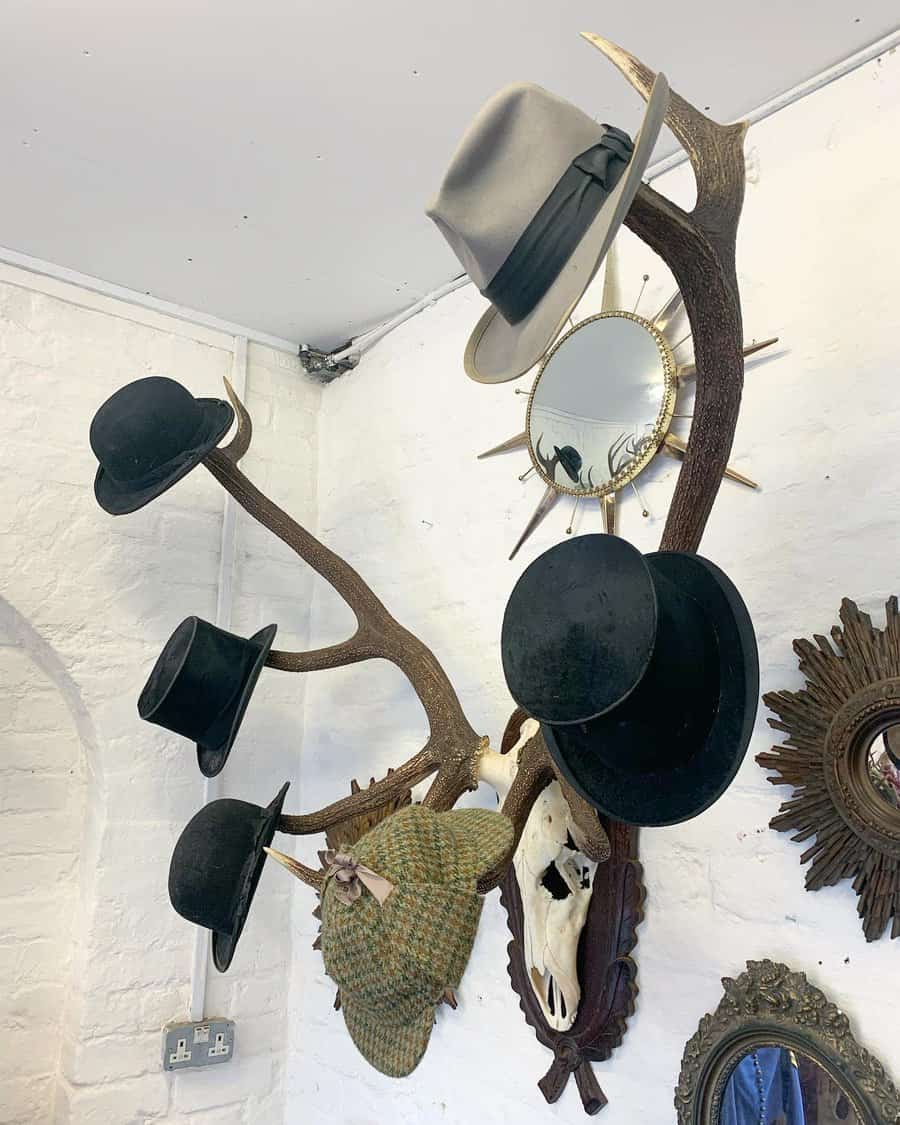
13. Turn A Deer Horn Into A Rack
Although most hat racks are mundane pieces of wall decor that fade into the background, wall-mounted deer horn hat racks add a creative and stylish touch. This type of hat rack looks attractive when hung near a door or an entryway, adding texture and complexity to your wall décor.
The deer horn design allows for hats to be hung in an artistic way far from the ordinary standard. Not only is this wall-mounted deer horn hat rack aesthetically pleasing, but it can also double as a conversation starter due to its unique shape.
Source: @20th_century_funkin_junk via InstagramSource: @rmouldingandco via Instagram
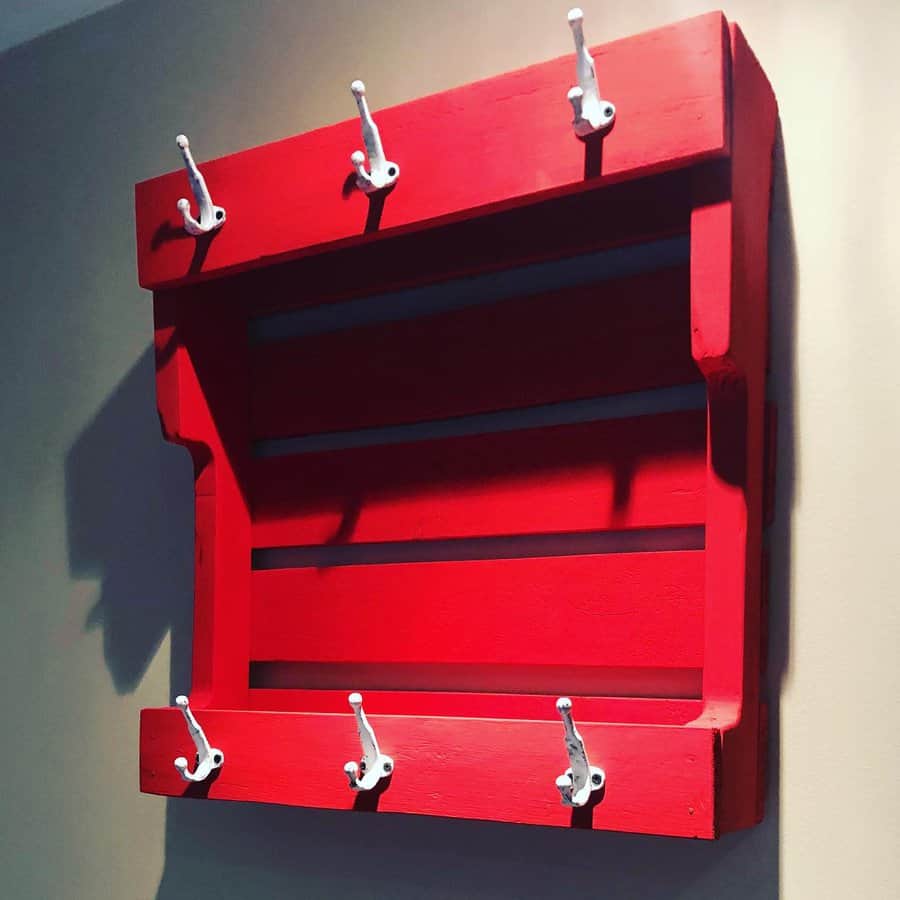
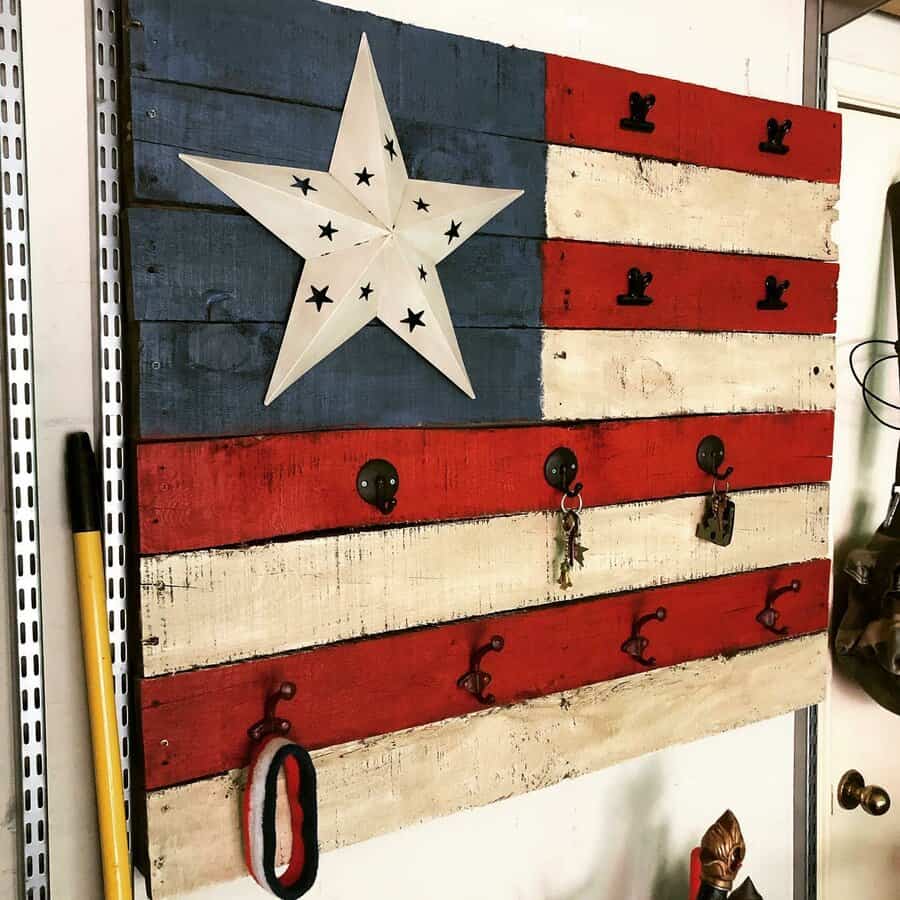
14. Paint Over It To Make A Statement
Hat racks seem like such mundane items, but with a painted hat rack, you can transform the purpose from merely utilitarian to artistic! Hat racks are an often overlooked piece of décor that can enhance your home. Use it for its original purpose or simply for display by hanging other pieces of art, such as hats, scarf, and jewelry.
For a vibrant look, opt for a painted hat rack crafted from wood finished in hundreds of paints and stains. A painted hat rack is a simple yet versatile way to add some personality to any room.
Source: @_scoleman_ via Instagram
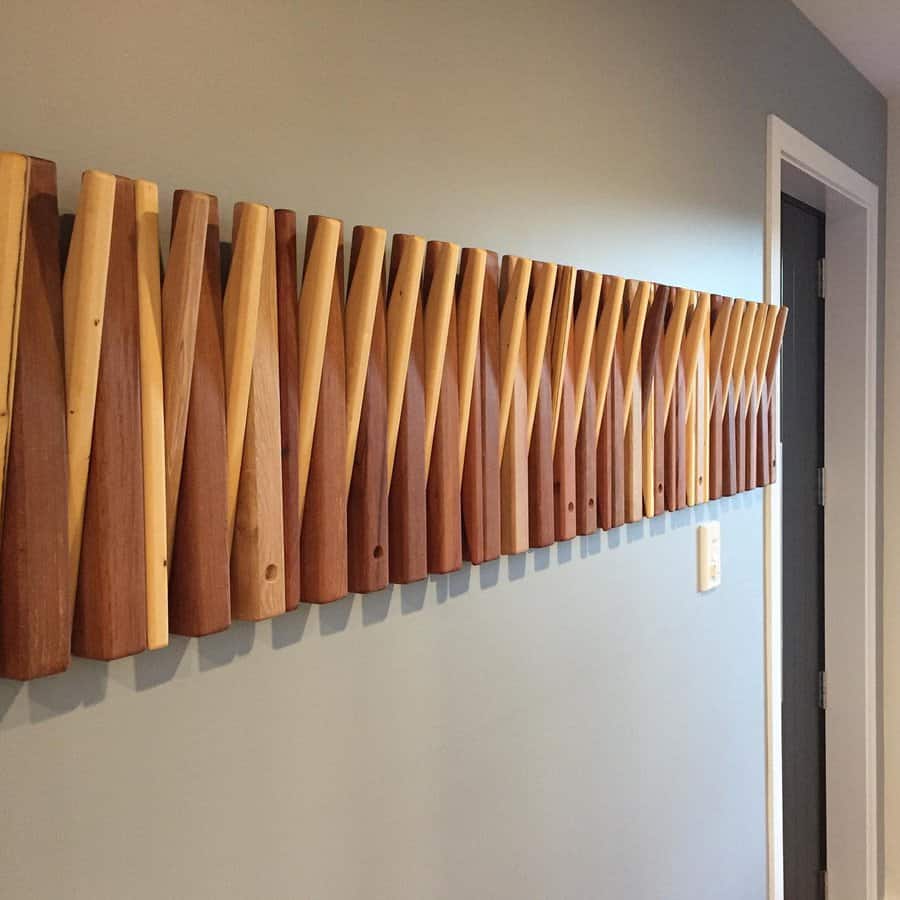
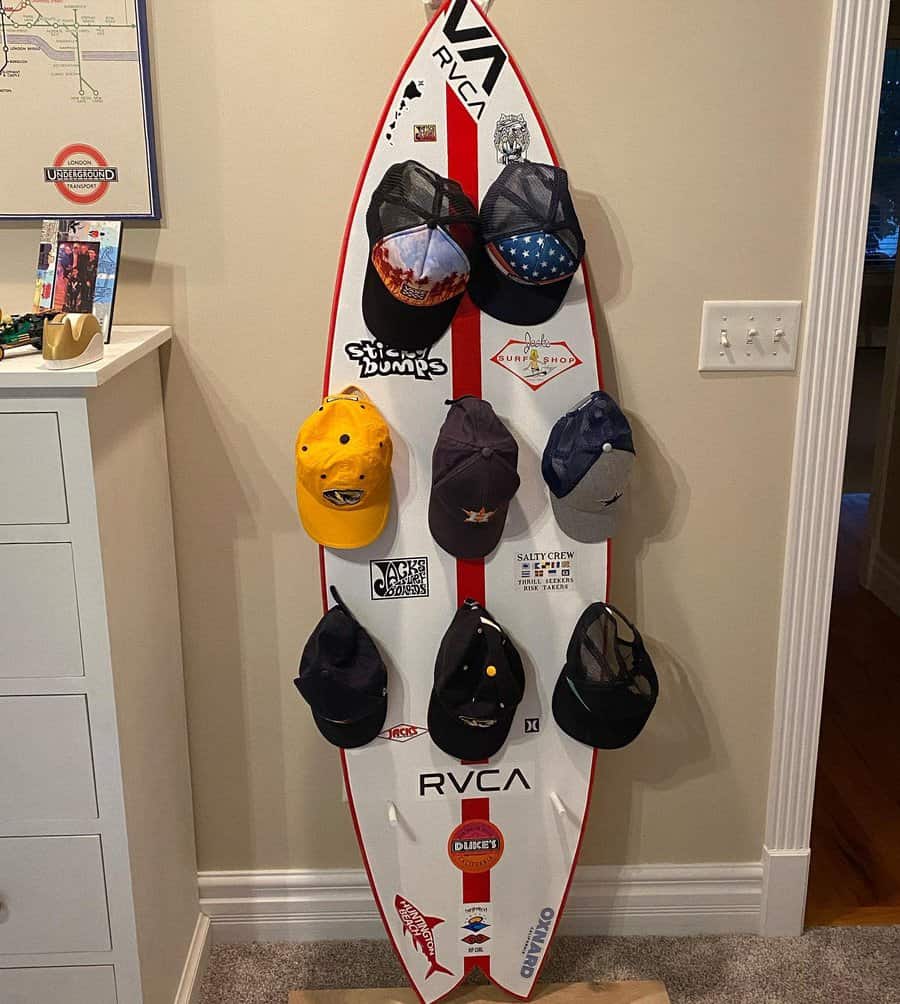
15. Add An Element Of Surprise
Give an old surfboard or wall-mounted rifle a new, creative purpose by repurposing them as a unique hat rack! Not only will these items add an unexpected element of surprise to your home decor, but they’ll also provide you with some eye-catching places to hang your hats.
Choose a spot in your entryway or hallway and secure the old surfboard or wall-mounted rifle securely so that it won’t shift during use, then get creative with the placement of different types of hooks and hangers to make a truly individualized display.
Not only is this a great way to show off and store your headgear, but it’ll bring life to otherwise overlooked decorations in your home.
Source: @ccothren via InstagramSource: @jaredforgey via Instagram
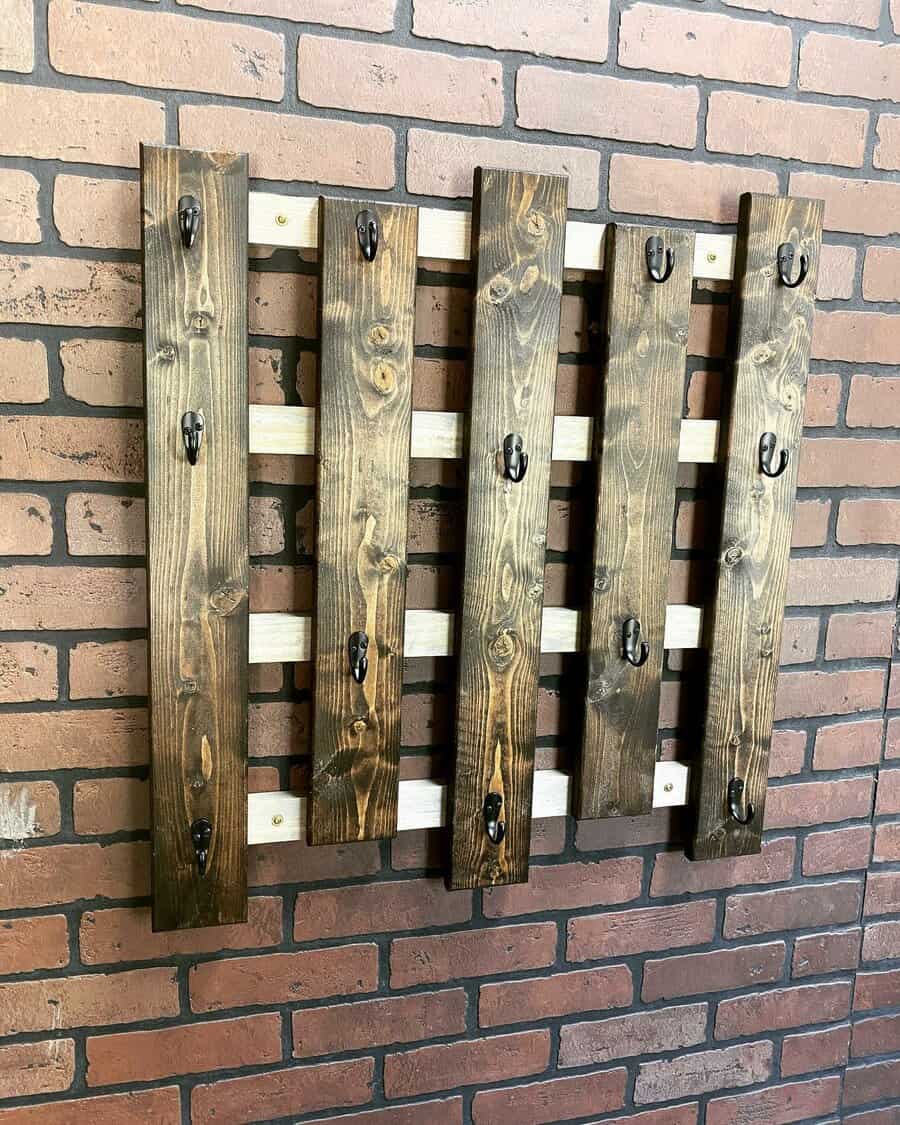
16. Go For A Seamless Look With Wall Mounted Hooks
For those looking to get creative with their wall space, a wall-mounted hat rack is a way to go. Not only does it provide seamless decoration, but it also serves as an instant storage solution for all your hats and caps. With wall hooks placed in any layout imaginable, you can now add even the most eclectic pieces to your wall without making the room look cluttered.
Plus, wall-mounted racks have the added bonus of being easily customizable – which makes them a great option if you’re looking for a minimalist style. So why not turn your wall into a functional art piece that stores all your hats?
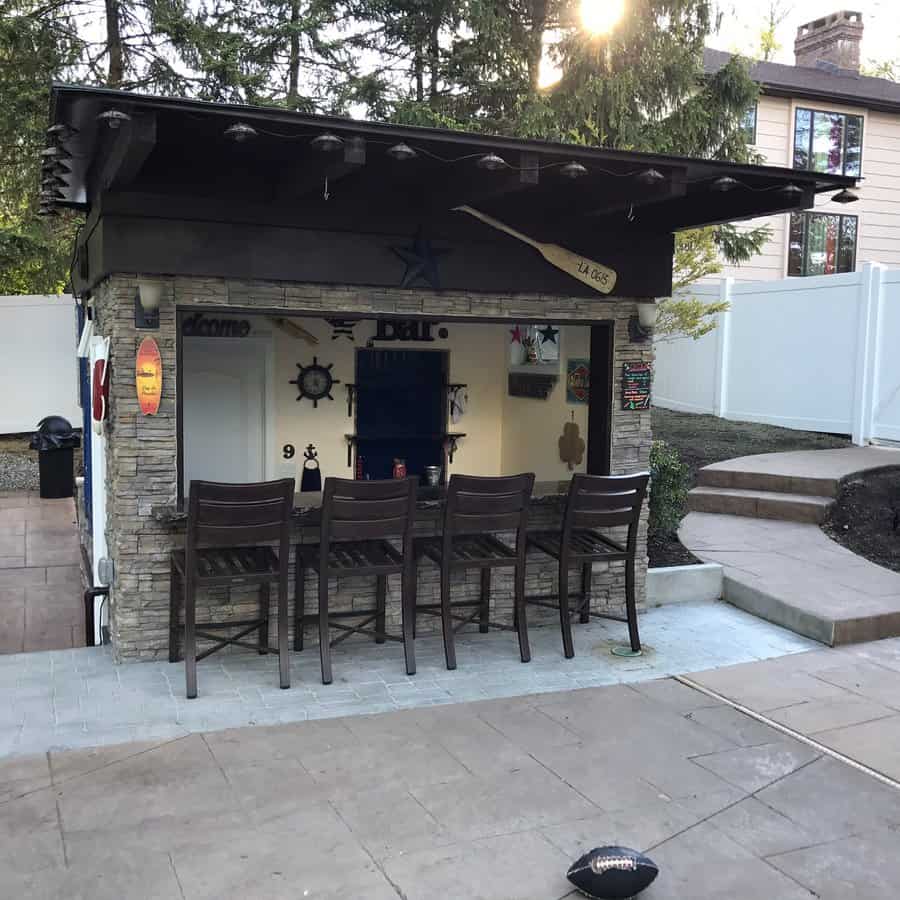
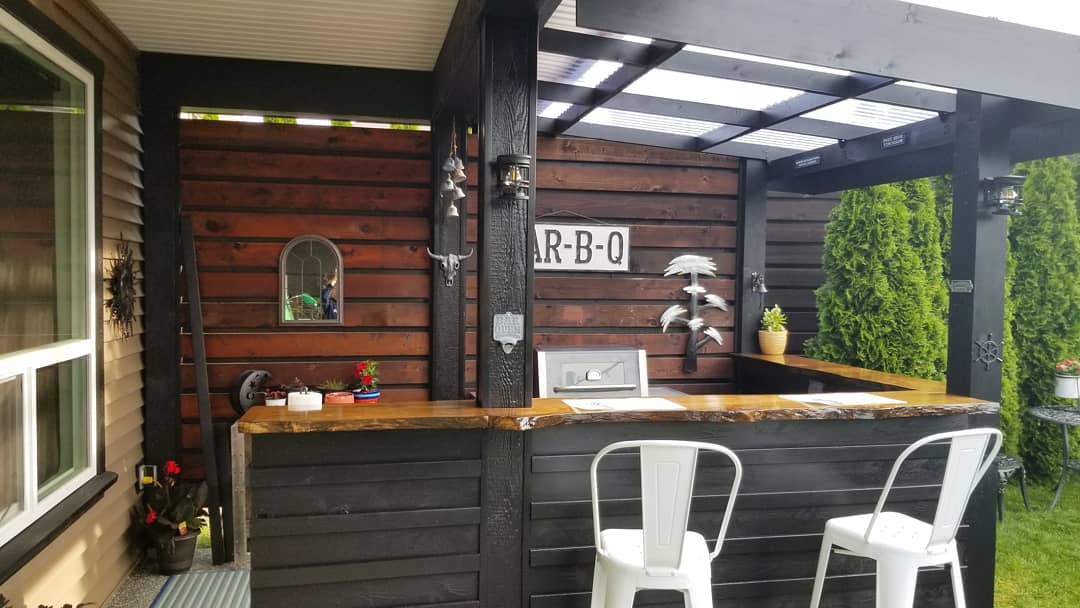
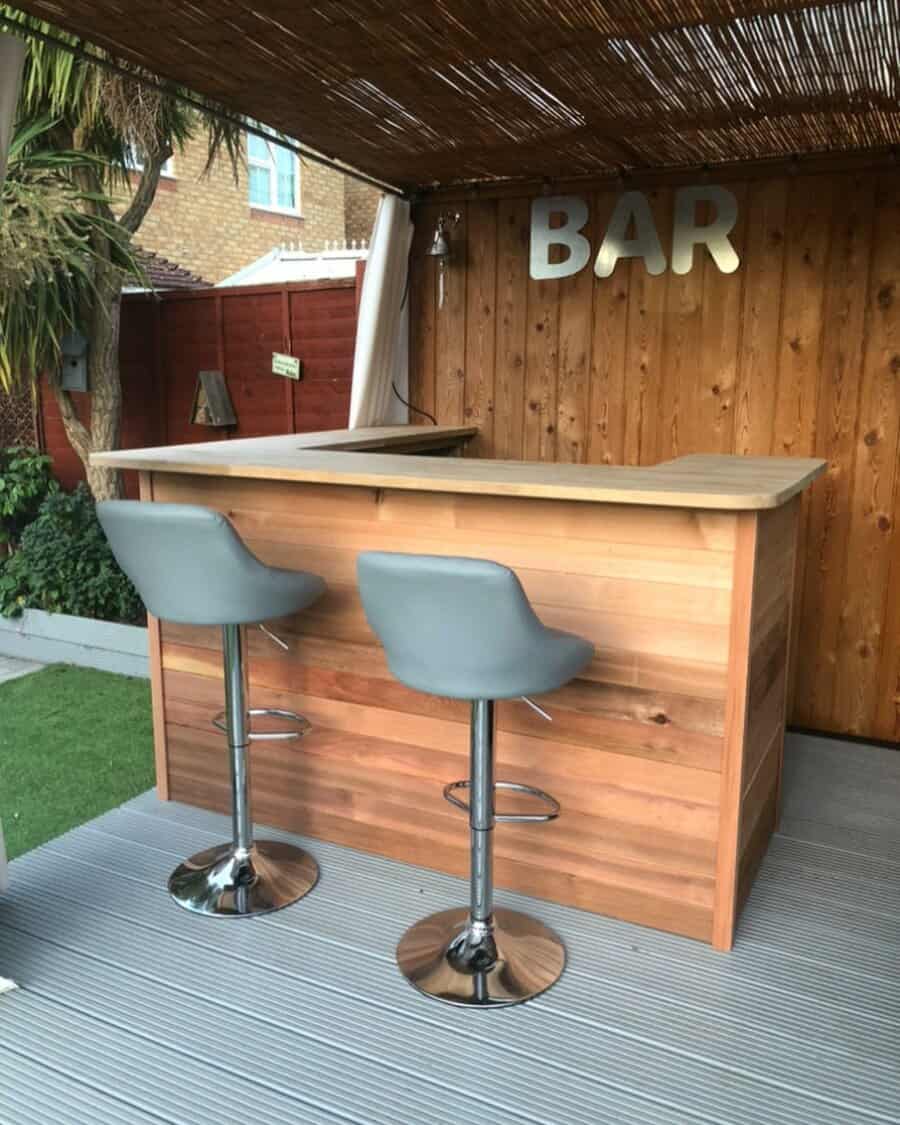
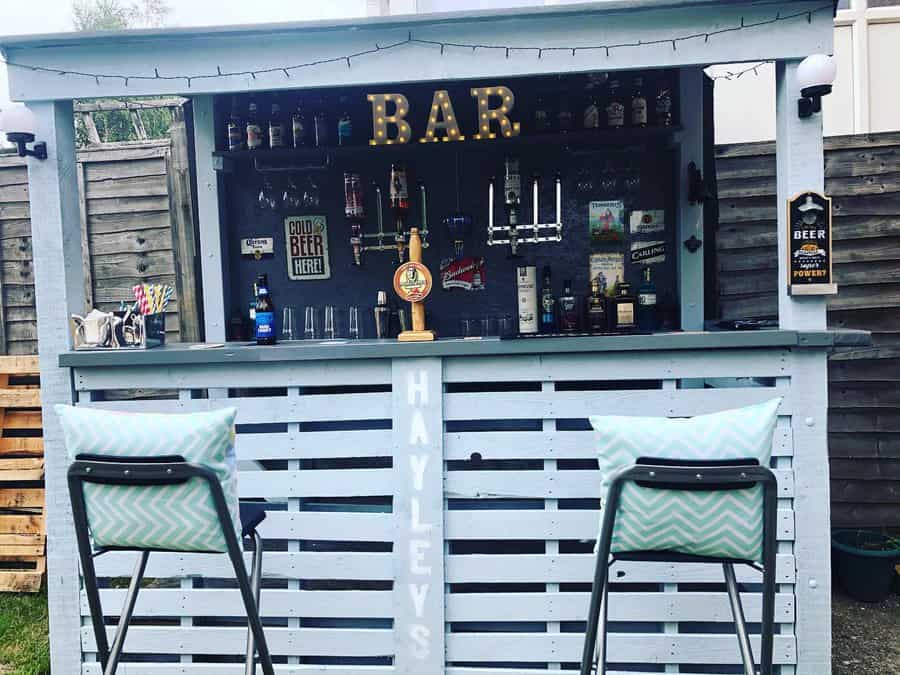
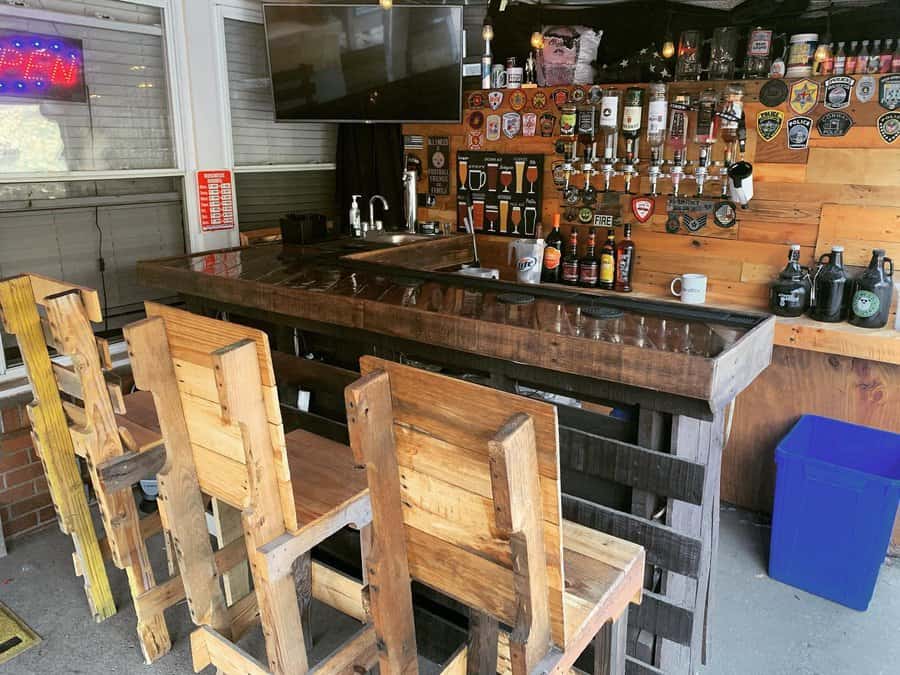
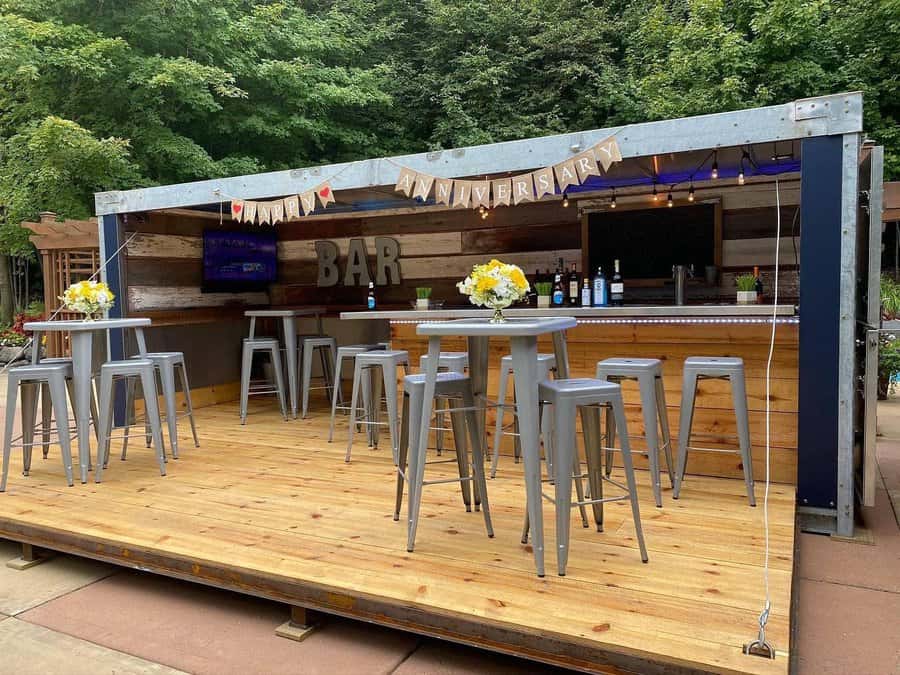
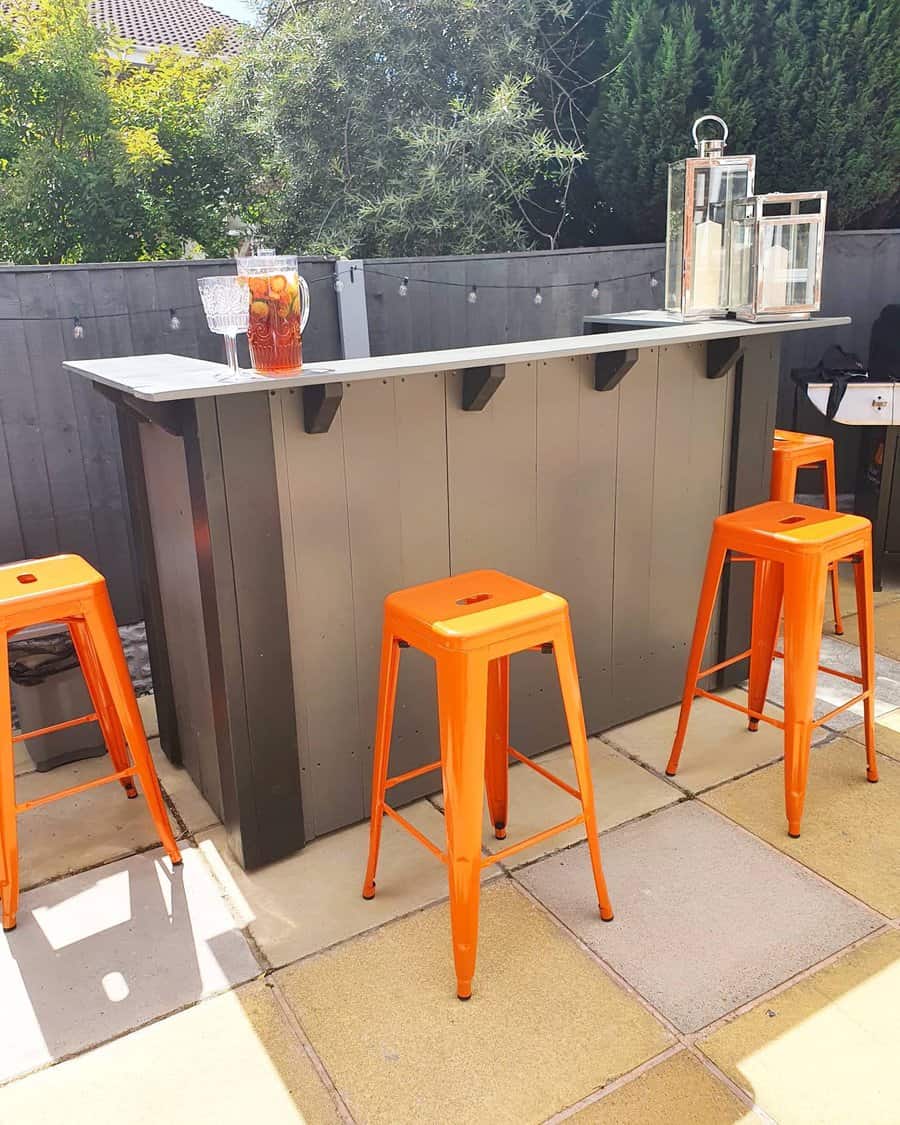
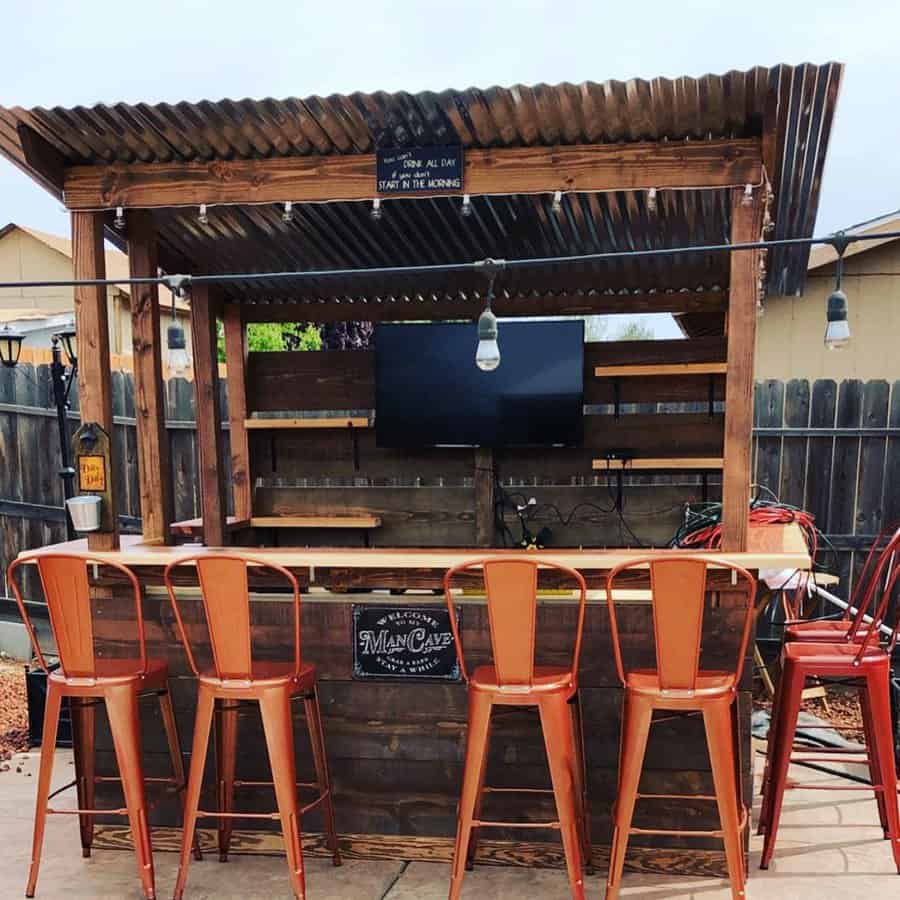
You love your man cave and wouldn’t give it up. However, it forces you to stay stuck inside. This isn’t appealing when the weather is warm, the sun is shining, and summer is in full swing. What you need is a backyard pub. This gives you the perfect place outside to enjoy a few cold drinks with friends on a Saturday afternoon.
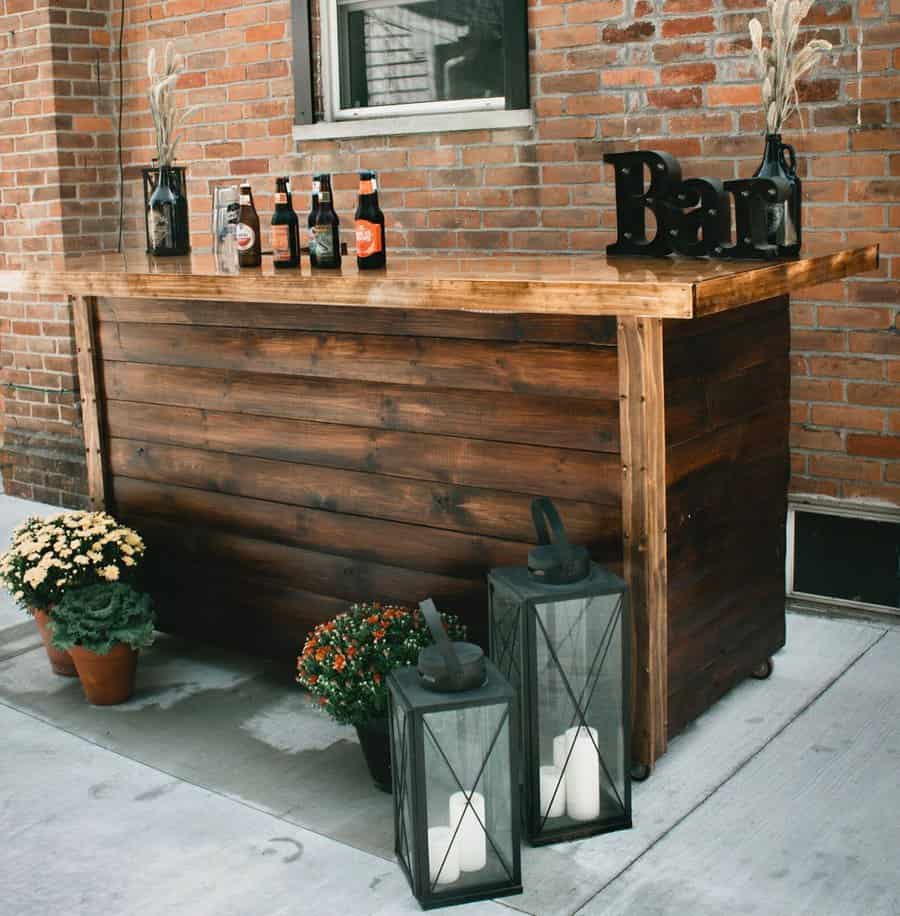
What’s nice about building your outdoor bar space is that it can be as simple or elaborate as you’d like. From a basic bar made from pallets to one that’s custom-designed and built from granite. These backyard bar ideas will help you get started building the perfect gathering place for your family and friends.
[view_toc]
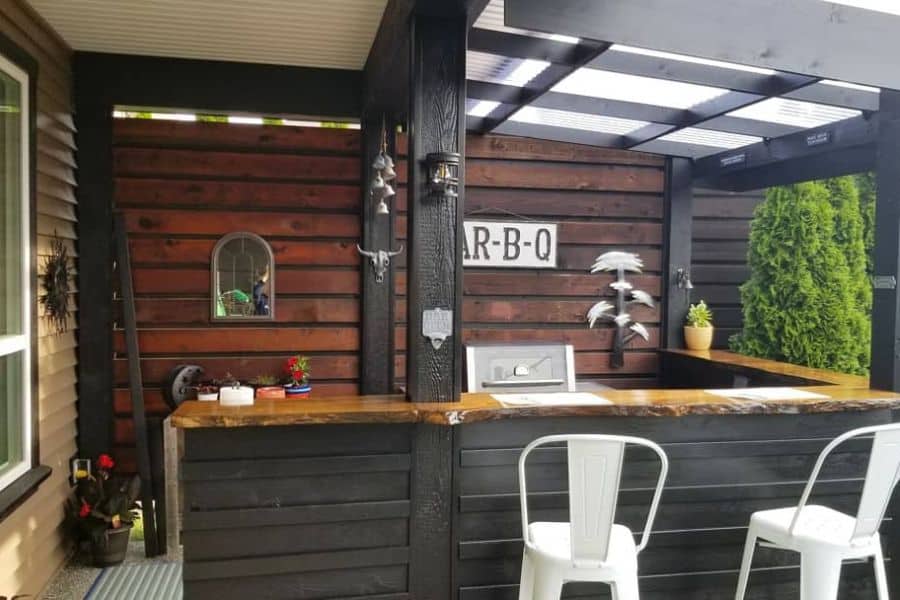
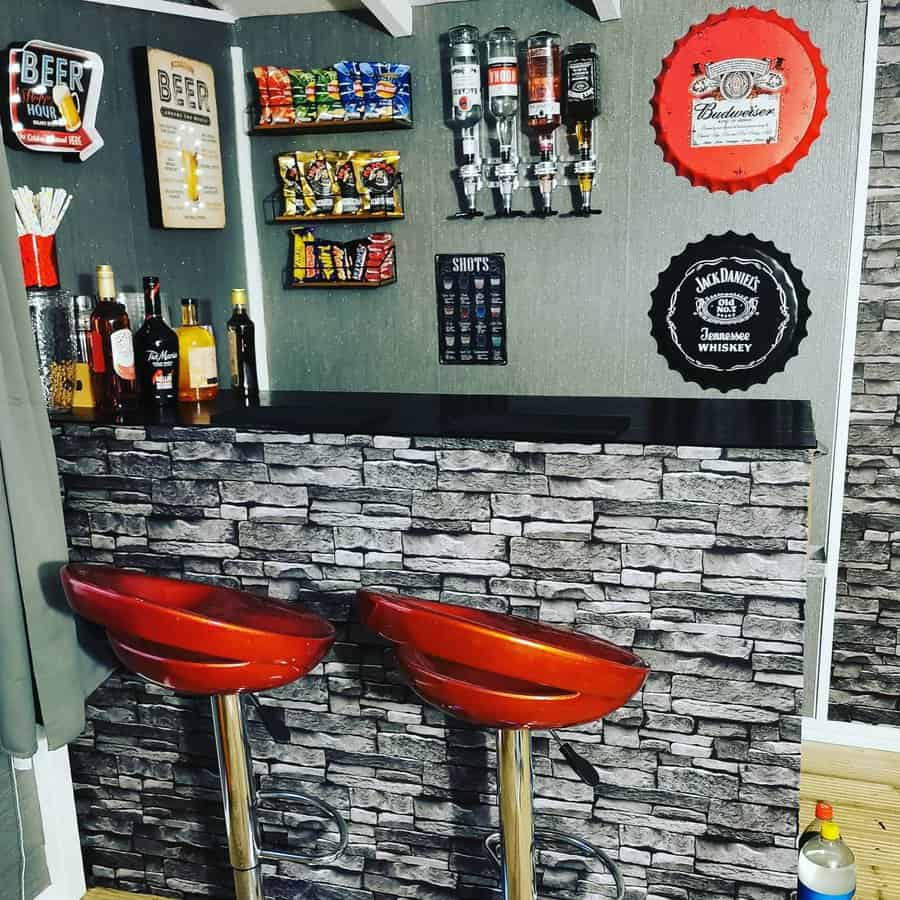
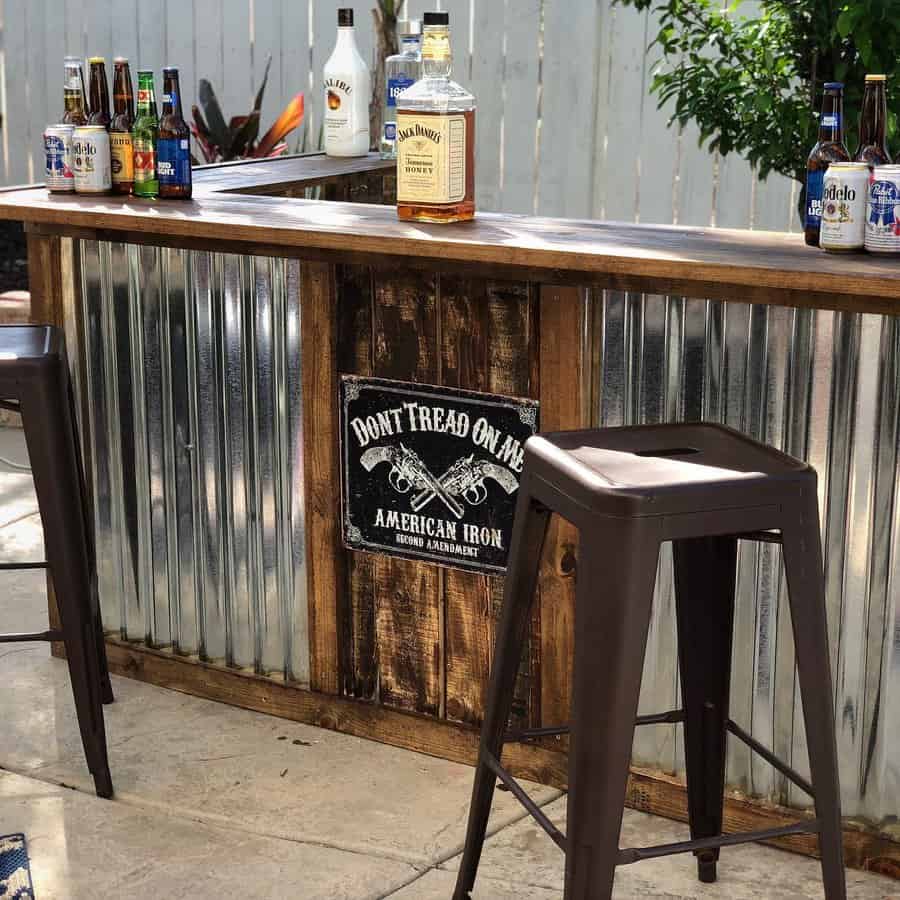
1. Explore Elegant Countertop Ideas
The countertop of your bar needs to be durable enough to withstand the weather elements. Unless you have a cover for your bar, it’ll get exposed to the sun, rain, wind, and ice. This makes some materials a bad idea. While wood is a popular choice for your bar inside, it will require a lot of upkeep to stay looking nice outside.
Source: @coopwithinacoop via InstagramSource: @corykalina via InstagramSource: @thefootrailstore via InstagramSource: @tonyconnect via InstagramSource: @ultimatetiki via Instagram
If you really want wood, try a murphy bar. It folds away flat against the wall when not in use. Then you can set it up when you need it and throw an ice chest under it. This style of op-up bar is ready when you need it and out of the way when you don’t.
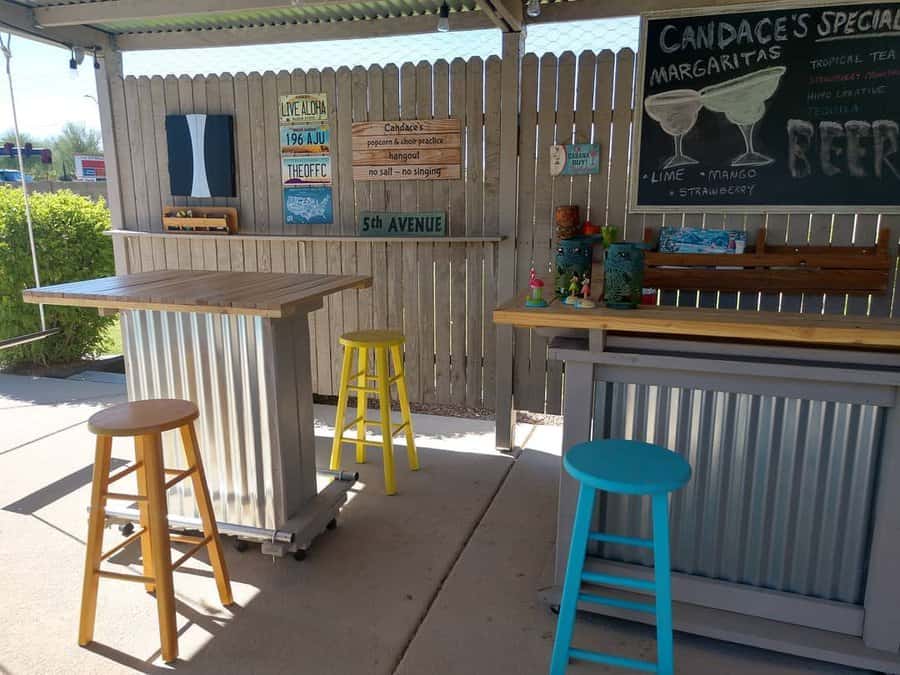
2. Discover Stylish Bar Coverings
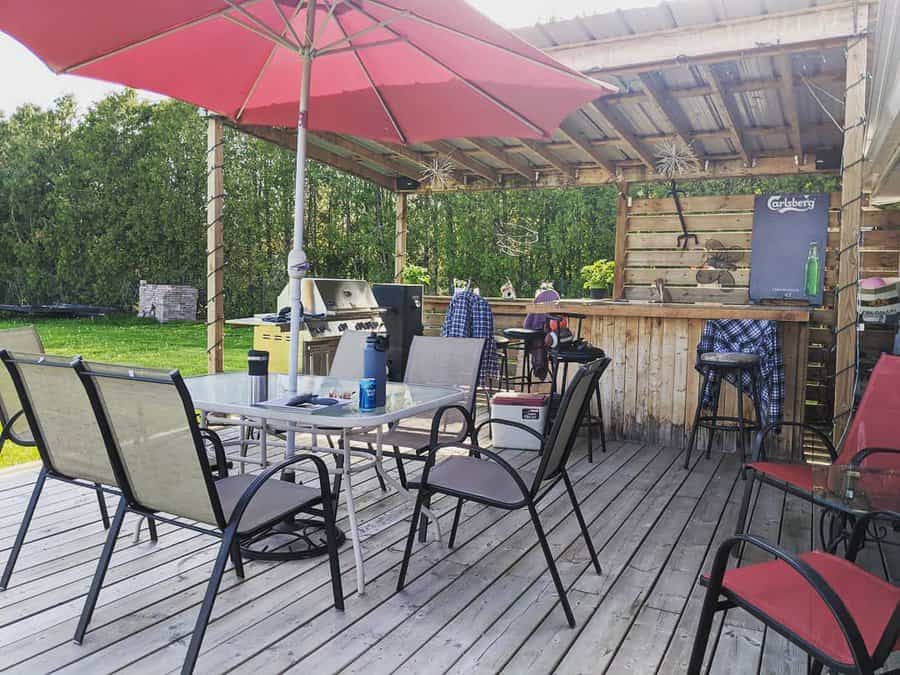
Nothing puts a damper on good times like bad weather. Add a cover to your outdoor bar and let the party continue. You can do this with a gazebo or pergola. These are structures that you can have built over your bar and surrounding area.
Source: @adam_dave_brooks88 via InstagramSource: @bamboo_bettys via InstagramSource: @cknk310 via InstagramSource: @guy_from_jersey via InstagramSource: @hey_ca_xox via InstagramSource: @mygardenbars via Instagram
While there are metal pop-up style gazebos, you’ll want to avoid these. Invest in a permanent wood frame option. This will have better durability and give you more protection. If you choose to build a pergola instead, look for one with adjustable slats on the roof. Some are manually operated and others are motor operated.
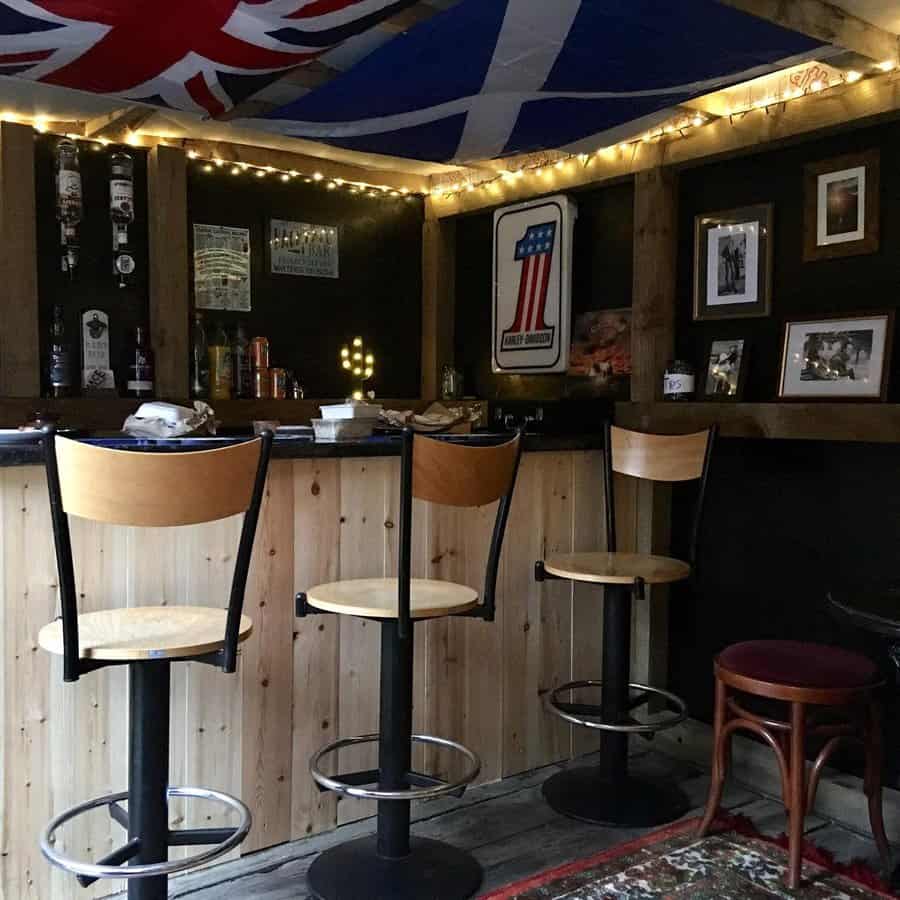
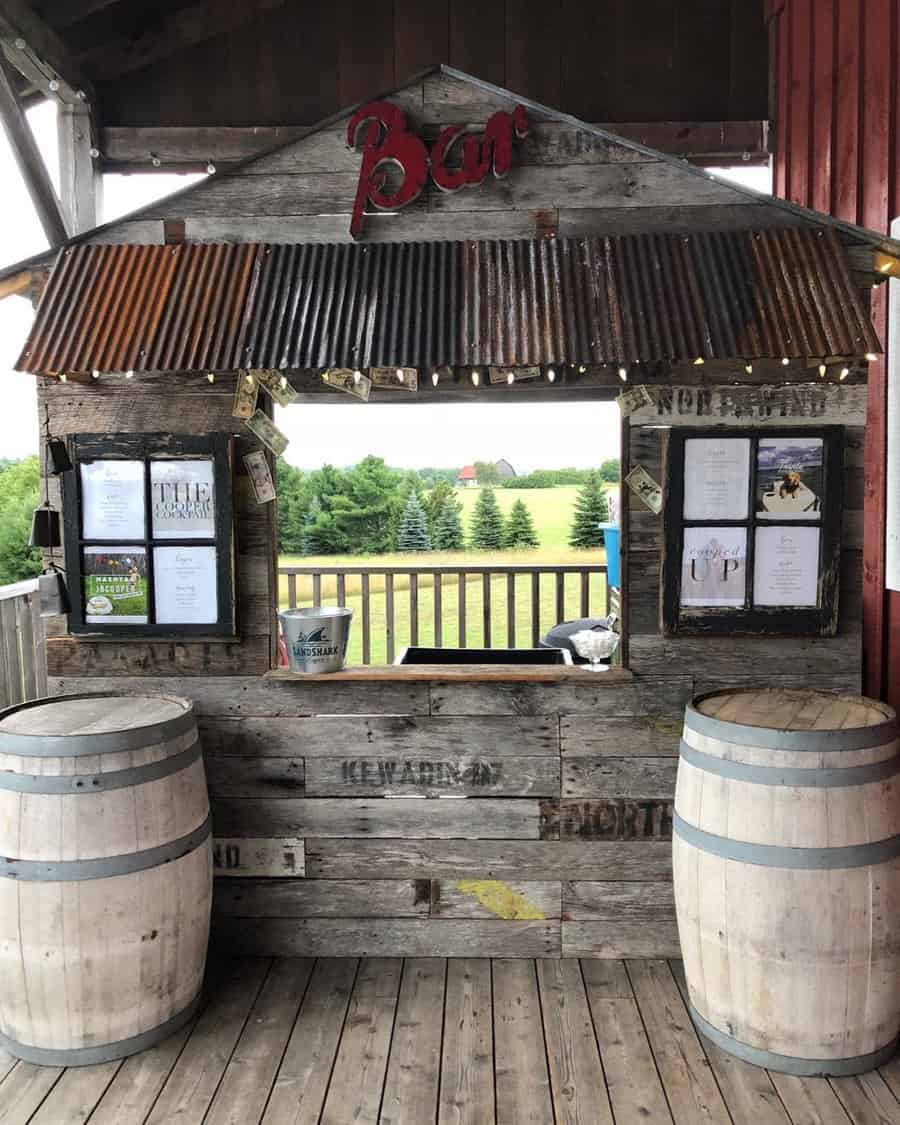
3. Embrace DIY Outdoor Bar Projects
You don’t have to hire an expensive contractor to build your bar. With a little carpentry know-how, you can have your own DIY outdoor bar.
Simple DIY outdoor bar ideas show you how to use a wine barrel or old door. These create the main structure of the bar and then you only have to build around them.
Source: @becky_ballett via InstagramSource: @islandfashionfinds via InstagramSource: @kegworks via InstagramSource: @nathanatkinsoncarpentry via InstagramSource: @sistersheen via InstagramSource: @the910tavern via InstagramSource: @the_lucky_barrow_pubshed via Instagram
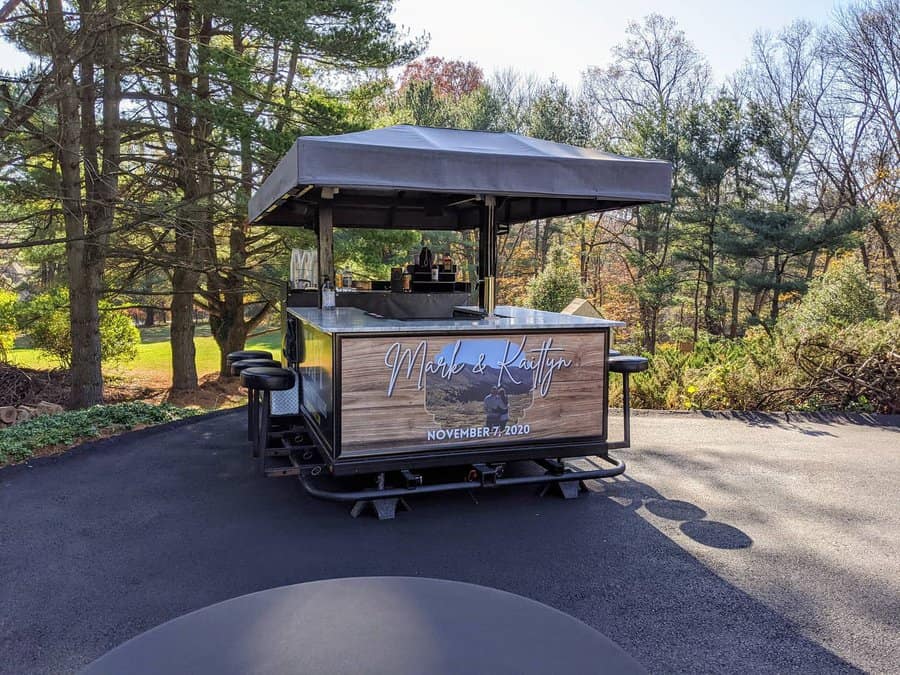
You could also build a DIY bar from the ground up. This is the best option if you want a custom bar. Consider this option if you need an unusual size or shape for your bar.
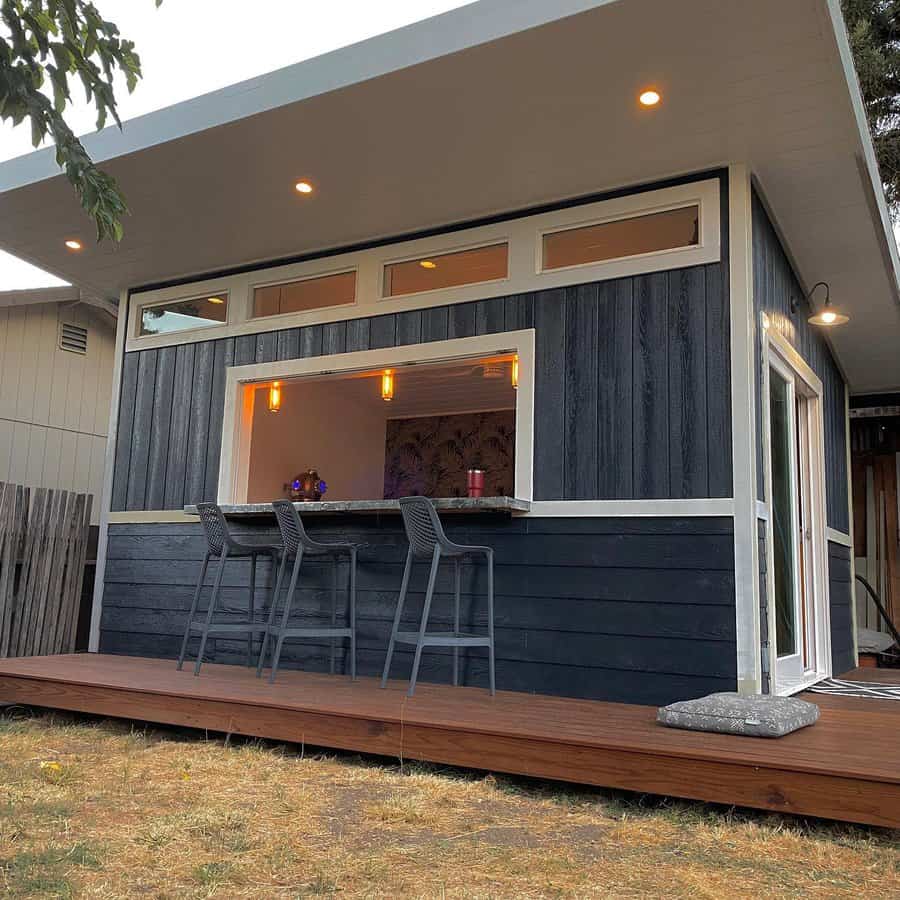
4. Built an Outdoor Bar on an Existing Deck
If you have a deck, then you already have an outdoor living space. This makes it easy to add an outdoor bar. There are several design ideas that show you how to build the bar into your deck.
You could build the bar top into the railing and then line bar stools up along the railing. This is a great idea if you have a great view from your deck.
Source: @brandfluentialmarketing via InstagramSource: @cbee18 via InstagramSource: @esters.will via InstagramSource: @guaro20 via InstagramSource: @home_at_number21 via InstagramSource: @pinkflamingomusicproductions via Instagram
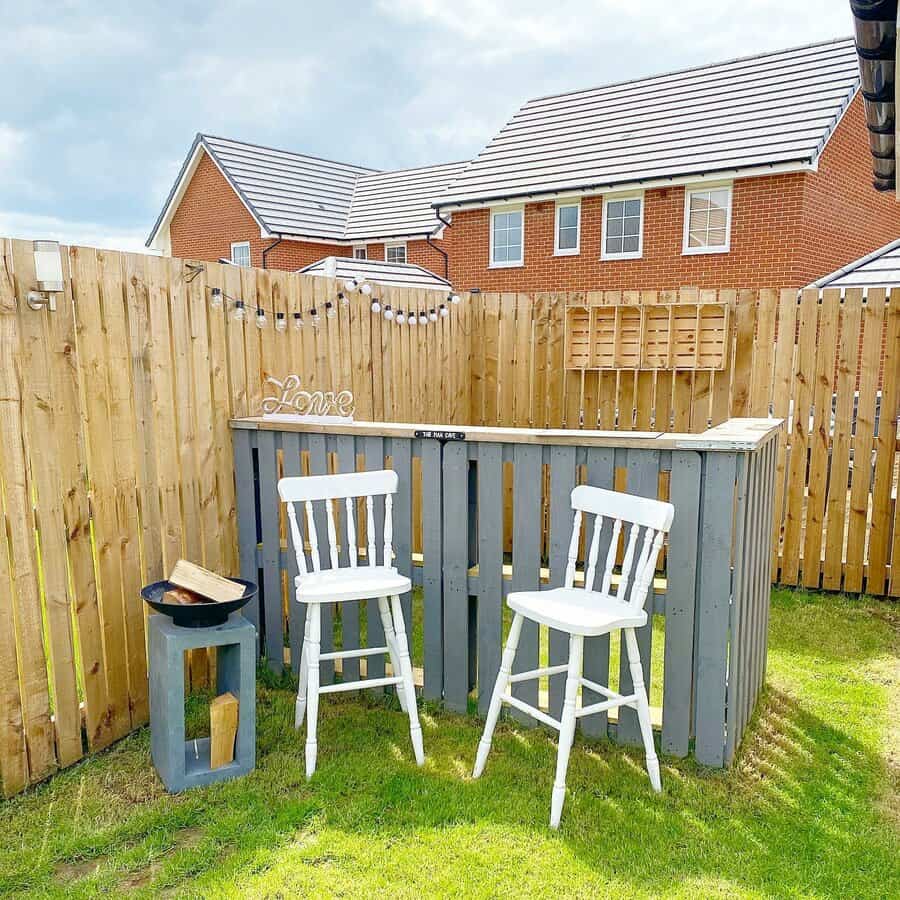
Another option is to build your bar in a naturally dead corner of your outdoor space. It’s the corner that’s awkward to put furniture in and ends up sitting empty or getting used for storage. Turn it into a functional space by building a bar around it.
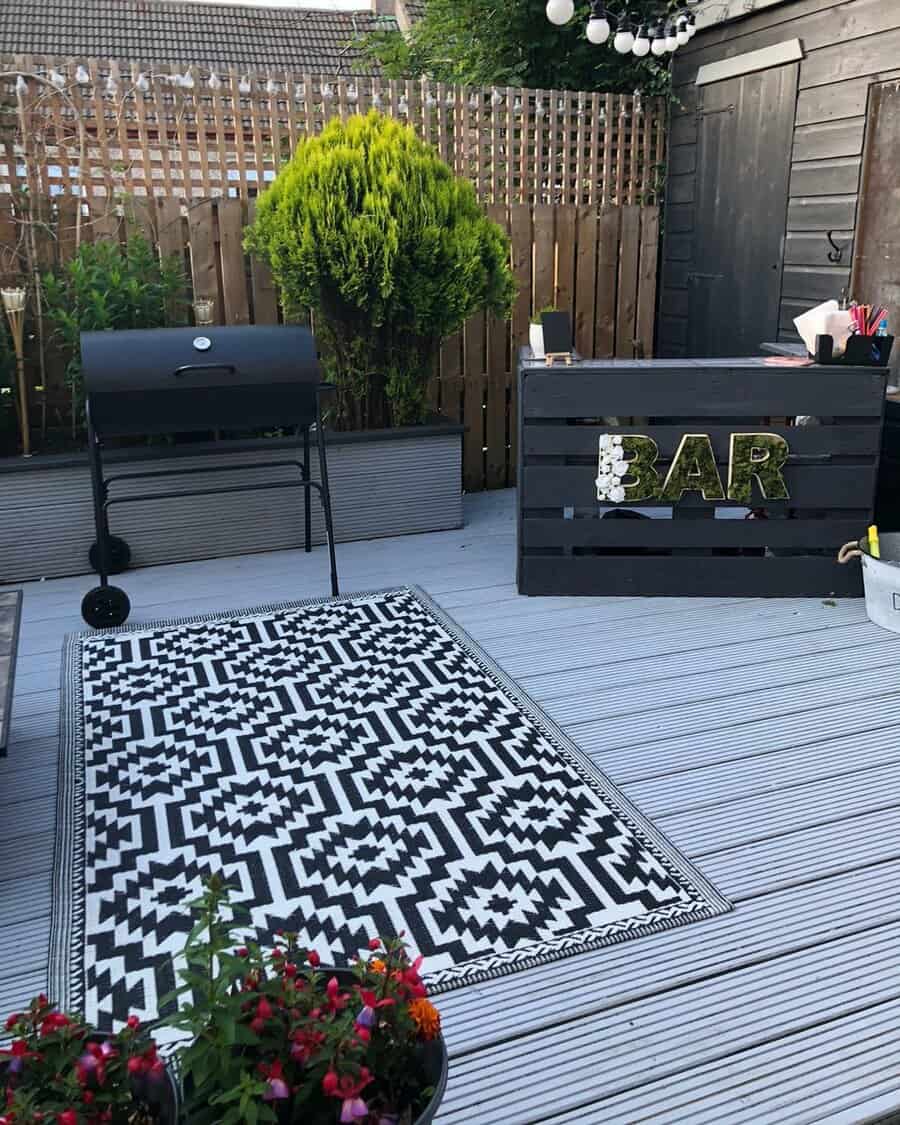
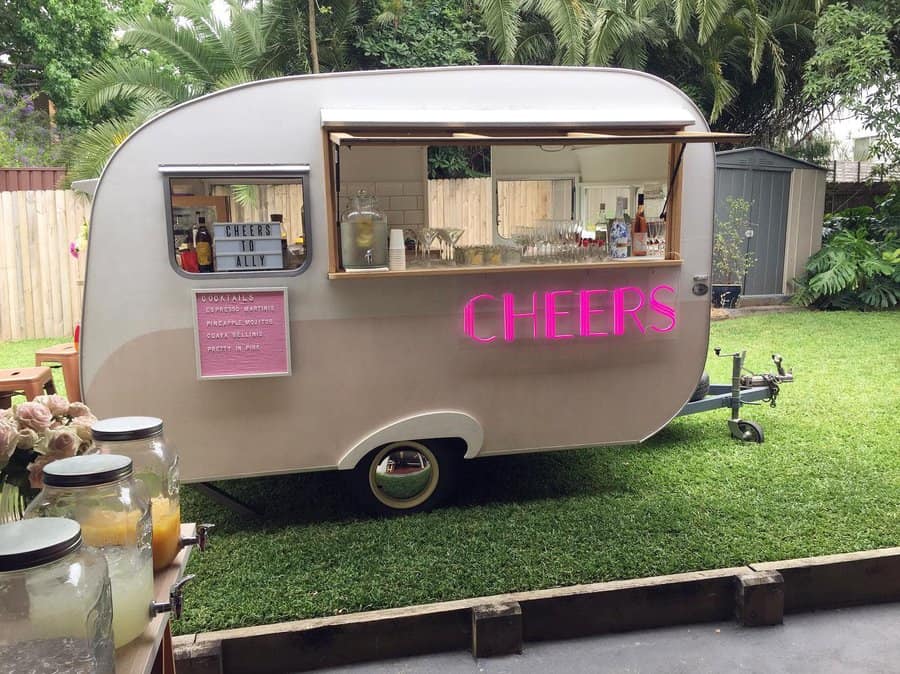
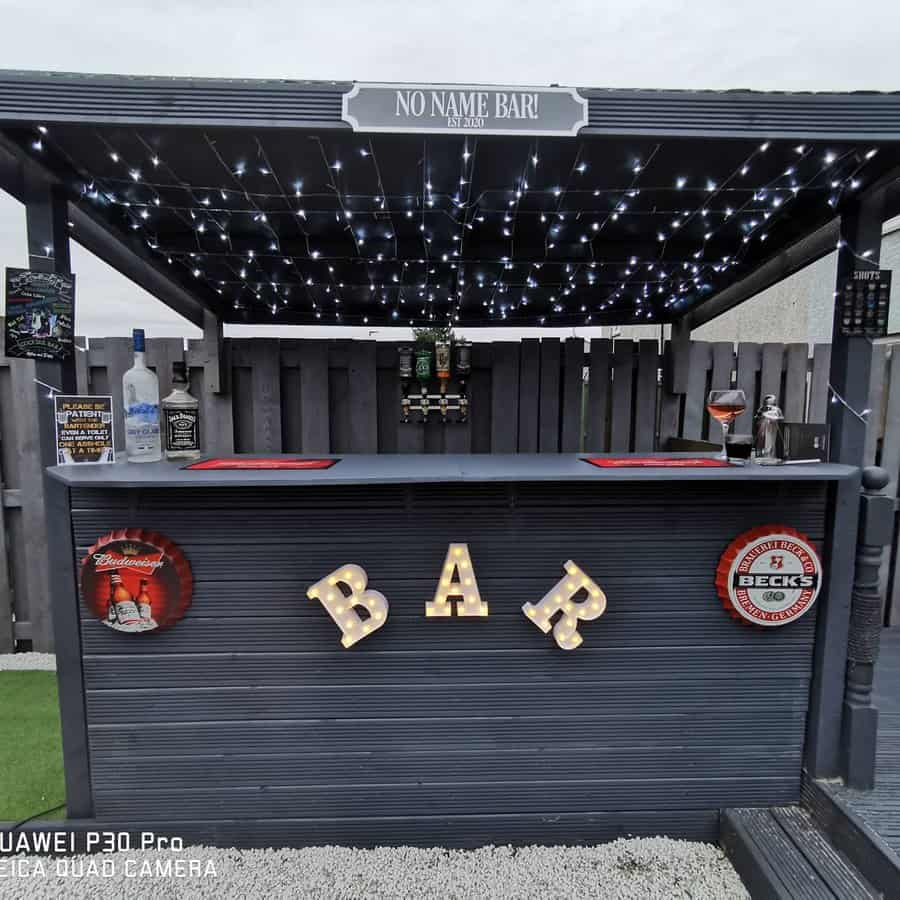
5. Blend Your Bar with Backyard Aesthetics
Get creative with your backyard bar design. You could have it blend in with your other backyard structures for a cohesive look. If you love to plant and have a garden, why not build a garden bar. This gives you an entertaining space that seamlessly blends in with its surroundings.
Source: @bridgecityjohn via InstagramSource: @butleranddunne via InstagramSource: @coureur_de_bourgeoisie via InstagramSource: @drewbarnes9 via InstagramSource: @hikeskigo via InstagramSource: @inside.number12 via InstagramSource: @more.to.explore.outdoors via InstagramSource: @mylittlepeonyau via InstagramSource: @taptrentals via InstagramSource: @the_lucky_barrow_pubshed via InstagramSource: @theshekshanty via InstagramSource: @totalscapedesign via Instagram
Instead of the standard bar design, use an outdoor bar cart. This gives you an elegant design. If you have a fire pit, build a rustic bar out of the same materials that you’ve built the fire pit out of.
6. Create a Cozy Seating Palace for Comfort
Don’t stop at just the bar. You need to have a palace for people to sit down. This will encourage people to stay in the space longer as they will be more comfortable.
If you have a limited amount of square footage, then all you need are a few bar stools. Try to have at least three; otherwise, it will look off-balance and odd.
Source: @athomewiththedawsons via InstagramSource: @beverleyliddle via InstagramSource: @cliftonscrafts via InstagramSource: @club443pub via InstagramSource: @kimberleyvallee via InstagramSource: @ourbuchananbeginnings via InstagramSource: @starbud99 via InstagramSource: @tiki.tiny via Instagram
If you have more space, then create a lounge-like atmosphere. Arrange an accent chair, love seat, or sofa. Even a long bench would work. Then add cushions and throw pillows. Look for seating that is deeper, which creates a more relaxed sitting position.
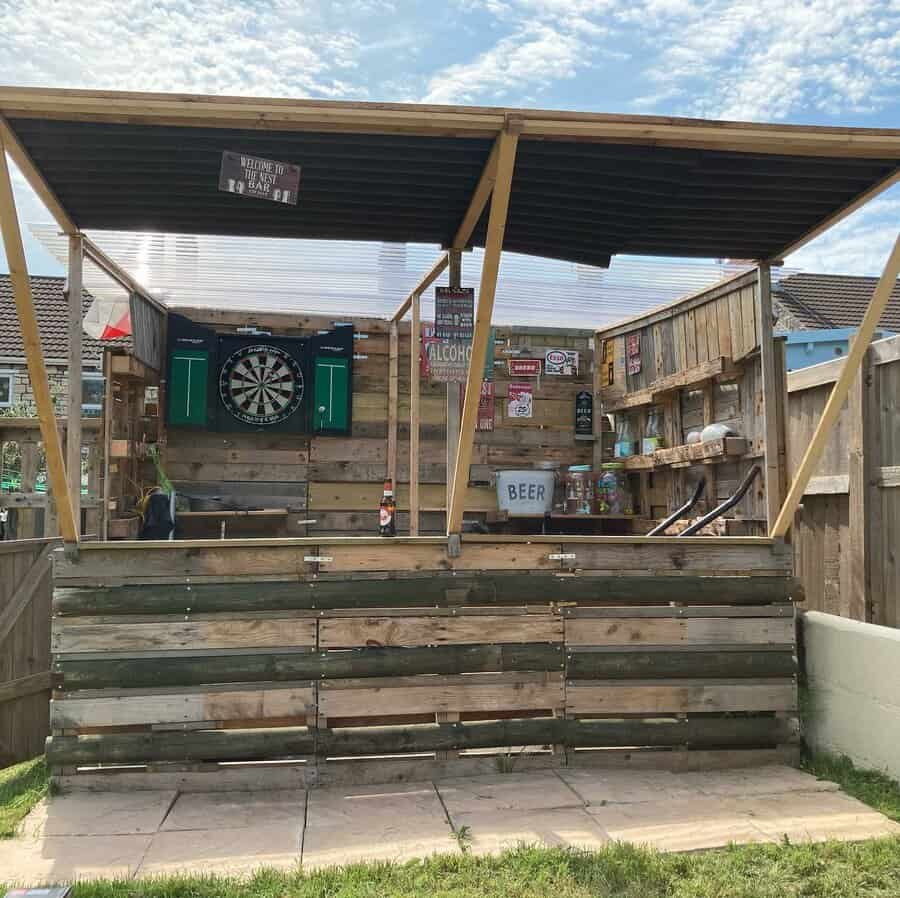
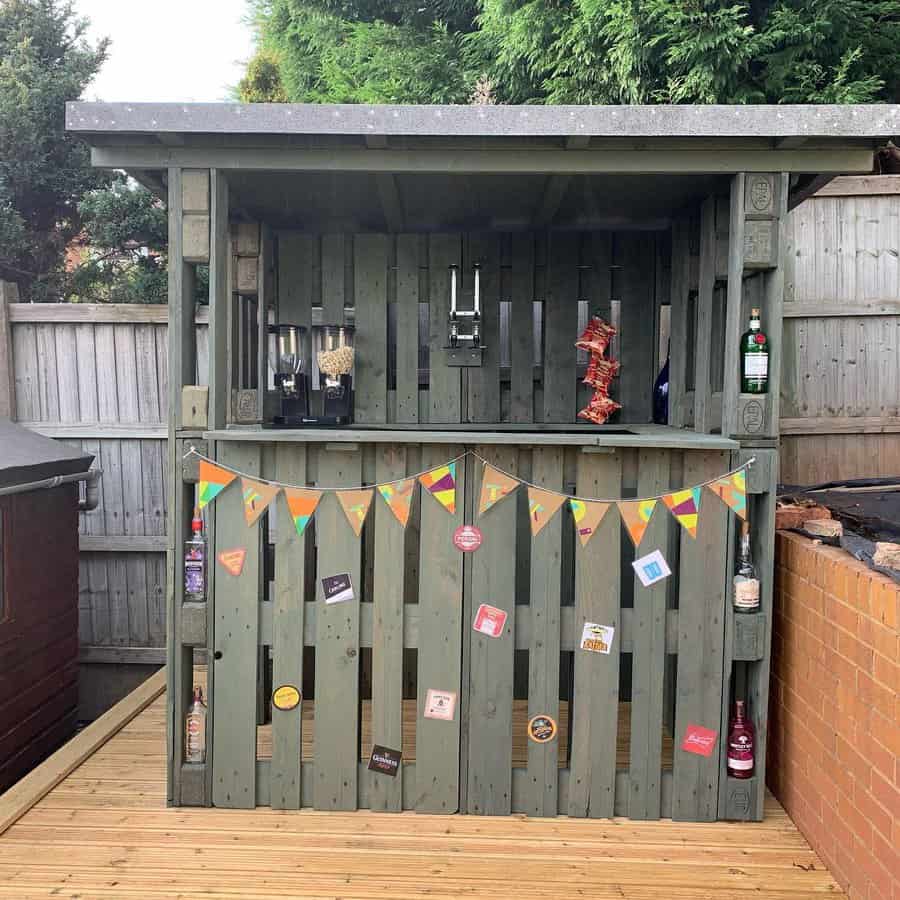
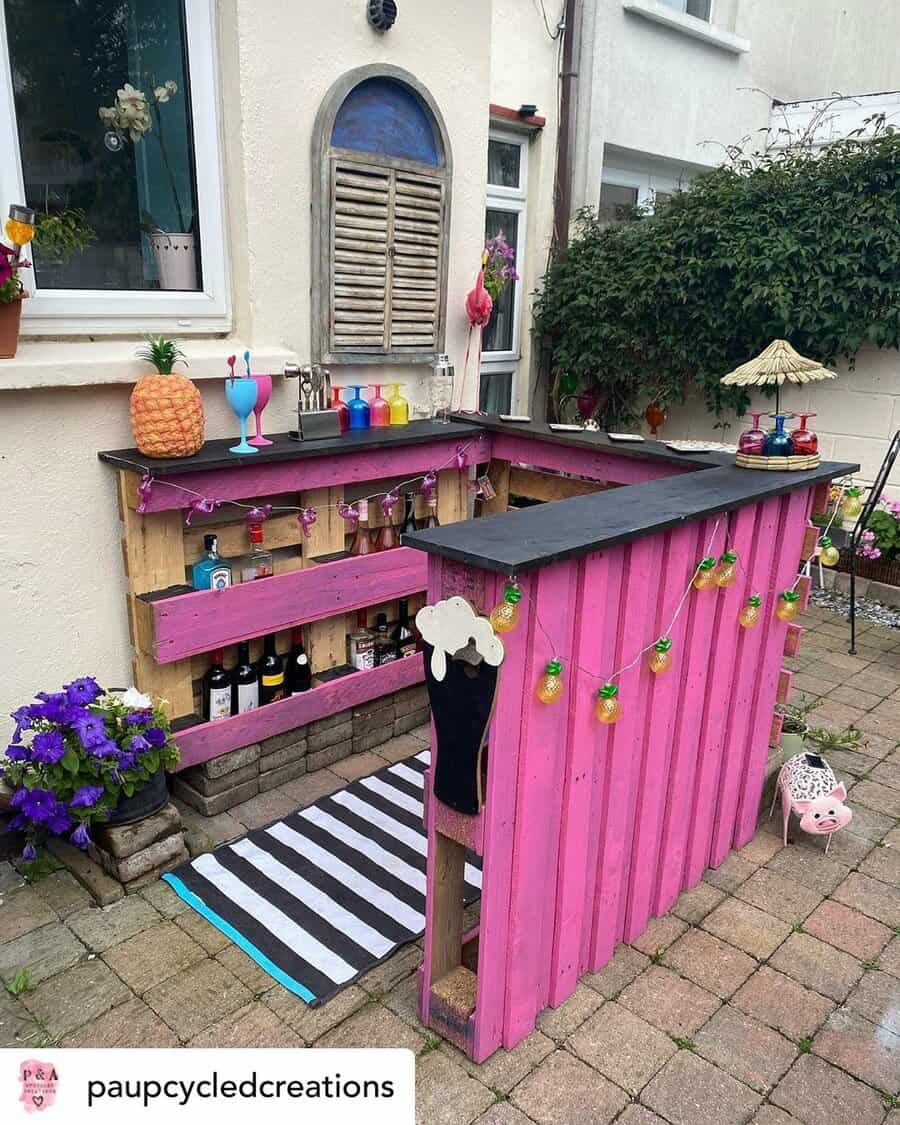
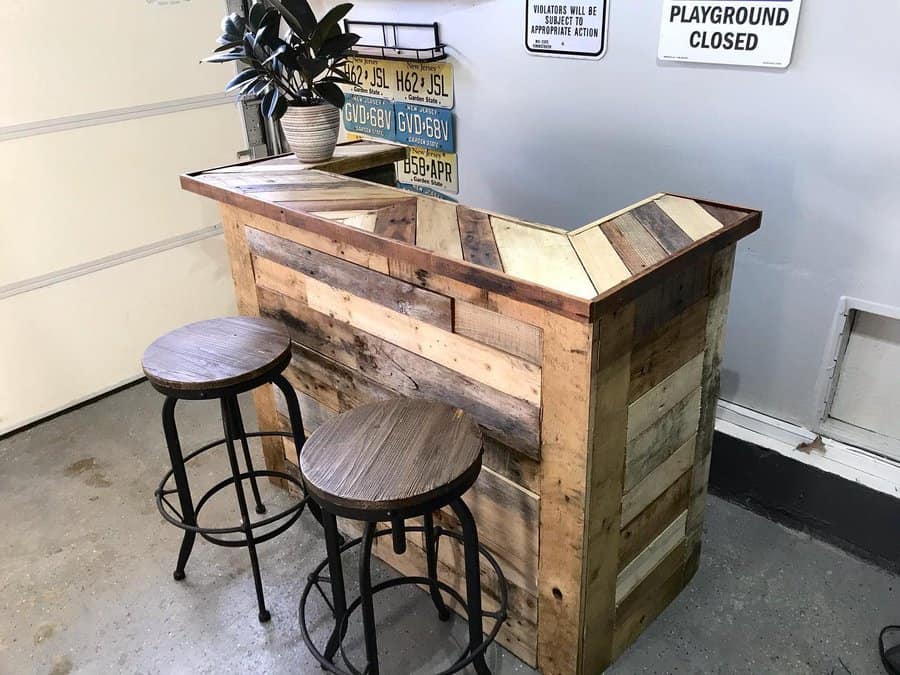
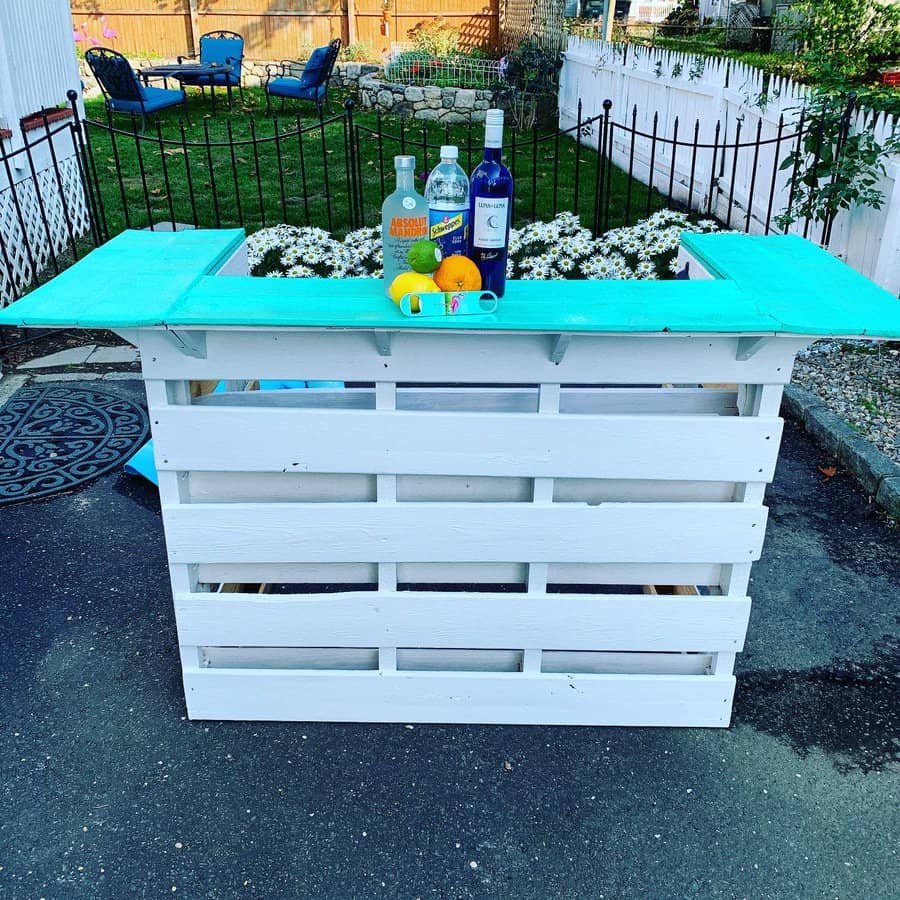
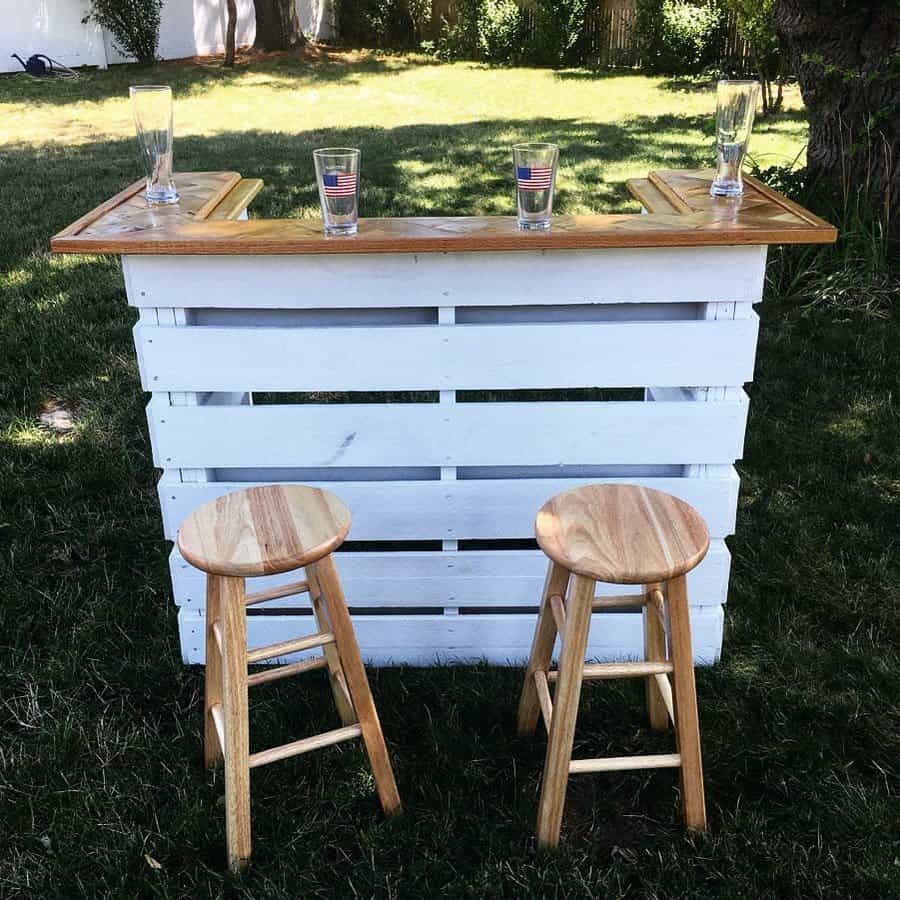
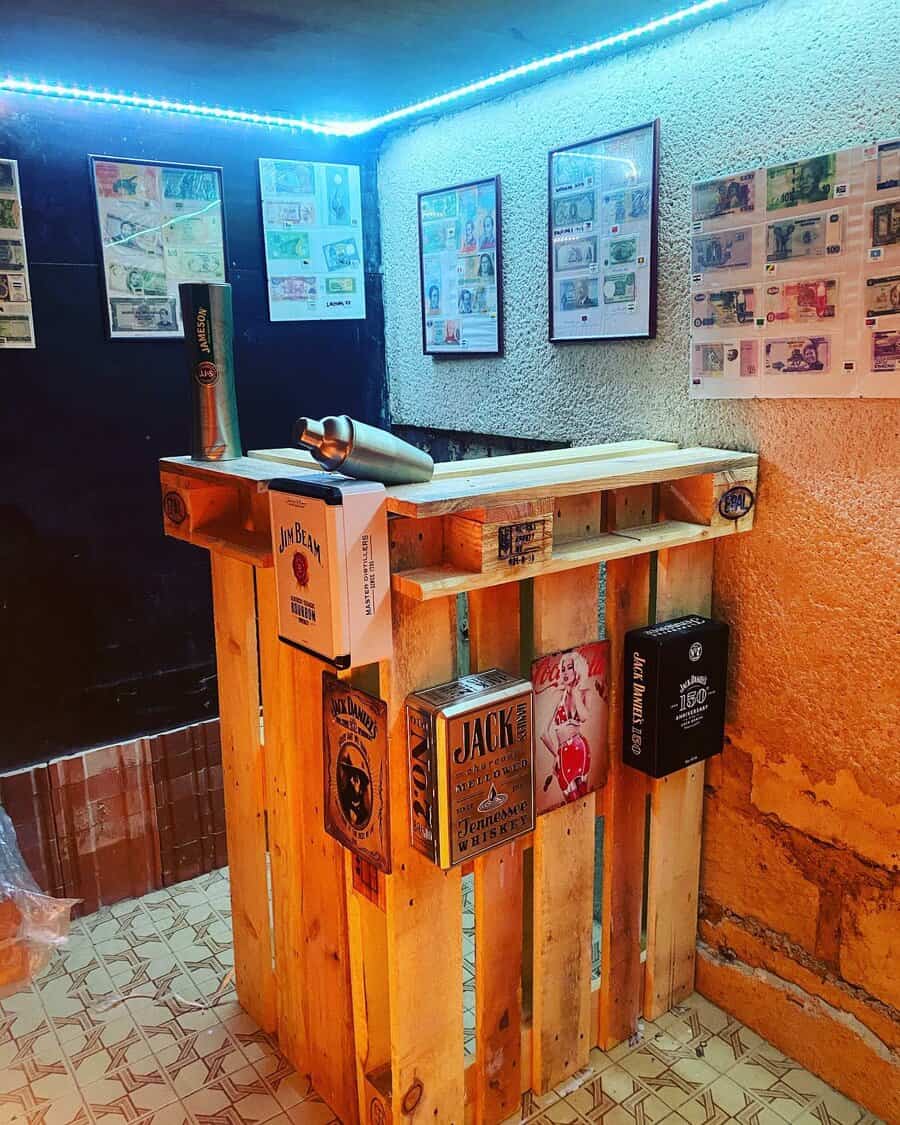
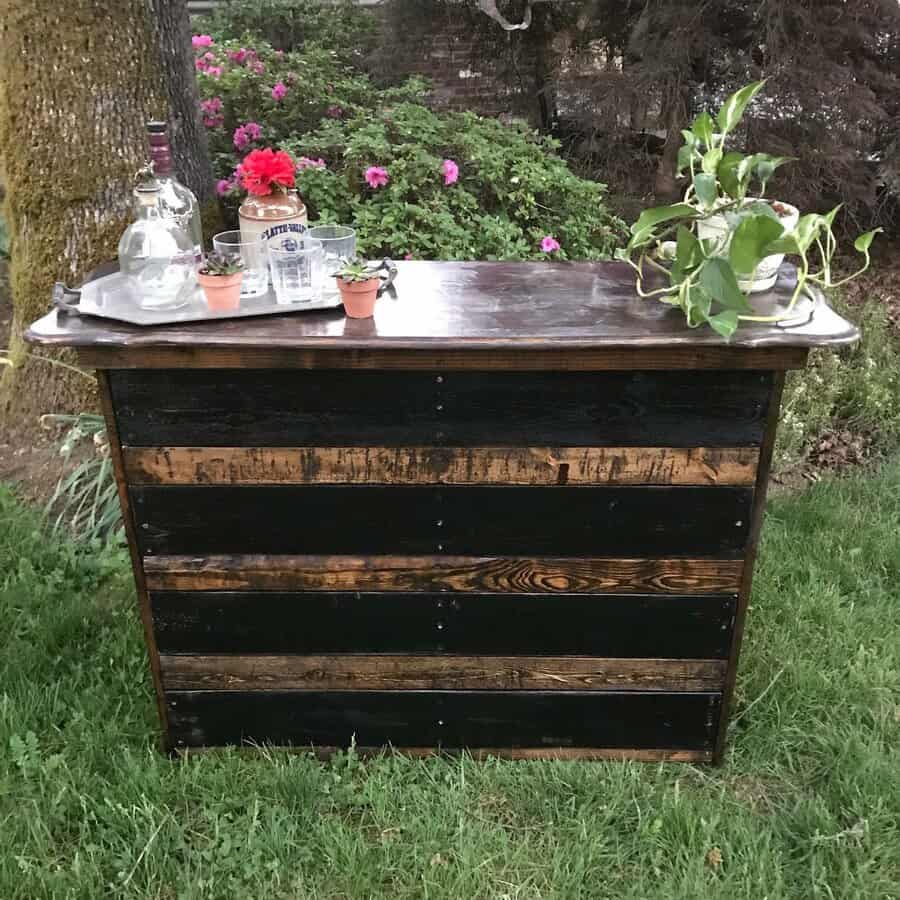
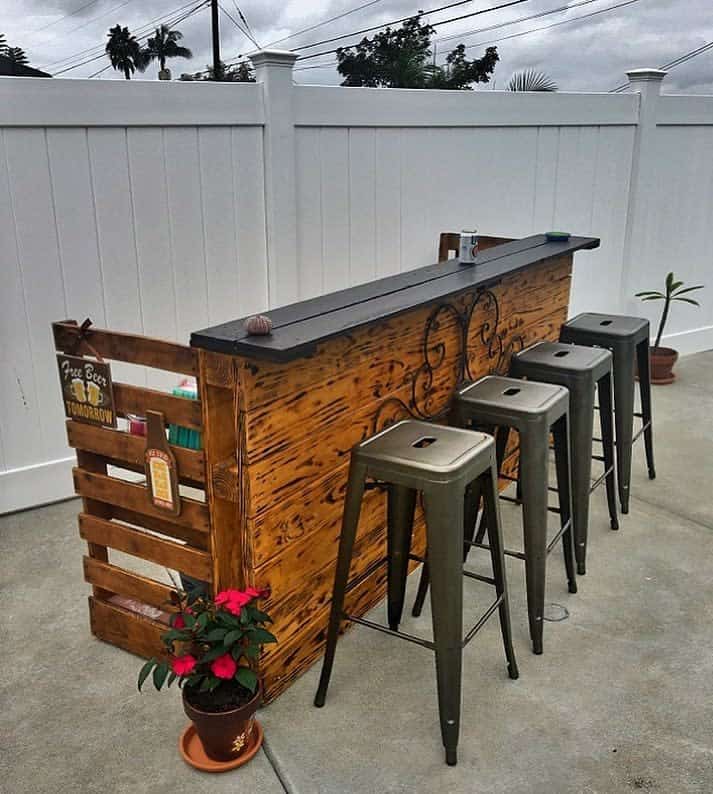
7. Embrace Upcycling: Build Your Pallet Bar
Modern trends embrace the idea of upcycling wood pallets. A popular use is to make a pallet bar. There are two ways you can go about building your bar. The first is to leave the wooden pallets intact and just attach them to each other. This is fast and easy but limits your customization ability.
Source: @amykatedesigns via InstagramSource: @custom_pallet_bars via InstagramSource: @dukesdecorli via InstagramSource: @jrrobert88 via InstagramSource: @laureelau via InstagramSource: @once_upon_a_pallet via InstagramSource: @there_goes_nic_again via InstagramSource: @uk_hockey_fam via Instagram
The other option is to break the pallets down. Now you have several similarly sized and shaped pieces of wood. You can use them to build a bar that fits your space and needs. Try taking it a step further by making a design out of the wood. Alternate light and dark pieces for a striped effect.
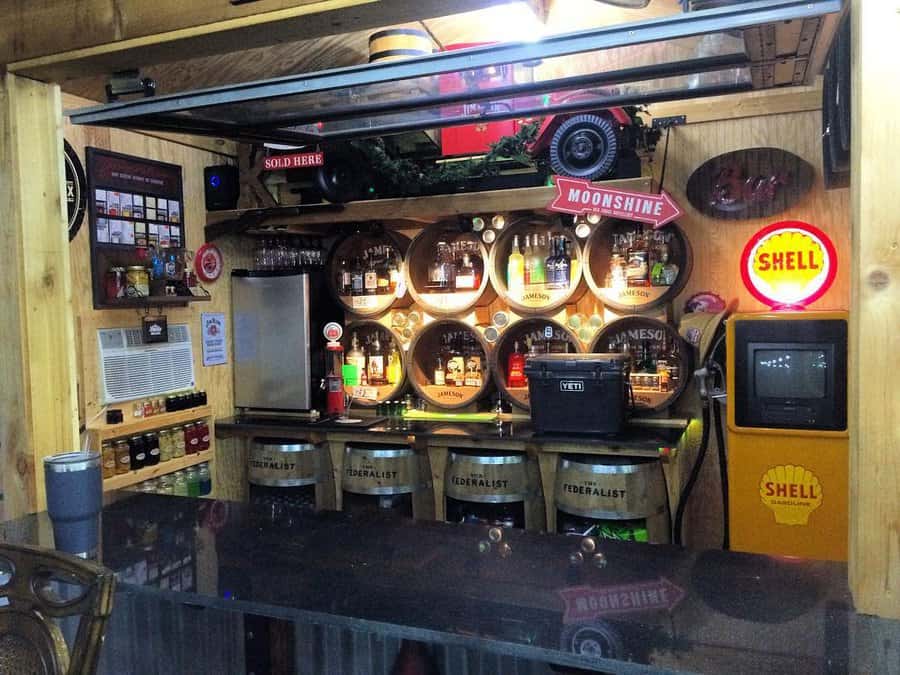
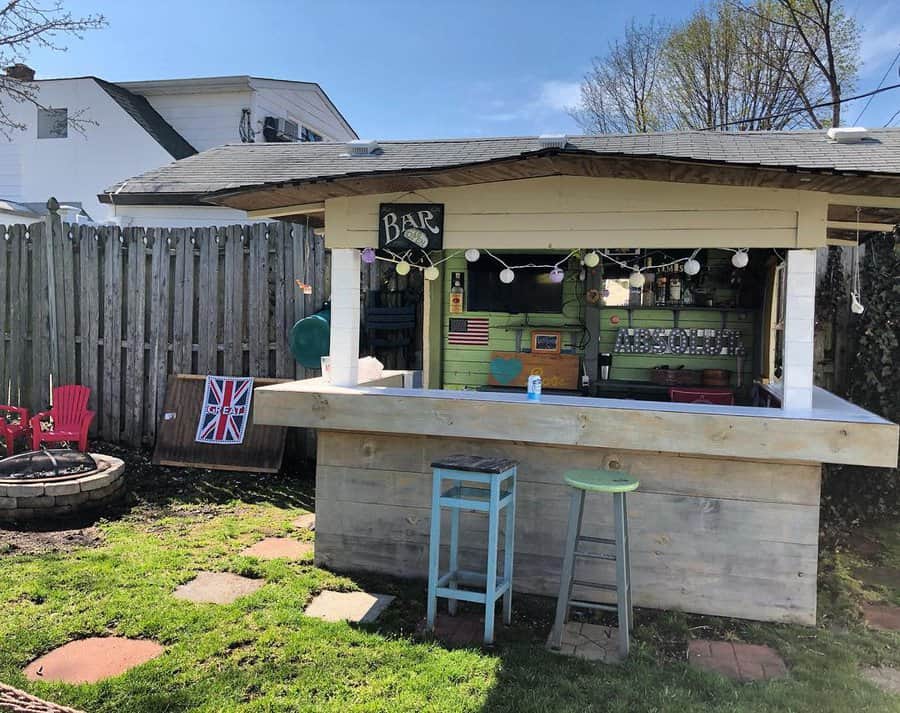
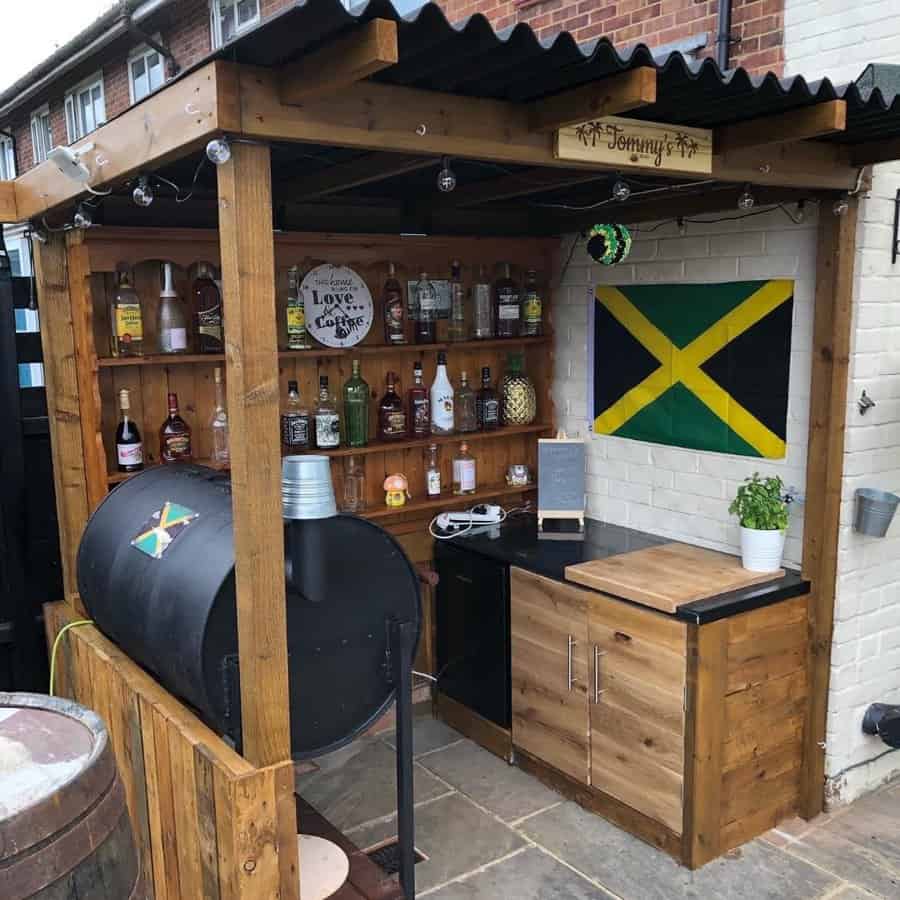
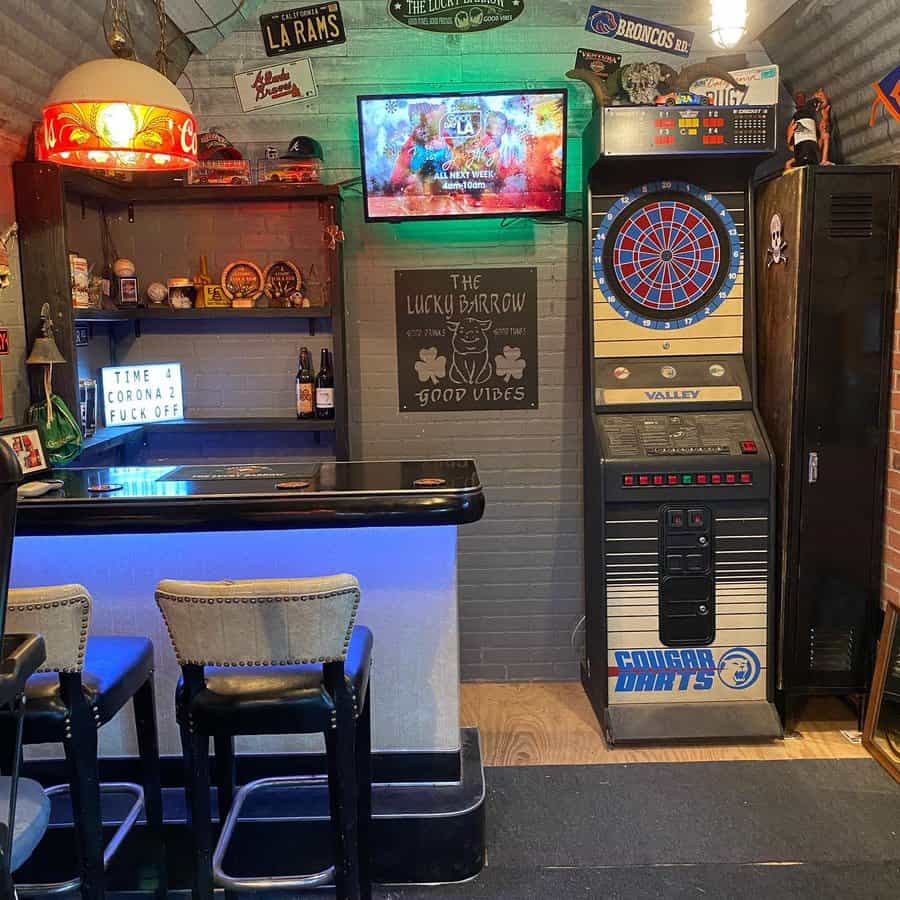
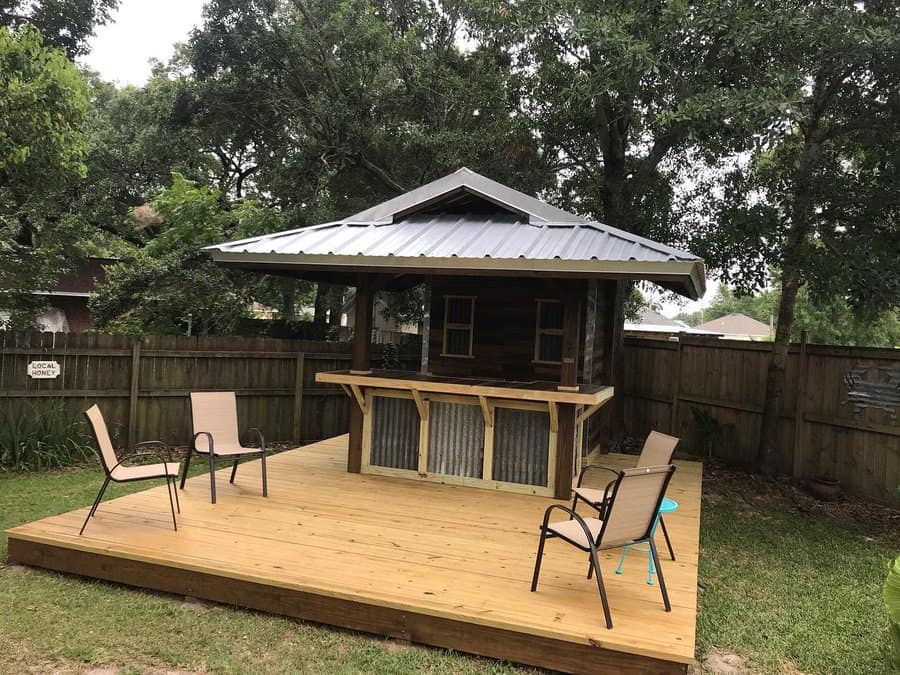
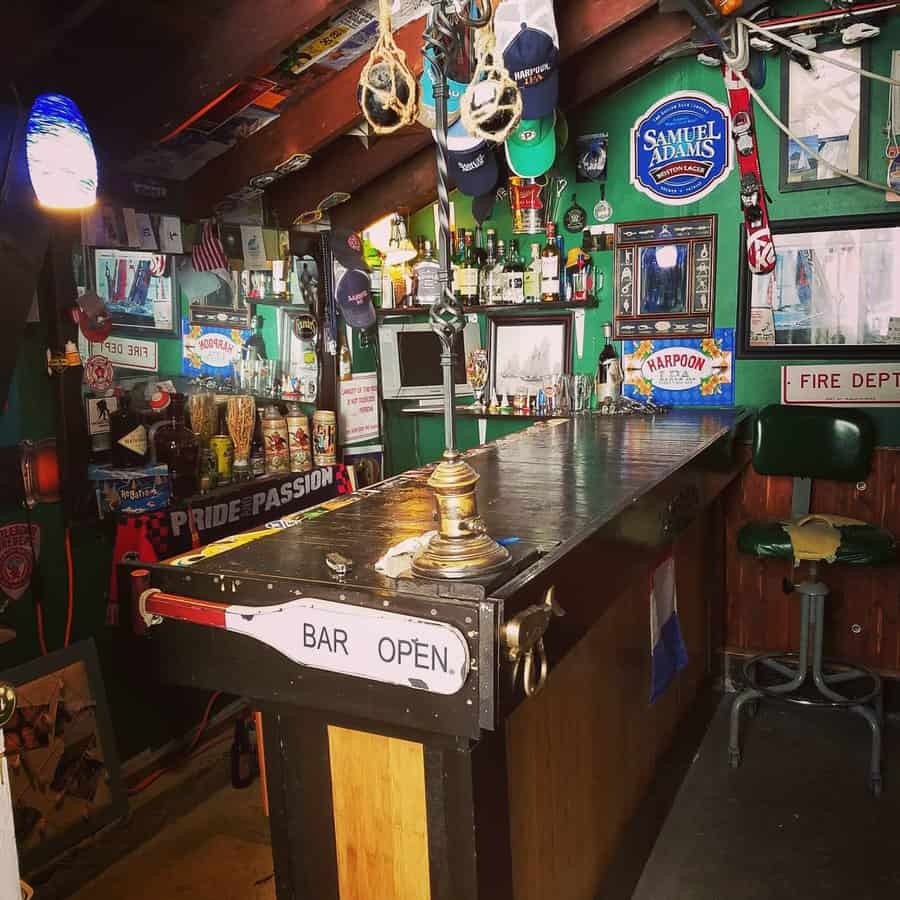
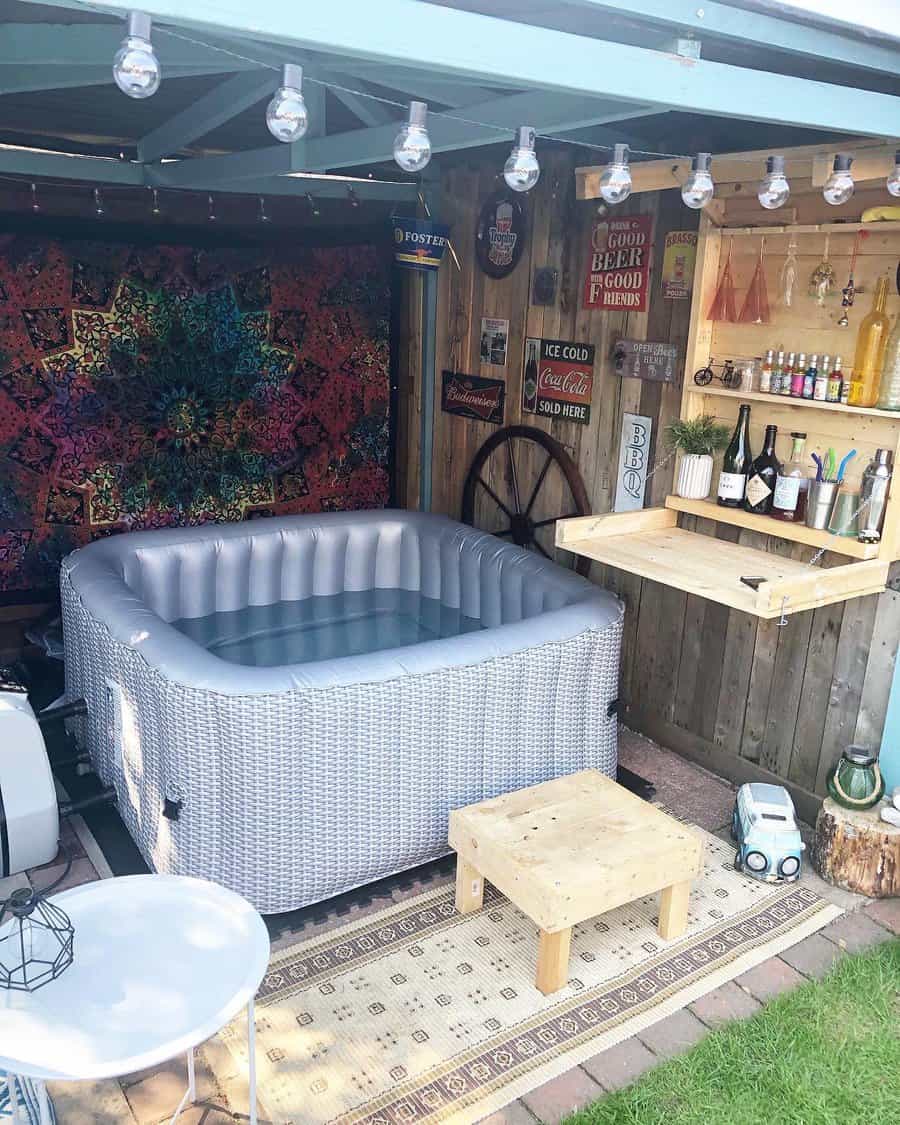
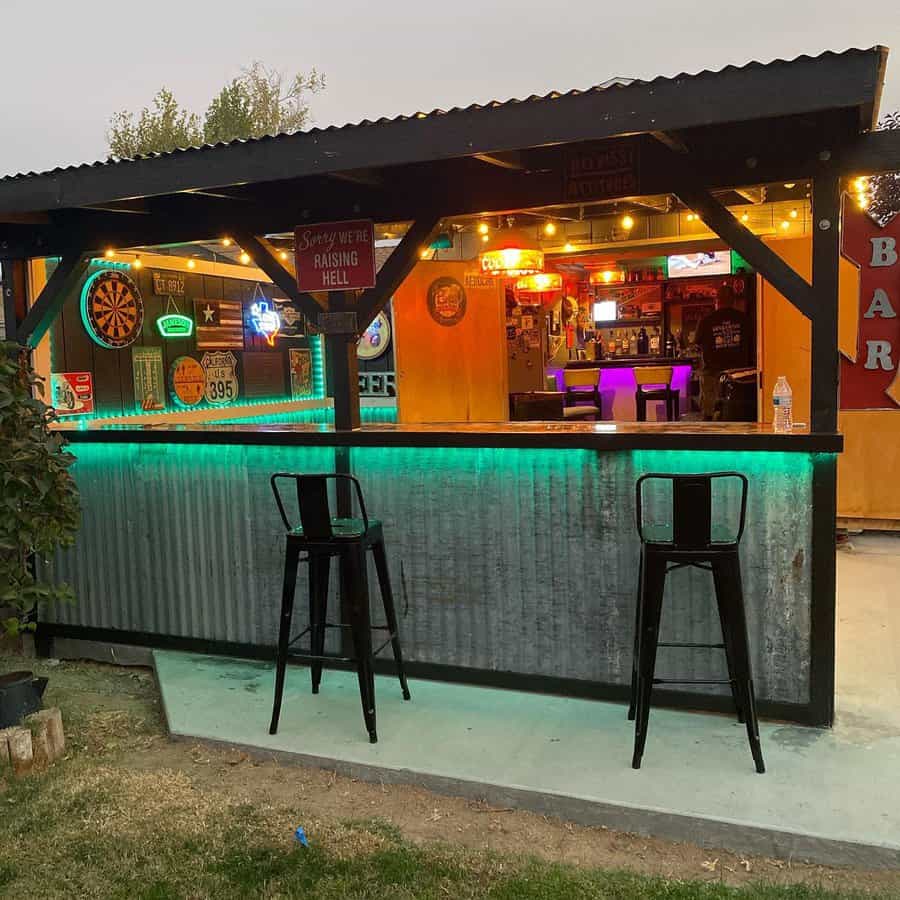
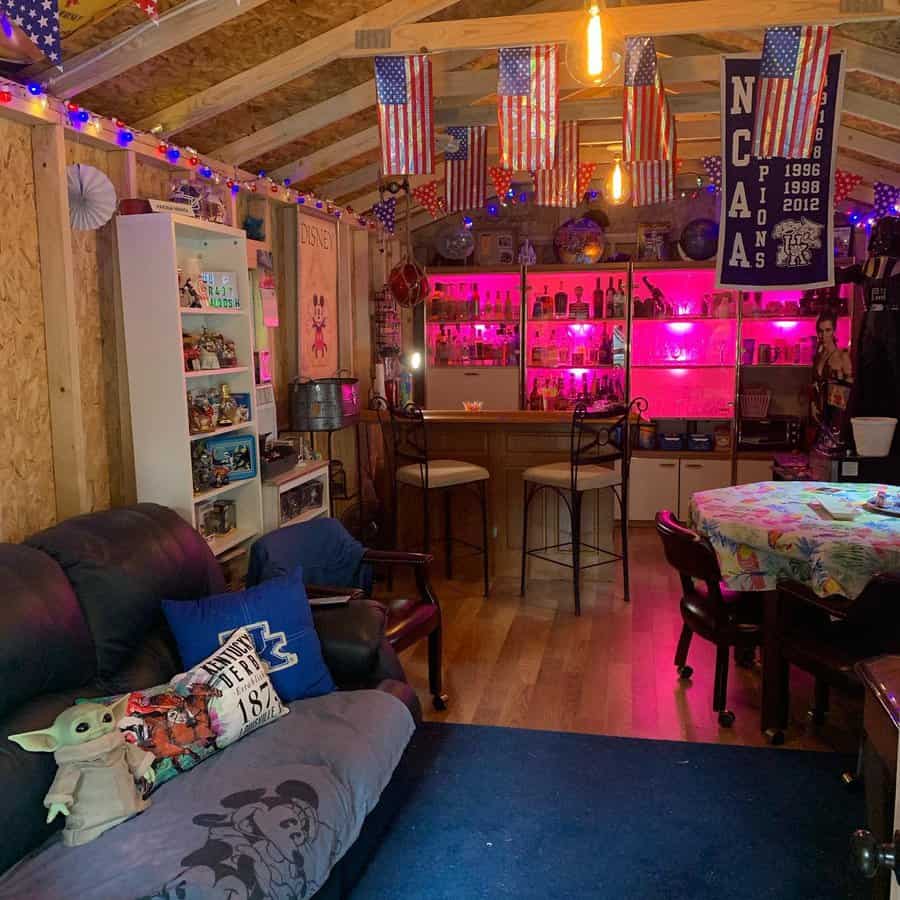
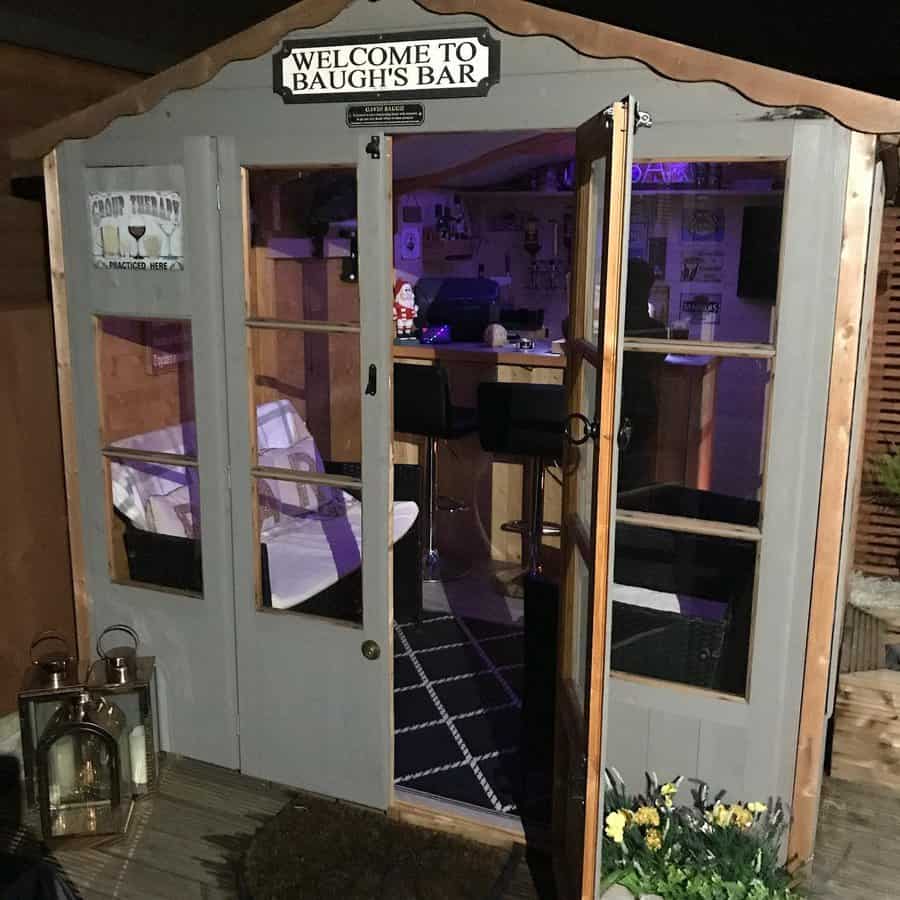
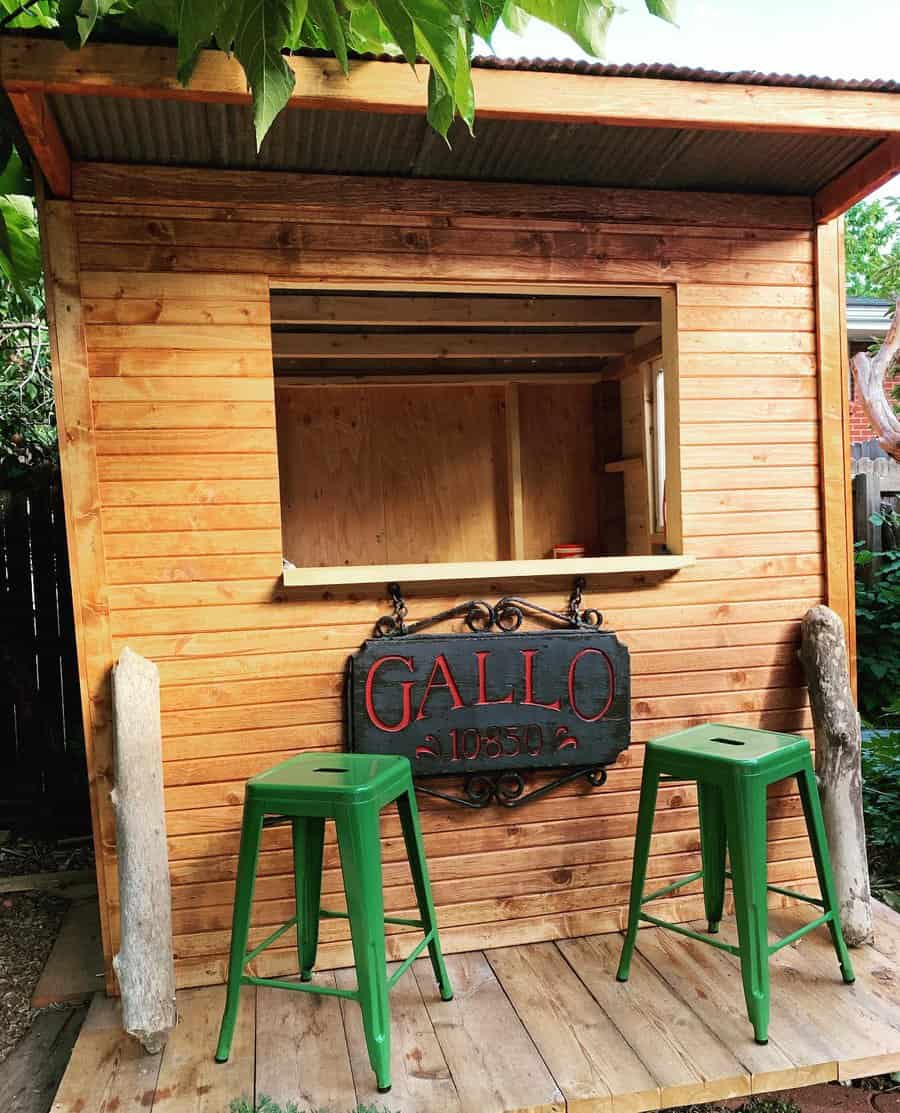
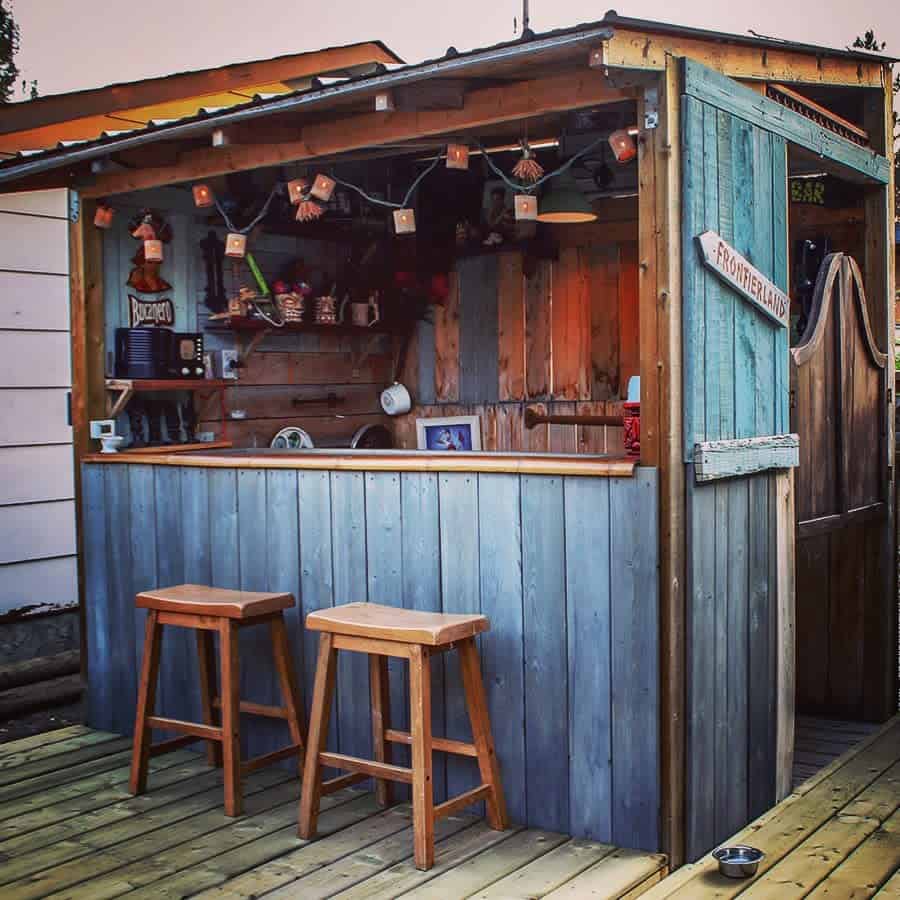
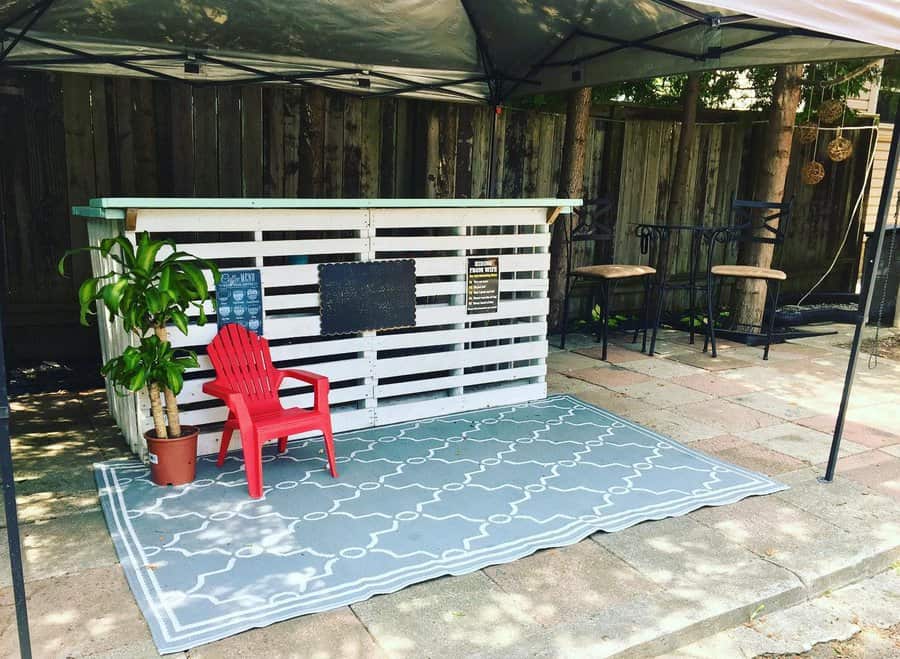
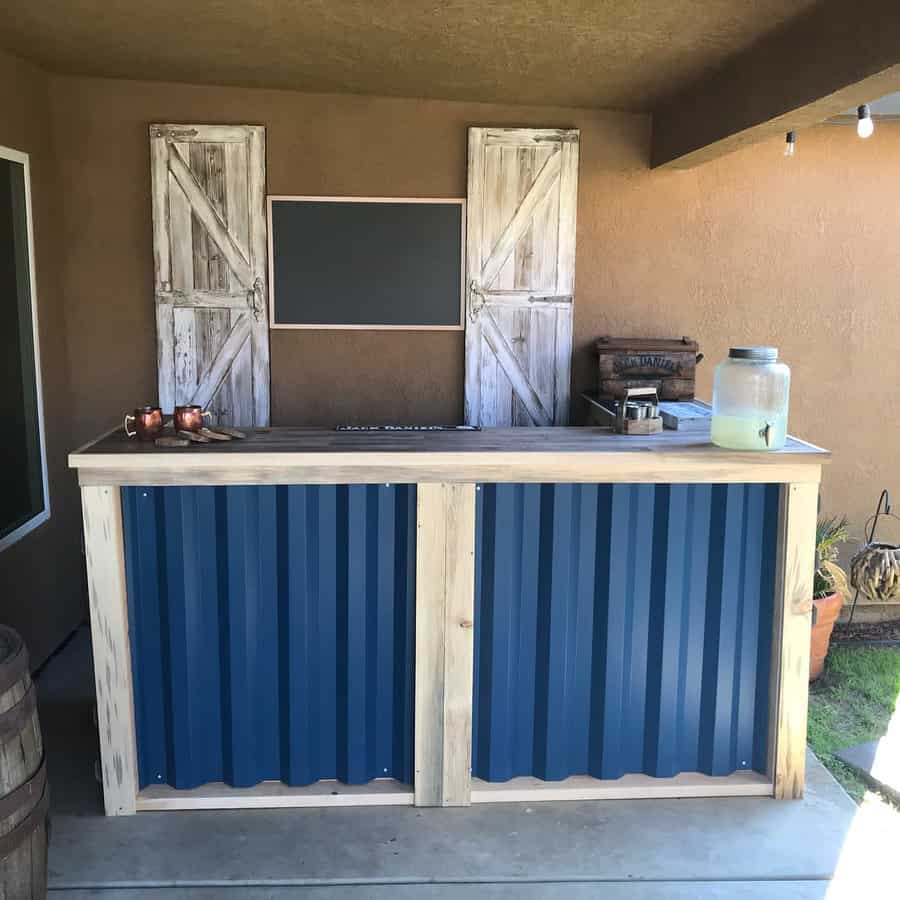
8. Transform Backyard Sheds into Cozy Bars
Building a bar shed lets you build an outdoor bar idea without having to leave your bar outside. You could convert an old gardening shed. Replace the potting bench with a drinking bench.
Replace the small door with two large double barn-style doors. Or you could have a lift-up style door to open the bar from the side. People would then walk up or sit at bar stools on the outside, and the person preparing the drinks would stand inside.
Source: @baughsbar via Instagram
Bar sheds tend to work best when they are a flex space. This blends indoor and outdoor living together so that you can easily transition from one to the other.
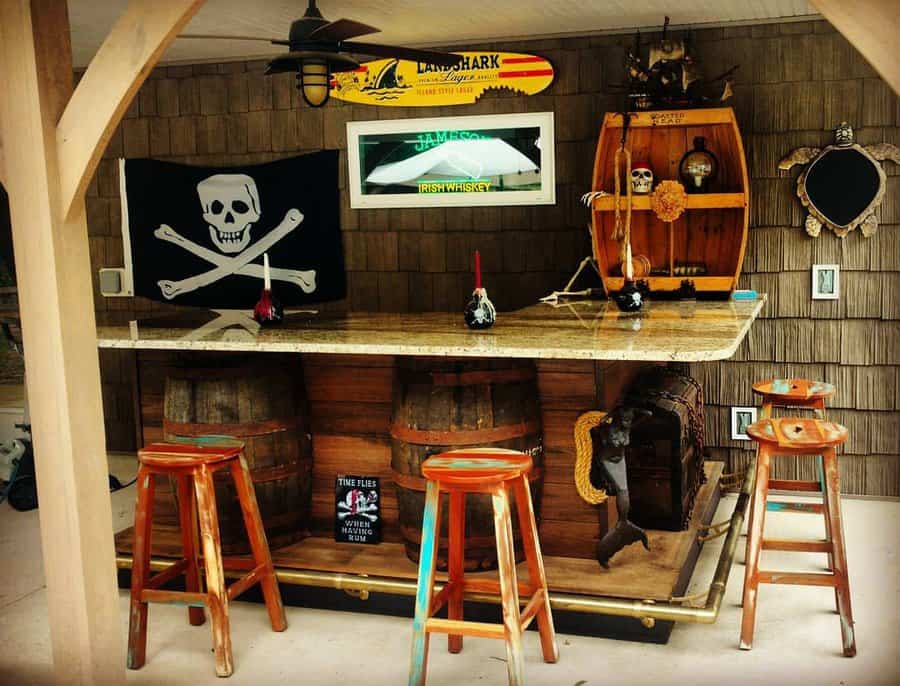
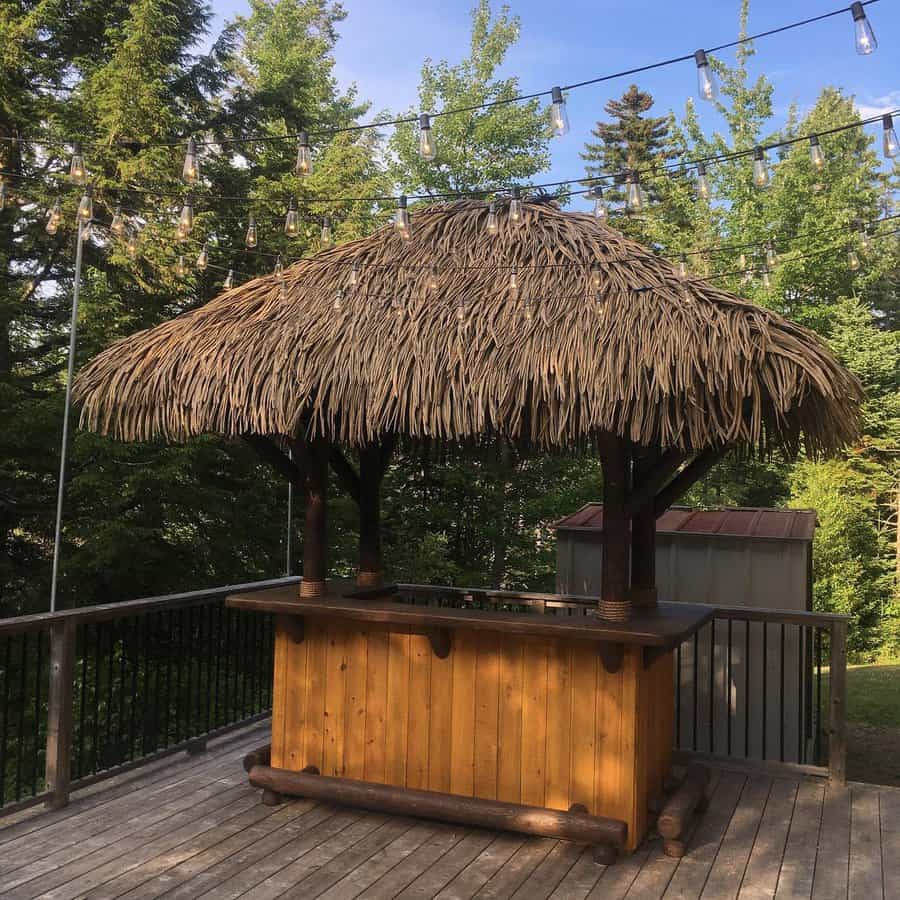
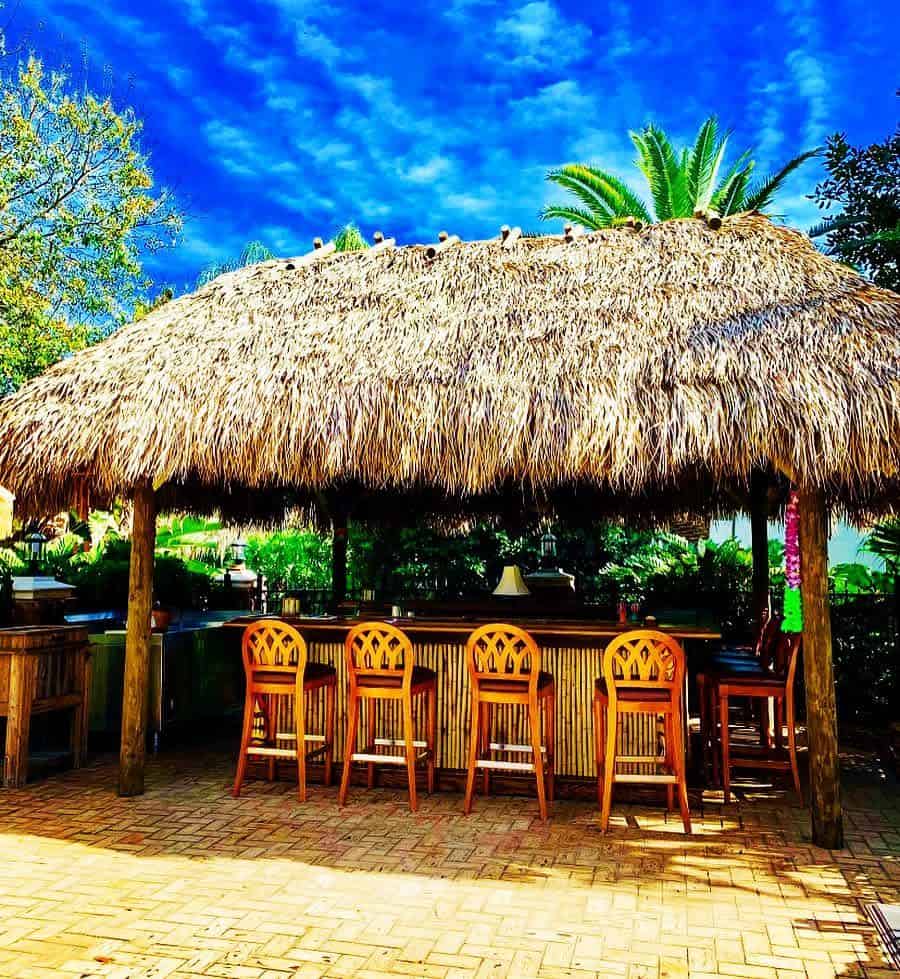
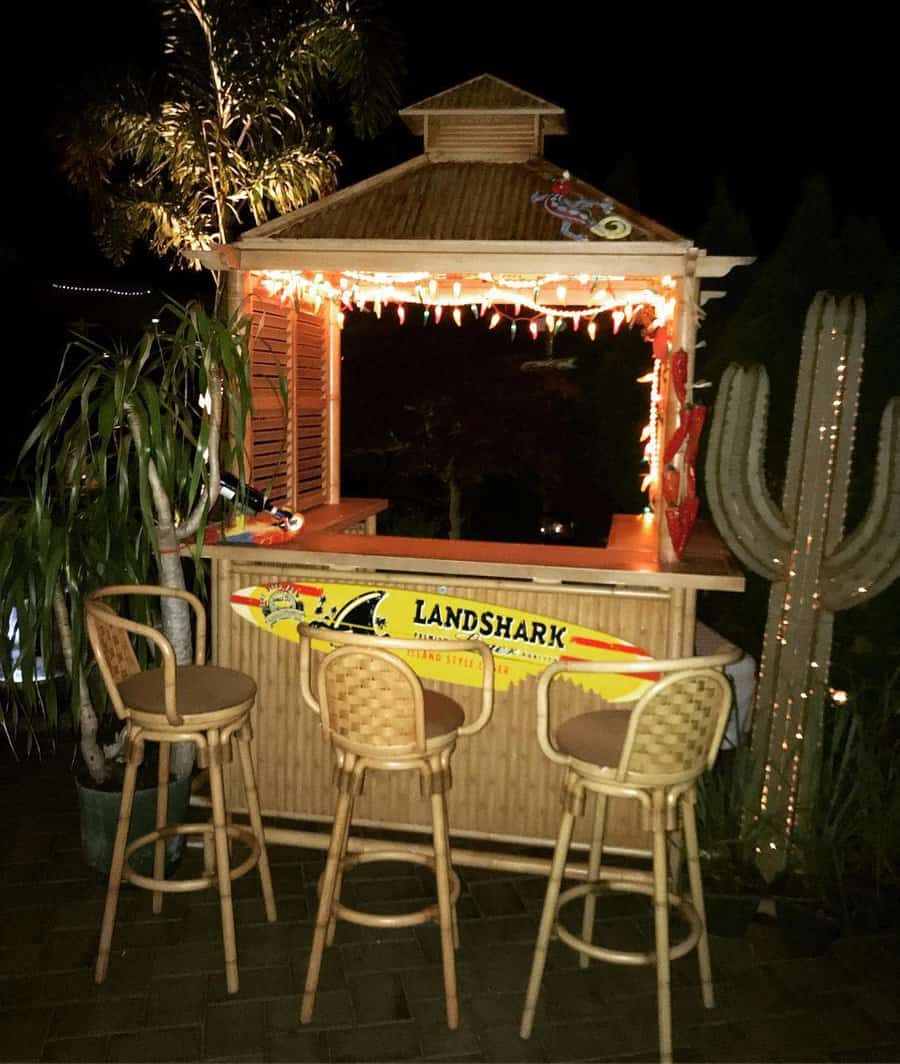
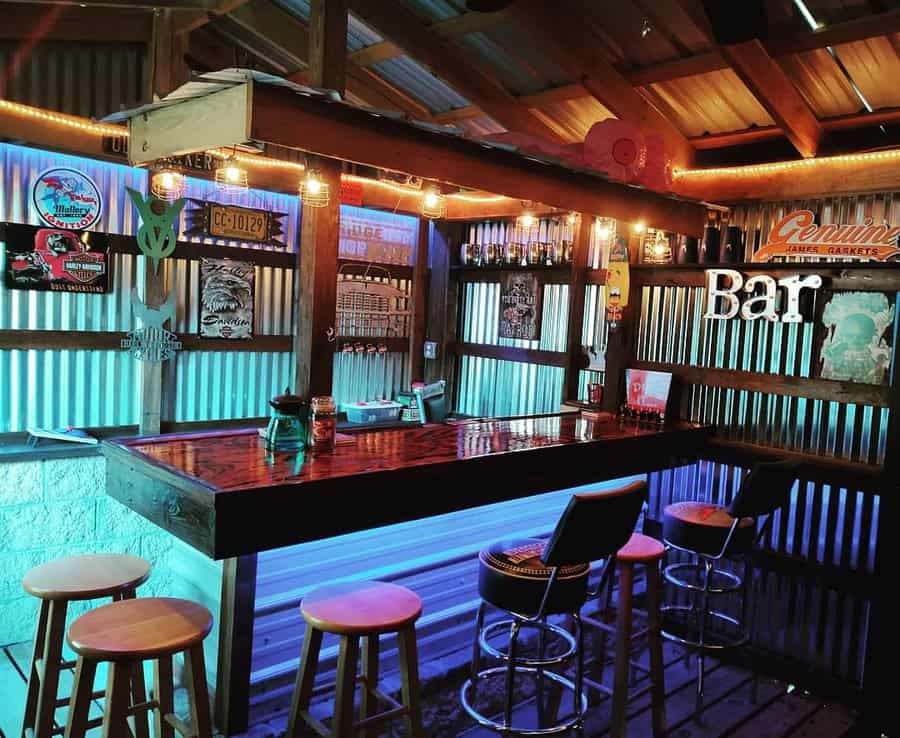
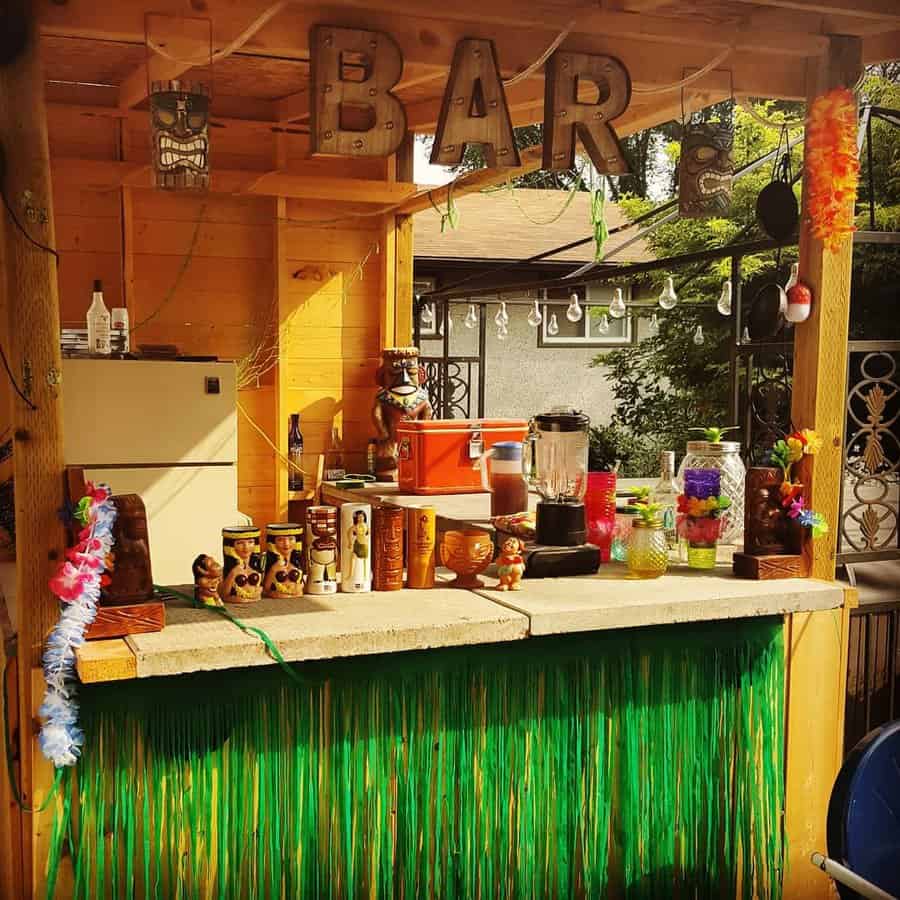
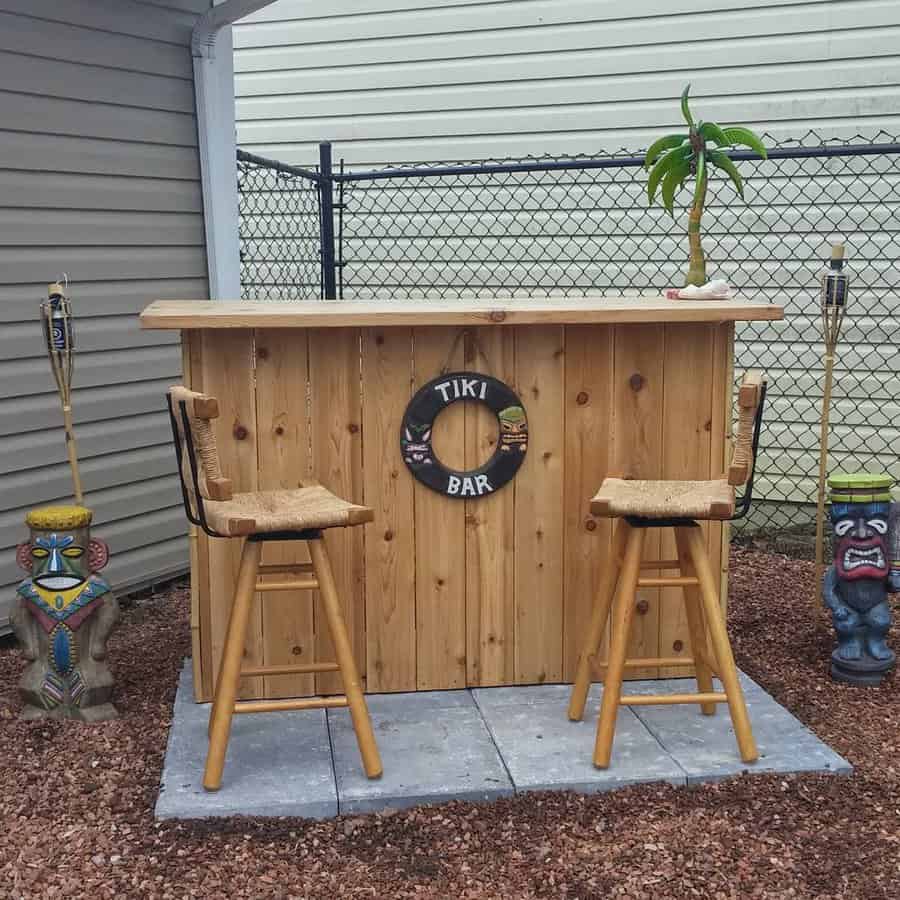
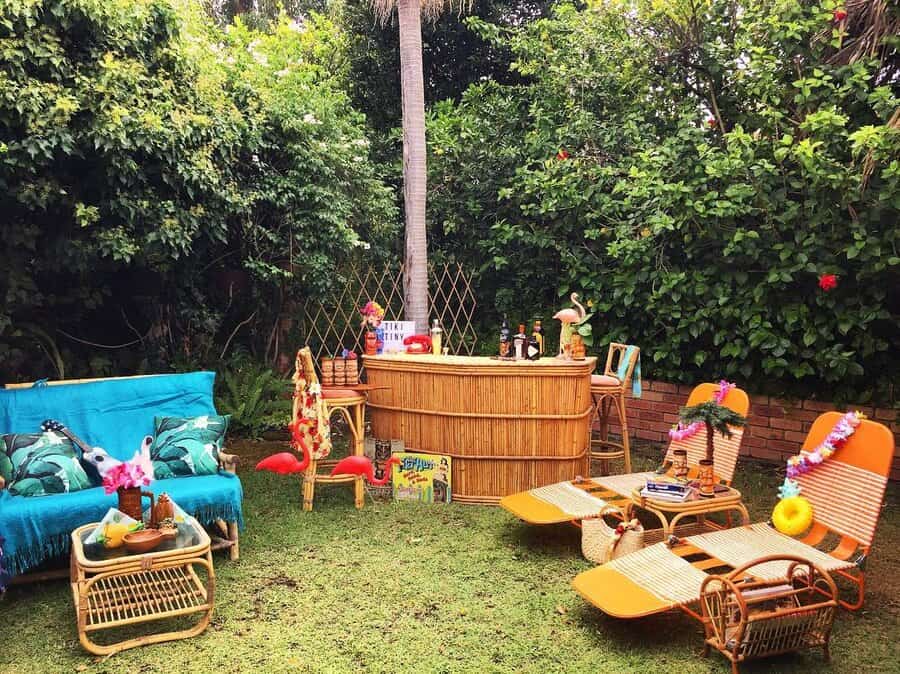
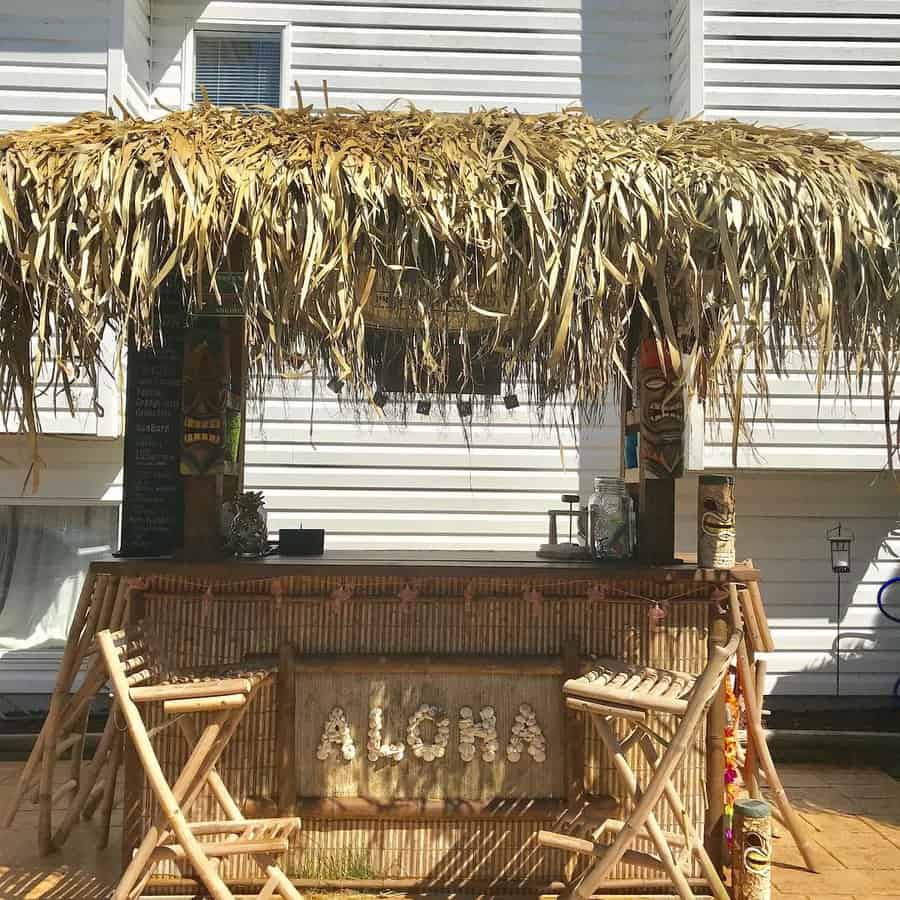
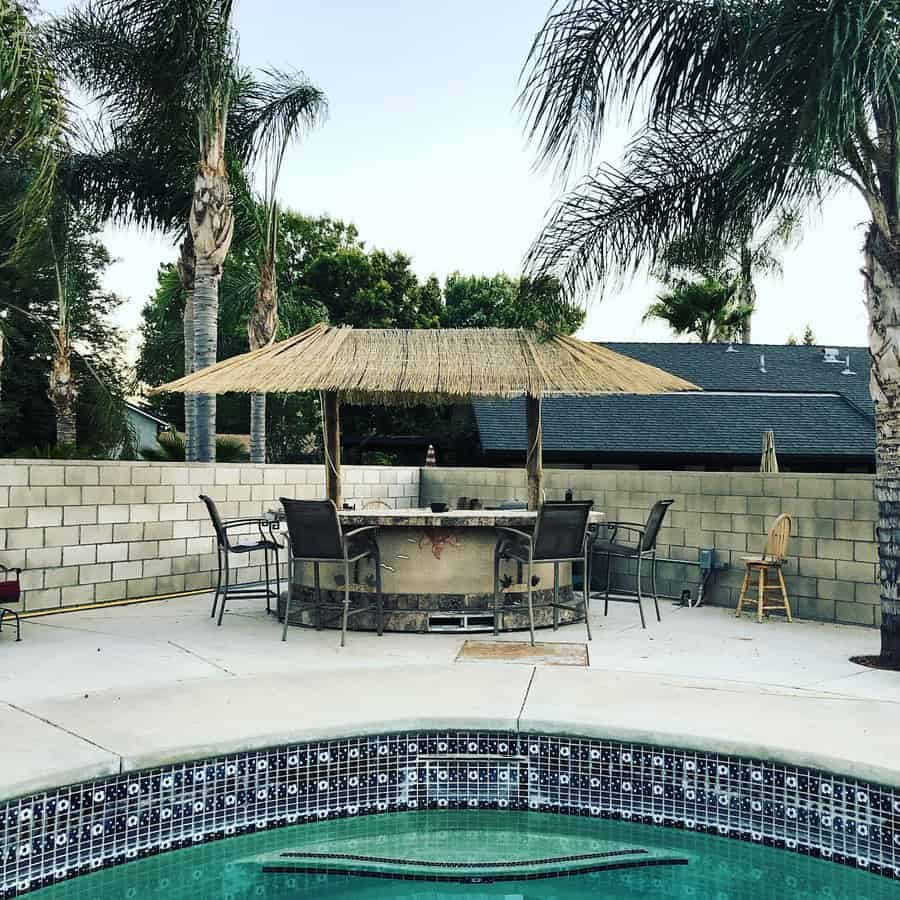
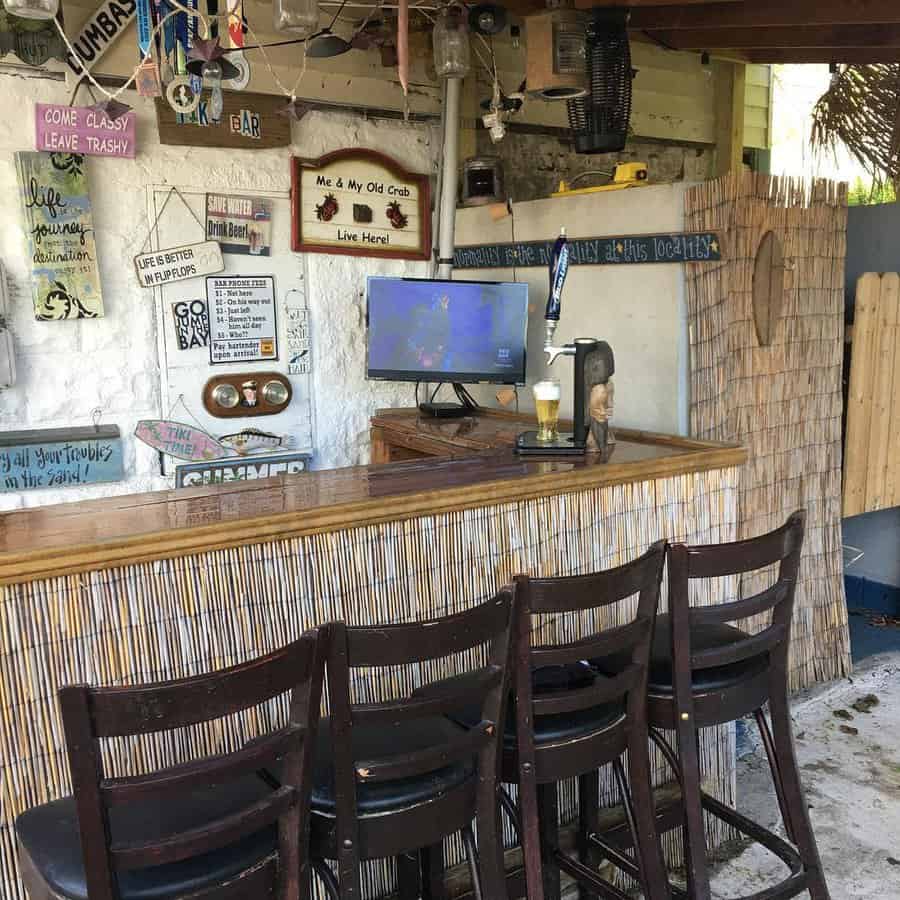
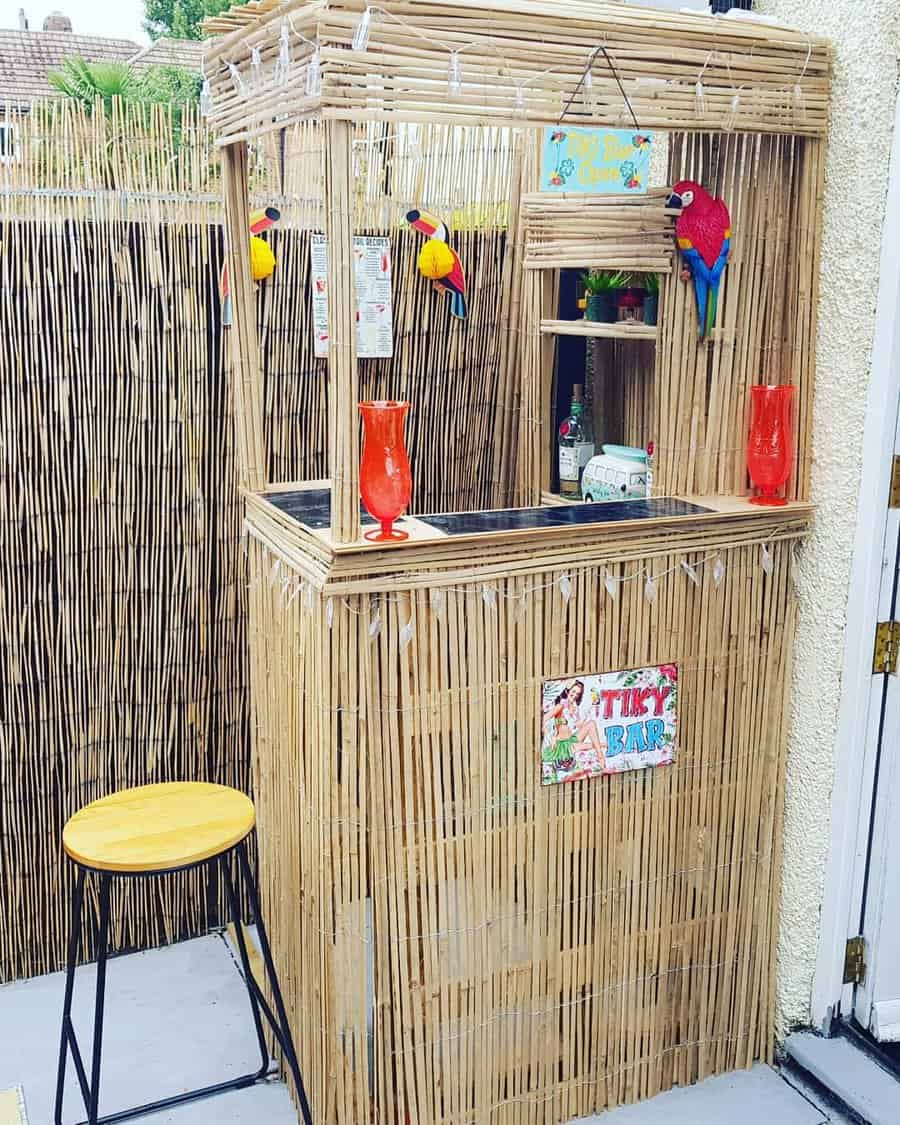
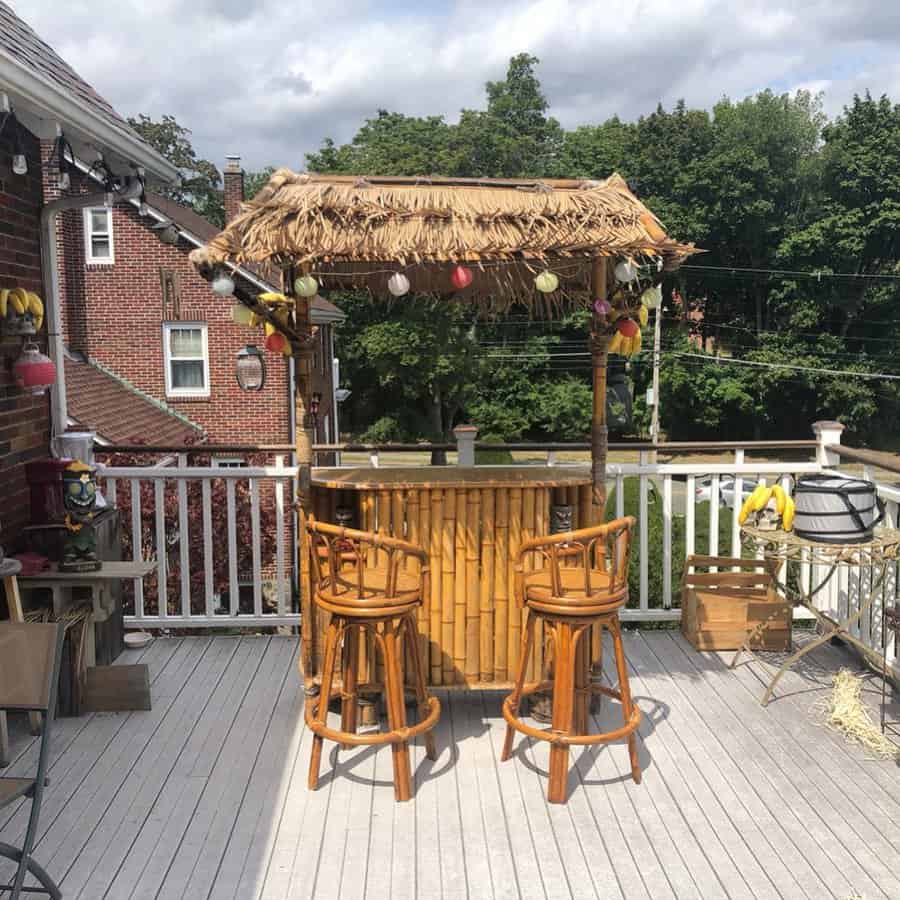
9. Experience Tiki Bar Escapes
Create your own island oasis getaway right in your own backyard by building a tiki bar on your patio. Use bamboo for the front of the bar; it comes in easy to work with rolled sheets or panels. Then create an overhead cover with a grass roof.
Source: @barbaracrosby via InstagramSource: @funguystuff5280 via InstagramSource: @j.luis.normandin via InstagramSource: @ryankellly5 via InstagramSource: @thebeardedtiki via InstagramSource: @thegoonatic via InstagramSource: @theslimmingman via InstagramSource: @vaudevillepictures via Instagram
Finish your tiki bar by painting the wood elements bright tropical colors. Then decorate it with all of the island decor that you would expect to see at a tiki bar. It could be decorative surfboards, theme signs, Hawaiian totems, or tropical animal wall hangings.
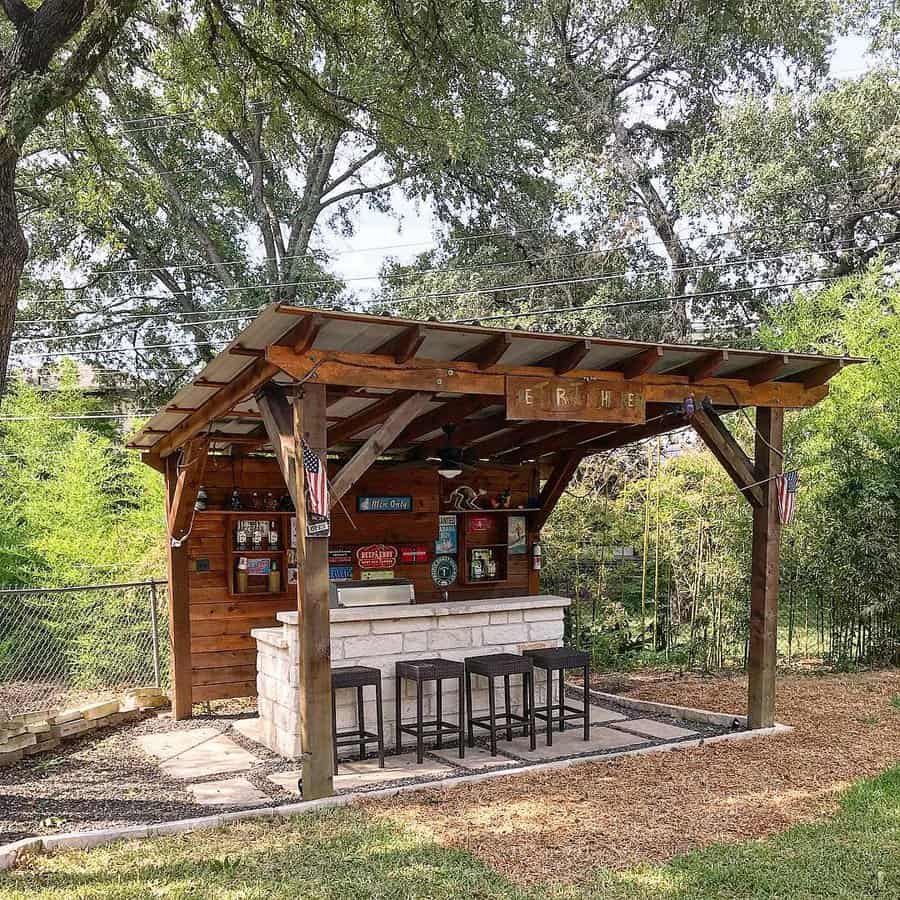
10. Go with the Hardwood for Outdoor Bar Construction
The popular wood of choice right now is reclaimed wood. It has an authentic rustic and vintage feel. The problem is that it isn’t the best choice for your backyard bar. Your best option is to build your bar out of hardwood. These woods are the most durable because they are impervious to water.
Source: @adamneilll via InstagramSource: @backyard_bars via InstagramSource: @cie_812 via InstagramSource: @haveninthemeadows via InstagramSource: @jimbobars via InstagramSource: @louisandcobars via InstagramSource: @myrealestateomind via InstagramSource: @outdoorsover50 via InstagramSource: @placehardwood via Instagram
If you can’t afford or find hardwood, then your next best option is a treated softwood. They won’t last as long as hardwood, but they’ll last a decent amount of time. You’ll want to regularly treat the wood to ensure you get the most out of it.
“Don’t take anything too literally. When throwing a coastal theme dinner, don’t just put seashells on the table. Instead, think about the colors and tones of seashells, what they remind you of and go from there.” – Jeremiah Brent
The beach vibe is a laid-back one that inspires thoughts of the perfect vacation. Consider channeling the feeling of your favorite coastal location during your bathroom makeover.
Start with a new shower curtain and then take it a step further. Change the wall color, switch out the tiles, and add beach-inspired decor.
These coastal bathroom ideas will have you dreaming of your next oceanside getaway.
[view_toc]
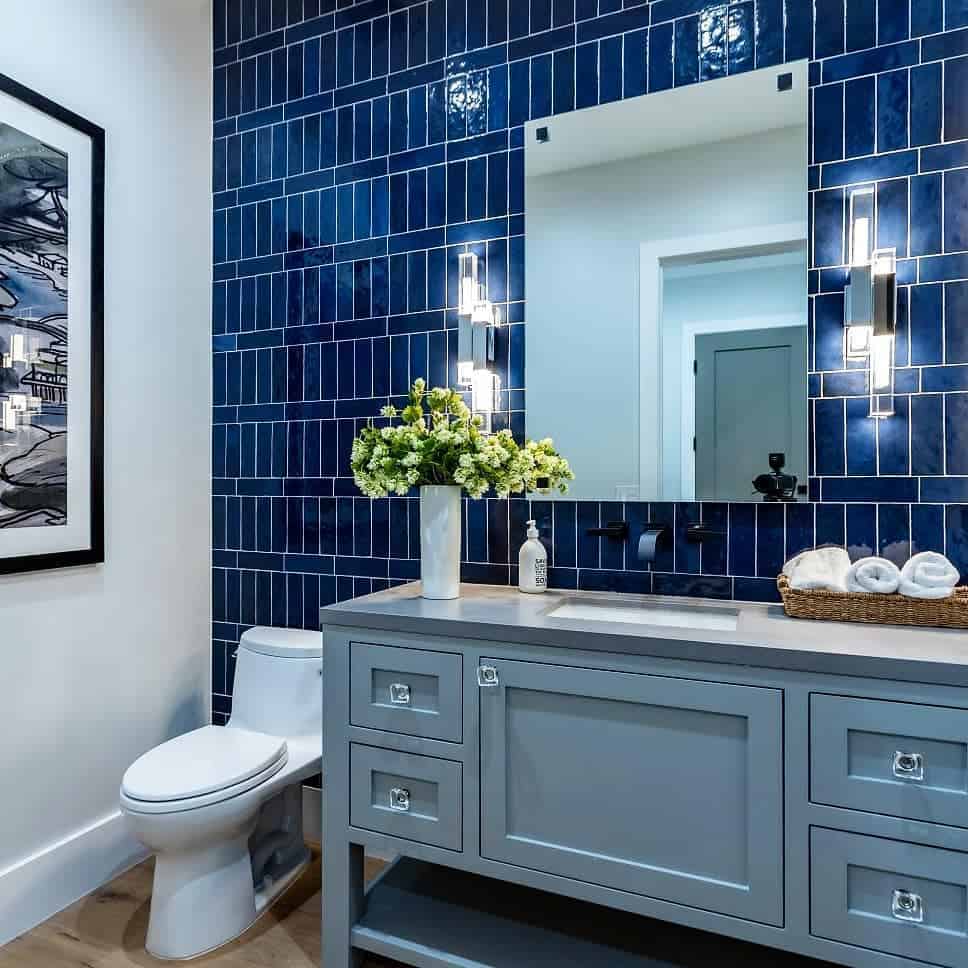
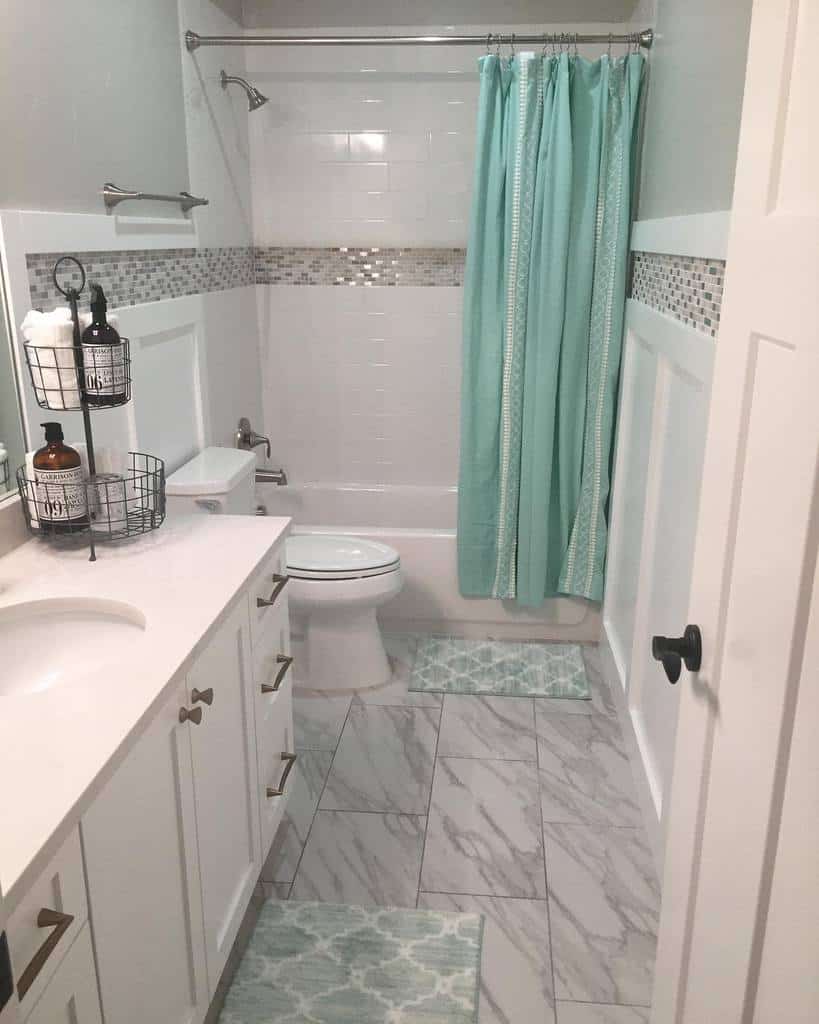
1. Incorporate Ocean-Inspired Blue Tones
Blue is the color of the sea and the perfect paint color for your beach-themed bathroom. The traditional approach is to simply paint the walls blue. However, this isn’t your only option. Paint your flat panel cabinets blue and give the vanity a fresh and modern feel.
Source: @claire_ccinteriors via InstagramSource: @moore_creative via Instagram
For a bold design, paint the ceiling blue. A pale shade will mimic the sky, while a deeper hue will look more regal and sophisticated as it mimics the color of the ocean. If you’re doing a bathroom remodel you could choose a bold blue color to mimic the colors of the water.
2. Add Bohemian Touches for a Unique Coastal Look
Embrace your creative side and wanderlust nature with a boho coastal look in your beach bathroom. Choose a mosaic tile design for your shower or vanity area.
If small tiles are too busy for your bathroom, consider a larger handmade tile. Handmade Moroccan tile Comes in a variety of blue and green shades. You could also get it in a fish scale design for a beachy feel.
Source: @our_build_bourne_boulavard via Instagram
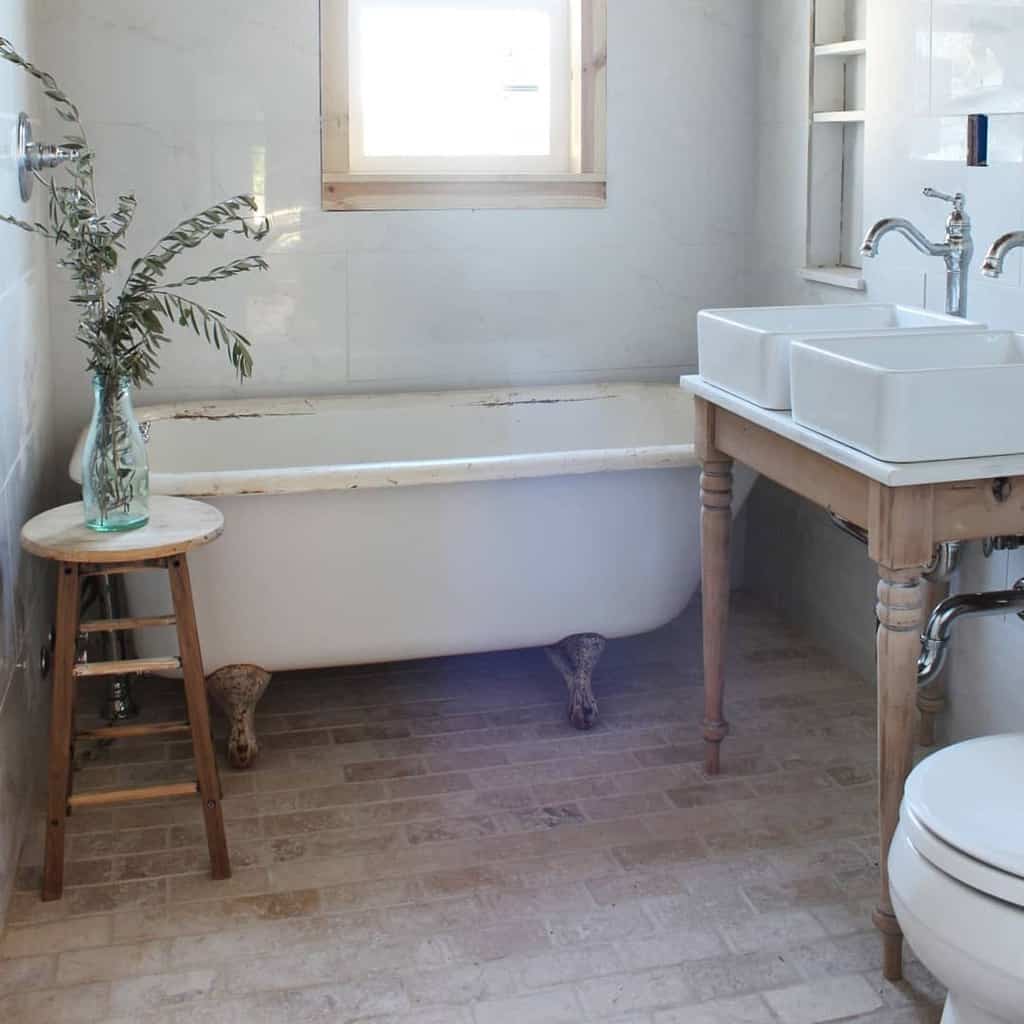
Finish your bathroom with a vintage clawfoot tub. This will give your bathroom an eclectic feel and balance the bold tile. Add a handmade wooden stool or hand-carved wood shelves. This will give your bathroom an organic feel. It also helps to look for pieces that are made in far-off tropical places.
3. Blend Coastal Charm with Farmhouse Style
Combining coastal design and farmhouse decor is the perfect combination for creating a coastal theme while also giving your home a warm and lived-in feeling. Add shiplap to the walls and paint it white. You don’t have to do the entire bathroom; just an accent wall is enough.
Source: @aligninteriorsgroup via InstagramSource: @linenandbasil via InstagramSource: @mavellahome via InstagramSource: @mbc.interiordesign via InstagramSource: @novelinteriors via InstagramSource: @sonyaburgessblog via Instagram
Look for salvaged or handmade wood pieces, such as a shelving unit, vanity cabinet, or chair. It should look well worn and imperfect. Add authentic nautical decorative items, such as markers, brass light fixtures, or a pulley.
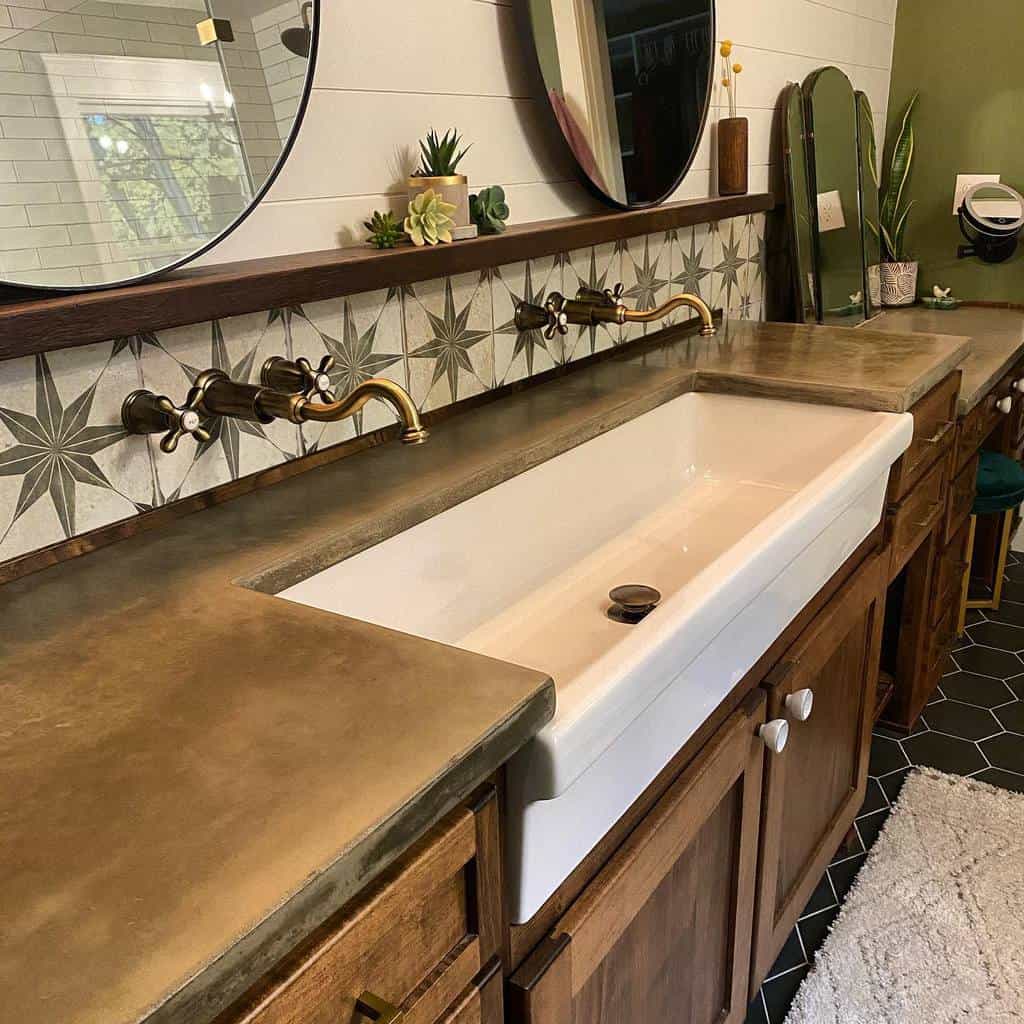
4. Use Nautical Metallics for a Touch of Elegance
Metal and the ocean don’t generally get along well. The salt in the water and the oxygen in the air work together to corrode and rust your metal.
A similar effect happens in your bathroom since it is also a high moisture environment. This is why using nautical metal fixtures is perfect for your master bathroom.
Source: @andyanddeb via InstagramSource: @zigzag.developments via Instagram
Try using a nautical-inspired sink faucet with your vessel sink. Or mount brass wall sconces on either side of the vanity mirror.
Use boat-worthy metal accents and hardware for the drawer pulls and other metal elements in the room. Not only will this give your bathroom an authentic feel, but it will also give it more durability and corrosion resistance.
5. Create a Minimalist Coastal Bathroom Oasis
You shouldn’t use a lot of coastal decor in your minimalist master bath.
Stick with a floating vanity, glass pane shower enclosure, mirror, and toilet for the bathroom design. Bathroom decor would add clutter, which goes against the main principle of minimalism.
Source: @clayandclover_ via InstagramSource: @strittdesignandconstruction via Instagram
Channel a coastal feel by using wood, shades of blue, sea glass, and coastal plants. This keeps the design minimal while also creating a calming and bright bathroom. Consider also adding texture with strategically placed woven baskets and matching pendant light.
6. Design a Contemporary Coastal Bathroom Retreat
A coastal design theme and modern trends blend well together to create a sophisticated and almost elegant master bathroom.
Start with a marble countertop that is in a fresh white color. Then combine it with a darker wood. You could do this by oiling teak or using mahogany. Then use gold for the metal fixtures.
Source: @house.becomes.home via InstagramSource: @nickyhousesnaps via InstagramSource: @whd.design.buro via InstagramSource: @zigzag.developments via Instagram
Choose pieces that have minimal detailing and design. Focus on clean straight lines for the vanity, shelving, and shower. Slab-style cabinet doors are perfect for the vanity to create hidden storage space.
The shower area could have large glass sheets as the enclosure. You could also leave everything open and build a wet room.
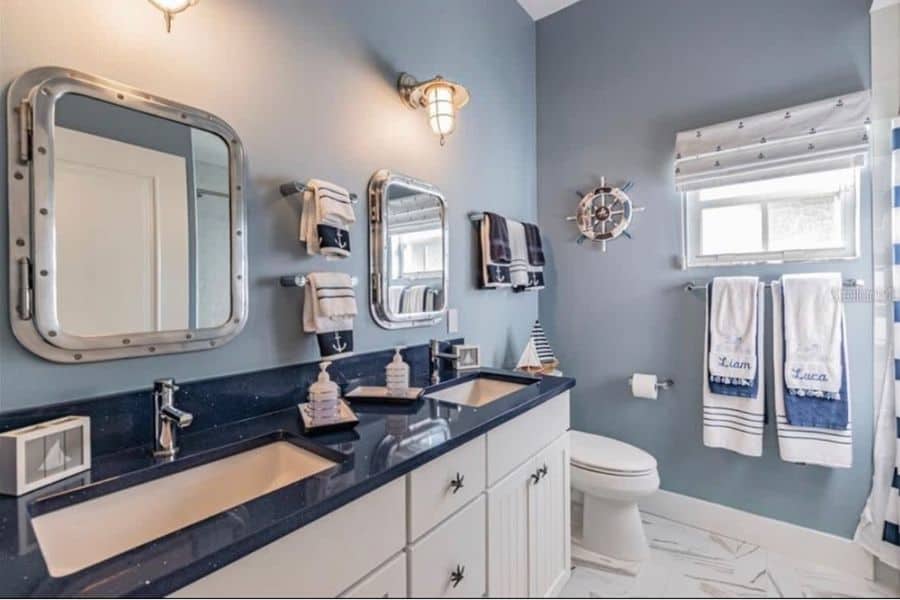
7. Incorporate Classic Nautical Elements
Embrace the open ocean with nautical bathroom ideas. This is slightly different than a beach-style themed bathroom. Use a mirror that has rope for the frame. Or a round mirror that looks like a porthole.
Use a dark blue color and pair it with crisp white. Then use bright red and yellow as accents. If you have a tub, look for a white or slightly off-white shower curtain that’s a canvas to mimic the sails on a ship.
Source: @bayswaterhome via InstagramSource: @hallidaybuilders via InstagramSource: @kefi_storeuk via InstagramSource: @lindross_remodeling via InstagramSource: @the.adventures.of.el via InstagramSource: @todashtondesign via Instagram
Use elements that you would find on a yacht or sailboat as decor, for example. Nautical lamps have a cage over them to give them durability and a unique look. You can find similarly inspired designs for use in your bathroom.
8. Embrace Serene Neutrals for a Beachy Ambiance
Neutral colors are perfect for creating a calming yet beachy feel. Choose colors that resemble the colors of the sand, such as light beige and cream. Use a few shades that are both light and dark. This adds depth to the room and keeps it from feeling stark and sterile.
Source: @aligninteriorsgroup via InstagramSource: @ccg_interiordesign via Instagram
Neutrals are also good because you can find them easily in natural materials. This makes it easy to add texture, which brings warmth to the bathroom. You can easily do this with beach materials, such as rope, wicker, wood, and shells.
9. Transform Your Powder Room with Coastal Elegance
Your powder room is small, with just a bathroom vanity and toilet. You can give it a beach house feel by adding decorative sea glass in the form of a chandelier. Or a beachy vibe with a teak framed vanity mirror.
Source: @duckhomes via InstagramSource: @house.becomes.home via Instagram
Use more delicate decor in your powder room that isn’t durable enough for a master bathroom that you use every day. It’s the perfect place for displaying your collection of seashells or shark teeth. Arrange clear glass jars on floating shelves to display your collections.
10. Decorate Your Walls with Coastal Inspiration
Your bathroom walls are the perfect place for creating the kind of coastal vibe you want accent wall. You could use clear glass tile that is the colors of the water. It should be a range of blues and greens with a few white or clear tiles thrown in. Small pebbles or stones will give you the durability of tile but with a more organic feel.
Source: @akwdesignandhome via InstagramSource: @delpinocustom via InstagramSource: @tamrablair_interiordesign via Instagram
You can get more creative on the walls that won’t get wet. You could paint or wallpaper them. Another option is to use wood shiplap or cedar shingles.
11. Opt for Crisp White Themes in Coastal Bathrooms
The all-white design theme was one that was in full swing for several years. However, it is starting to fall out of favor because it’s so hard to keep clean. It also feels a bit bland and cold. Giving your all-white bathroom a coastal vibe is perfect for adding warmth and comfort to a sterile white room.
Source: @renovating_as_5 via Instagram
Keep the white walls and white tile. Add to it natural materials like metal and wood. Gold metal fixtures add color and warmth without taking away from the white theme. Wood has a similar effect and can give your bathroom a coastal feel. Try using the wood for the vanity, countertop, flooring, mirror frame, or shelving.
12. Accentuate with Wicker and Bamboo for a Coastal Vibe
To give your bath the ultimate coastal feel, you need bamboo or wicker furniture. It should have a woven rattan design. This is the furniture you typically see on decks and patios but is actually commonly used in coastal environments. It’s durable to the high humidity and provides a level of breathability that keeps things fresh.
Source: @a_house_is_built via Instagram
Choosing traditional rattan furniture will give your bathroom a boho or vintage feel. There are also modern designs that can keep your bathroom looking fresh and in line with current trends.
13. Integrate Natural Wood Elements for Warmth
Skip the pressed wood and plywood as these have no place in a coastal environment. The high humidity will cause them to swell, warp, and split. It also makes them a terrible idea in your bathroom. Instead, use hardwoods that are impervious to water. Teak and bamboo are popular options.
Source: @our_build_bourne_boulavard via InstagramSource: @the.bowen.edit via Instagram
Driftwood is also a great option. This is wood that’s been exposed to salt water and the elements for so long that it goes through a decomposition process. It becomes impervious to water and incredibly durable. You can find driftwood on all coastal shores throughout the world that’s formed from a variety of wood types.
It’s easy to feel like we have nowhere to relax after a long day at work or running errands.
If that sounds like your day-to-day experience, a backyard oasis might just be the perfect landscaping project for your home.
What is a backyard oasis? It’s a private, tranquil outdoor space of your very own. And all it takes is a little planning to transform any backyard into a luxurious getaway.
If you’re ready to prioritize “me time” and give your yard a new purpose, keep reading for our favorite backyard oasis ideas you can try for yourself.
[view_toc]
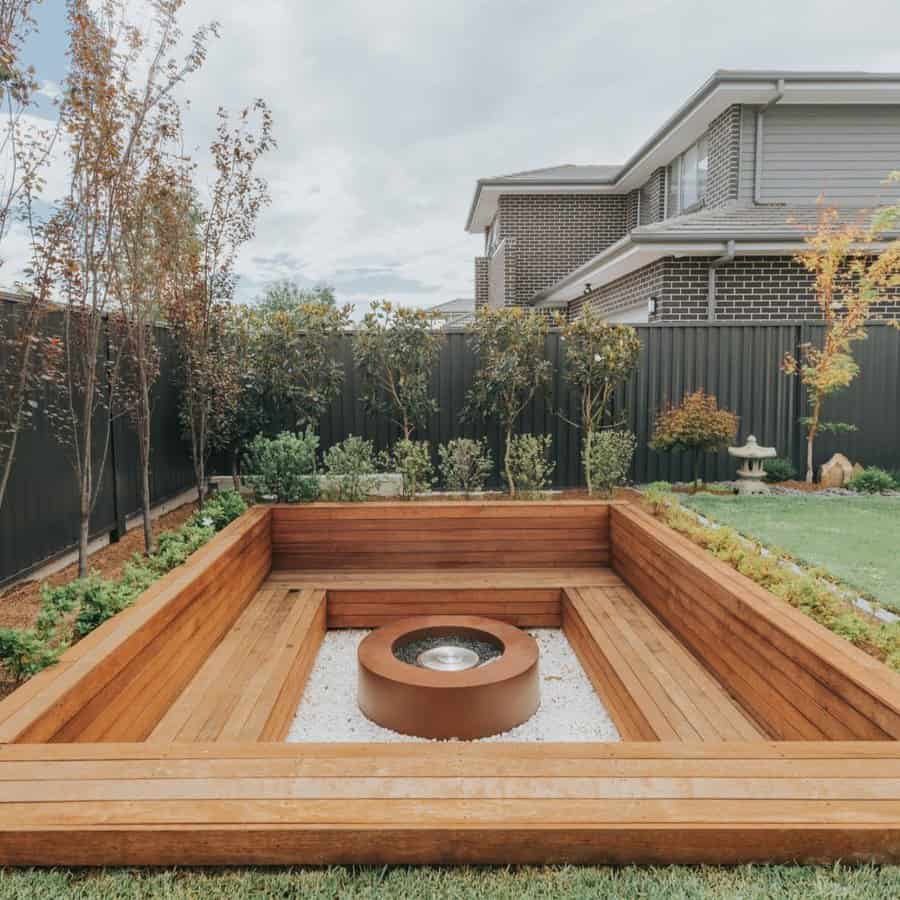
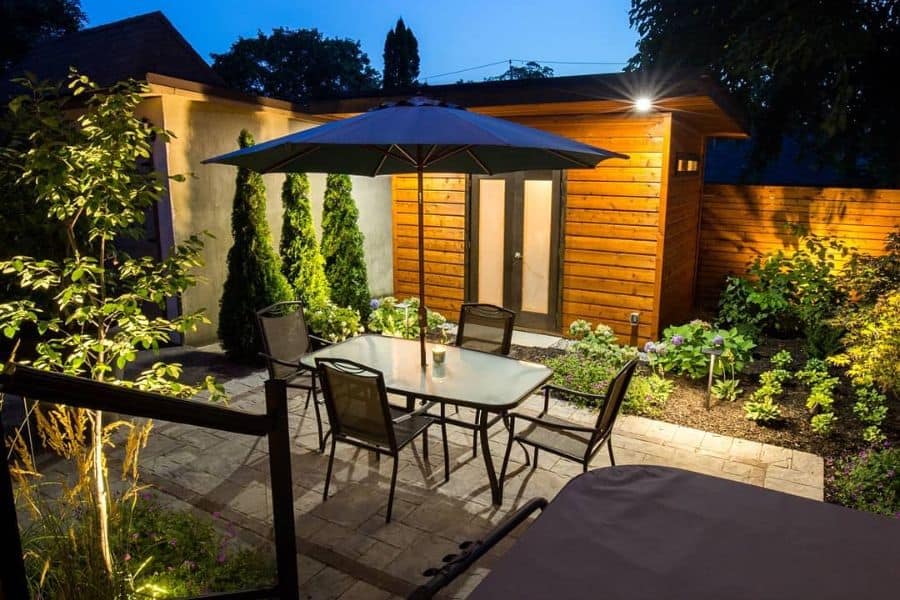
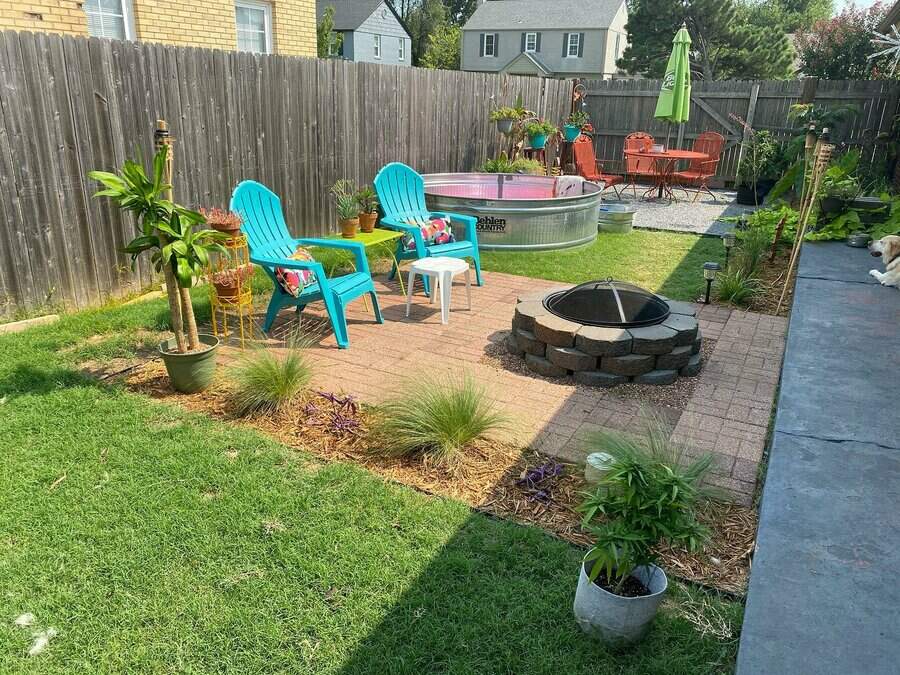
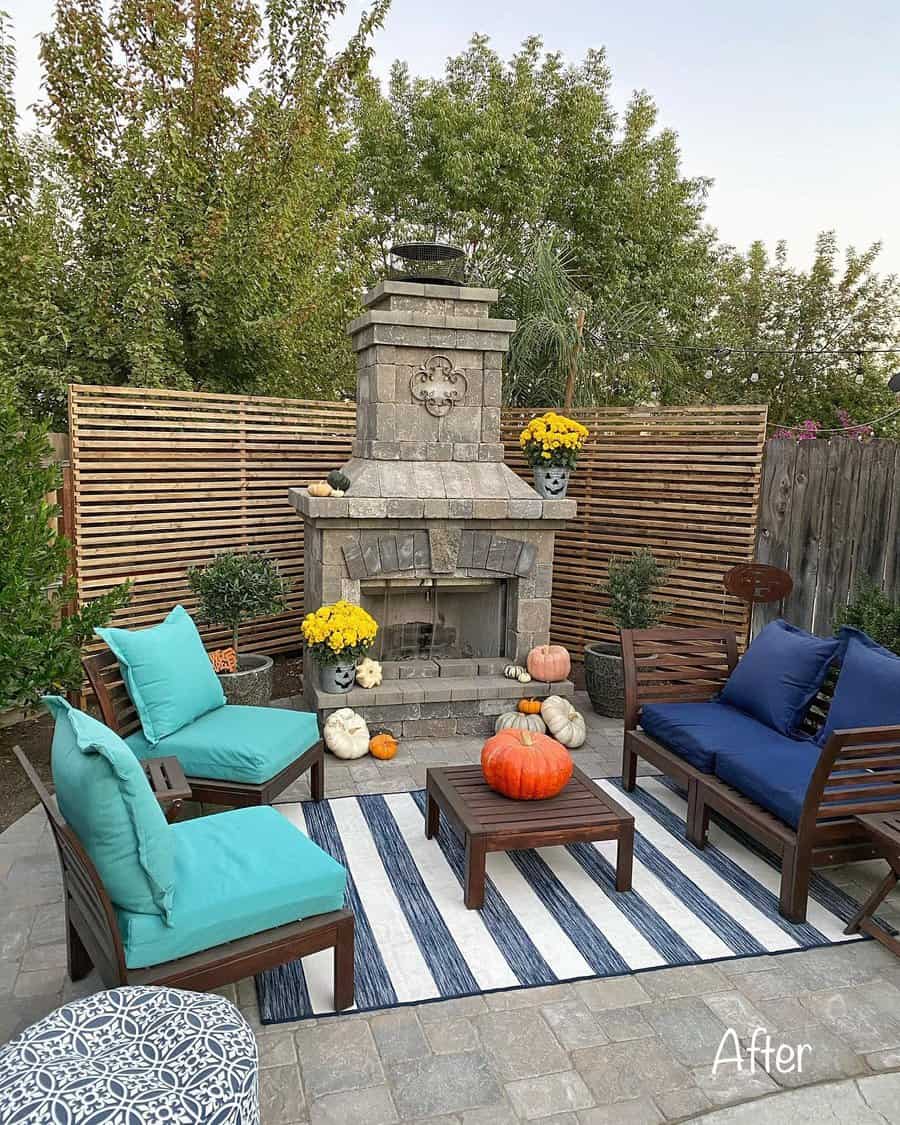
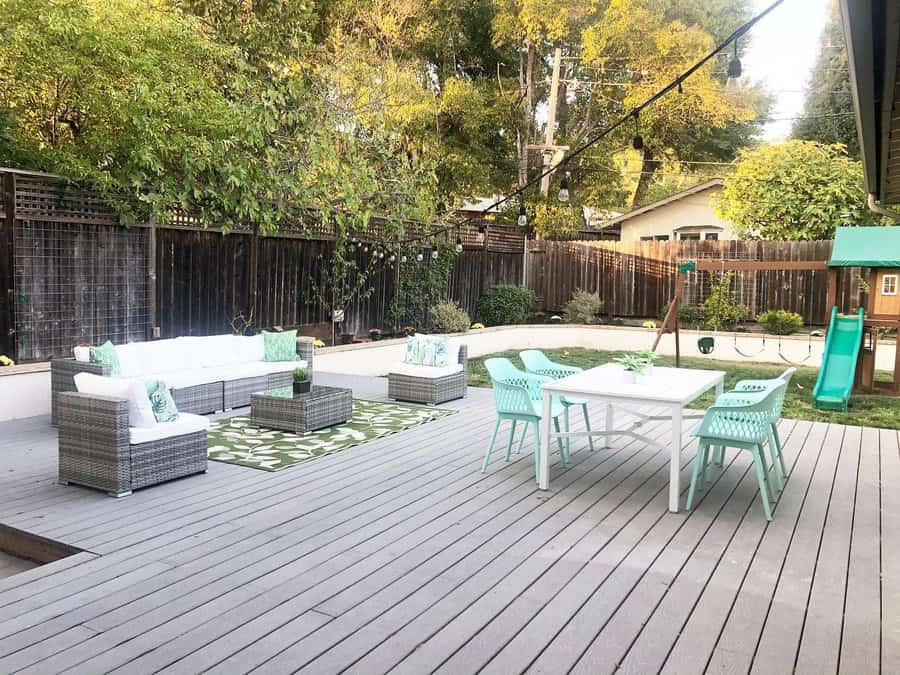
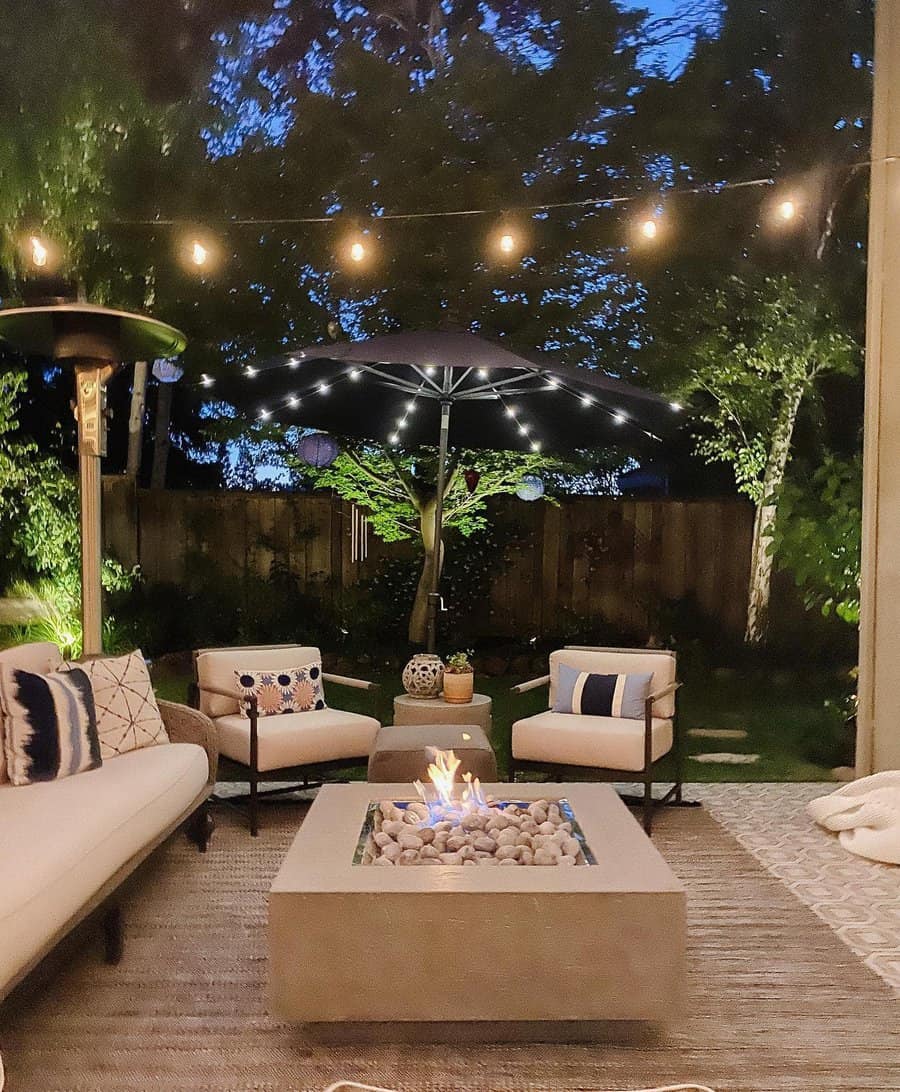
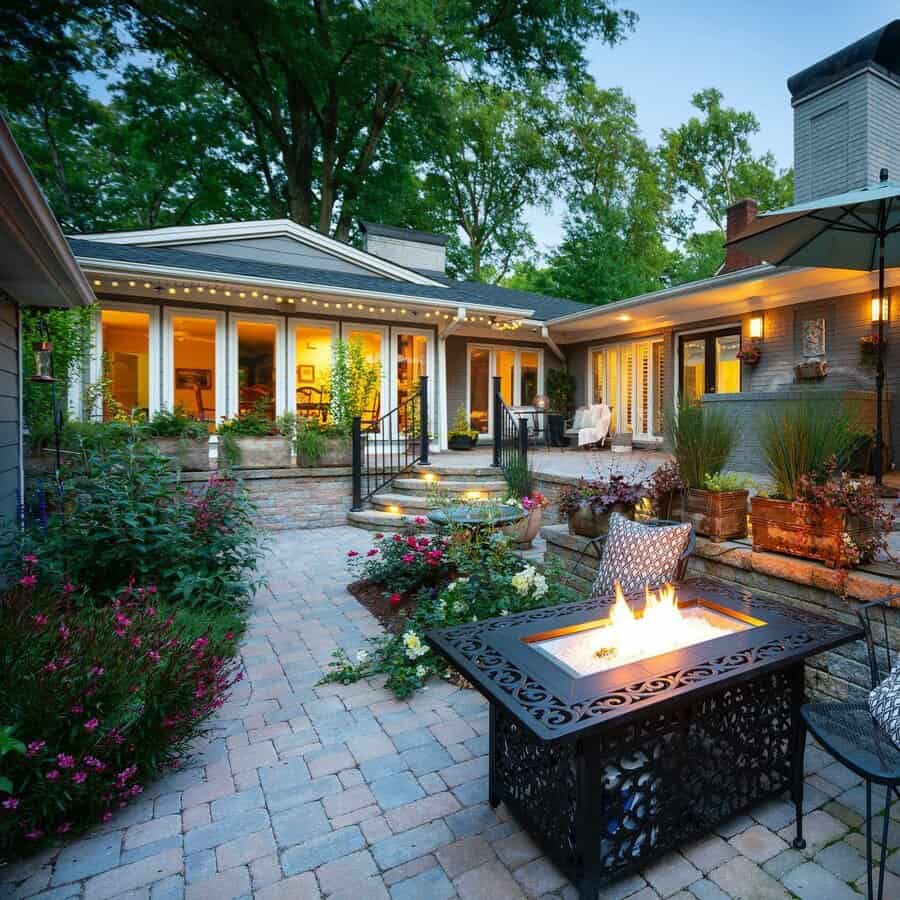
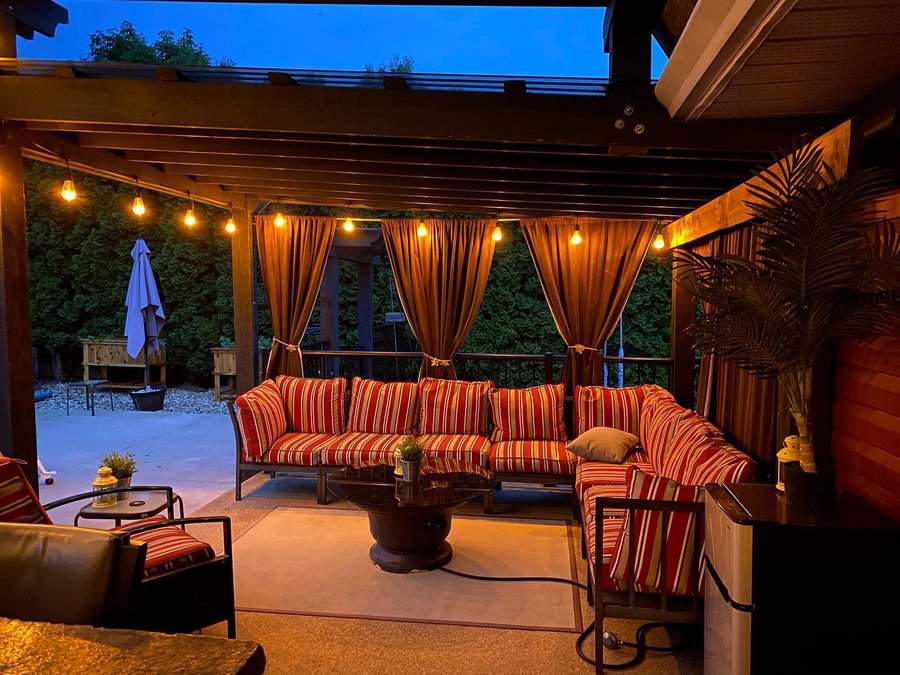
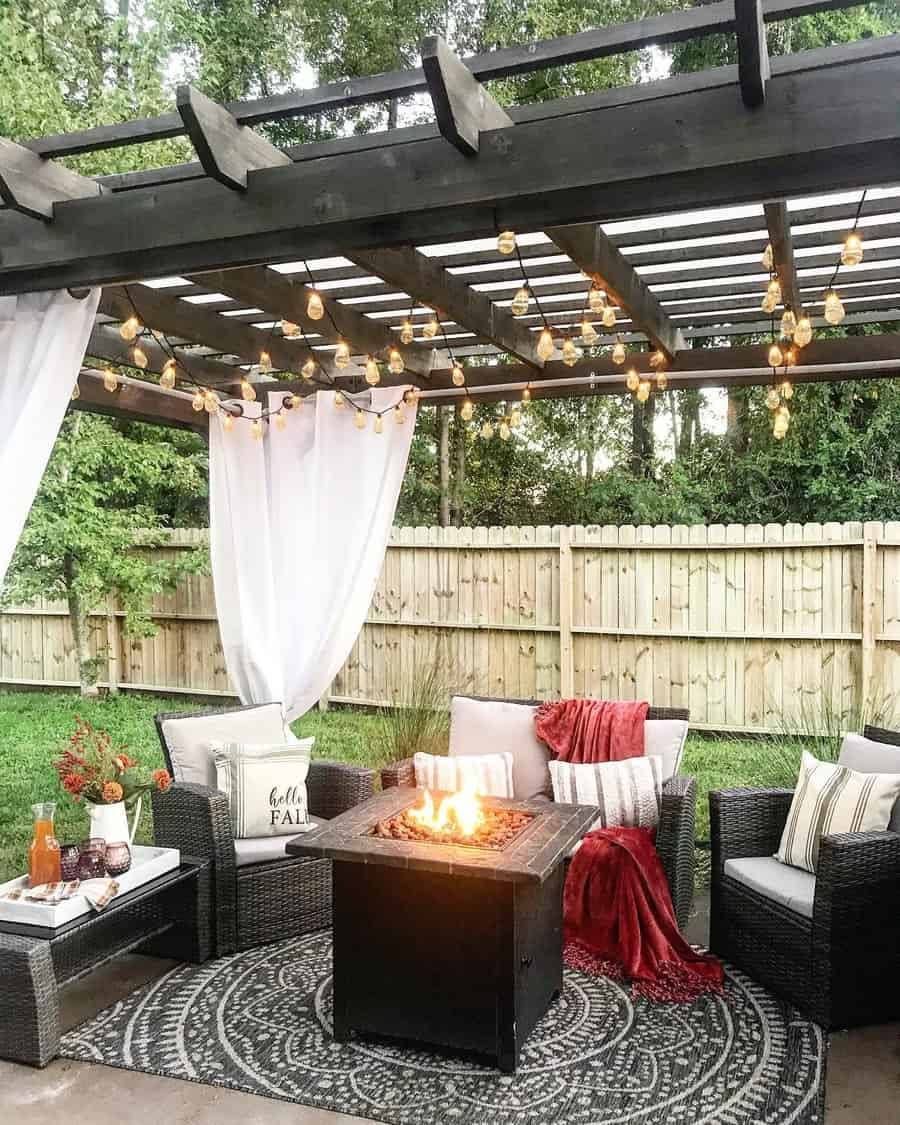
1. Set up a Backyard Fire Pit
Transform your backyard into a warm, inviting space with a fire pit. Select a style that complements your outdoor decor, whether it’s a rustic stone circle or a sleek, modern metal design. Position it as a focal point and surround it with comfortable seating. This setup not only adds a cozy ambiance but also extends your outdoor gatherings into the cooler evenings.
Source: @coramayday via InstagramSource: @jenstumps via InstagramSource: @jocelyn_jujess via InstagramSource: @lieu.s via InstagramSource: @mayfair__modern via Instagram
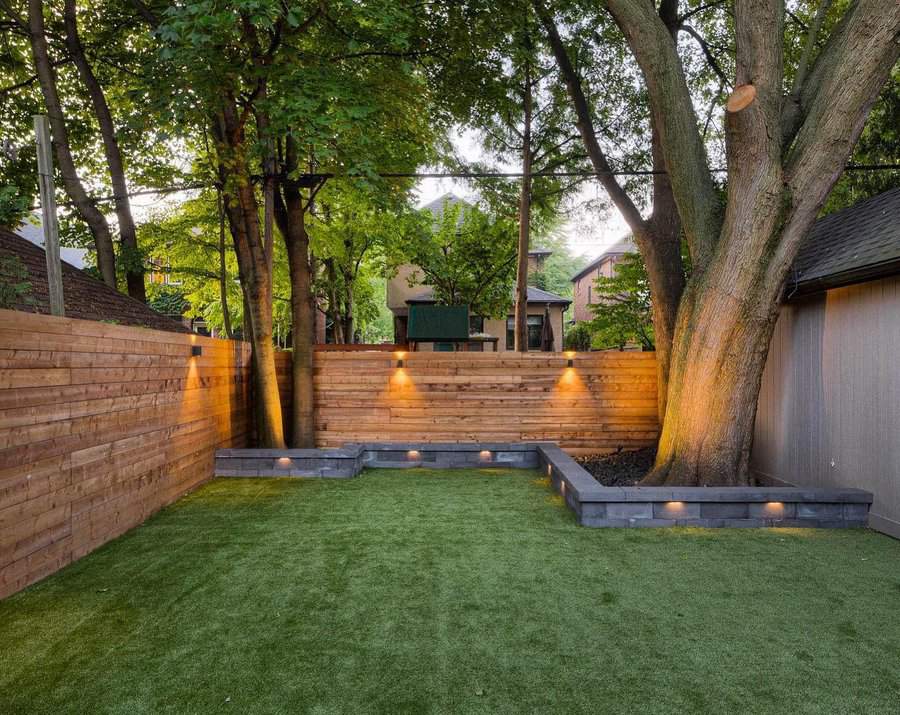
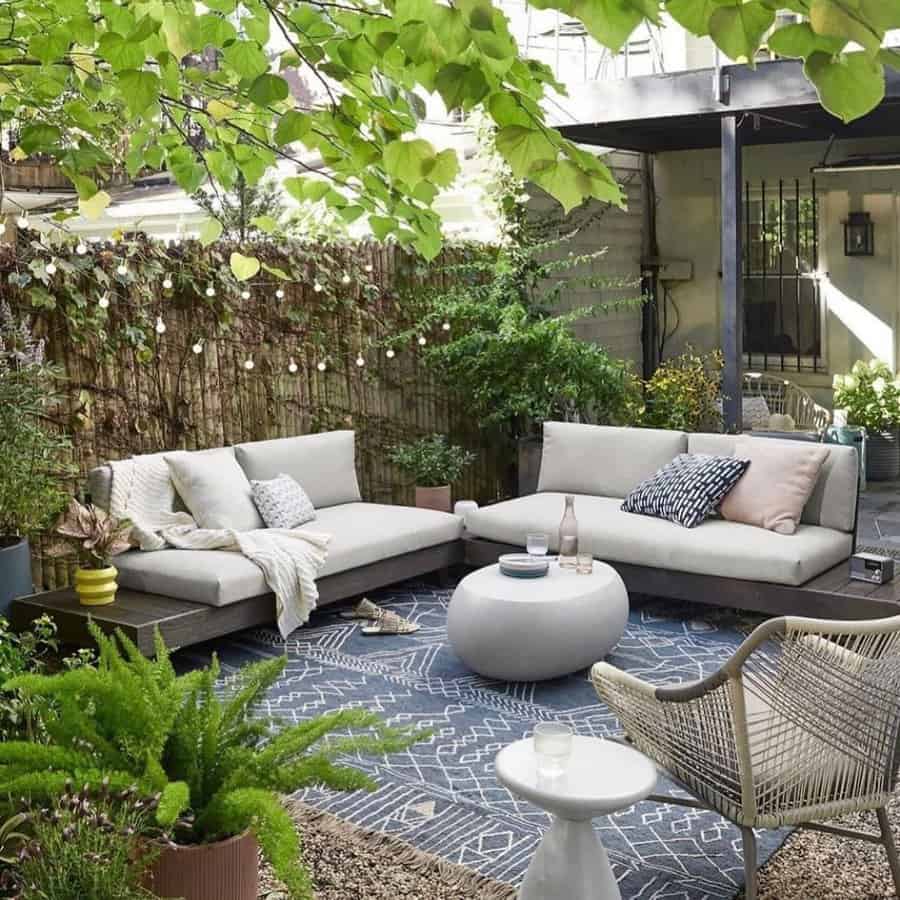
2. Build a Privacy Fence
A privacy fence is crucial for creating a secluded backyard haven. Choose materials like cedar or bamboo for a natural look, or go for vinyl or composite for low maintenance. A fence height of at least six feet ensures privacy, while adding lattice or horizontal slats can introduce a decorative touch. This barrier not only secures your space but also serves as a backdrop for outdoor decor.
Source: @erleen.rae via InstagramSource: @secondstreetkate via InstagramSource: @sugar.oak.design via Instagram
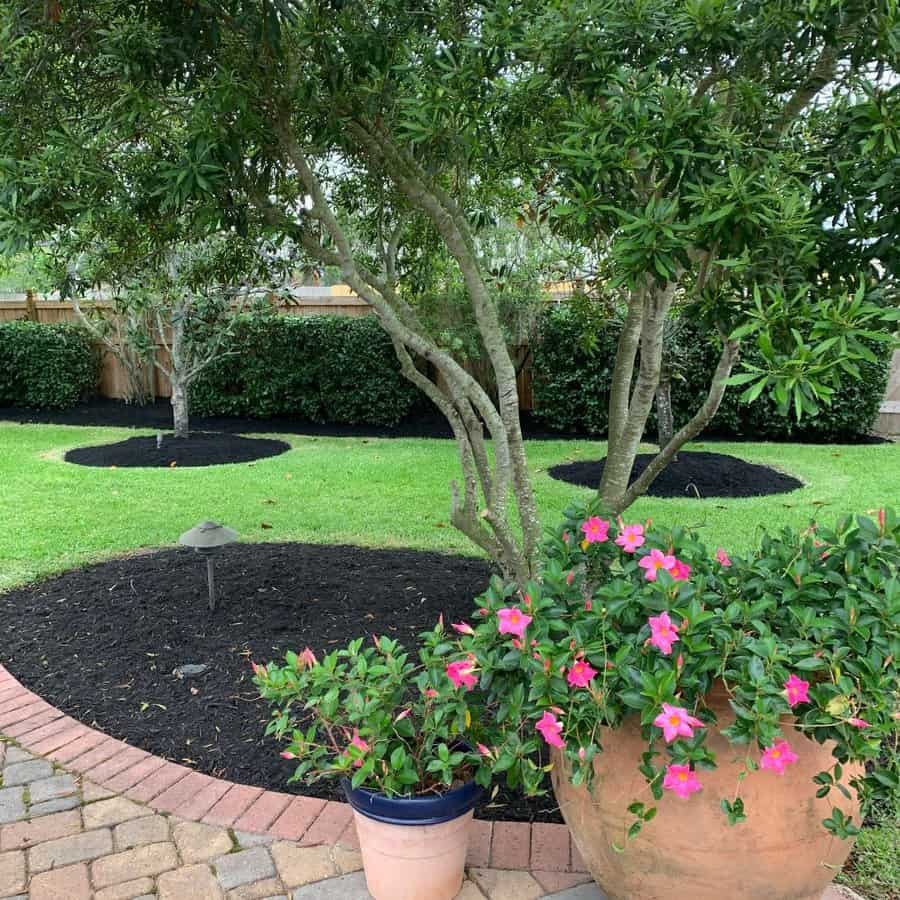
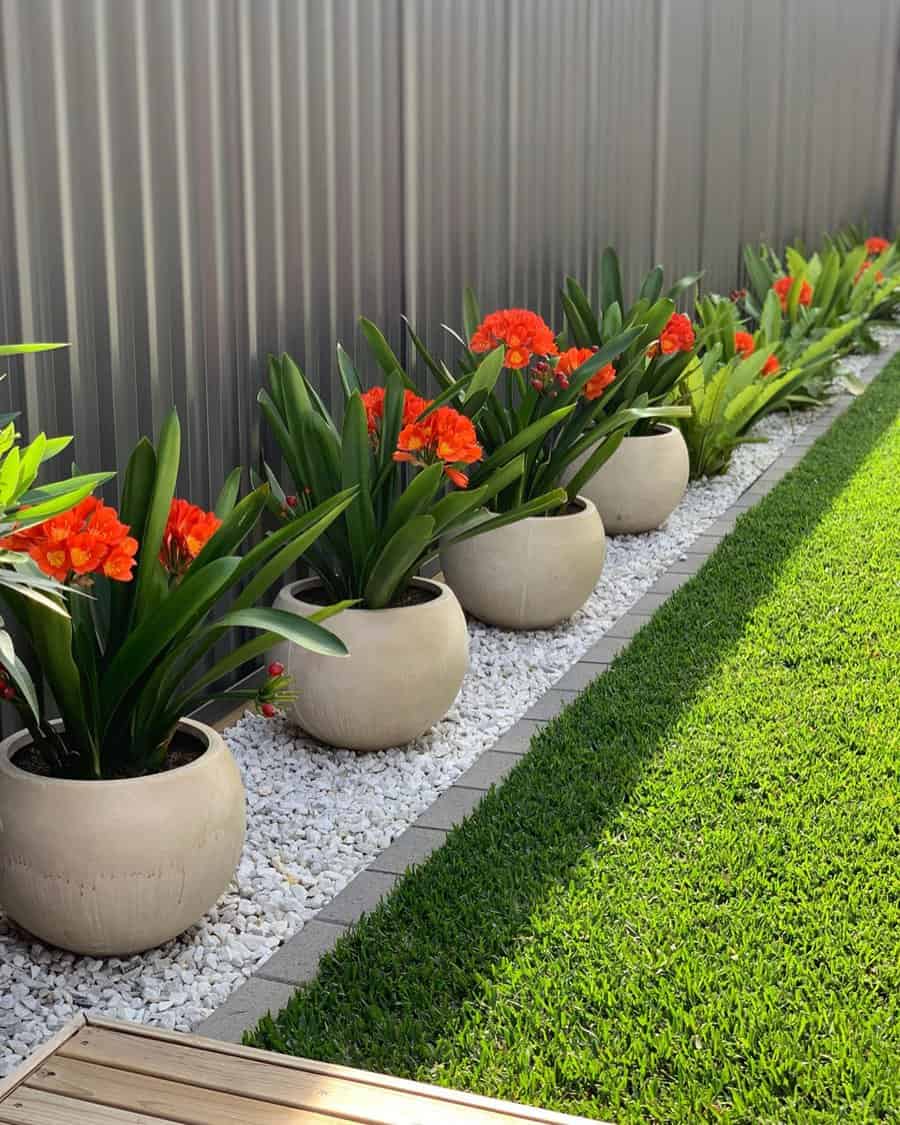
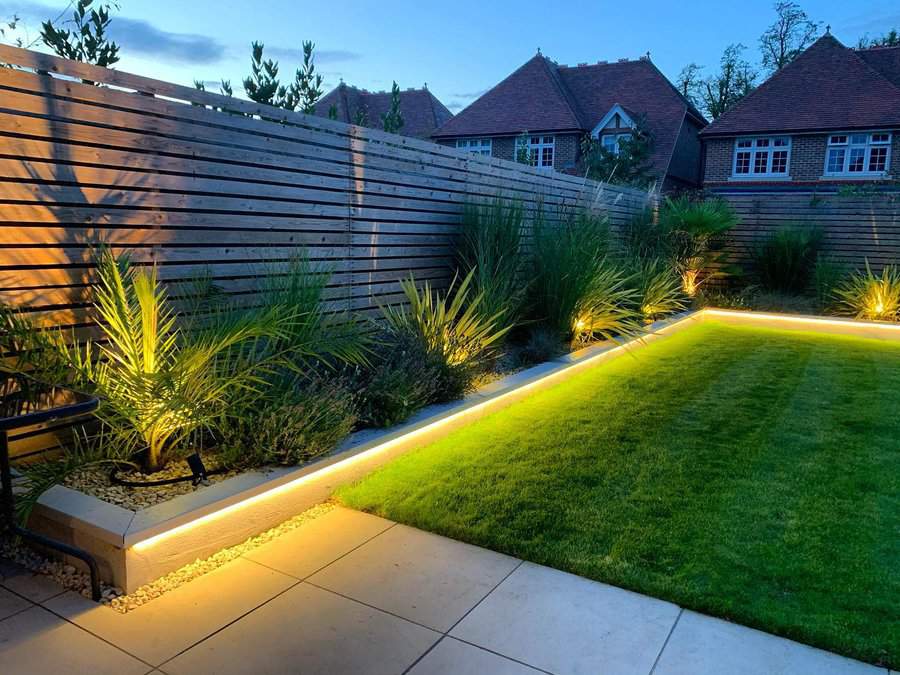
3. Incorporate Plants and Greenery
Infuse life and color into your backyard with a variety of plants and greenery. Choose native plants for low maintenance and sustainability. Arrange them in clusters for visual impact, mixing heights and textures. Don’t forget to include some aromatic herbs or flowering plants to add sensory pleasure to your outdoor oasis.
Source: @haus.of.kerr via InstagramSource: @alluredecoronline via InstagramSource: @vlwentzel via Instagram
4. Add a Stock Tank Plunge Pool
For a refreshing retreat, consider a stock tank plunge pool. It’s a cost-effective and chic alternative to traditional pools. Choose a galvanized tank for a rustic touch or paint it to match your outdoor theme. Place it in a sunny spot, add some deck chairs, and enjoy a cool dip on hot days.
Source: @stayathomewithchelsea via InstagramSource: @houseofbutterfield via Instagram
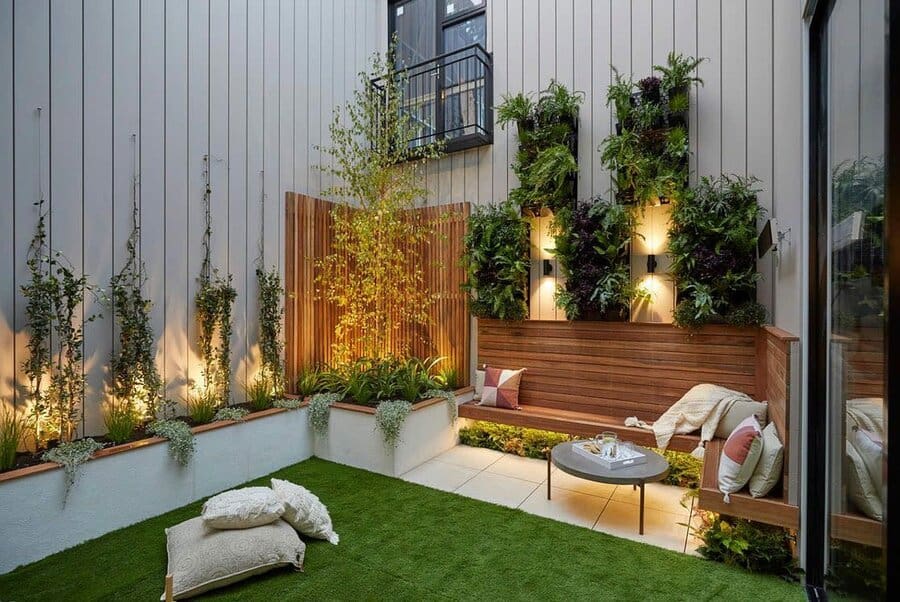
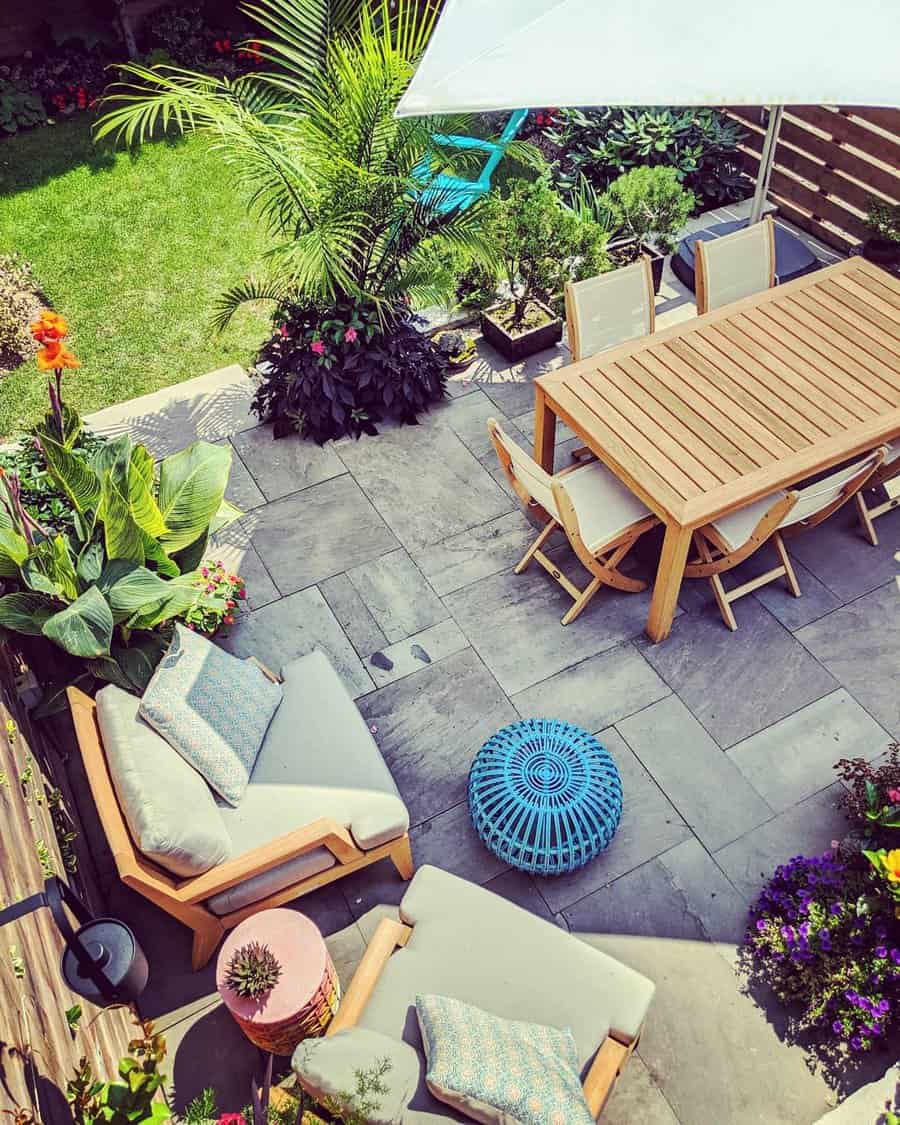
5. Build a Backyard Deck Patio
A deck patio elevates your outdoor space both literally and figuratively. Use materials like natural wood or composite decking for durability and style. Design the deck with levels to define different areas for dining, lounging, and cooking. Proper lighting and a few potted plants will make your deck patio the highlight of your home.
Source: @erleen.rae via InstagramSource: @heidi_prahl via InstagramSource: @maxinemanniondesign via InstagramSource: @mcdonnellprocontracting via InstagramSource: @mosher_design via Instagram
6. Create a Cozy Outdoor Oasis with a Modern Gas Fire Pit
Imagine a chic, contemporary space with a modern gas fire pit as its centerpiece. Select a sleek, minimalist design that doubles as a statement piece. Gas fire pits offer ease of use and clean burning, perfect for urban backyards. Surround it with plush seating and ambient lighting for a sophisticated, yet cozy atmosphere.
Source: @caitinthecommons via InstagramSource: @taradobrecdesigns via InstagramSource: @frankfordshade via InstagramSource: @thatfunkymonkeysb via InstagramSource: @thestonemanrocks via InstagramSource: @the_cozycasa via Instagram
7. Install Concrete Pavers
Concrete pavers offer a versatile way to upgrade your backyard. They come in various shapes, sizes, and colors, allowing for creative patterns and designs. Use them for pathways, patios, or even as stepping stones through a grassy area. They’re durable, easy to maintain, and add a structured, yet elegant look to your outdoor space.
Source: @earthandsole via InstagramSource: @earthscape_ via InstagramSource: @fourcornersinteriors via Instagram
8. Build a Brick Patio
A brick patio offers a timeless and classic appeal to your backyard. Choose bricks that complement your home’s exterior and consider laying them in unique patterns like herringbone or basket weave for added visual interest. Ensure proper ground preparation with a solid base to prevent shifting and settling. This type of patio is not only durable and low maintenance but also adds a warm, inviting touch to your outdoor space, perfect for gatherings or quiet relaxation.
Source: @thefontaineflat via InstagramSource: @casacoluch via Instagram
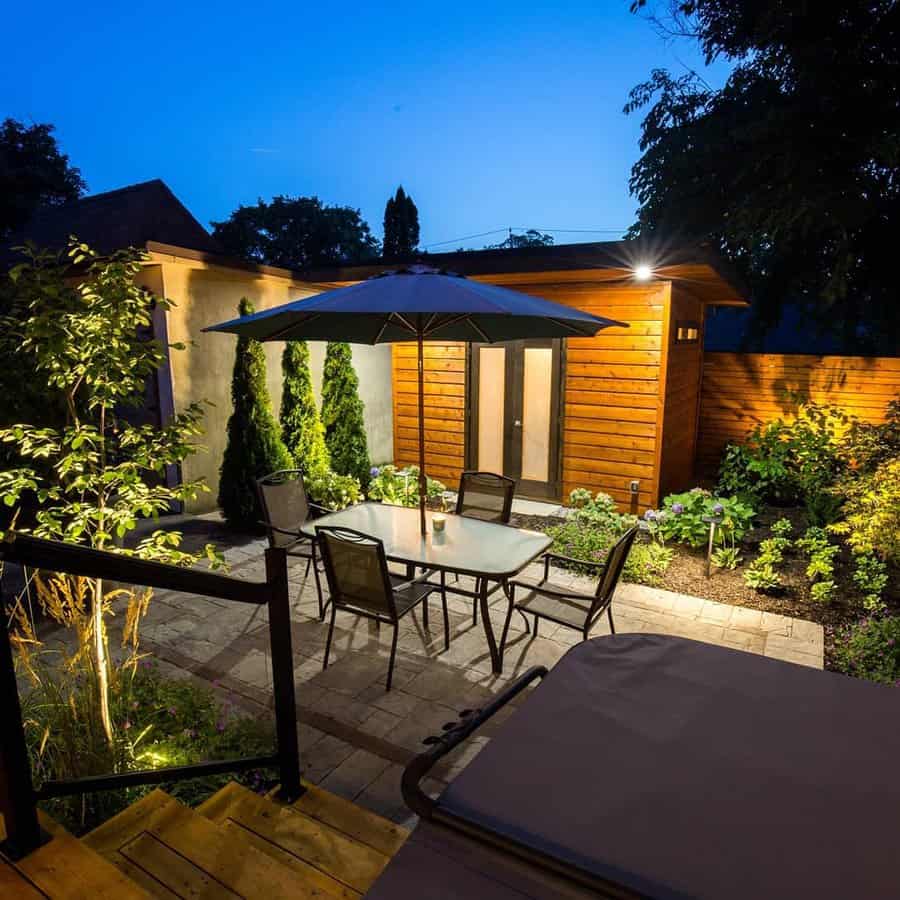
9. Create Outdoor Seating Area for Two
Design an intimate seating area for two, perfect for quiet conversations or enjoying a morning coffee. Choose a charming bistro set or a pair of comfortable lounge chairs. Position this nook in a scenic spot of your garden, perhaps shaded by a tree or overlooking a flower bed, to make these moments truly special.
Source: @illuminateelectric via InstagramSource: @lisa_in_va via Instagram
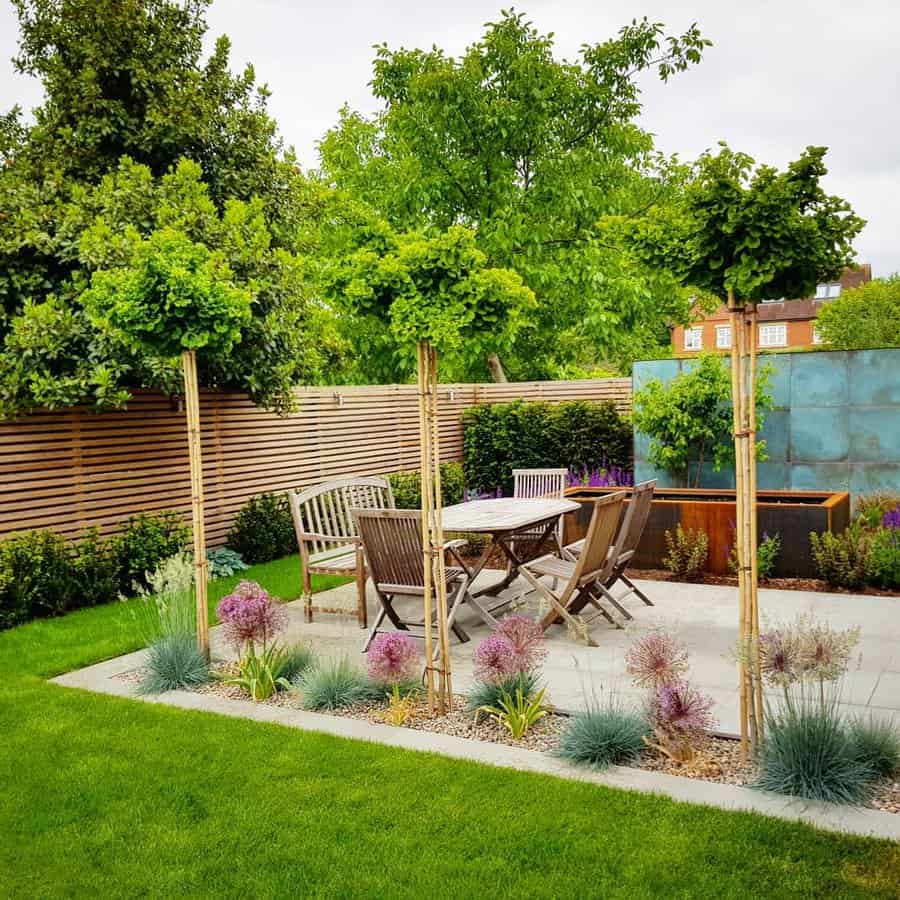
10. Landscape Your Area
Good landscaping can transform your backyard into a picturesque retreat. Start with a well-thought-out design that balances open spaces with planted areas. Use a mix of shrubs, perennials, and annuals to create year-round interest. Remember, the key is to create a harmonious and sustainable environment that reflects your personal style.
Source: @tibor_kiss_studio via Instagram
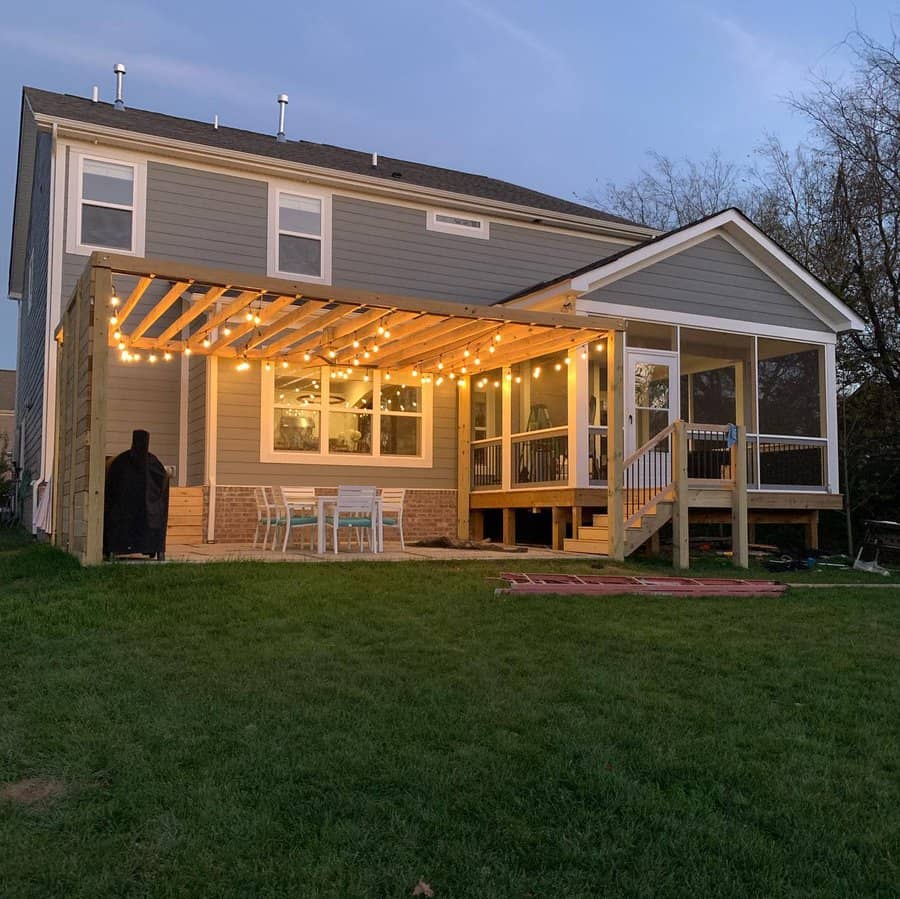
11. Cover With a Pergola
A pergola not only adds shade but also brings an architectural element to your backyard. Select materials that blend with your home’s exterior – be it natural wood or modern metal. Train climbing plants over it for a natural canopy, or add a retractable cover for adjustable shading. This structure creates a perfect outdoor room for dining or relaxing.
Source: @touchofeleganceinteriors via InstagramSource: @treesideliving via InstagramSource: @_ben.smith___ via InstagramSource: @alisa.dugan via InstagramSource: @d_bomb43 via InstagramSource: @shiplapshanty via InstagramSource: @stonecorejax via InstagramSource: @allieshouse via Instagram
12. Maintain Your Grass Lawn
A lush, green lawn is the foundation of a beautiful backyard oasis. Regular mowing, watering, and fertilizing are essential for its upkeep. Consider aerating your lawn annually for healthy growth and overseeding to fill in bare spots. A well-maintained lawn serves as a vibrant base for your backyard paradise.
Source: @paversandturf via InstagramSource: @ryinhomesweethome via Instagram
“You wouldn’t build a house unless the design was exactly what you wanted; honing in on the design of your renovation project is crucial before you proceed.” – Michael Upshall
Choosing a countertop can be one of the most difficult decisions when building a home or doing a bathroom or kitchen remodel.
After all, a countertop is a wide expanse of color in any room and it’s one that you must live with happily for quite a long time.
Depending on the material you choose, it can also be one of your home’s biggest investments.
Countertop ideas can feel virtually limitless when trying to narrow down your preferences.
Each type of countertop has its own benefits and drawbacks. Scroll through our selection of the best countertop ideas and learn why each is a good—or perhaps not-so-good—option for your home.
[view_toc]
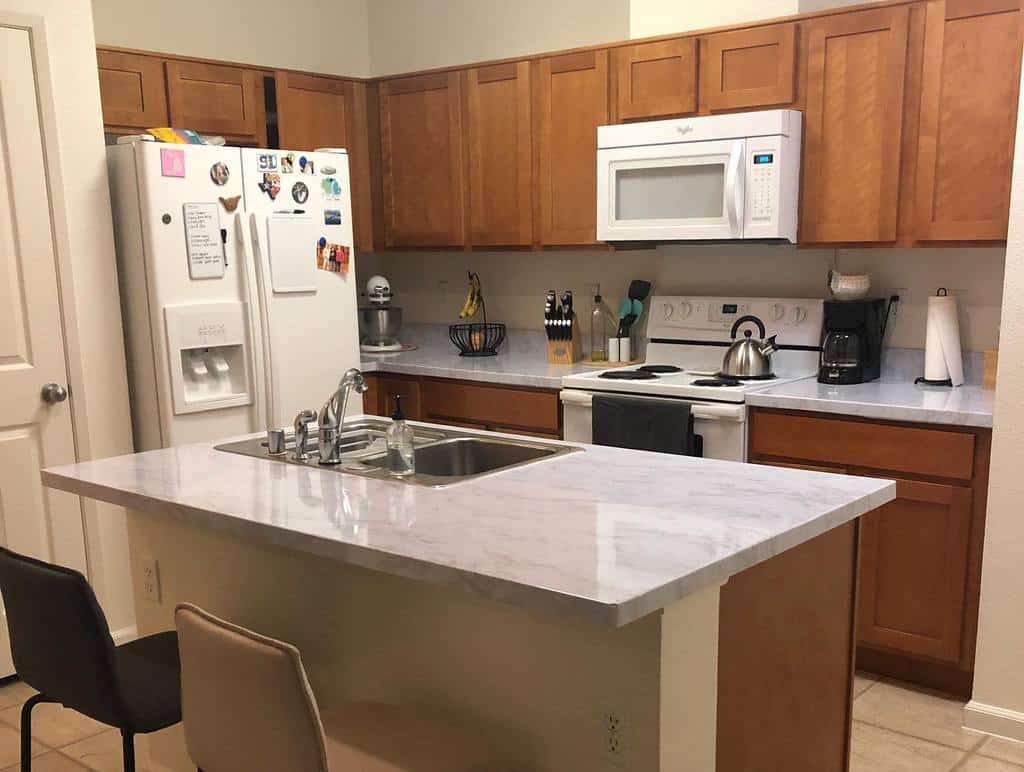
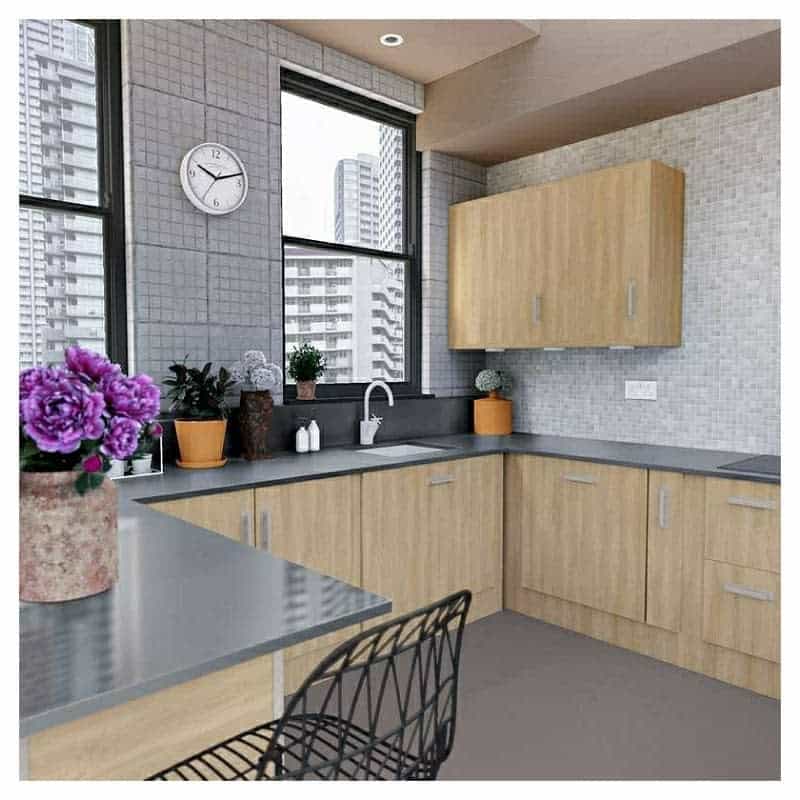
1. Porcelain Countertop
This versatile material offers both durability and beauty, making it an excellent choice for any modern kitchen. The clean and smooth surface of porcelain complements various design styles, allowing you to pair it with warm wooden cabinets for a cozy and inviting atmosphere or with vibrant colors for a bold and contemporary look.
One of the benefits of a porcelain countertop is its low maintenance. Its non-porous nature makes it resistant to stains and easy to clean, ensuring that your kitchen always looks fresh and pristine. With a porcelain countertop, you can achieve a chic and functional kitchen space that effortlessly combines style and practicality.
Source: @milano.granite via InstagramSource: @first.you_.take_.the_.butter via InstagramSource: @holmesinthehills via InstagramSource: @geomatrix.inc_ via InstagramSource: @thevintagebucket via InstagramSource: @luluhome.alana_ via InstagramSource: @richlandbuilds via InstagramSource: @a_yankee_in_dixie via InstagramSource: @tempo_wood_work_design via InstagramSource: @angiestithdesigns via InstagramSource: @jen_noble_home via InstagramSource: @kitchendesignpartners via InstagramSource: @carolinadesignassociates via Instagram
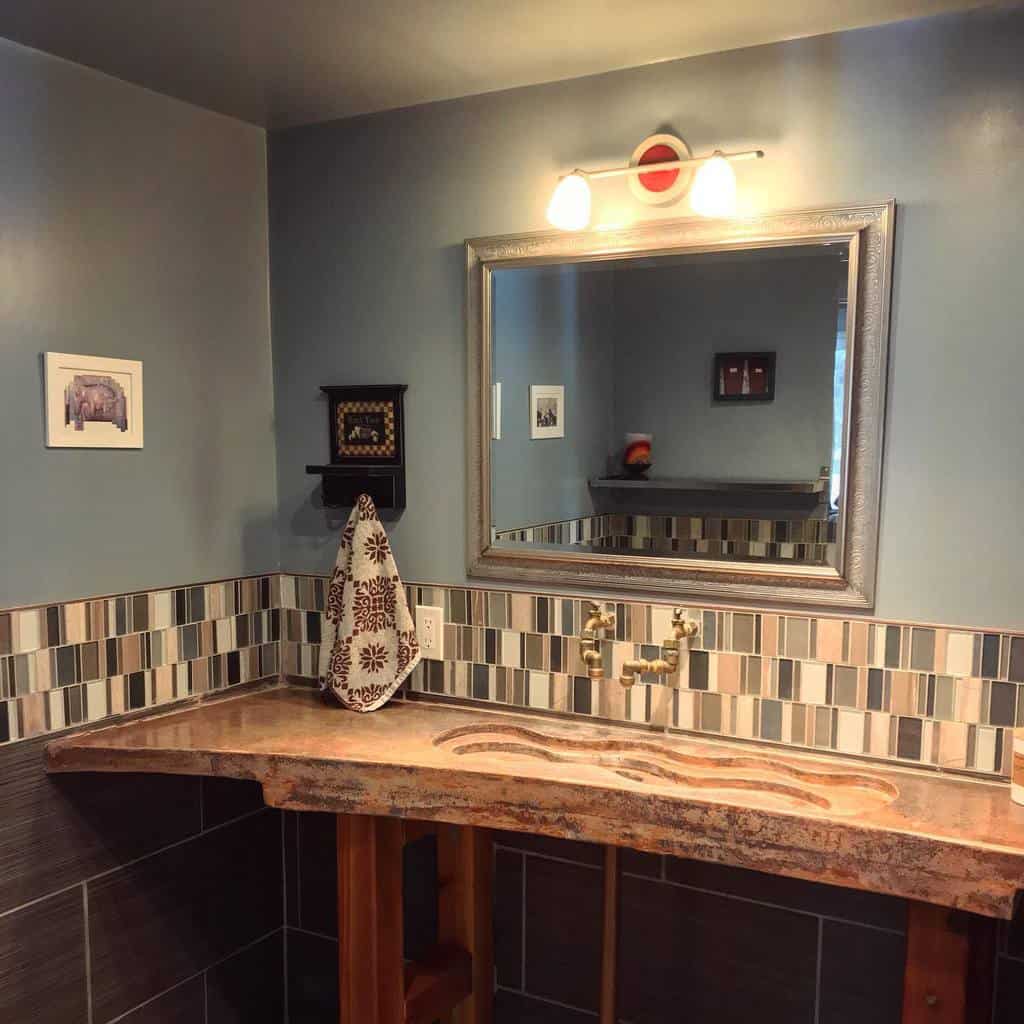
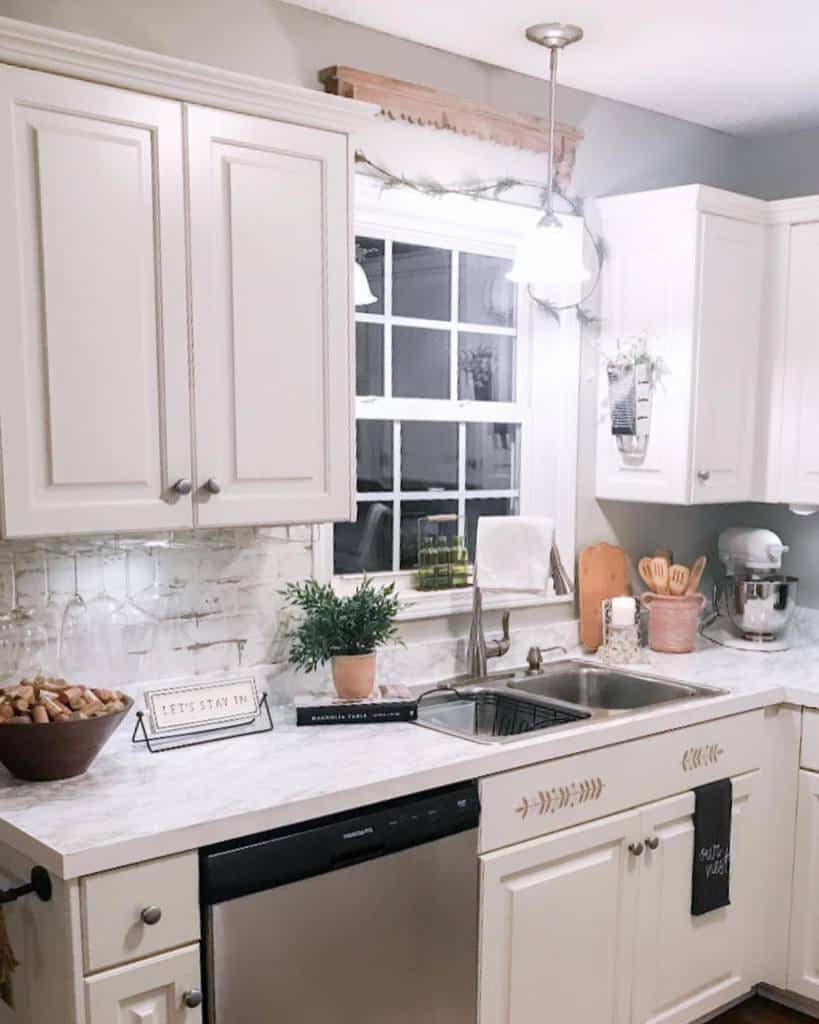
2. Wood Countertop
Opting for a wood countertop not only brings an organic and earthy element to your kitchen but also provides a durable and functional surface for meal preparation and entertaining. To ensure longevity, consider choosing laminated wood, which offers added protection against moisture and heat. When caring for your wood countertop, be sure to regularly seal it to maintain its luster and protect it from stains.
Embrace the natural variations in grain and color that come with wood, as they add character and uniqueness to your countertop. Whether you’re aiming for a farmhouse-inspired kitchen or a modern culinary haven, a wood countertop is a versatile choice that brings warmth and style to your space.
Source: @ducksnestinteriors via InstagramSource: @heartofamountainmama via InstagramSource: @rawsunshinecoast via InstagramSource: @kristensawdust via InstagramSource: @megan.d.miller via InstagramSource: @house_of_hemingway via InstagramSource: @lustigcabinets via InstagramSource: @ne_joinery_works via InstagramSource: @beautblog_x via InstagramSource: @beautheboler via InstagramSource: @deluxe_homeimprovements via InstagramSource: @tonchahardwood via InstagramSource: @er_kitchencabinets via InstagramSource: @thelongawaitedhome via InstagramSource: @tealacornashley via Instagram
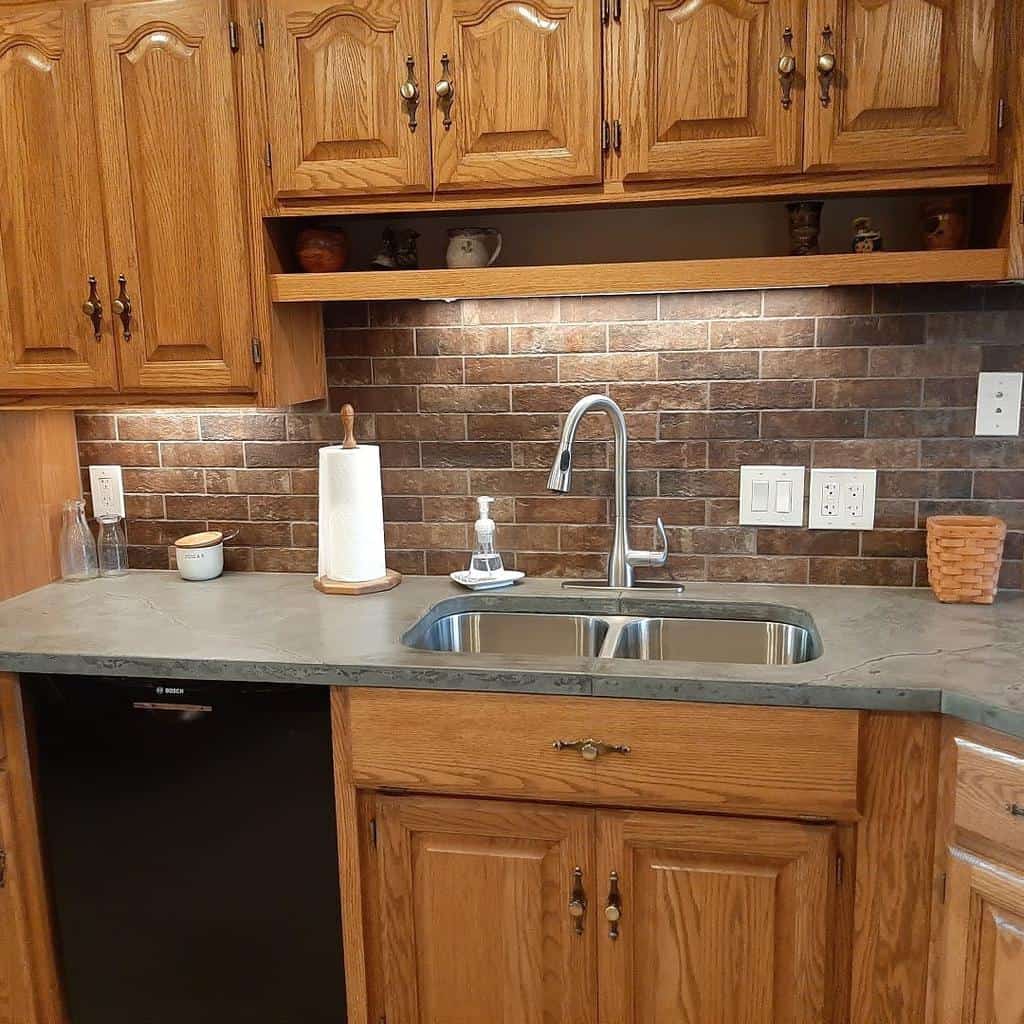
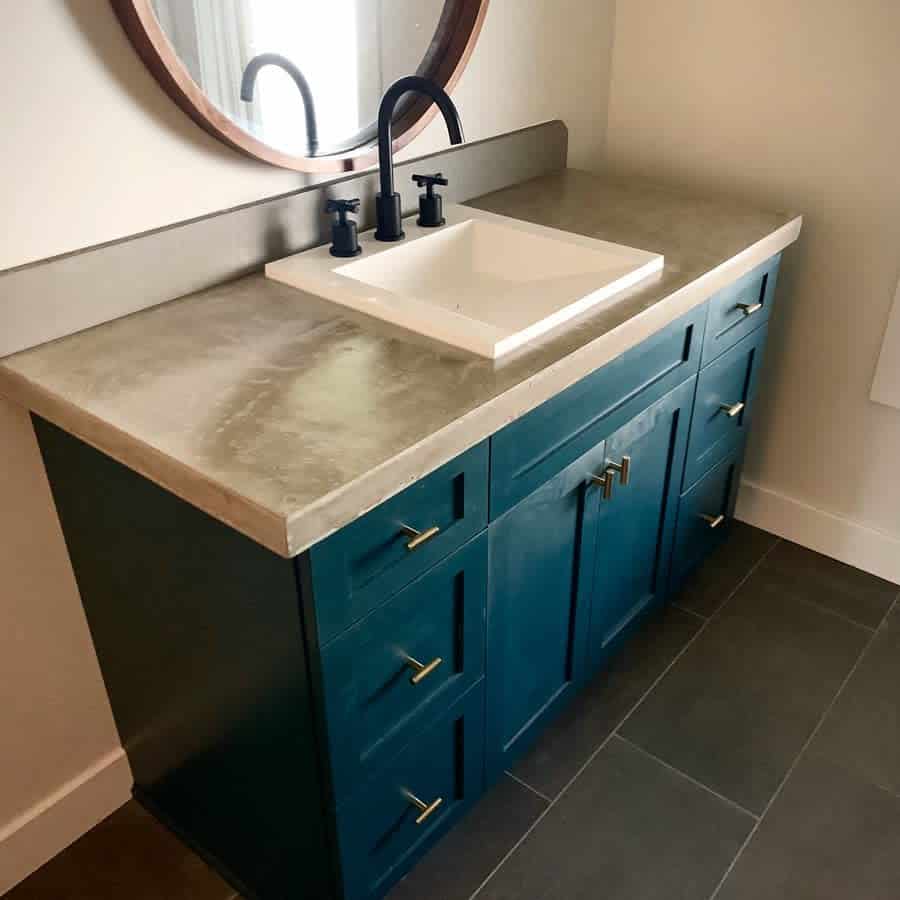
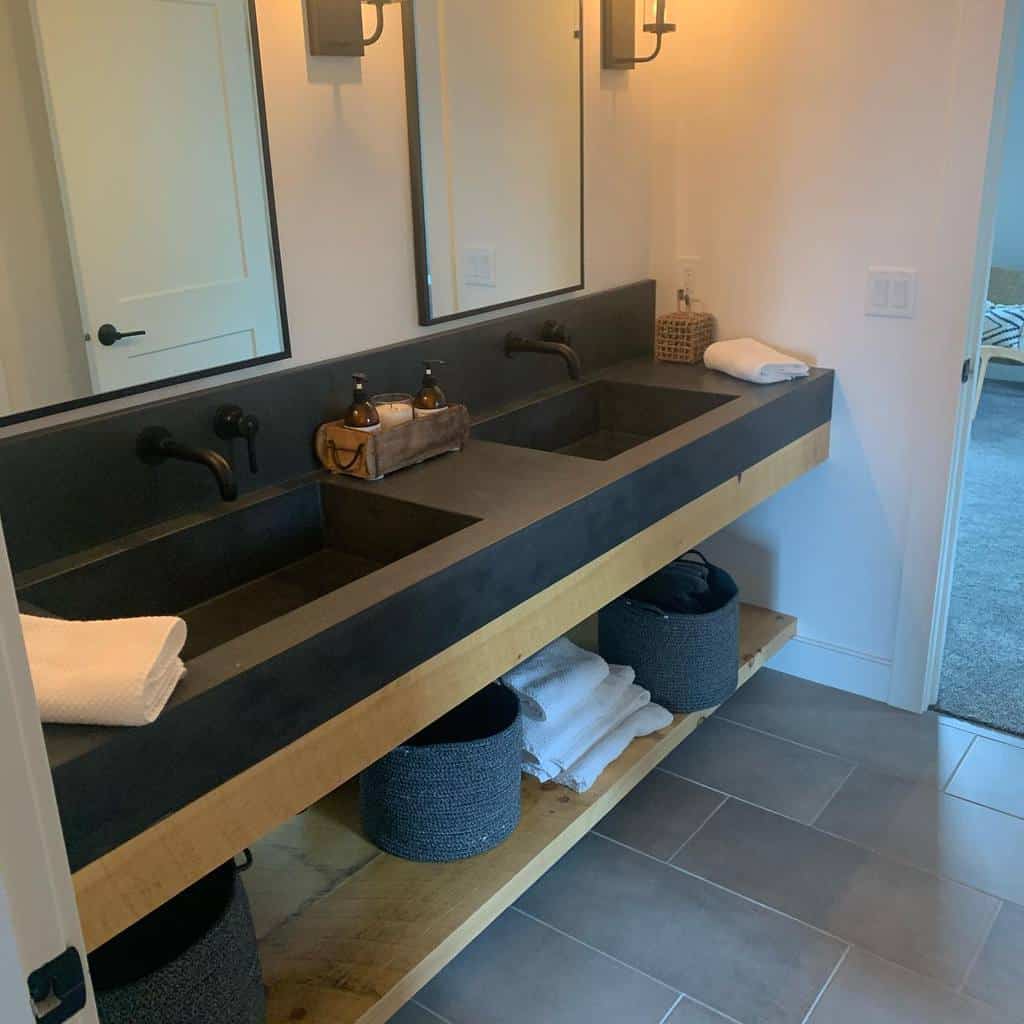
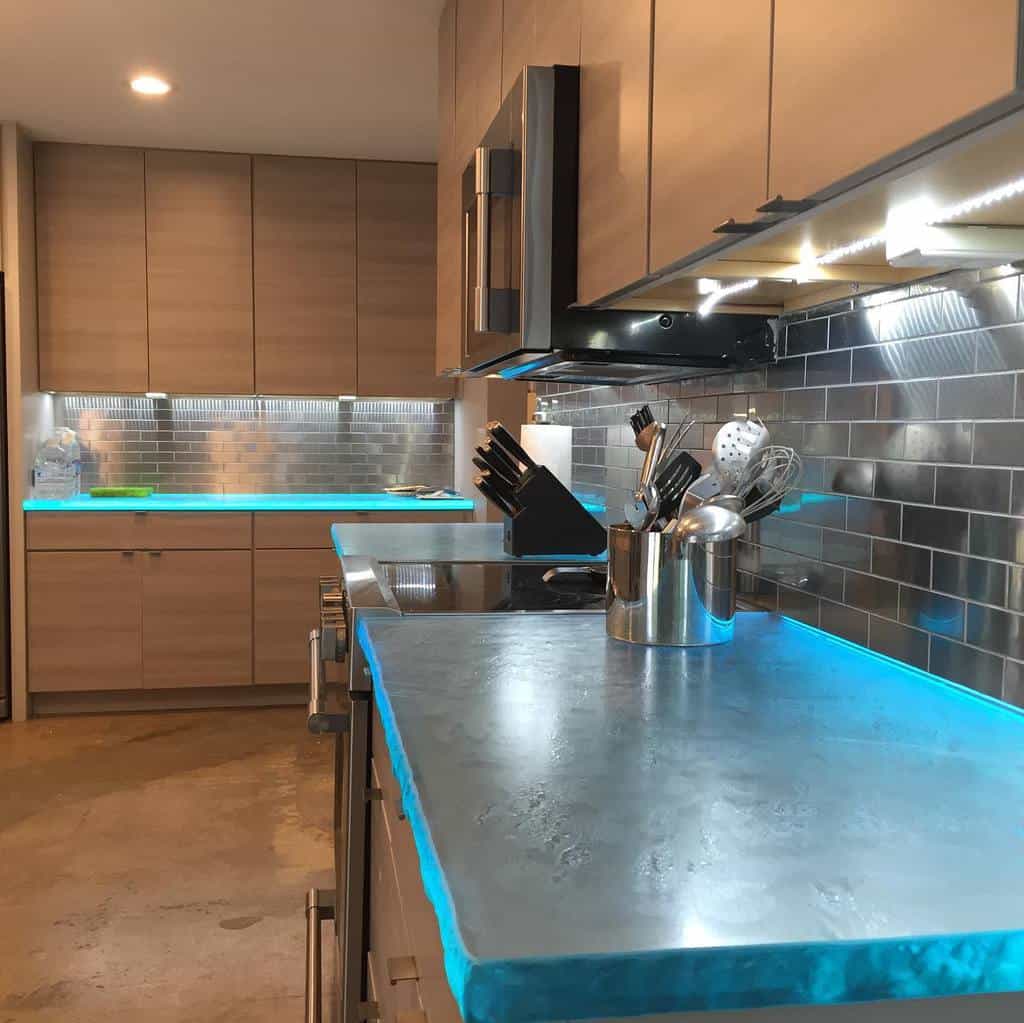
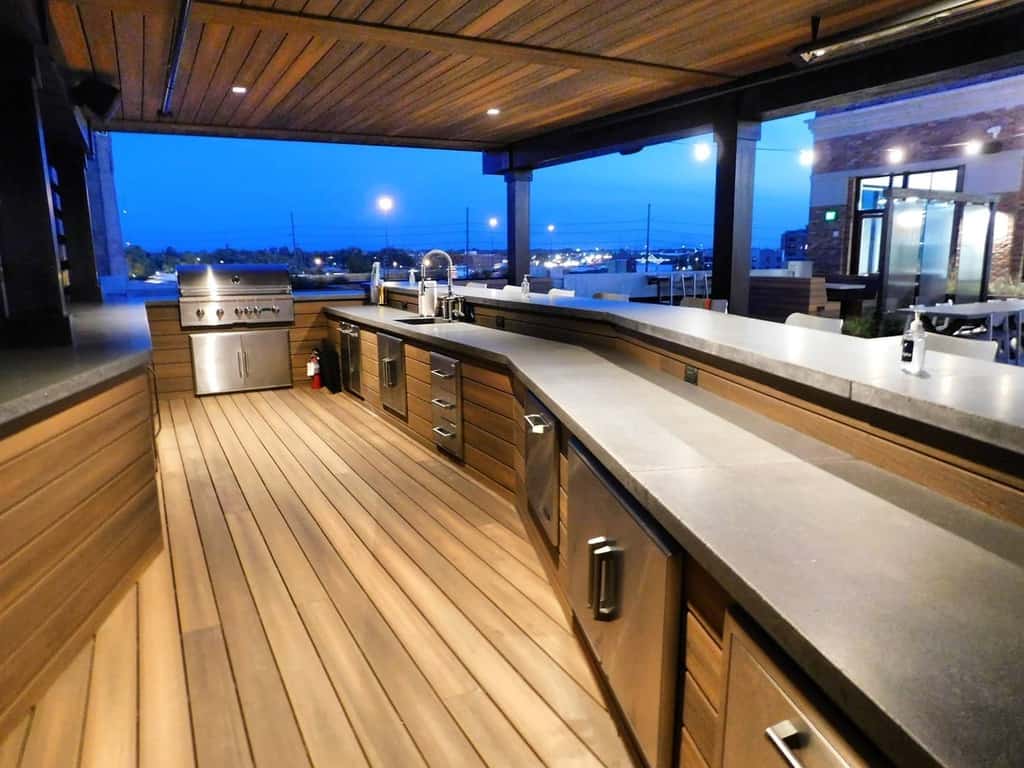
3. Concrete Countertop
Concrete countertops offer a unique texture and finish that adds character to any kitchen. They can be customized to suit your style, whether you prefer a smooth and polished surface or a more rugged and textured look. To ensure the longevity of your concrete countertop, it’s important to seal it properly and maintain it regularly.
Remember to avoid cutting directly on the surface and use trivets or cutting boards to protect it from heat and scratches. With the right care and attention, your concrete countertop will continue to impress for years to come.
Source: @erika.fromamerica via InstagramSource: @idealsurface via InstagramSource: @maxedgeinnovations via InstagramSource: @petersen_interiors_renovations via InstagramSource: @lanastenner via InstagramSource: @dciconcretewi via InstagramSource: @prorenovationsllc via InstagramSource: @pjelawncare via Instagram
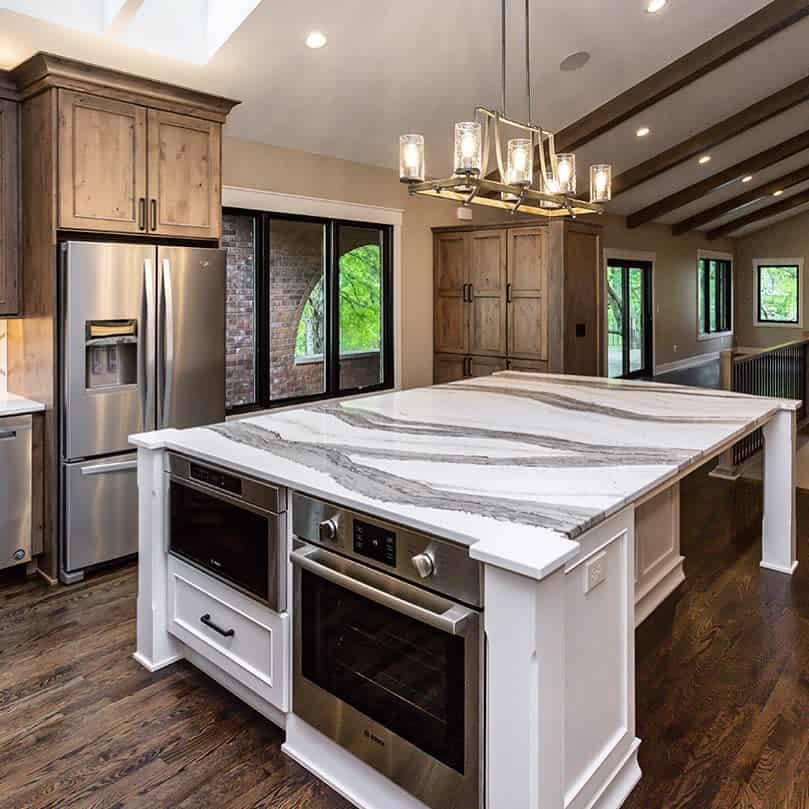
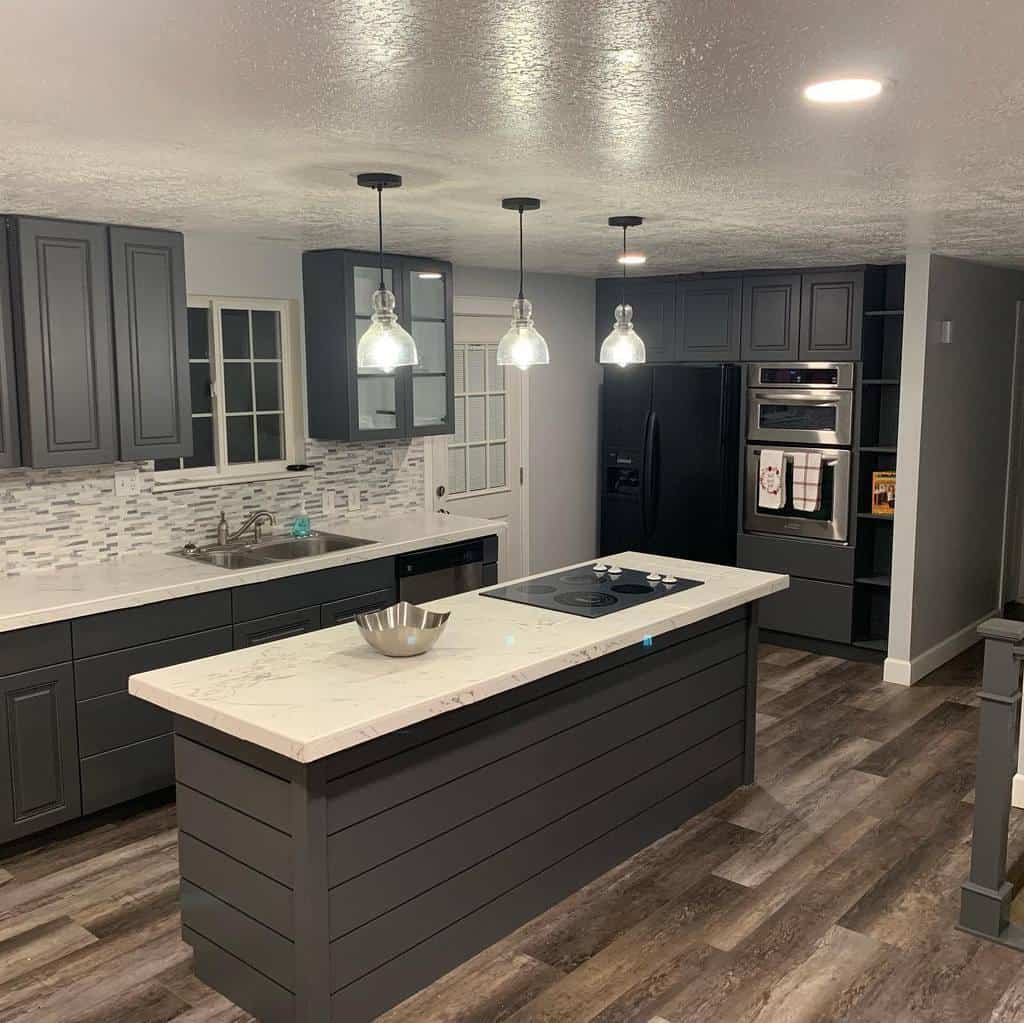
4. Granite Countertop
Granite is renowned for its natural beauty, with unique patterns and colors that can complement any kitchen style. It’s incredibly resilient and heat-resistant, making it perfect for cooking and baking activities. With proper sealing, it becomes resistant to stains and scratches, ensuring its longevity.
Plus, granite is easy to clean and maintain, requiring only a simple wipe-down to keep it looking pristine. Whether you prefer a sleek and polished granite or a textured and honed finish, a granite countertop will undoubtedly become the centerpiece of your kitchen, combining both style and functionality in one impressive surface.
Source: @isabelleambiance via InstagramSource: @natashaloveslilly via InstagramSource: @cjgreeneleaf via InstagramSource: @stonecraft_countertops via InstagramSource: @firstinlinehome via InstagramSource: @waltermadestudio via InstagramSource: @thedesignclub via Instagram
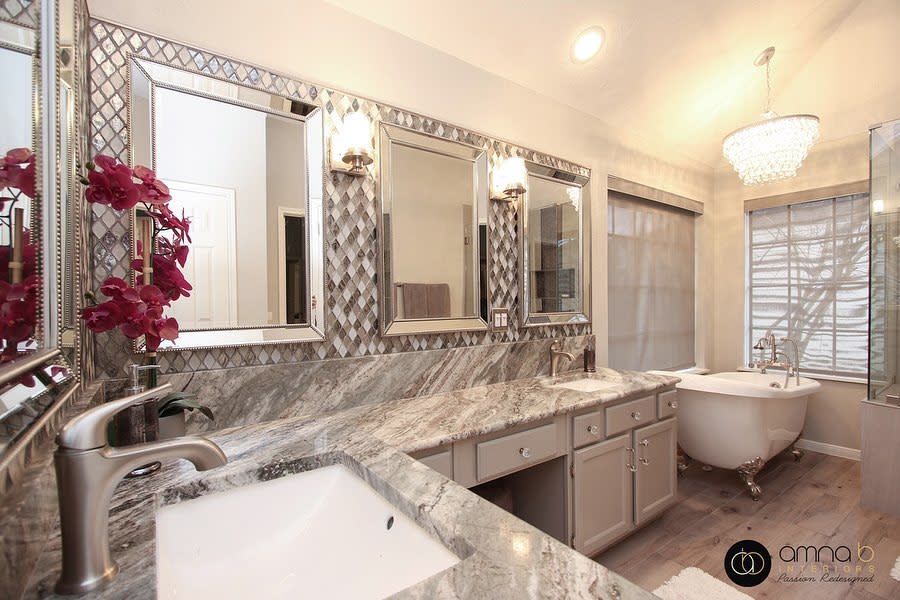
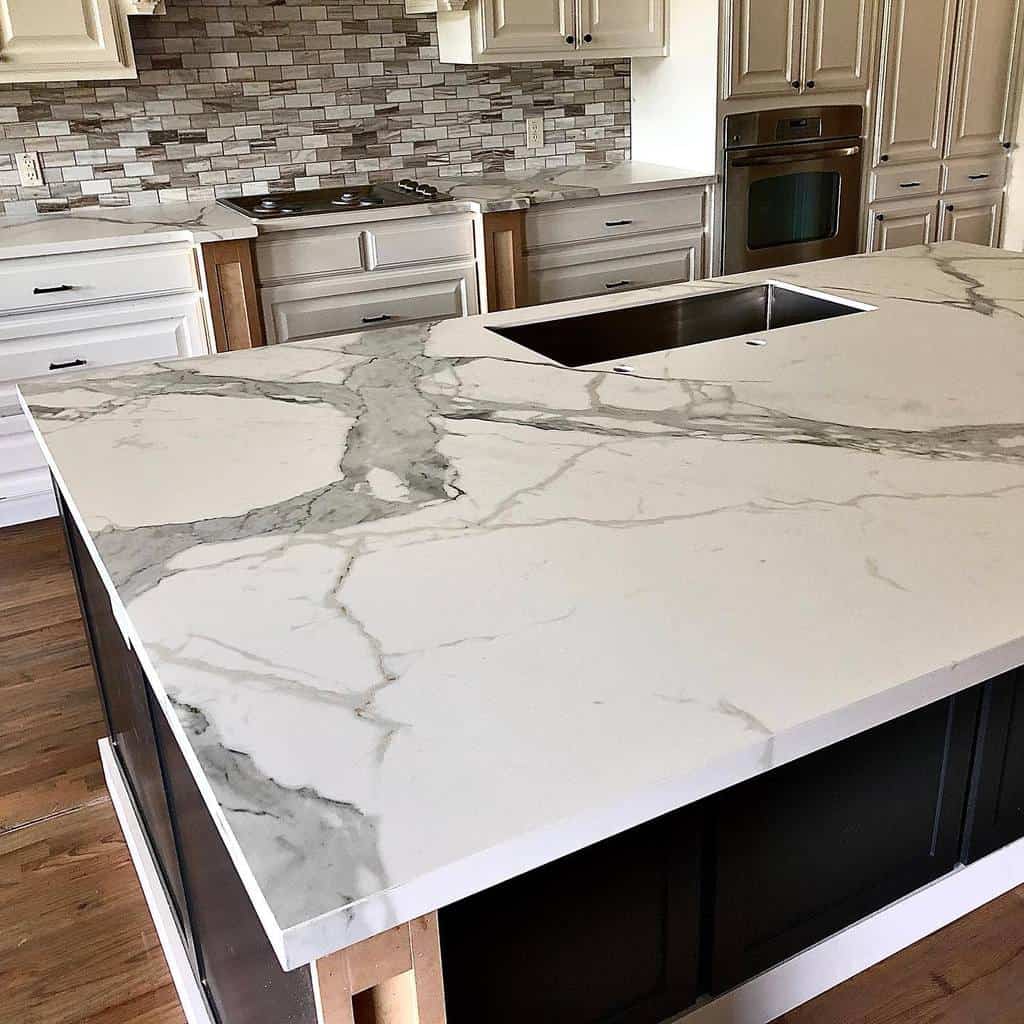
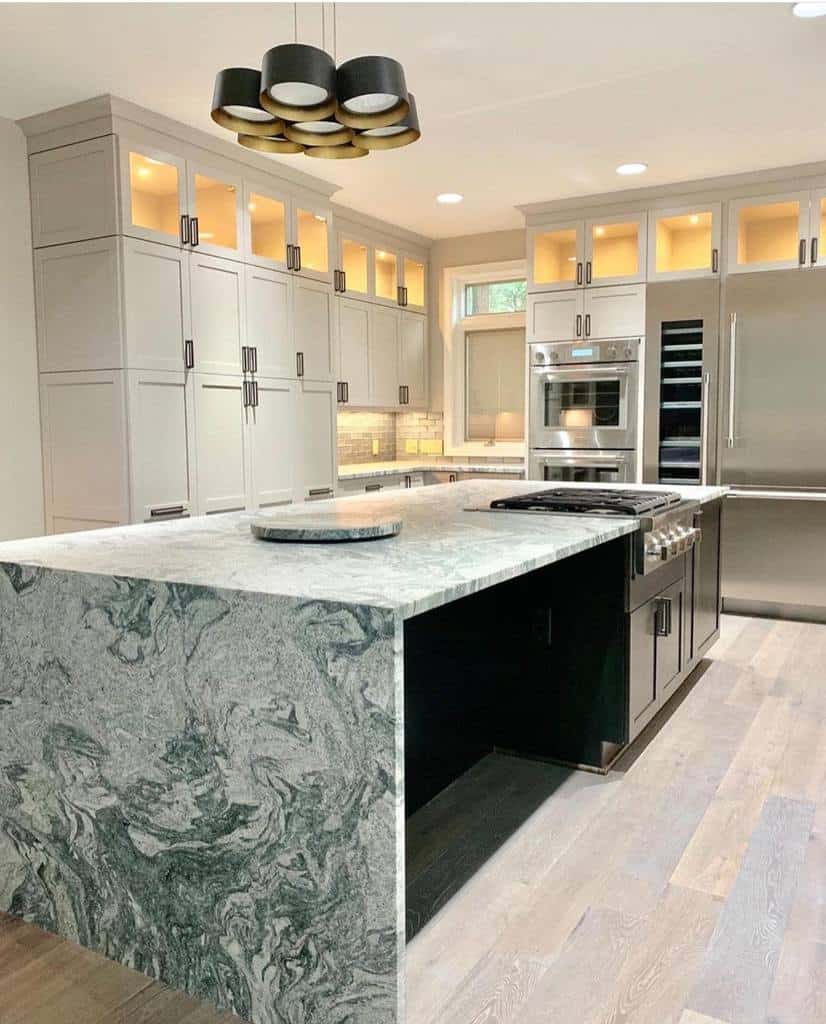
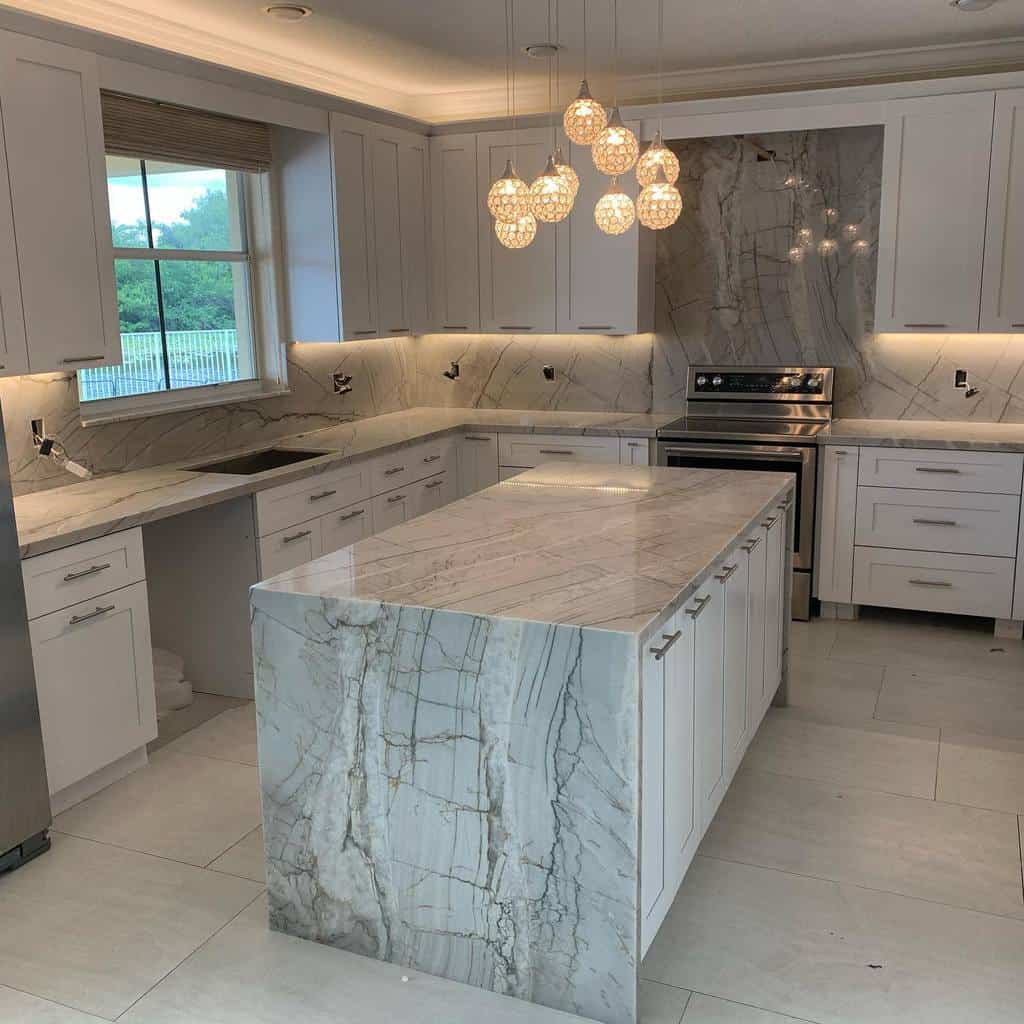
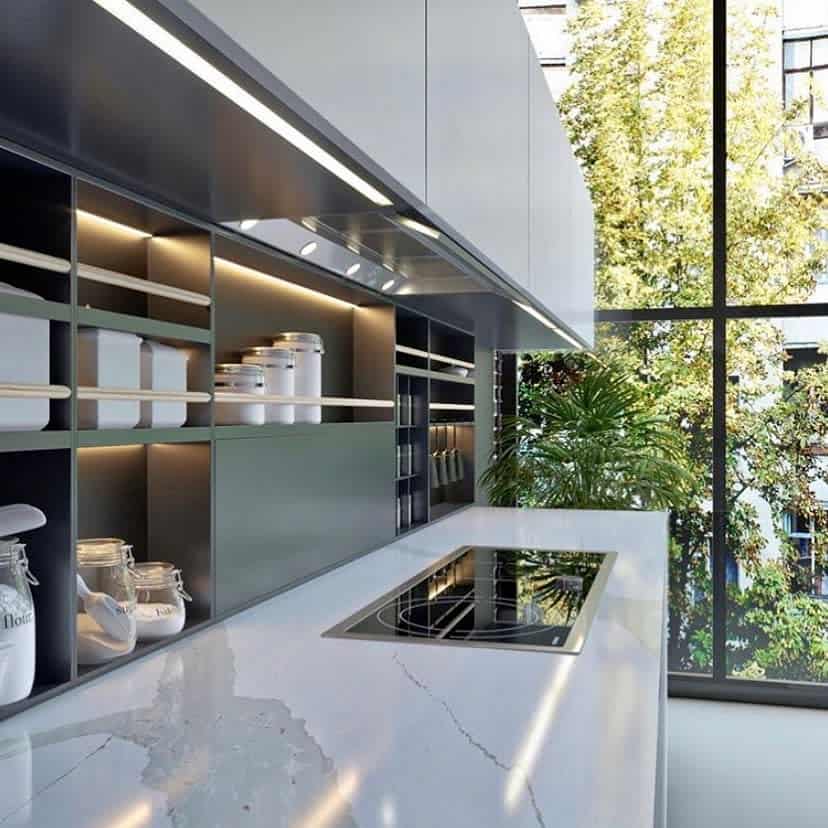
5. Marble Countertop
This luxurious surface instantly adds a touch of elegance and sophistication to any kitchen space. The smooth and glossy finish of marble not only looks stunning but also offers a durable and practical solution for your countertop needs.
It is natural veining and unique patterns create a sense of depth and character, making each countertop truly one-of-a-kind. Whether you prefer a classic white marble or a bold and dramatic color variation, the versatility of marble allows it to seamlessly blend with any kitchen style, from traditional to contemporary.
Source: @christinestarfish via InstagramSource: @hollyjholiday via InstagramSource: @shelley_blaires via InstagramSource: @amna_b_interiors via InstagramSource: @dallas.stone_.designer via InstagramSource: @emg_charleston via InstagramSource: @jesuscabinetandgranite via InstagramSource: @belllavigne via InstagramSource: @accidentallyausherman via InstagramSource: @constructioninthecreek via InstagramSource: @djanthony via InstagramSource: @kandvhomes via InstagramSource: @primestones via InstagramSource: @home_centered_design via InstagramSource: @umi_the_source via Instagram
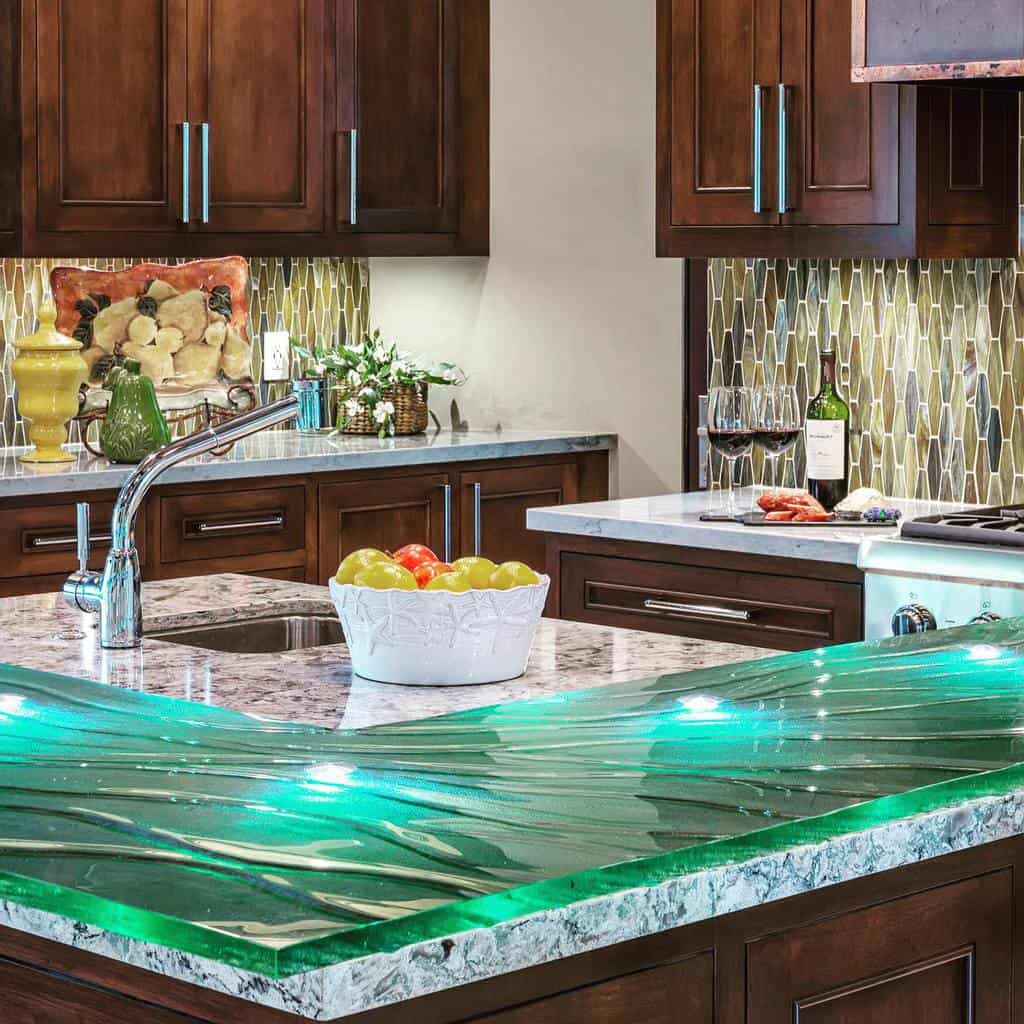
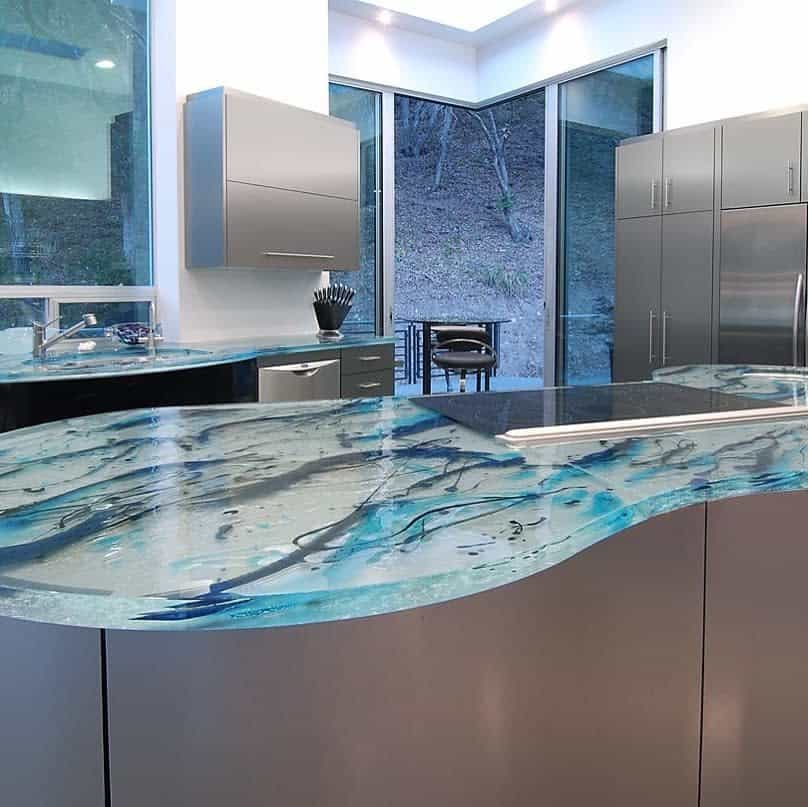
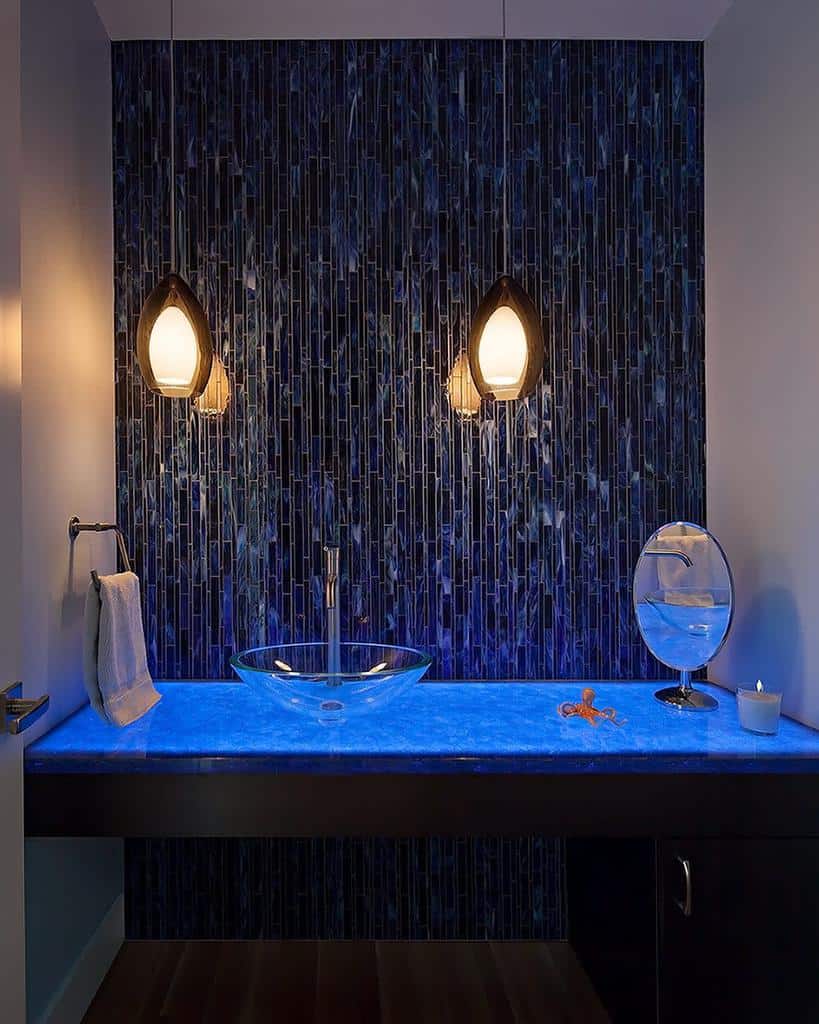
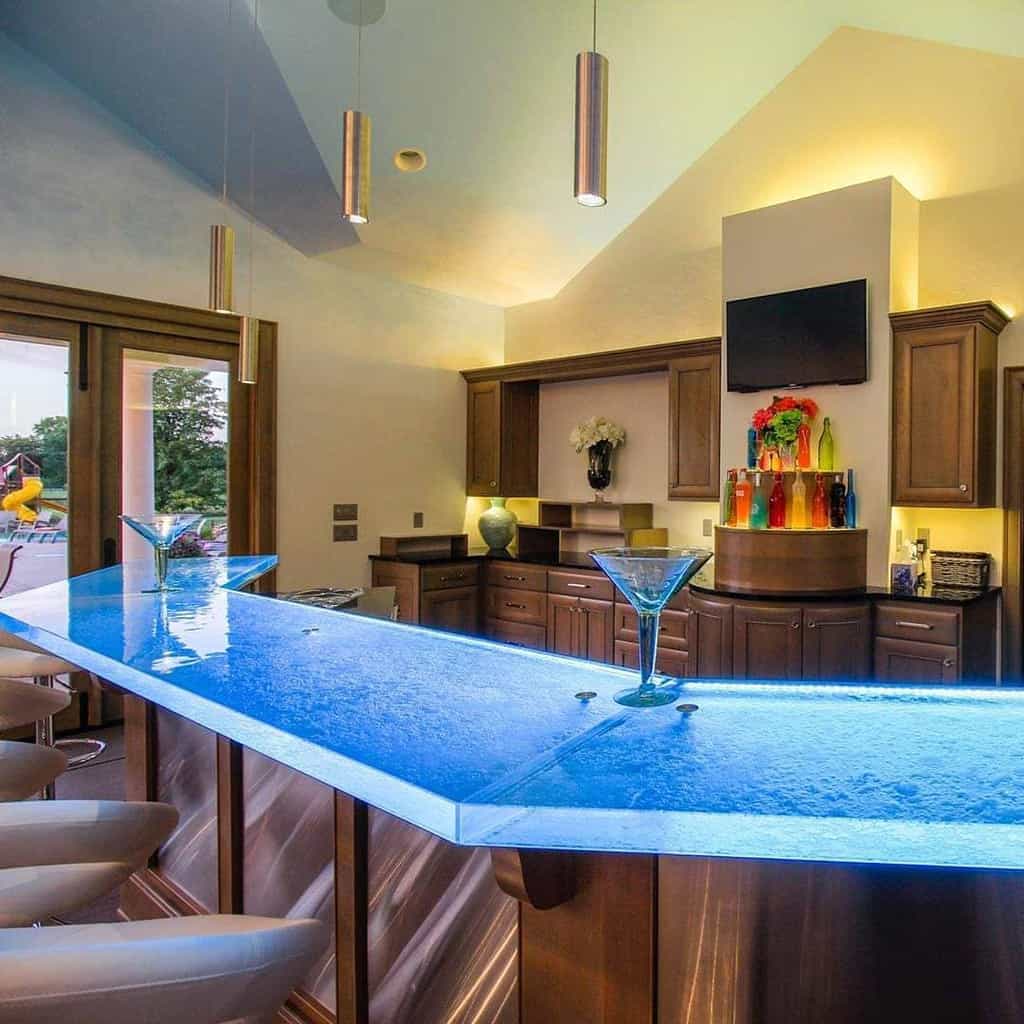
6. Resin Countertop
This innovative countertop material offers a mesmerizing blend of colors, patterns, and textures that will instantly become the focal point of your space. With its seamless and glossy finish, the resin countertop creates a modern and sleek look that complements various design styles. Each resin countertop is a work of art, as the mixture of pigments and additives creates a swirling and marbled effect, resembling a captivating psychedelic experience.
Whether you choose vibrant and bold hues or subtle and earthy tones, your resin countertop will bring an element of excitement and personality to your kitchen. Its seamless surface is not only visually stunning but also highly durable and easy to clean, making it a practical choice for any busy kitchen.
Source: @jockimo_glass via InstagramSource: @kate_tucker_hoyt via InstagramSource: @nwhomedesigners via InstagramSource: @thinkglass_official via Instagram
7. Quartz Countertop
This sleek and sophisticated surface adds a touch of elegance to any culinary space. With its glossy finish and timeless appeal, quartz countertops not only enhance the aesthetics of your kitchen but also offer exceptional durability and easy maintenance.
Whether you opt for a classic white shade, a bold and veined pattern, or a subtle neutral tone, quartz countertops provide a luxurious backdrop for your culinary adventures. The smooth and seamless surface of quartz offers both style and functionality, making it a perfect choice for those seeking a chic and high-performing kitchen countertop solution.
Source: @theglassguyshouston via InstagramSource: @elliscarpentryjoinery via Instagram
8. Wood & Marble Countertop
This unique pairing brings together the warmth and natural beauty of wood with the timeless elegance of marble. The rich tones and intricate grain patterns of the wood create a cozy and inviting atmosphere, while the sleek and polished marble adds a touch of luxury and sophistication.
Whether you prefer a rustic farmhouse look or a modern and minimalist style, a wood and marble countertop will effortlessly blend with any design aesthetic. Let the natural textures and contrasting colors of these materials become the centerpiece of your kitchen, creating a space that is both functional and visually stunning.
Source: @rocciatiles via InstagramSource: @emakowichuk via Instagram
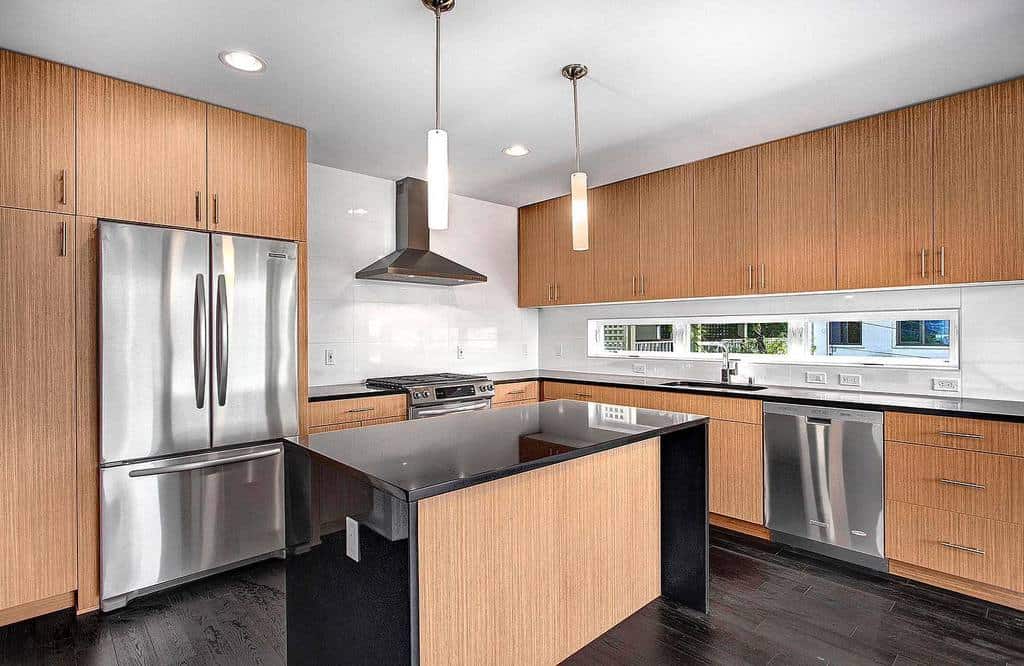
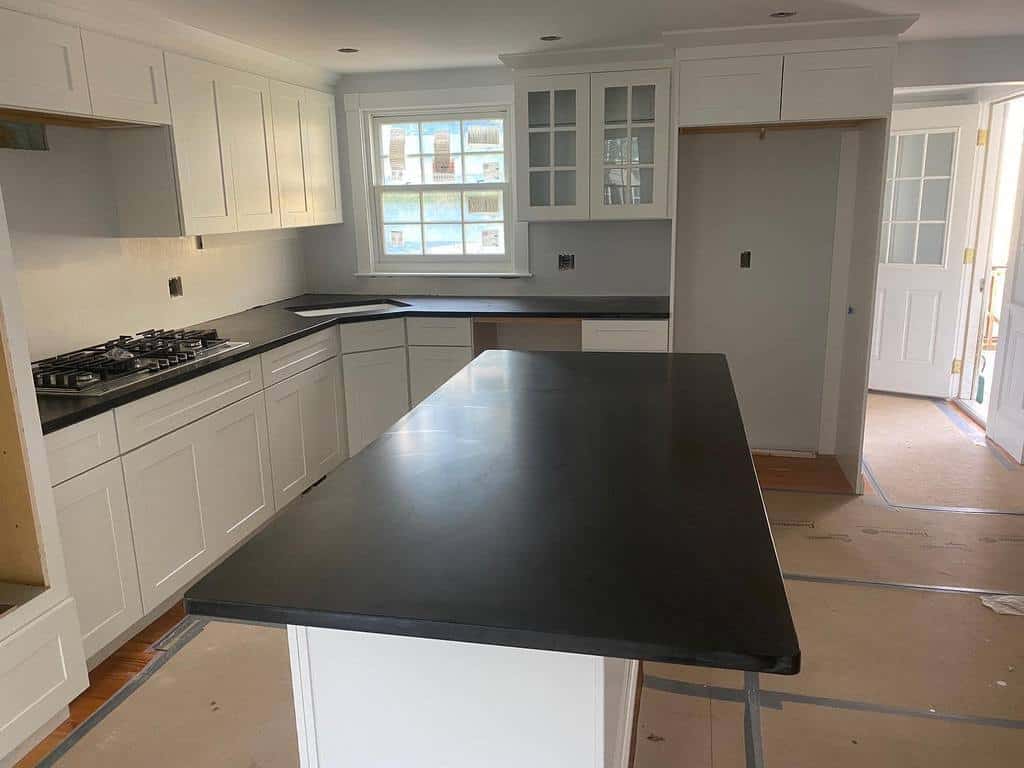
9. Black Countertop
Black countertops add a touch of elegance and drama to any kitchen space, creating a bold statement that is both chic and timeless. The deep, rich hue of a black countertop provides a striking contrast against lighter cabinetry, making it a focal point in the room. Whether you opt for a glossy or matte finish, the black surface adds a sense of depth and luxury.
Pair it with stainless steel appliances and sleek hardware for a modern look, or combine it with warm wood tones for a more rustic appeal. With its versatility and striking aesthetic, a black kitchen countertop is sure to transform your culinary space into a sophisticated haven.
Source: @seapointeconstruction via InstagramSource: @alyse.dezign via InstagramSource: @rskstone via InstagramSource: @tsherel_realtor via Instagram
10. Laminated Countertop
This affordable alternative offers a wide range of design options and allows you to achieve a chic and modern look. With its smooth and durable surface, a laminated countertop is not only budget-friendly but also easy to clean and maintain.
Choose from a variety of colors, patterns, and textures to match your kitchen’s aesthetic and create a stunning focal point. Whether you prefer a sleek and minimalist design or a bold and vibrant statement, a laminated countertop is a fantastic choice for adding both style and functionality to your kitchen space.
Source: @slewinskicph via Instagram
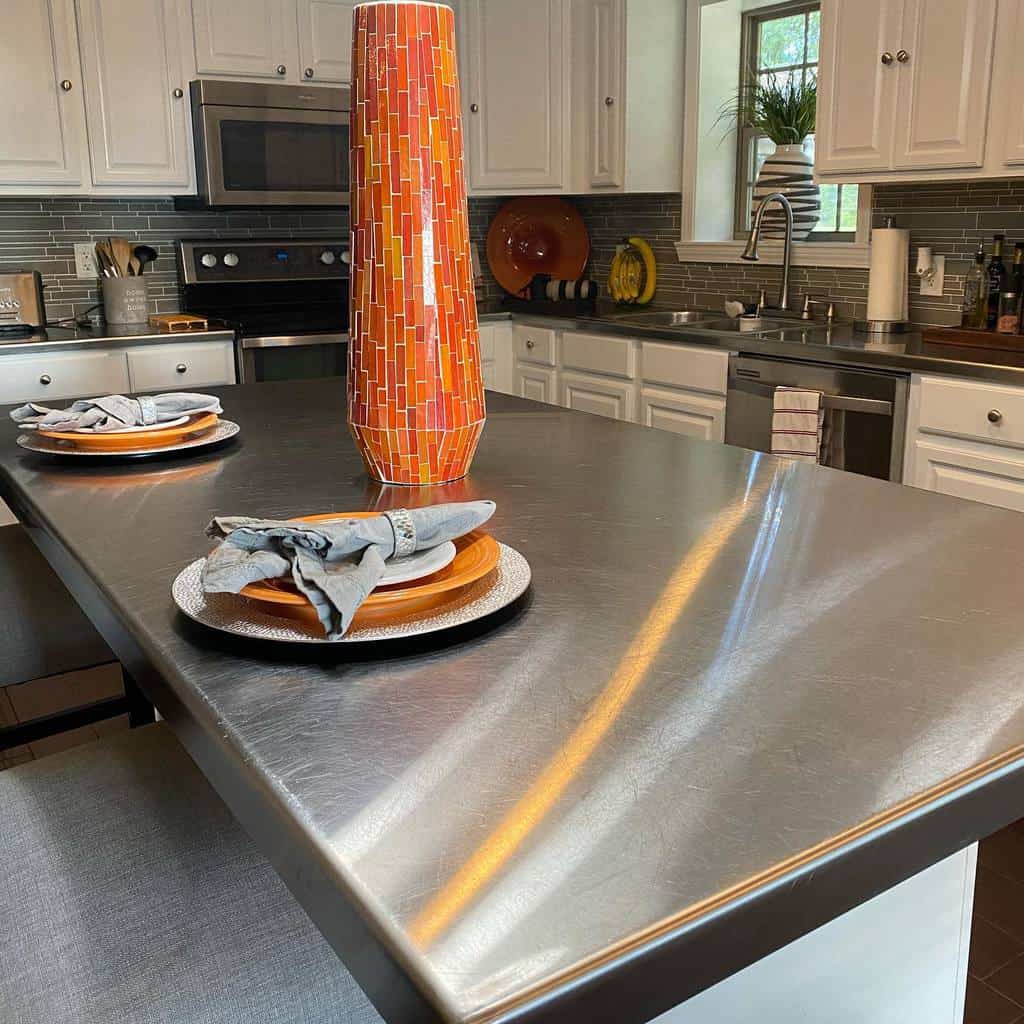
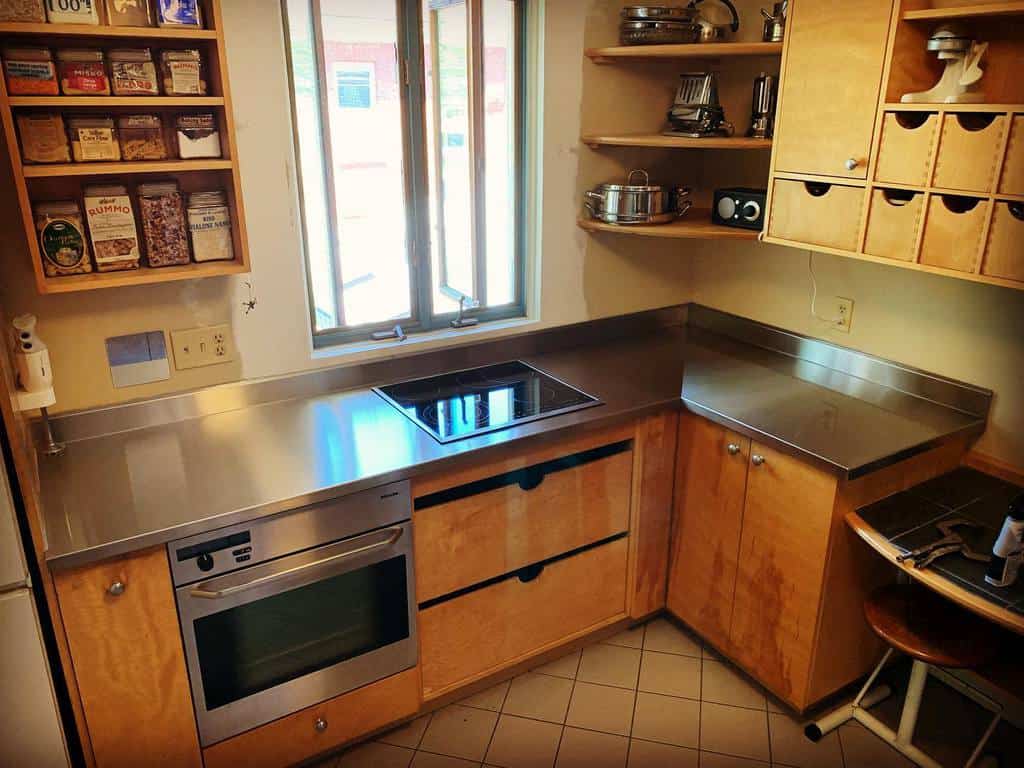
11. Stainless Steel Countertop
Elevate your kitchen design with the sleek and sophisticated appeal of stainless steel countertops. These modern and versatile surfaces bring a touch of professional style to your culinary space. Not only do they exude a contemporary vibe, but they also offer exceptional durability and functionality. With their resistance to heat, stains, and bacteria, stainless steel countertops are an excellent choice for busy kitchens.
They seamlessly blend into various design aesthetics, from minimalist to industrial, and their reflective surface adds a touch of glamour. Whether you’re a seasoned chef or a passionate home cook, a stainless steel countertop will enhance both the aesthetics and functionality of your kitchen.
Source: @browningswelding via InstagramSource: @caseybombacie via InstagramSource: @greatlakesstainless via InstagramSource: @homedecobylo via InstagramSource: @southern_craft_metalworks via InstagramSource: @tweenks_redecor via InstagramSource: @xtrememetalworx via Instagram
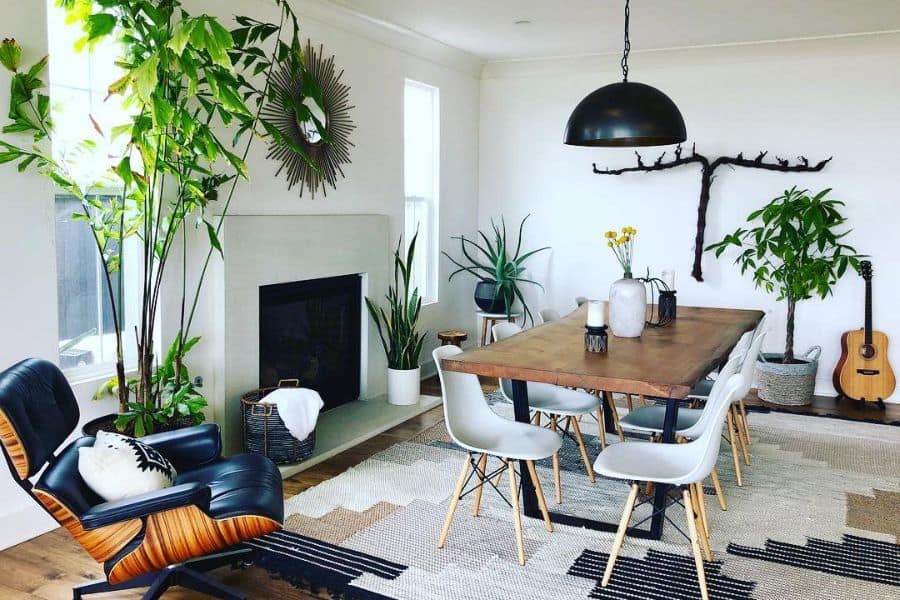
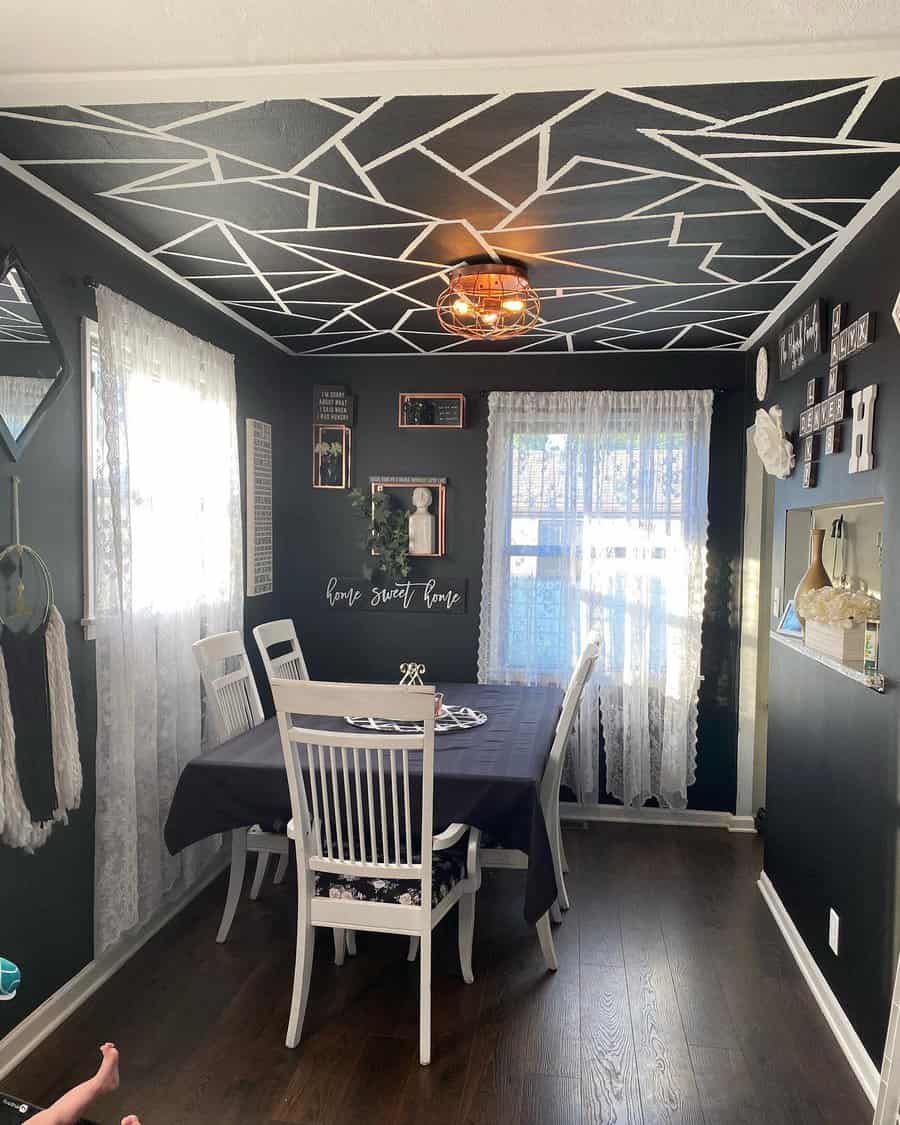
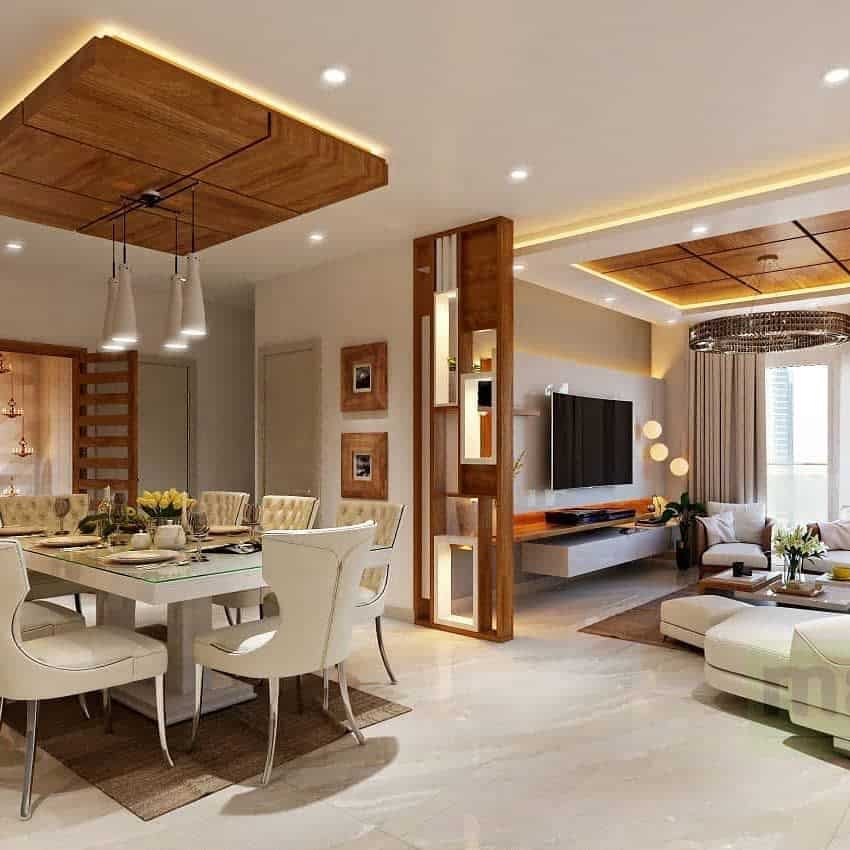
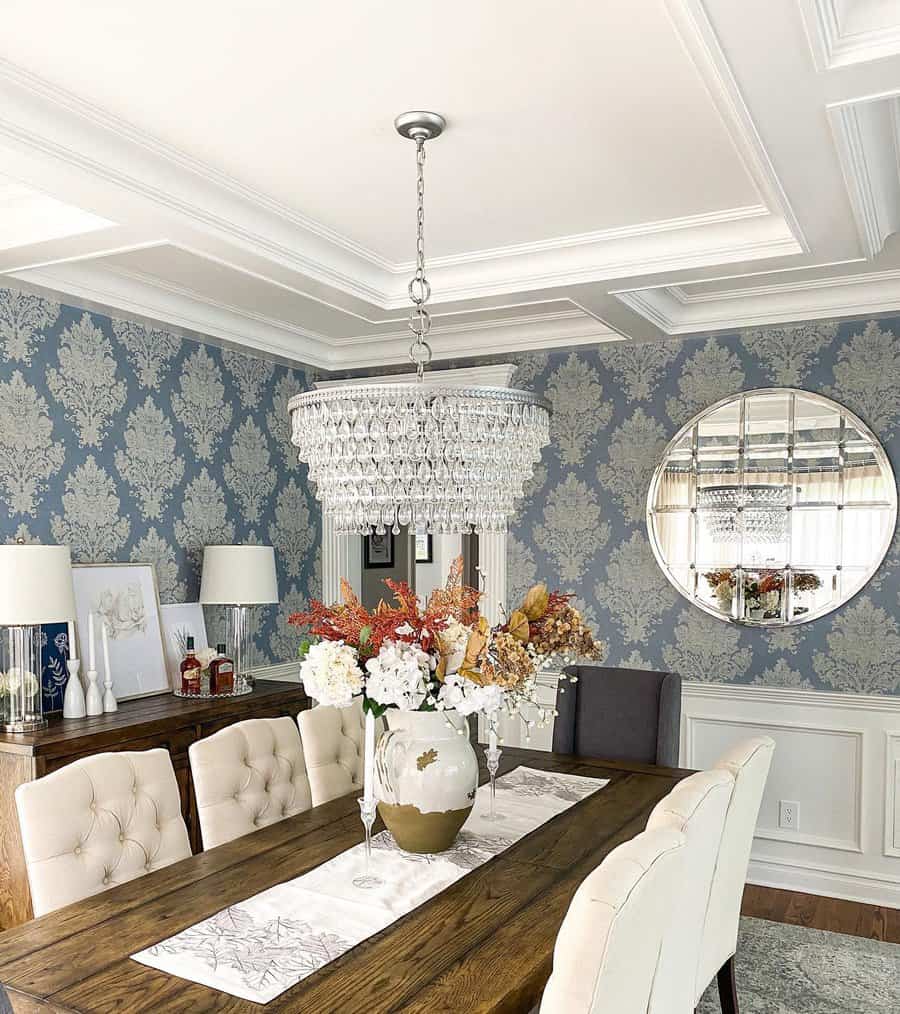
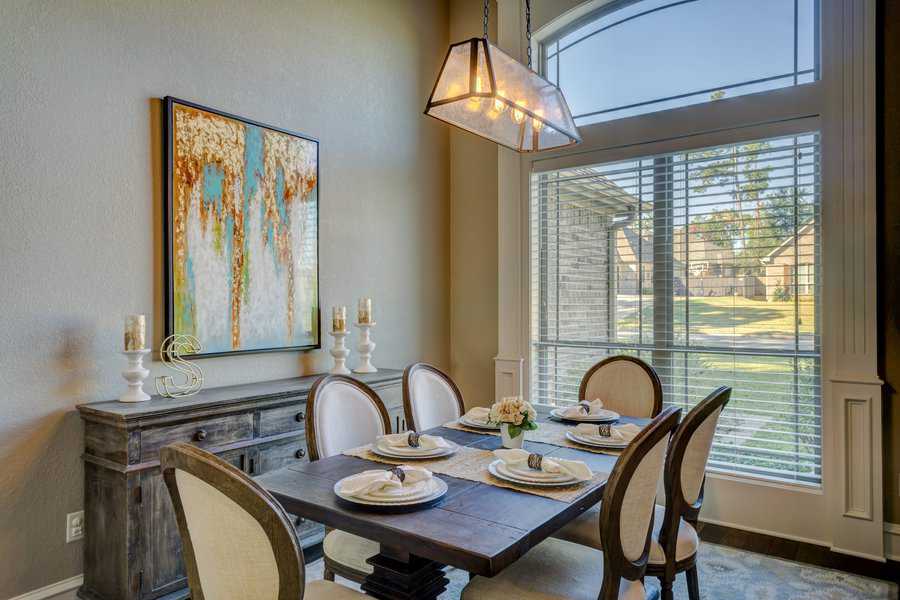
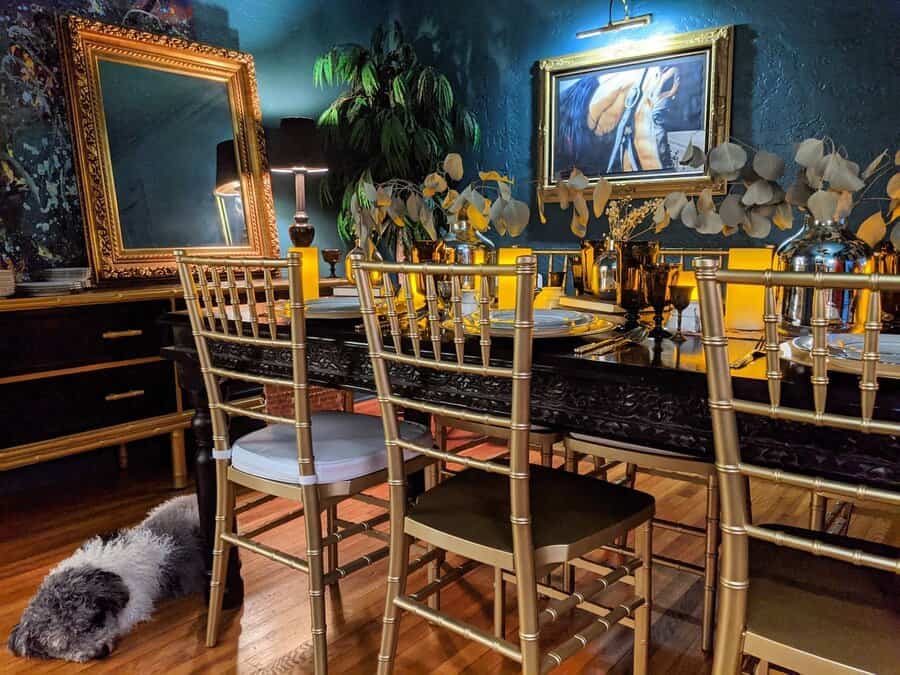
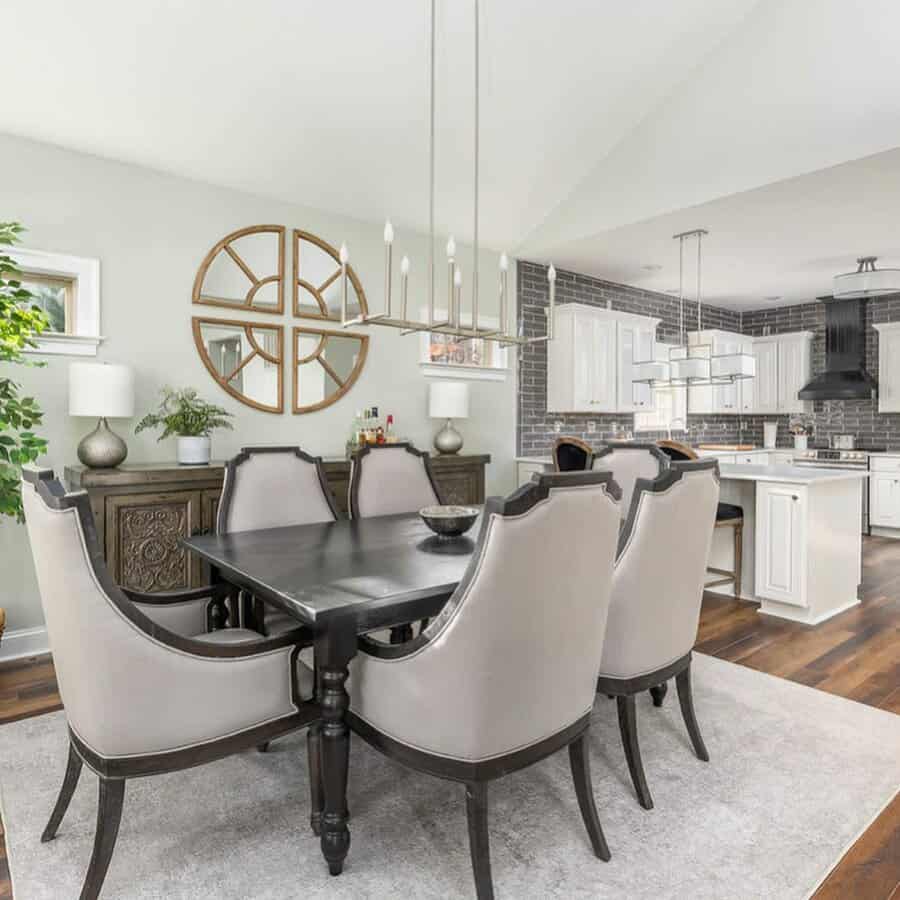
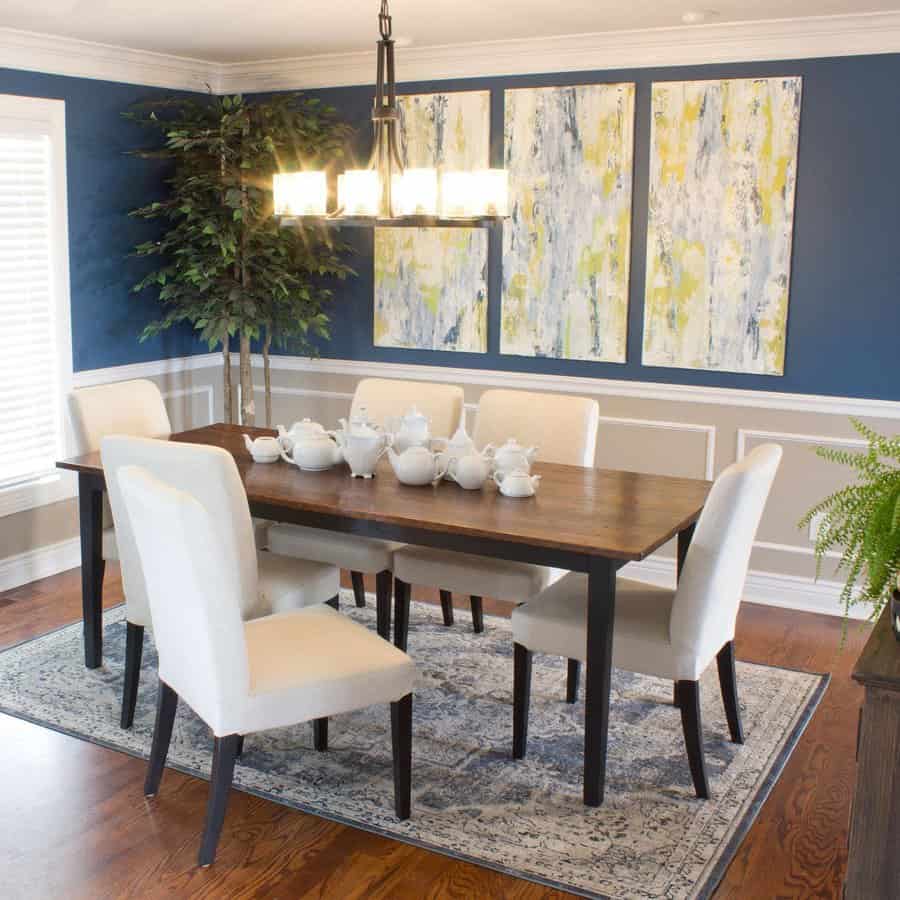
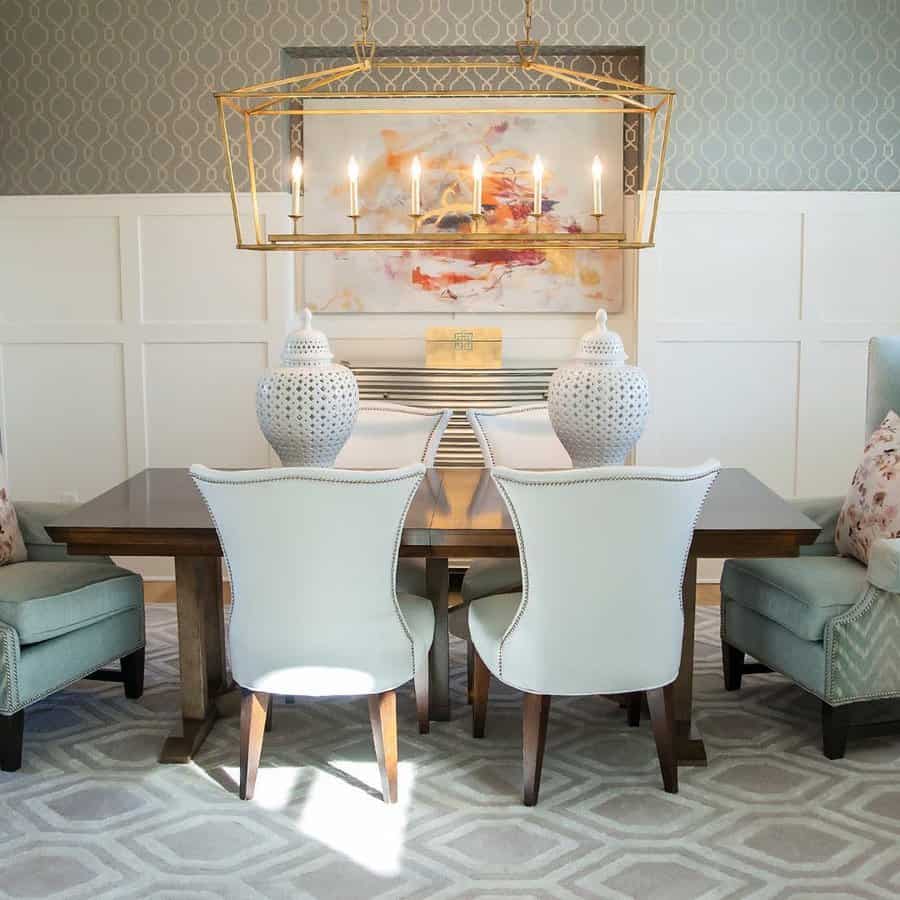
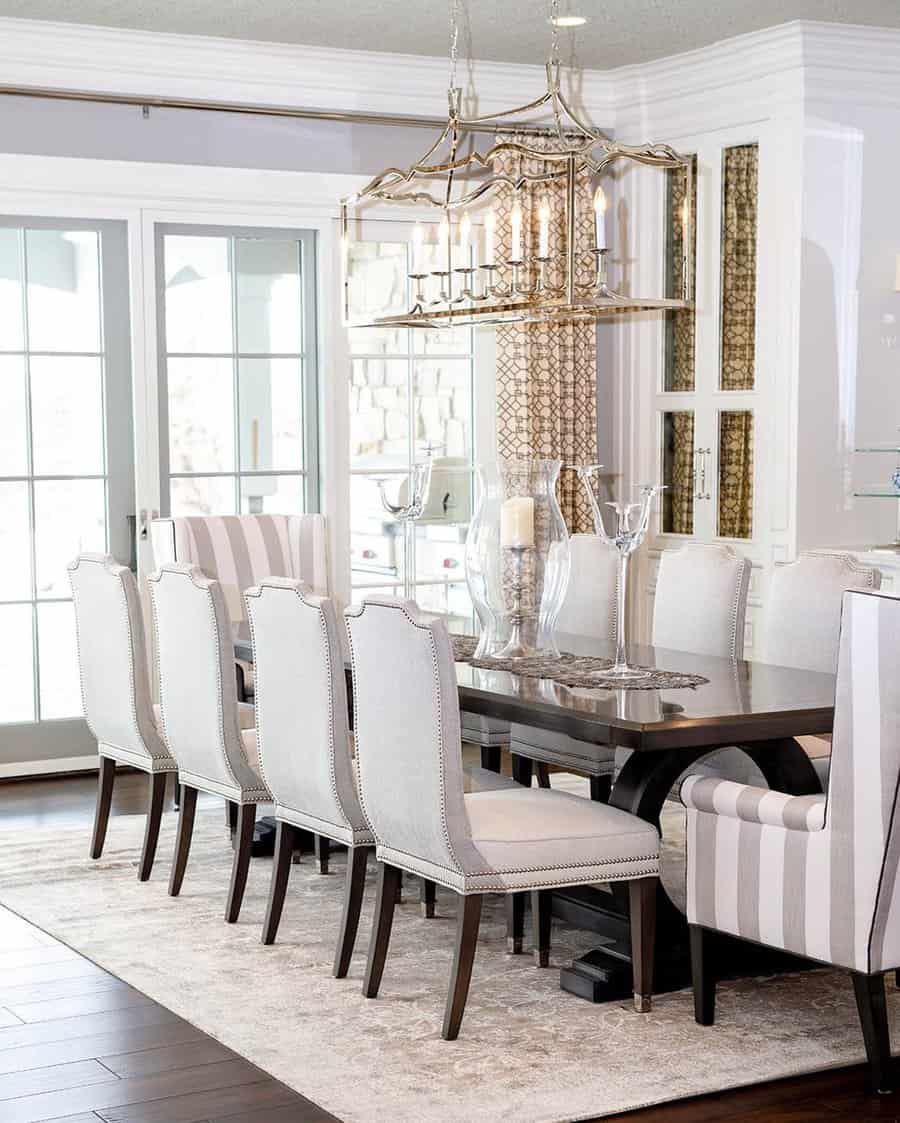
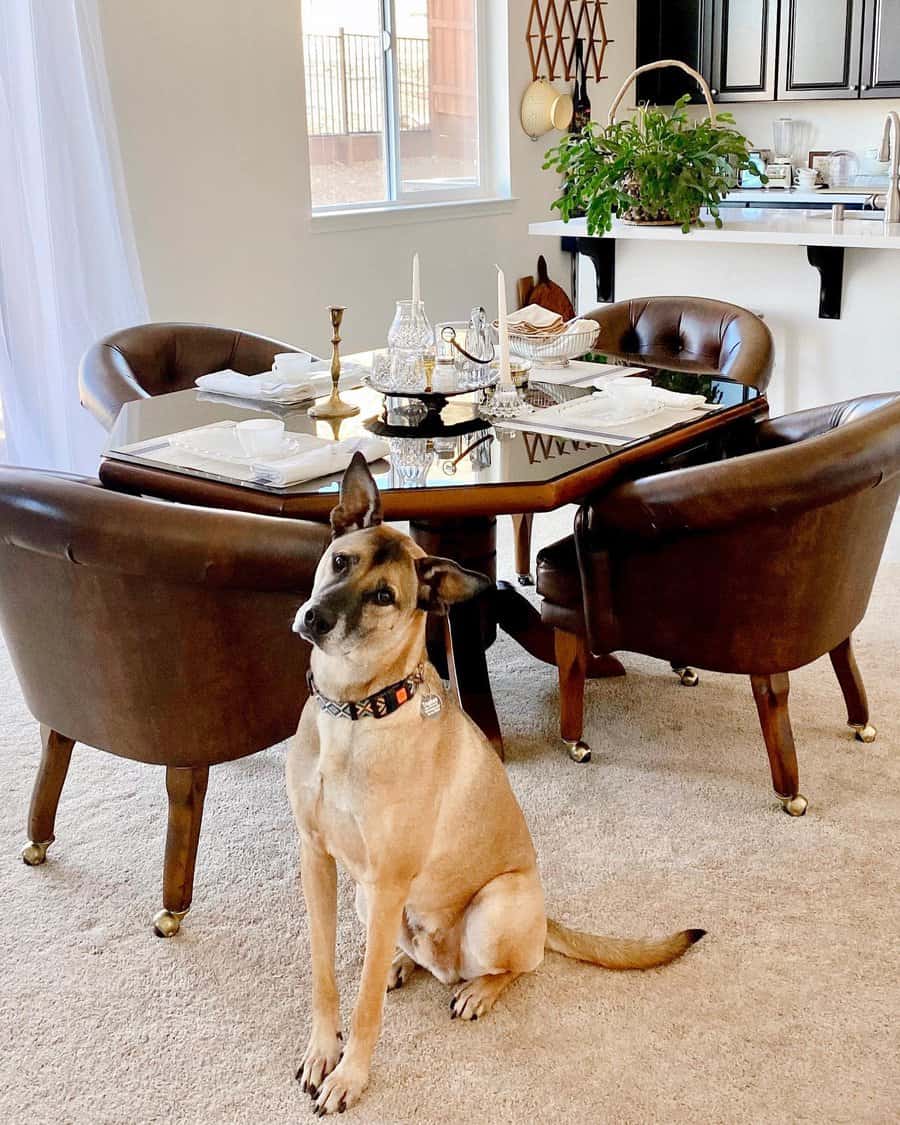
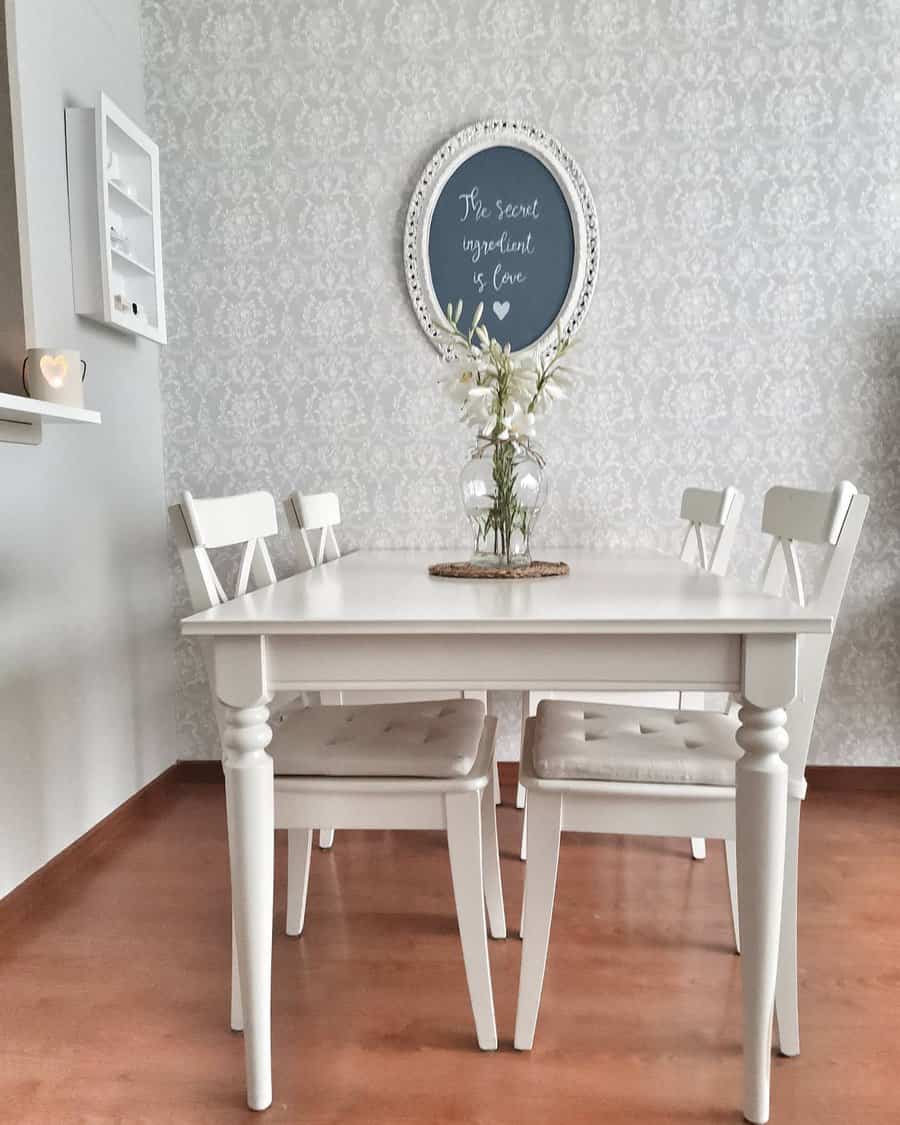
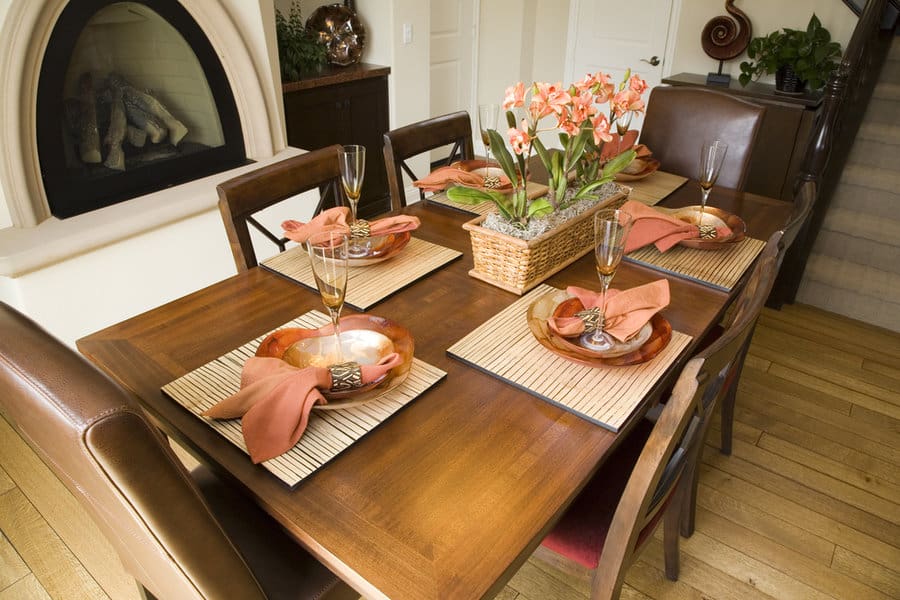
Today’s dining room doesn’t always get the respect it once earned as a central living space. But you don’t need to treat your dining area as a formal space to justify giving it some well-deserved updates.
Dining room design can range from ultra-casual to proper and elegant. While these styles can seem extremely different on the surface, no dining room deviates far from the standard layout of table, chairs, and auxiliary decor.
The dining room ideas below will give you everything you need to reimagine your dining space for the upcoming era of homeownership.
[view_toc]
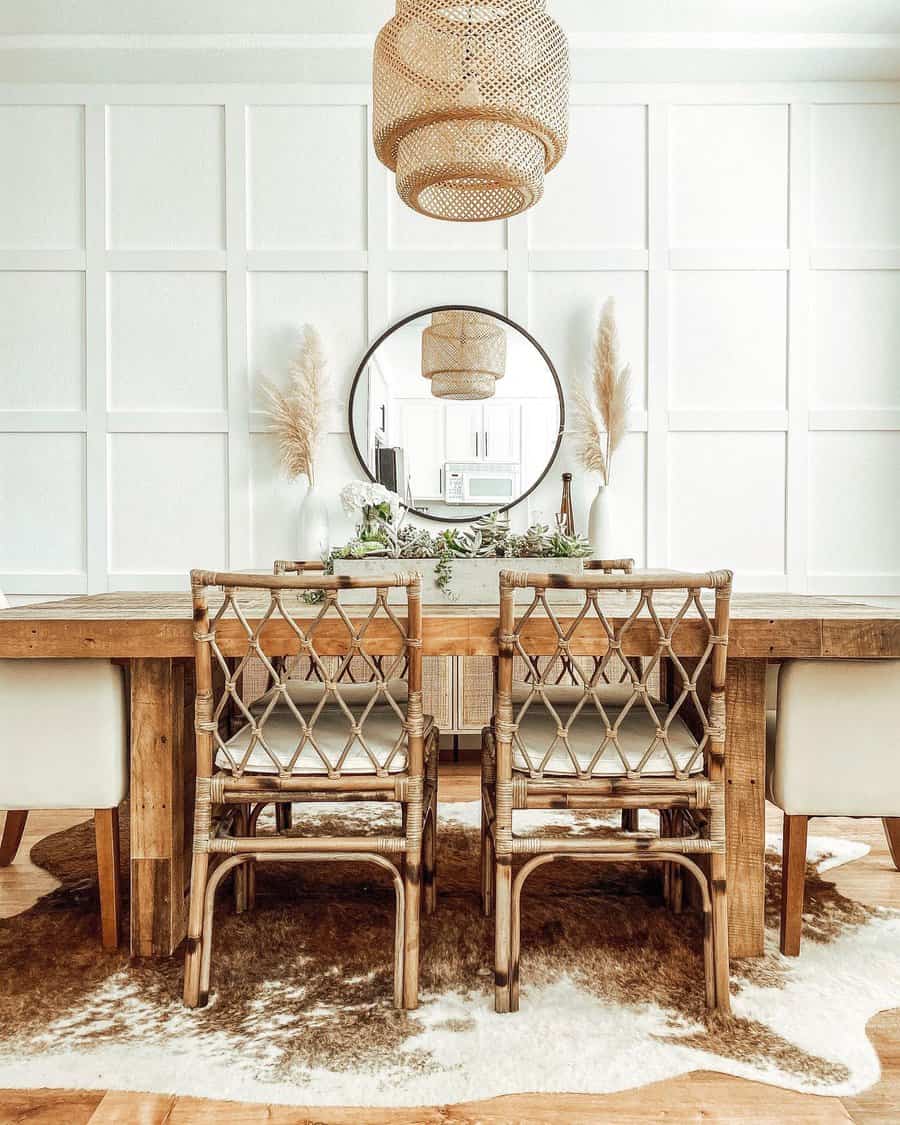
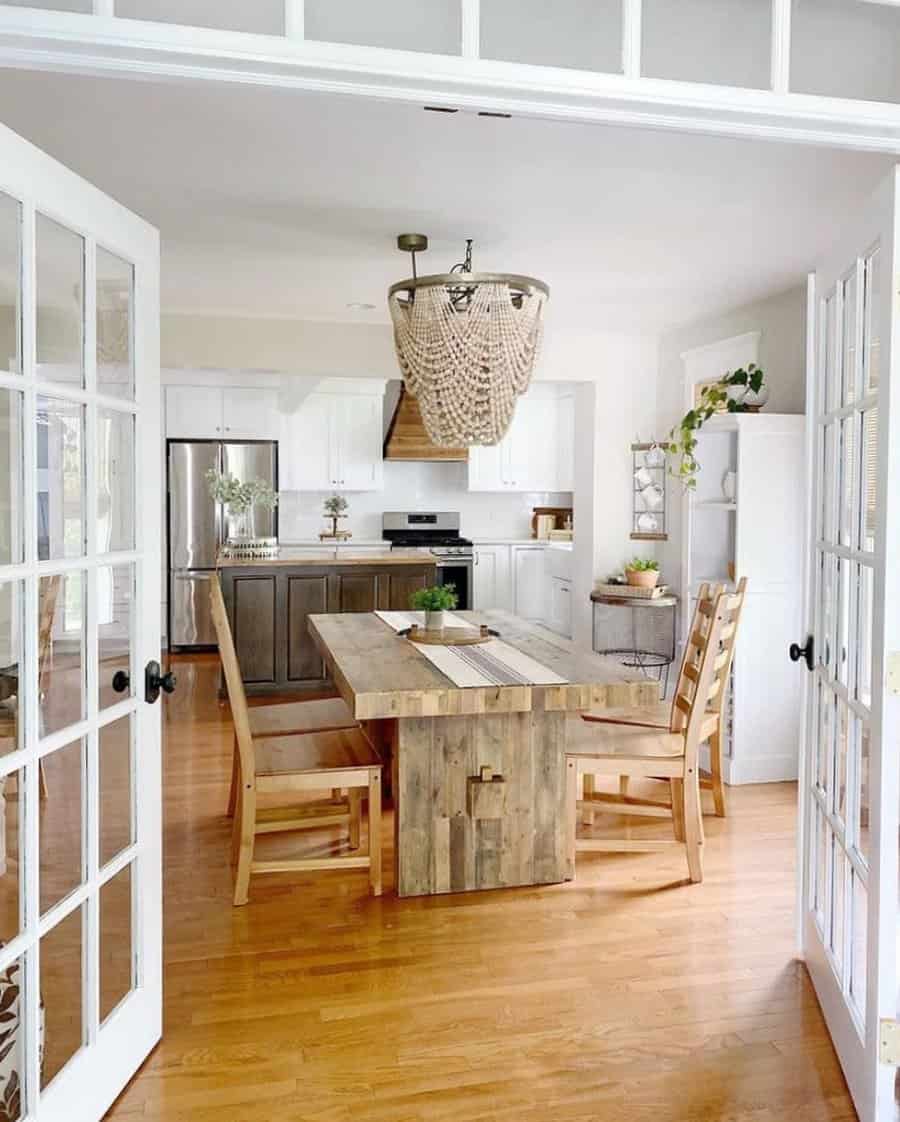
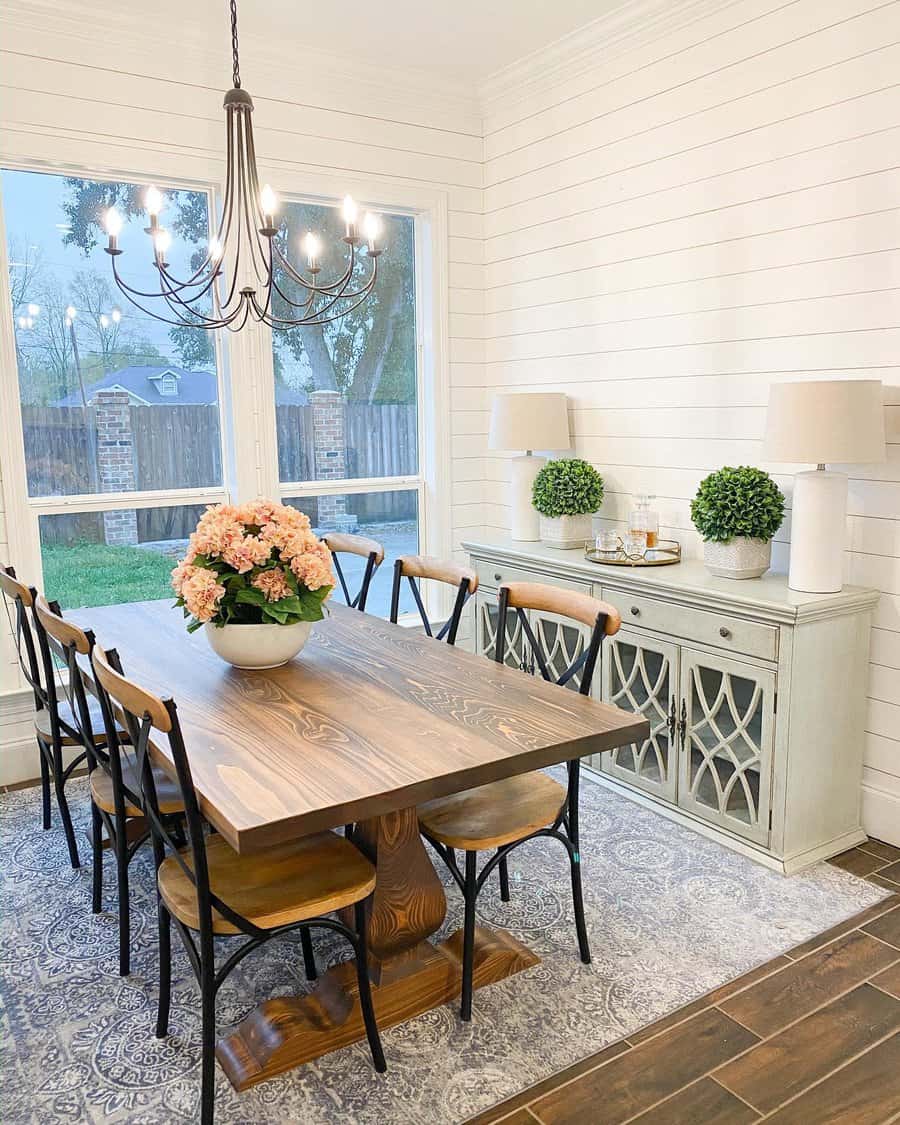
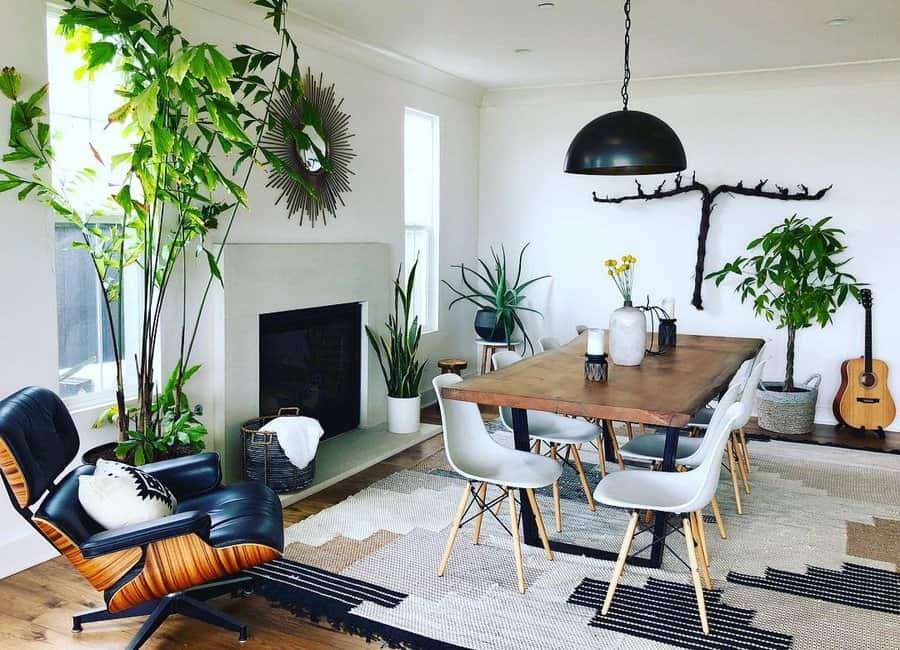
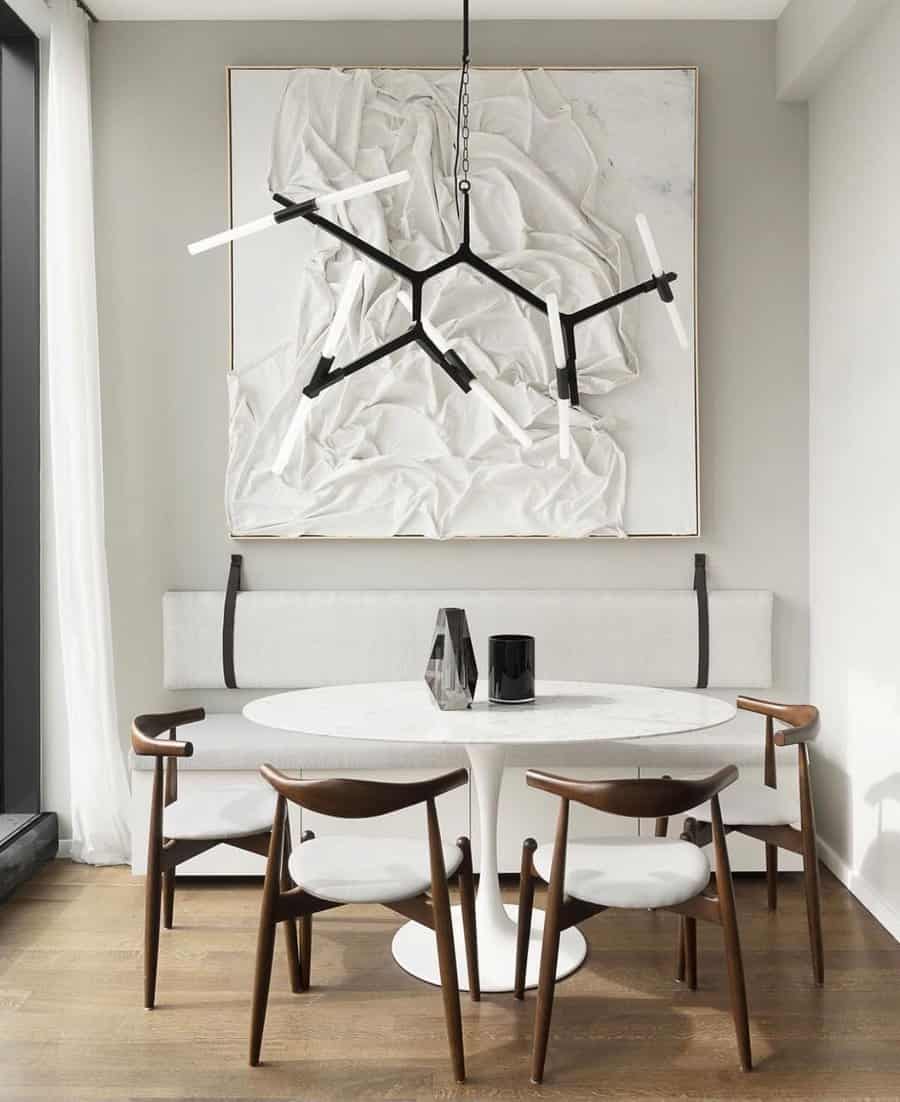
1. Create a Coastal Boho Dining Space
Embrace a relaxed, beach-inspired vibe with a Coastal Boho dining room. Mix natural materials like rattan or bamboo chairs with a light wooden table. Soften the look with a jute rug, and add pops of color through vibrant cushions or wall art depicting ocean scenes. This style thrives on airy, light-filled spaces, so consider sheer curtains to allow natural light to filter through.
Source: @sarahmervis via InstagramSource: @thehansenhaus via InstagramSource: @rumah_cunique via InstagramSource: @saltcoasthome via Instagram
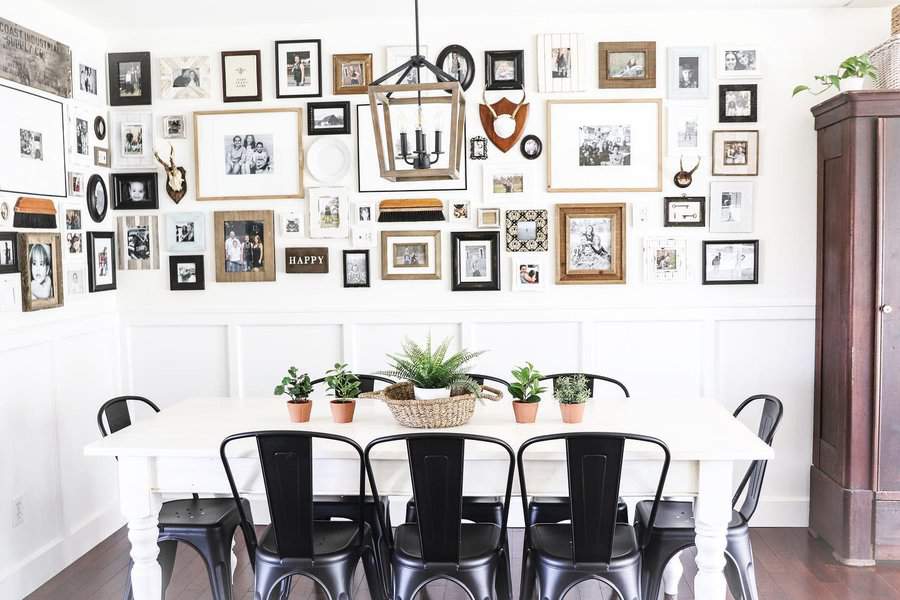
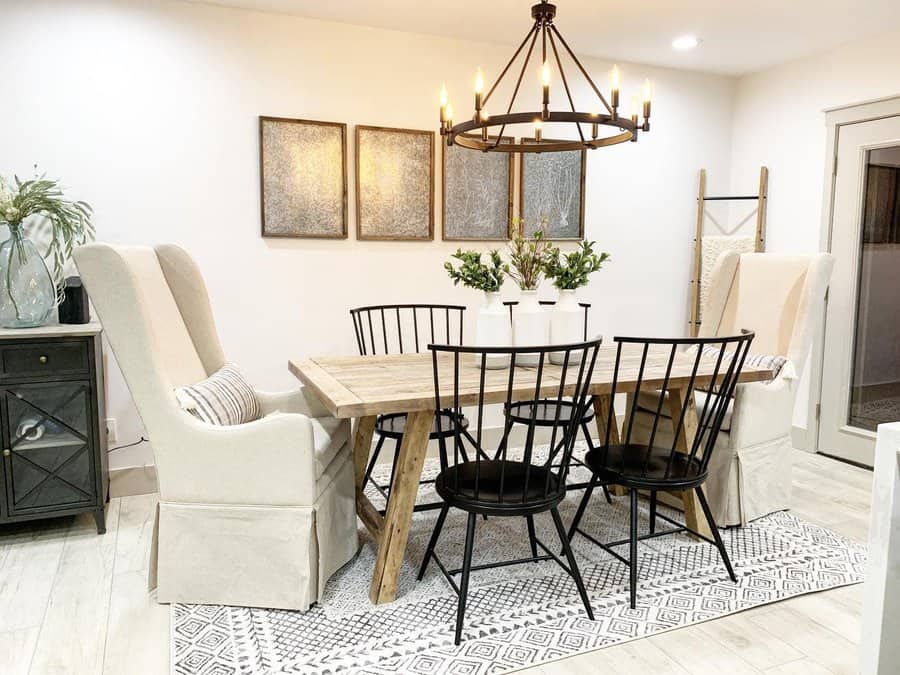
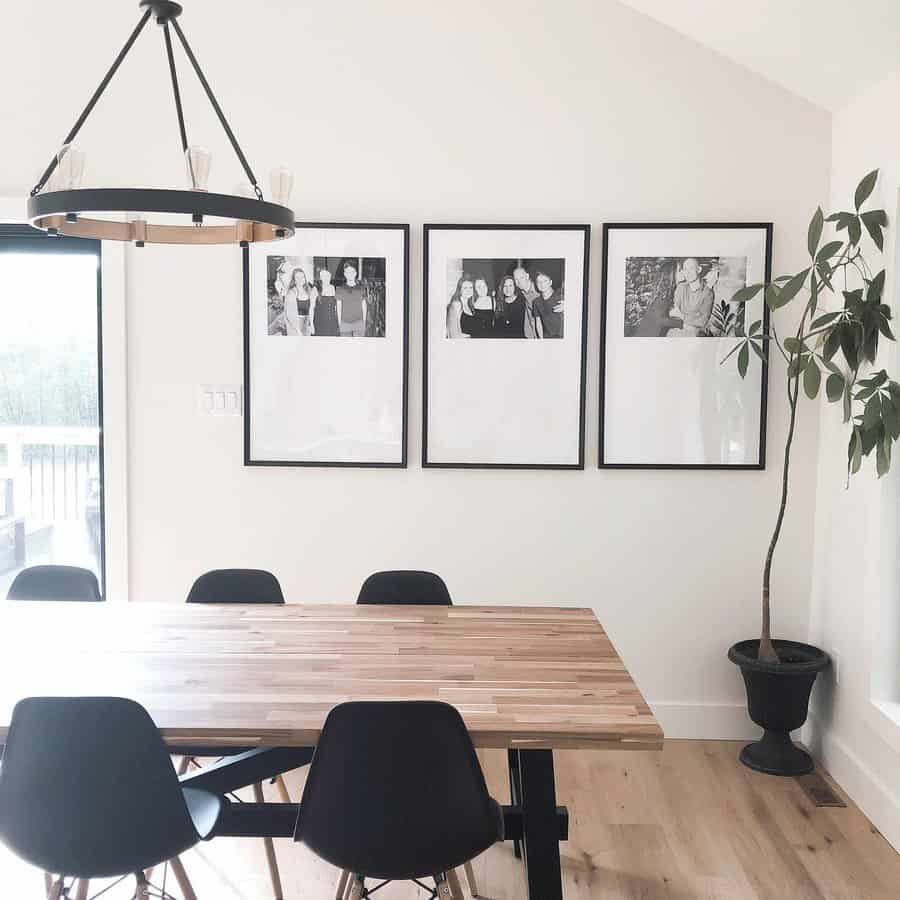
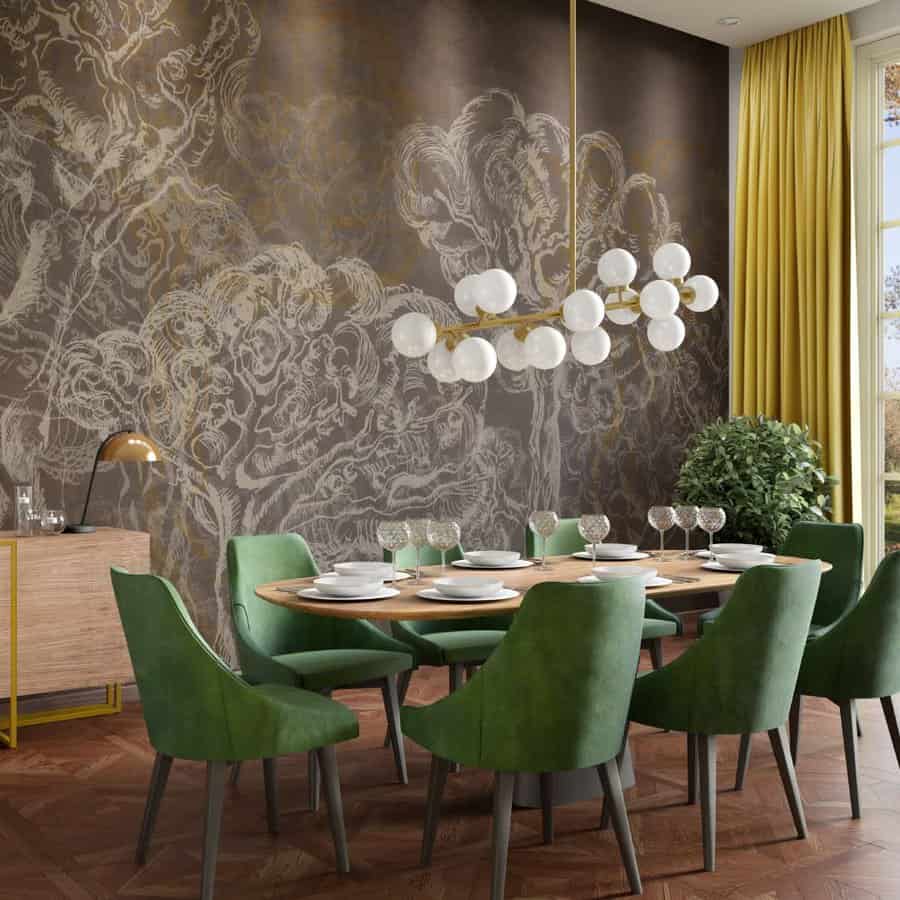
2. Design a Dynamic Artwork Gallery Wall
Transform your dining area into a dynamic space with an artwork gallery wall. Select pieces that share a common theme or color scheme for cohesion. Arrange them at eye level for maximum impact, varying sizes and frames for visual interest. This approach adds personality and can be a great conversation starter during meals.
Source: @freshfarmhousefeels via InstagramSource: @skol_art via InstagramSource: @interiorsbyalyx via Instagram
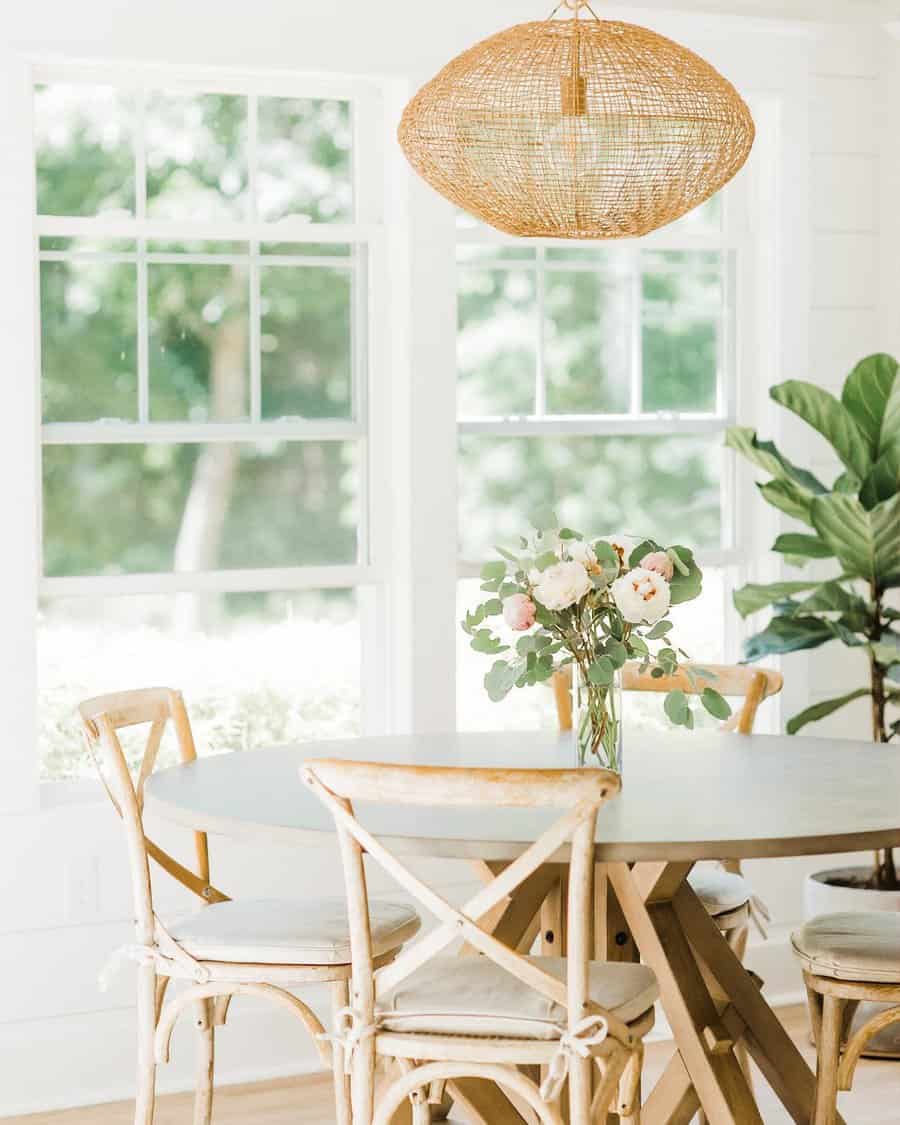
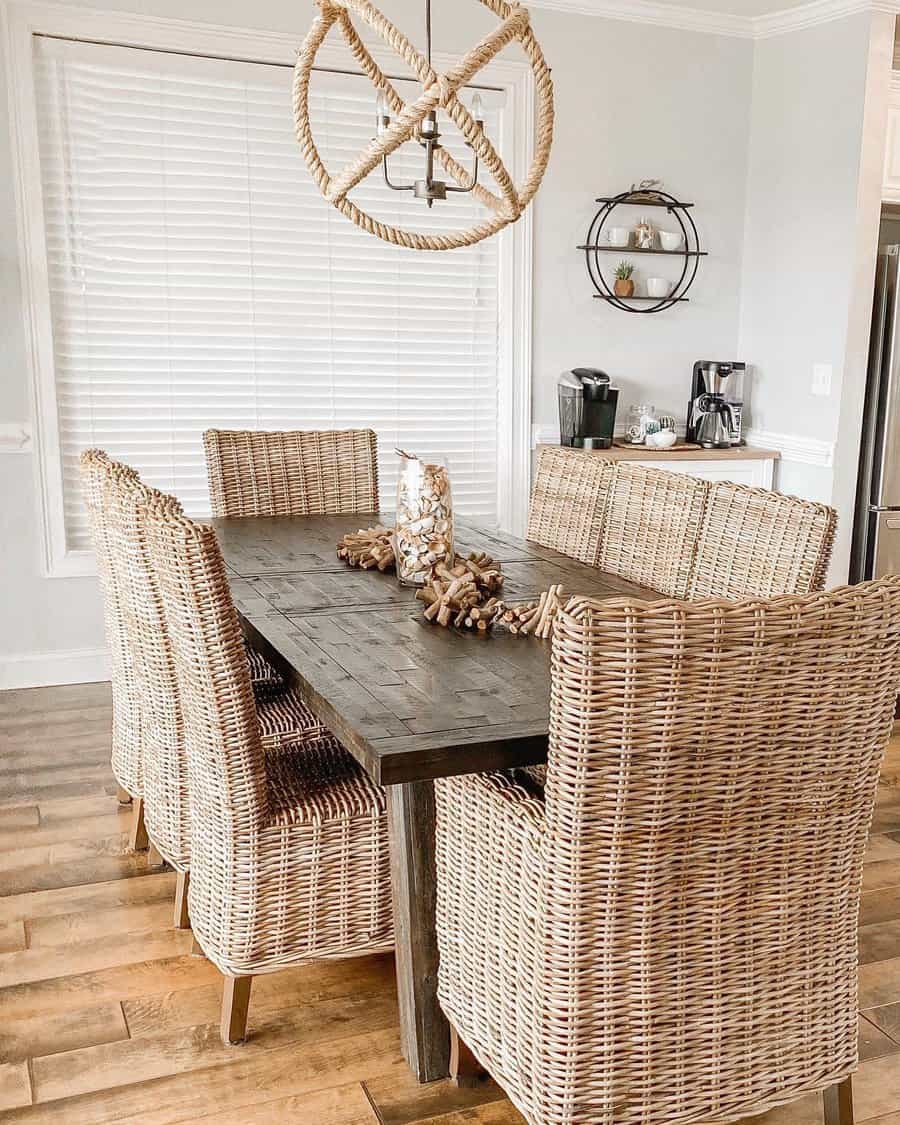
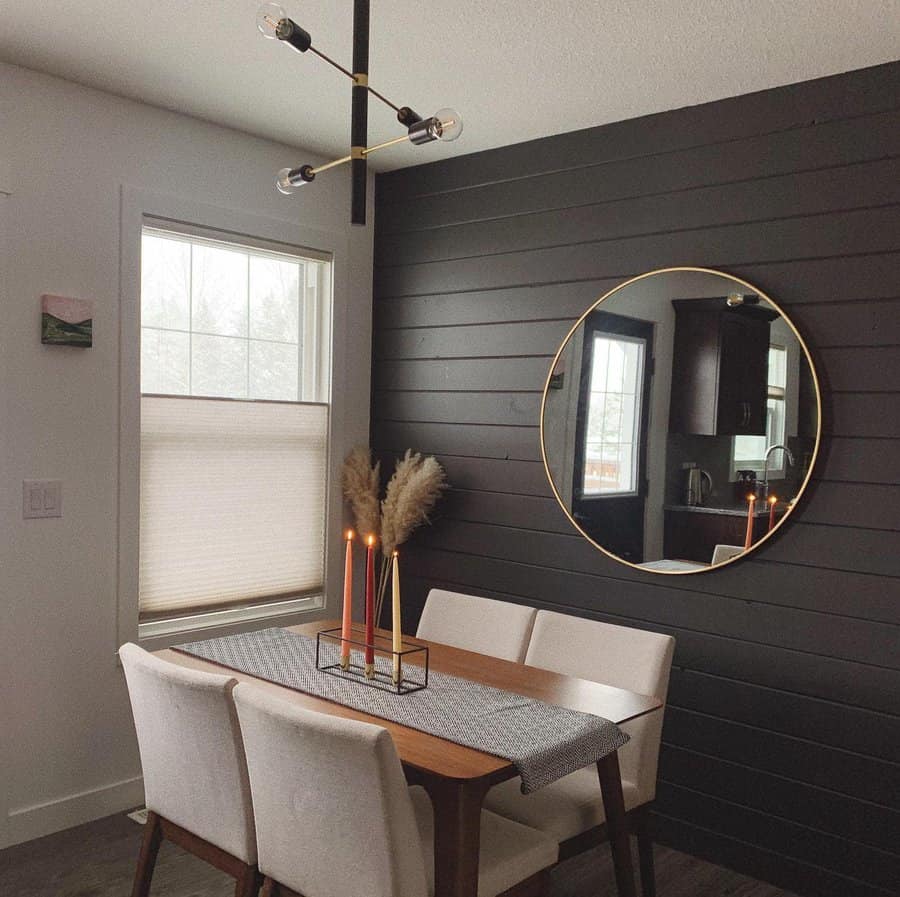
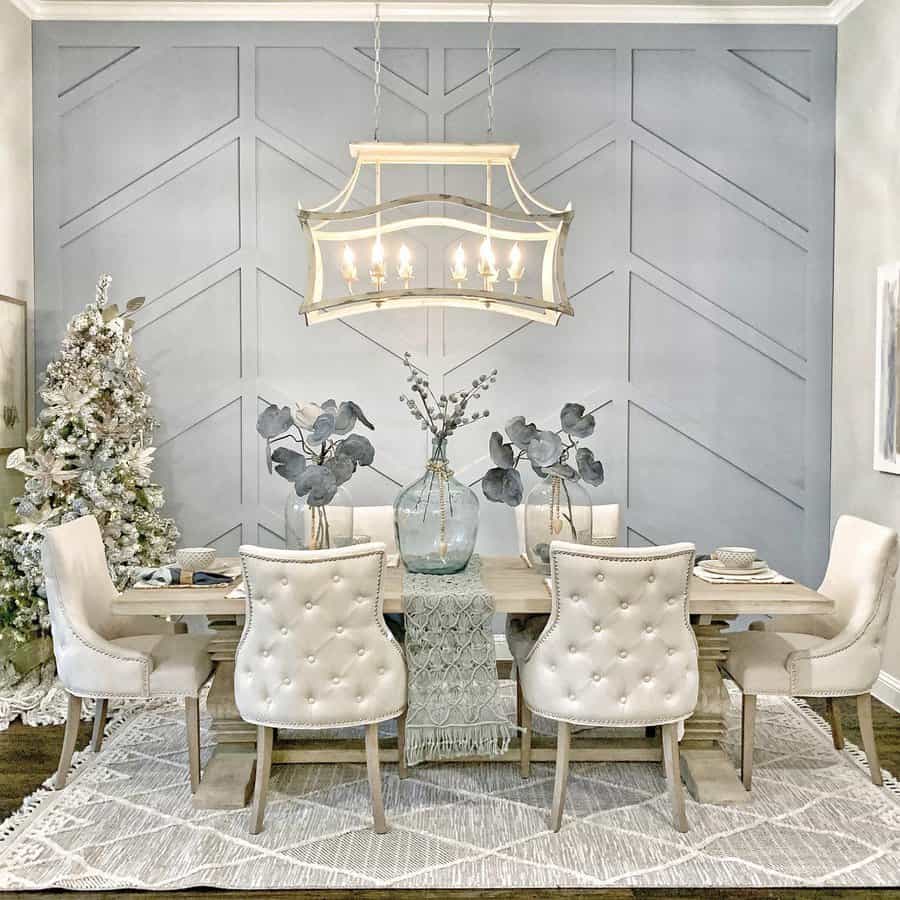
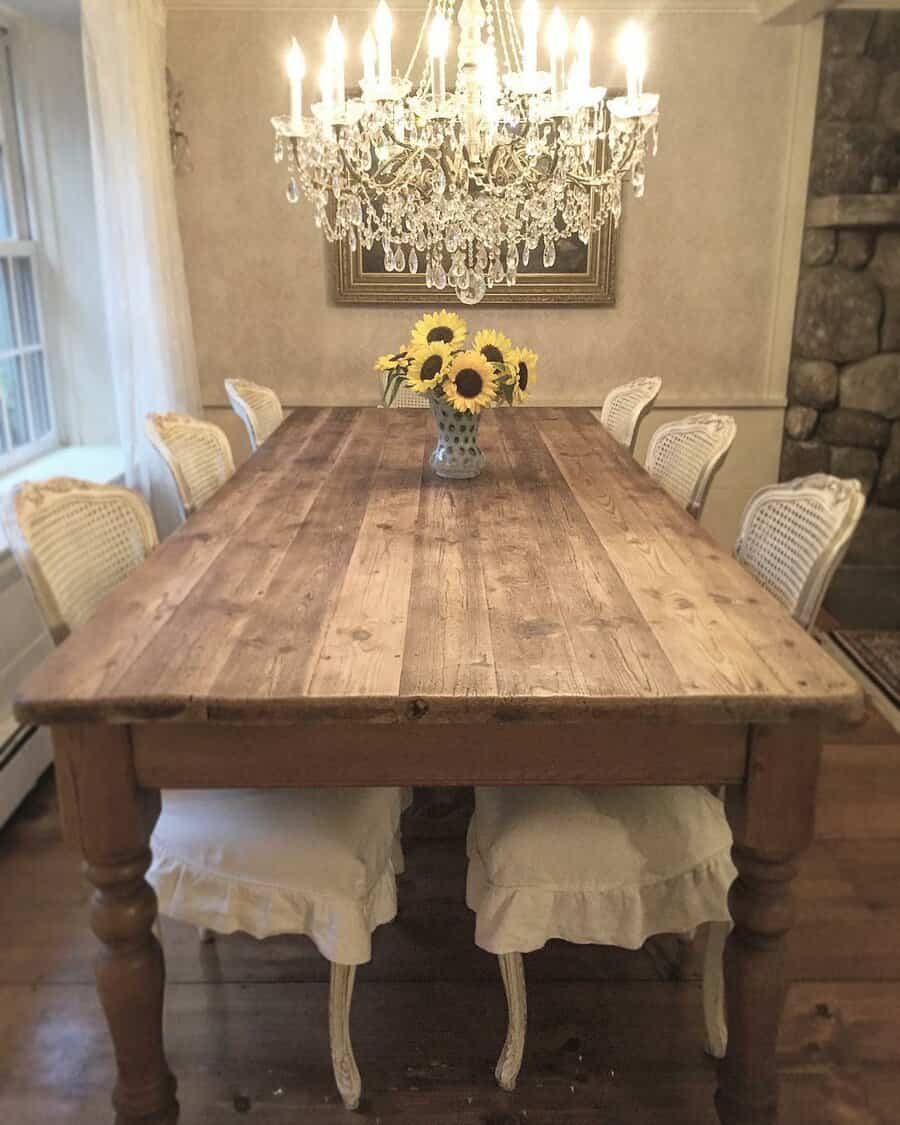
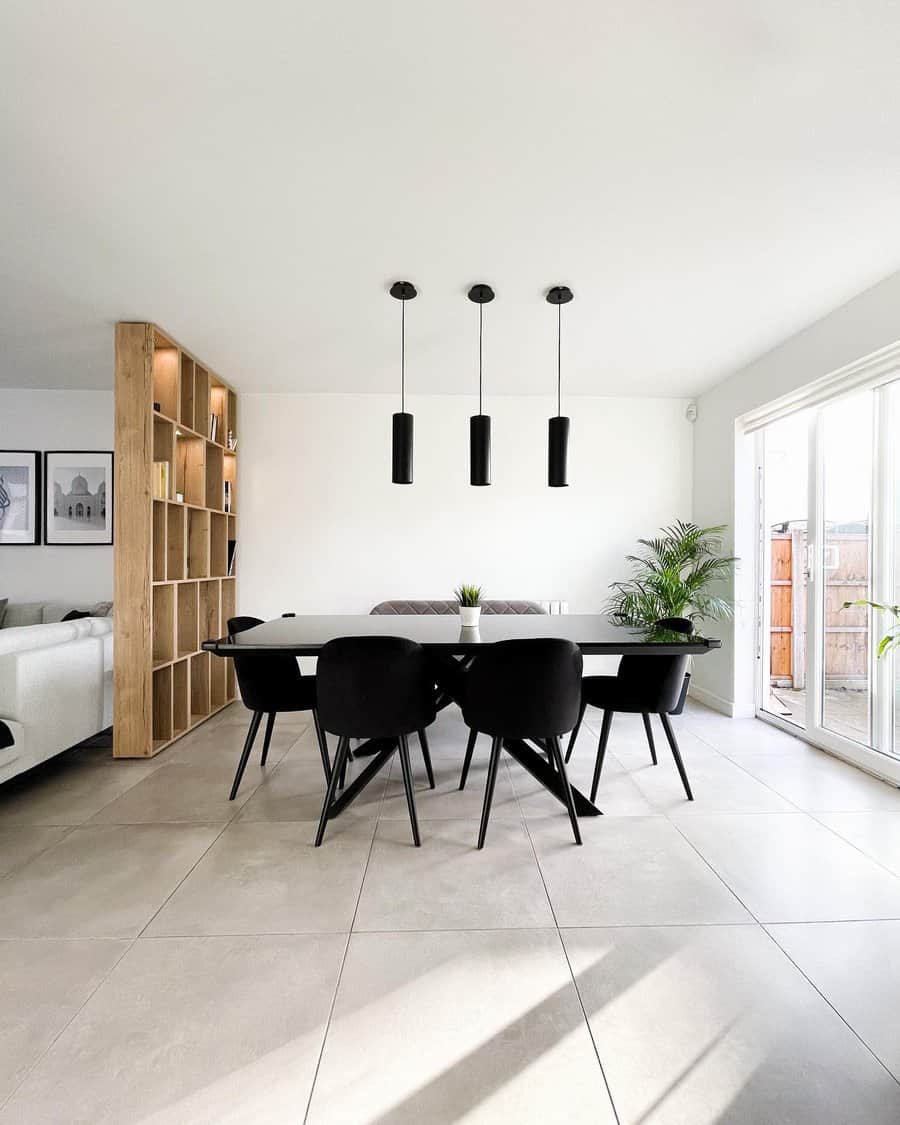
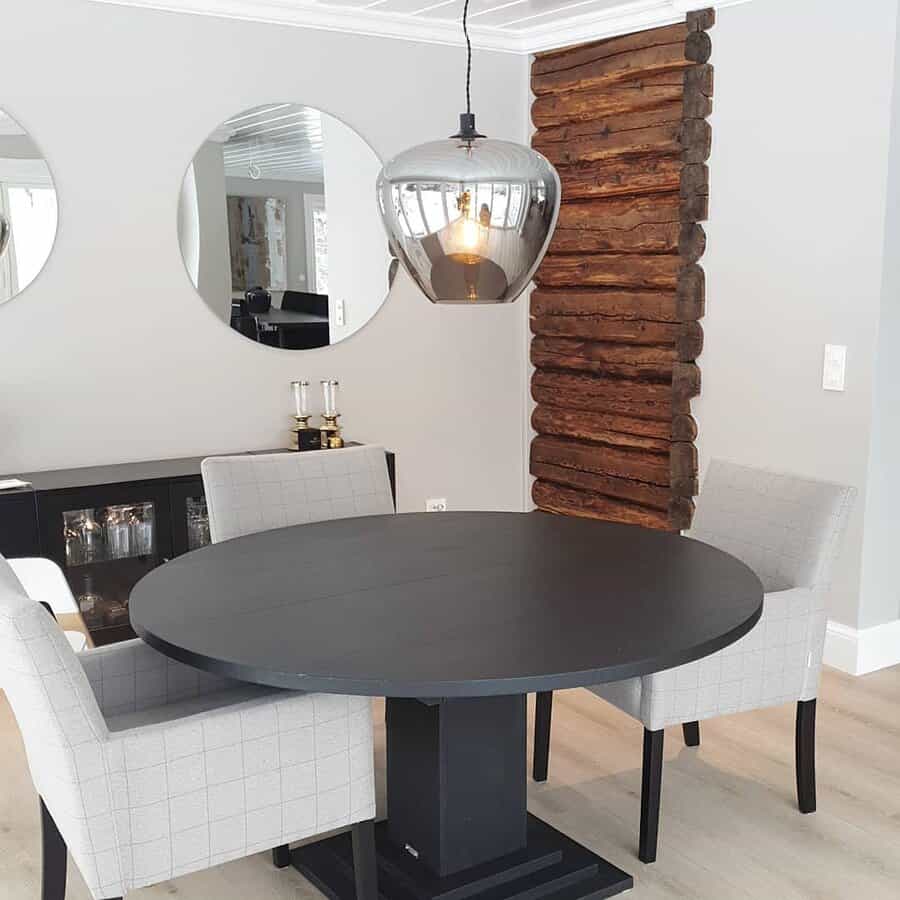
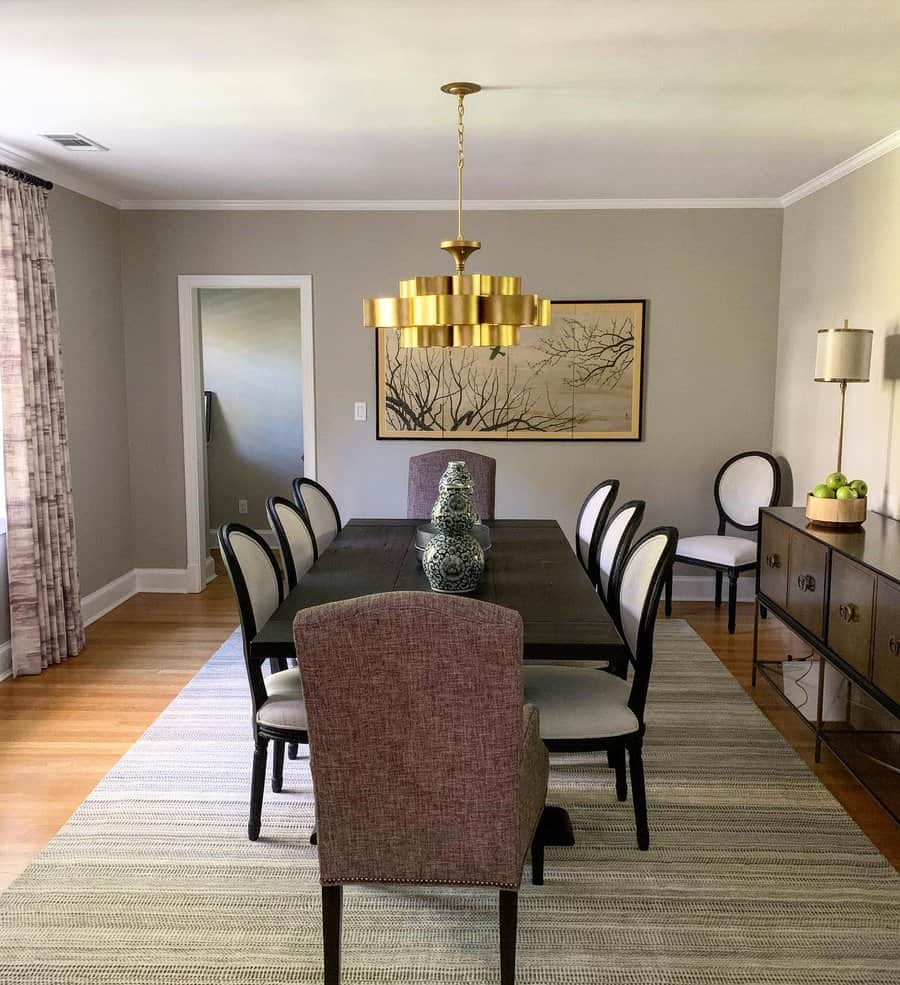
3. Illuminate with Stylish Pendant Lighting
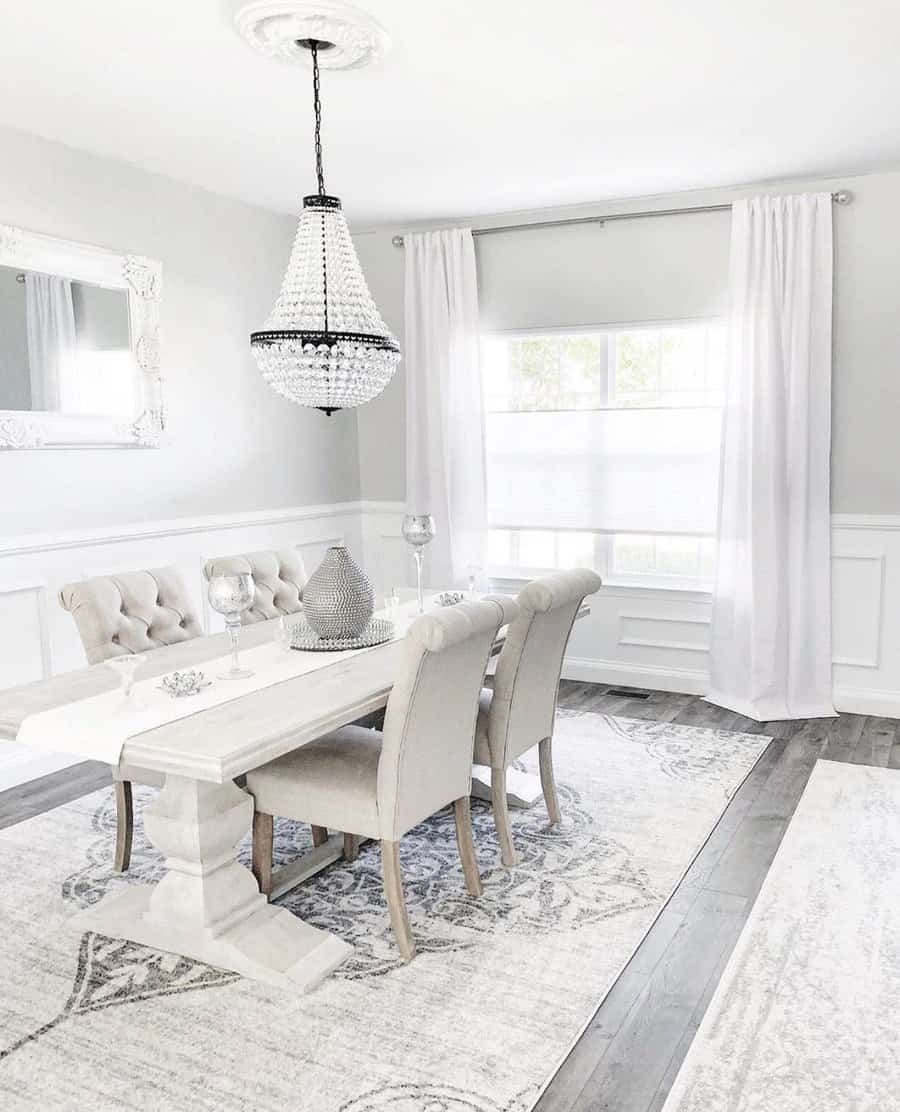
Pendant lights can redefine your dining space, offering both style and functionality. Choose a statement piece that reflects your room’s aesthetic, be it a sleek metal design for modern spaces or an ornate chandelier for classic settings. Position the light directly above the dining table to create an intimate ambiance and draw focus to the meal setting.
Source: @intex_turedesigners via InstagramSource: @jverainteriors via InstagramSource: @jverainteriors via InstagramSource: @karla_trincanell_int.decisions via InstagramSource: @_sydneydawn via Instagram
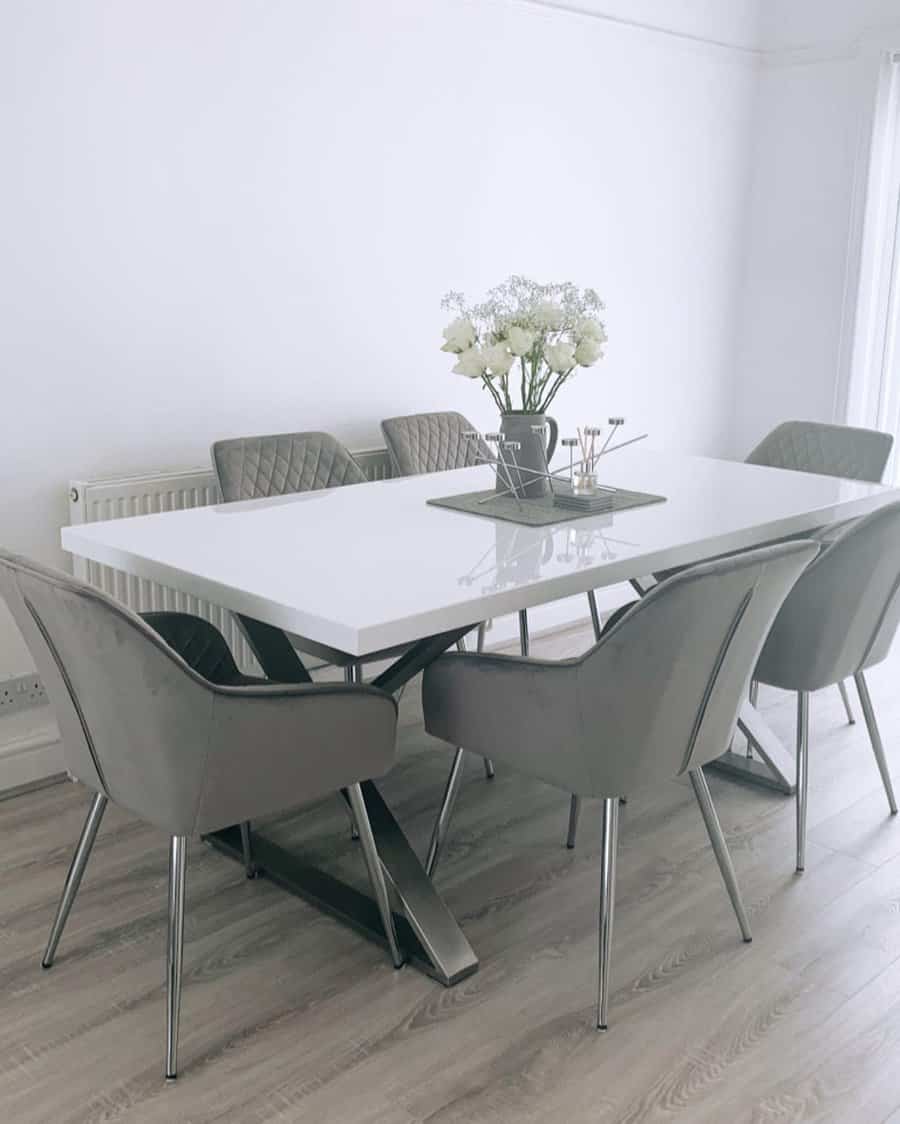
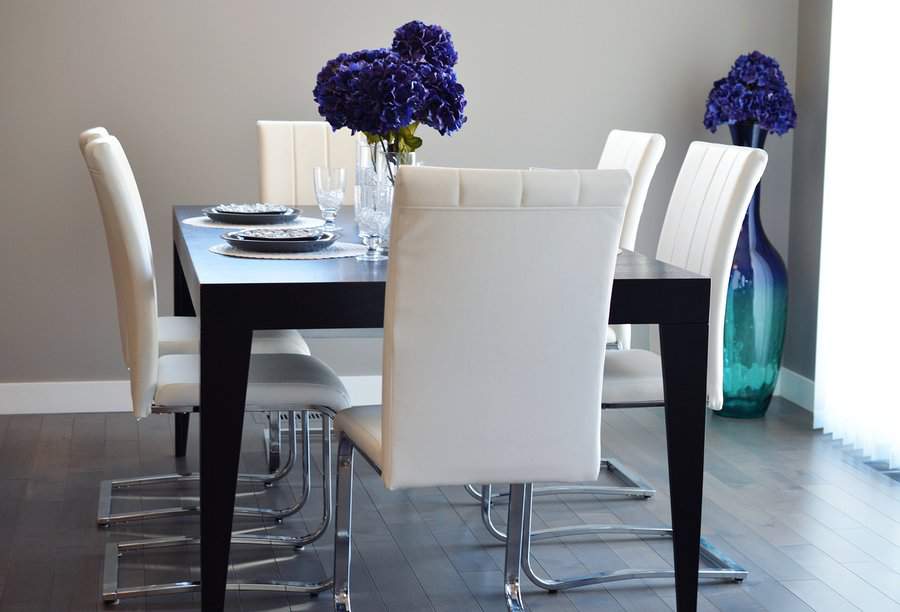
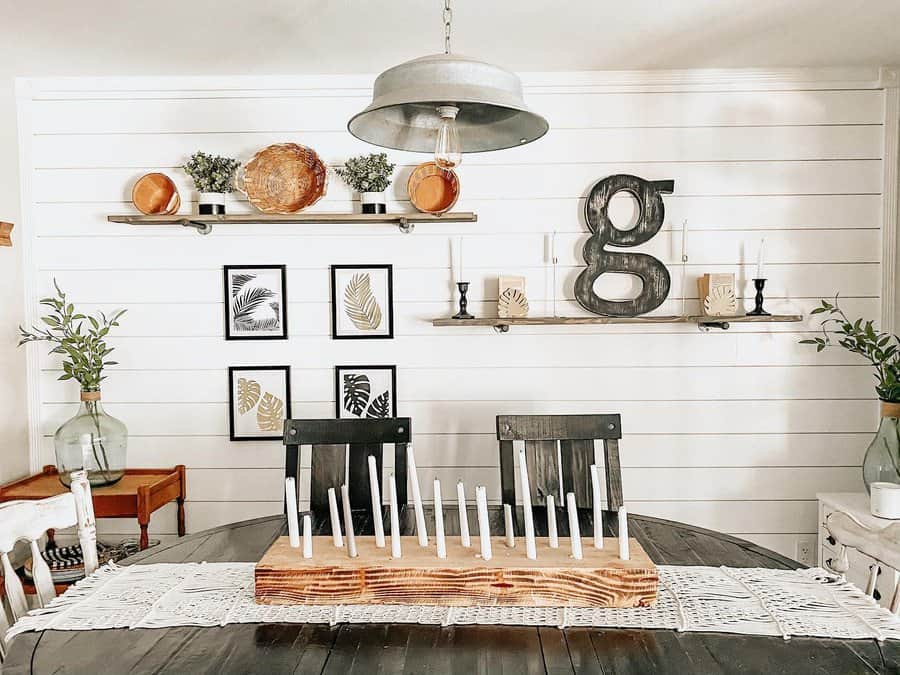
4. Craft a Floral Centerpiece Masterpiece
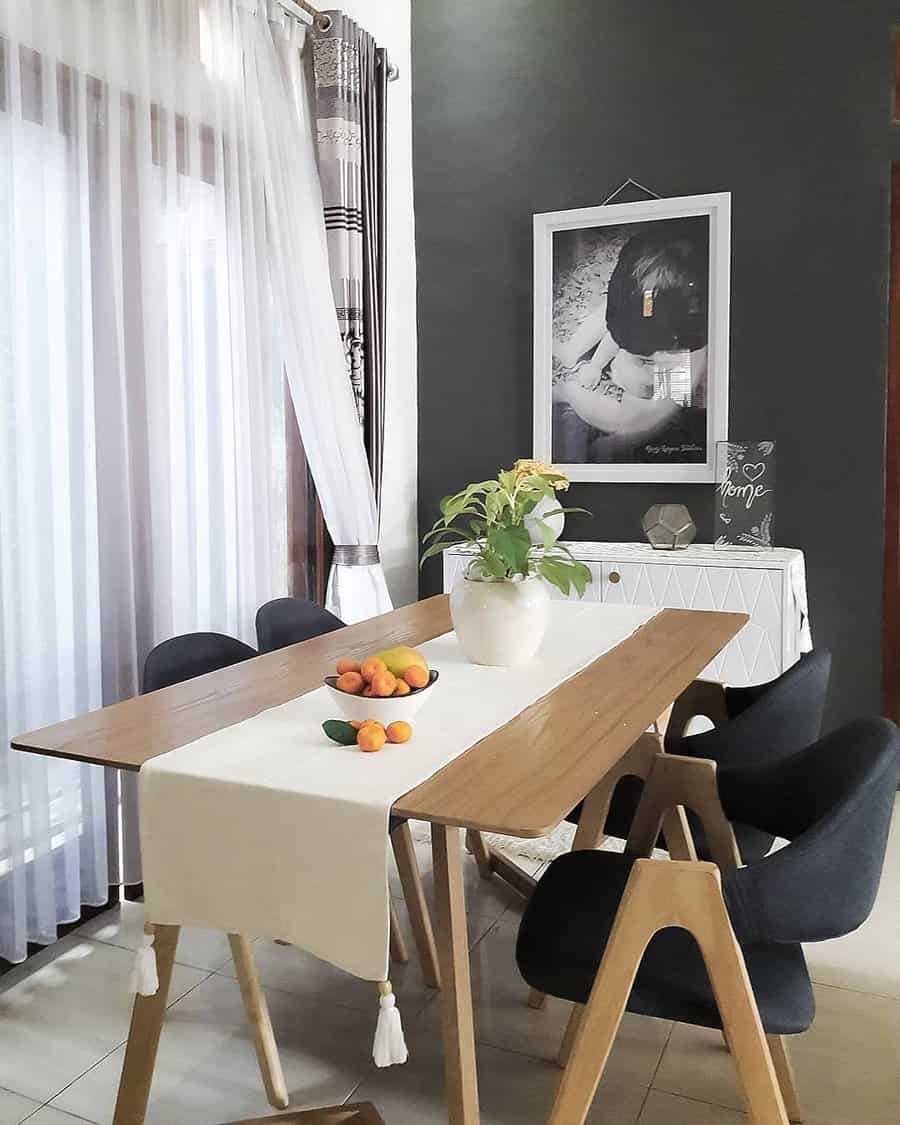
A floral centerpiece in a vase can be the crown jewel of your dining table. Select a vase that complements the table’s shape and size—tall and slender for long tables, compact and round for smaller ones. Choose fresh flowers that match the room’s color palette. Remember to change water regularly and trim stems for longevity.
Source: @mygreydunham via InstagramSource: @ourliverpoolhome.xo via InstagramSource: @mr.jongraves via InstagramSource: @instudioandcompanyinteriors via Instagram
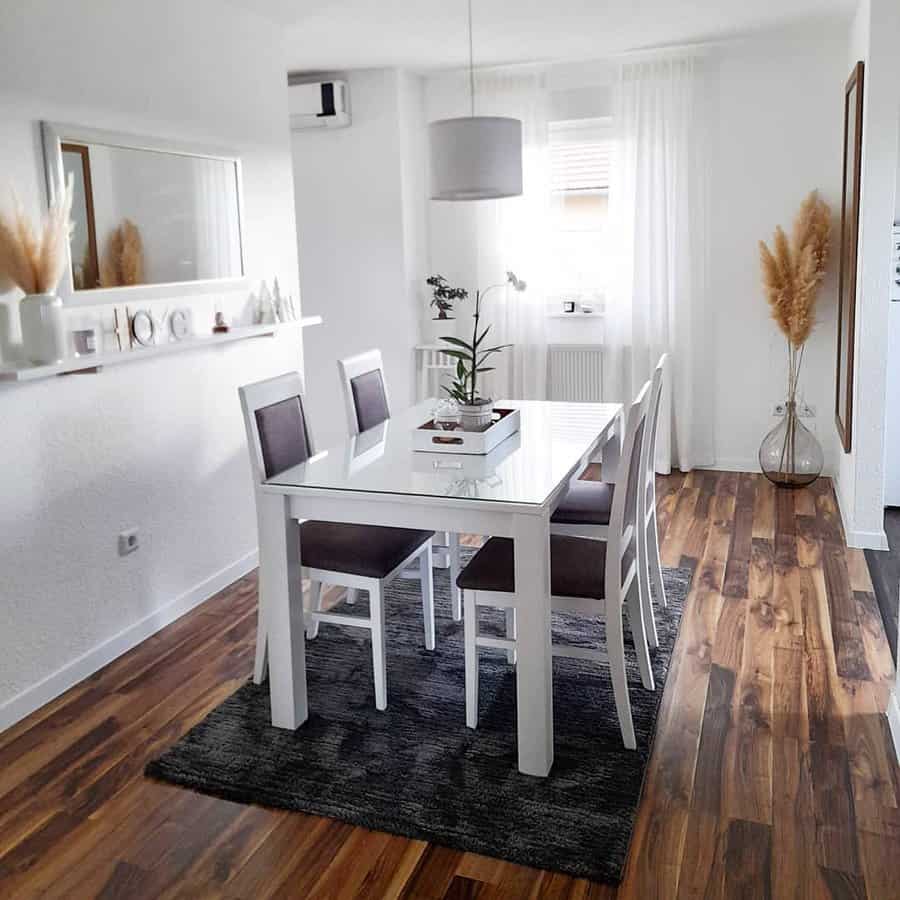
5. Choose the Perfect Dining Area Rug
A rug under the dining table helps define the space and adds warmth. Opt for a rug that extends beyond the table’s perimeter by at least 24 inches, ensuring chairs remain on the rug when pulled out. Material-wise, go for durable, easy-to-clean fabrics considering potential food and drink spills.
Source: @1930sarang via InstagramSource: @the.casey.cottage via InstagramSource: @annavynguyen via InstagramSource: @design_genes via InstagramSource: @jhwallpaints via InstagramSource: @home_by_sivac via InstagramSource: @mrs_sobczak via InstagramSource: @krafted_renovations via Instagram
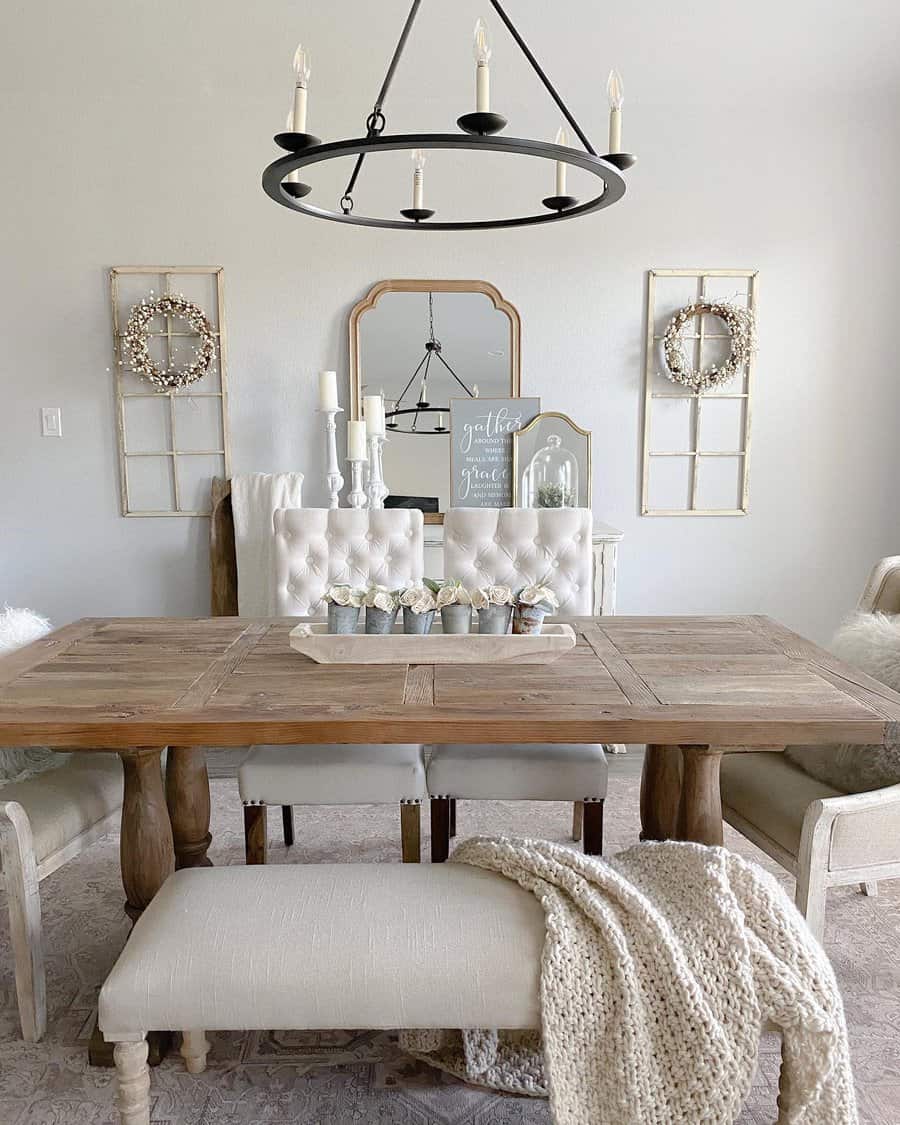
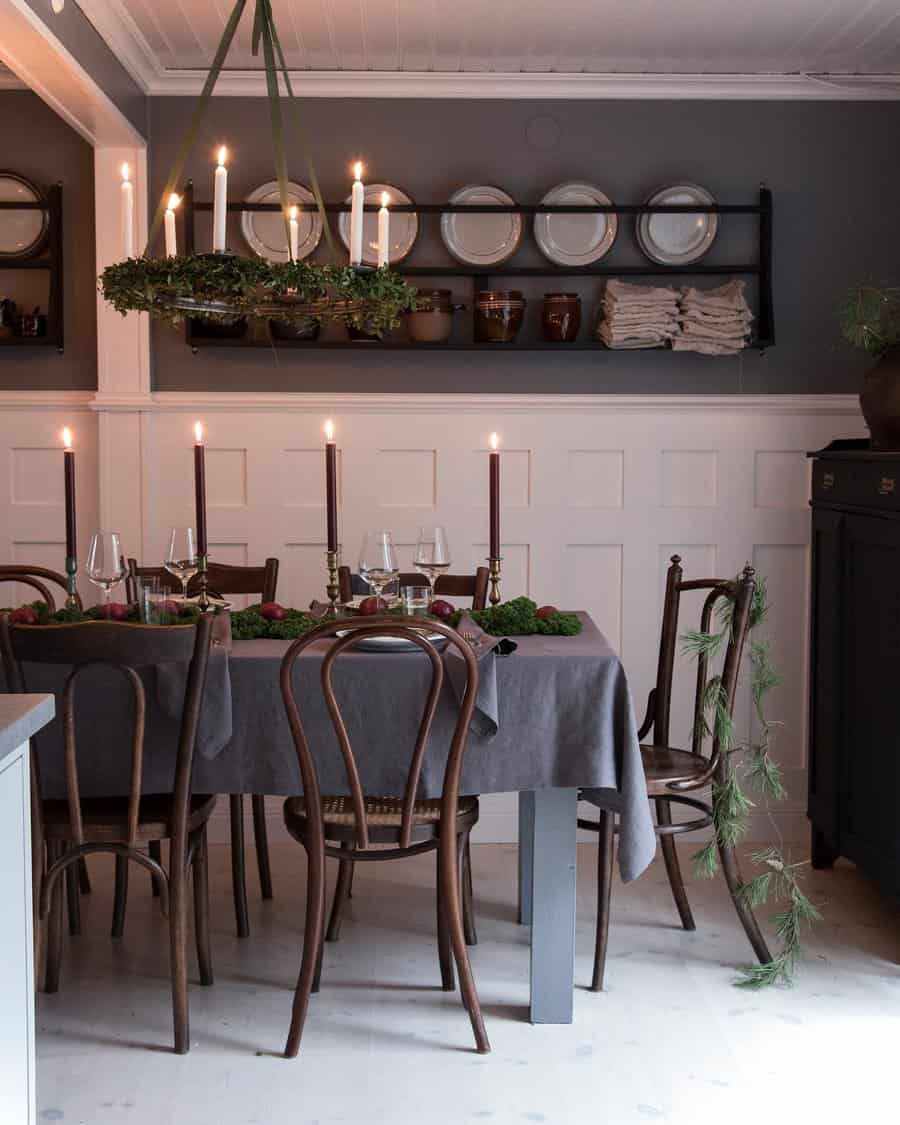
6. Enhance with an Elegant Table Runner
A table runner is a simple yet effective way to add texture and color to your dining room. It should be one-third the width of your table and hang evenly on both ends. Coordinate the runner’s fabric and pattern with your room’s theme—linen for a rustic look or silk for a more formal setting.
Source: @alittle_bitof_alldecor via InstagramSource: @rumahsriwedari via InstagramSource: @smalltowngirllife via InstagramSource: @chippyvintagehippie via Instagram
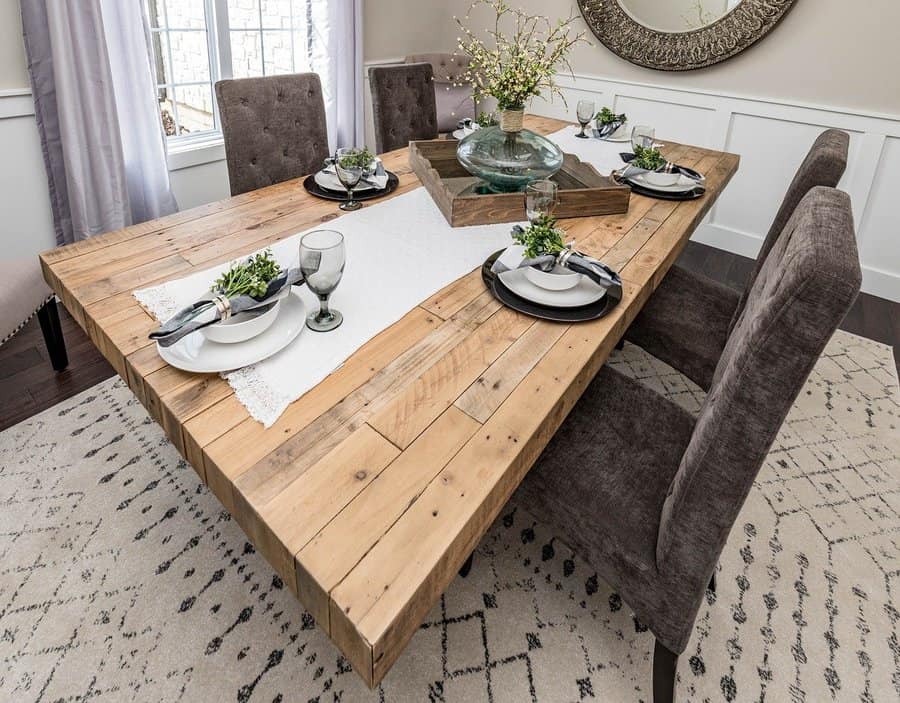
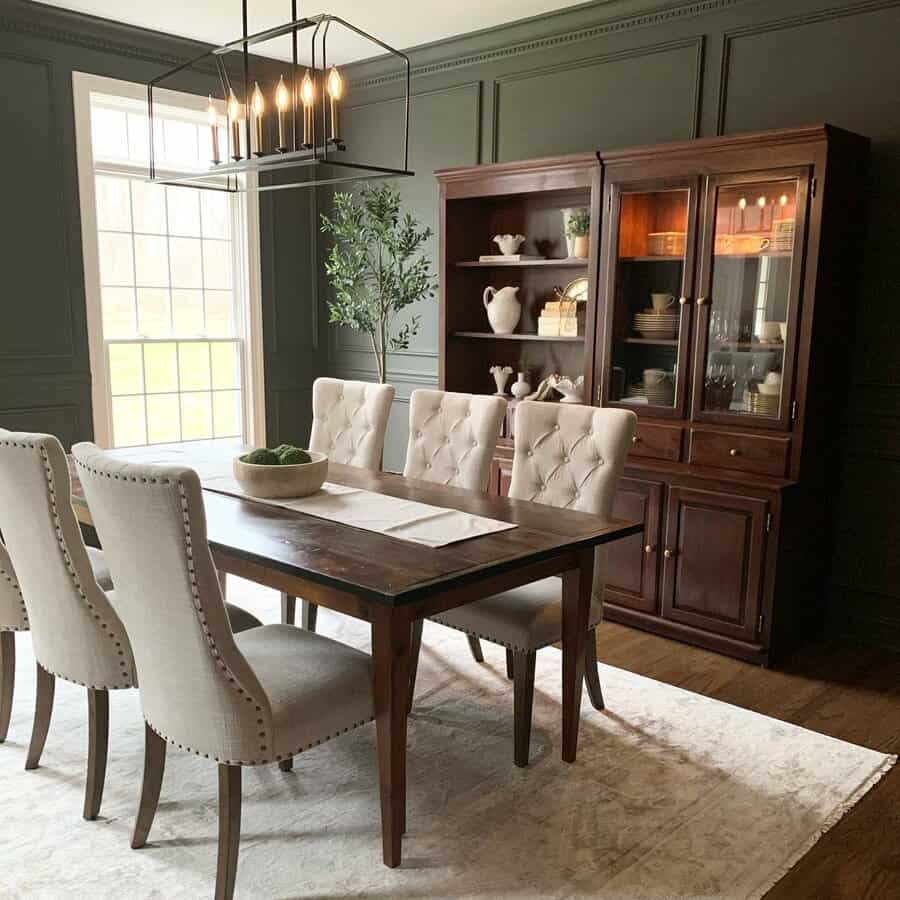
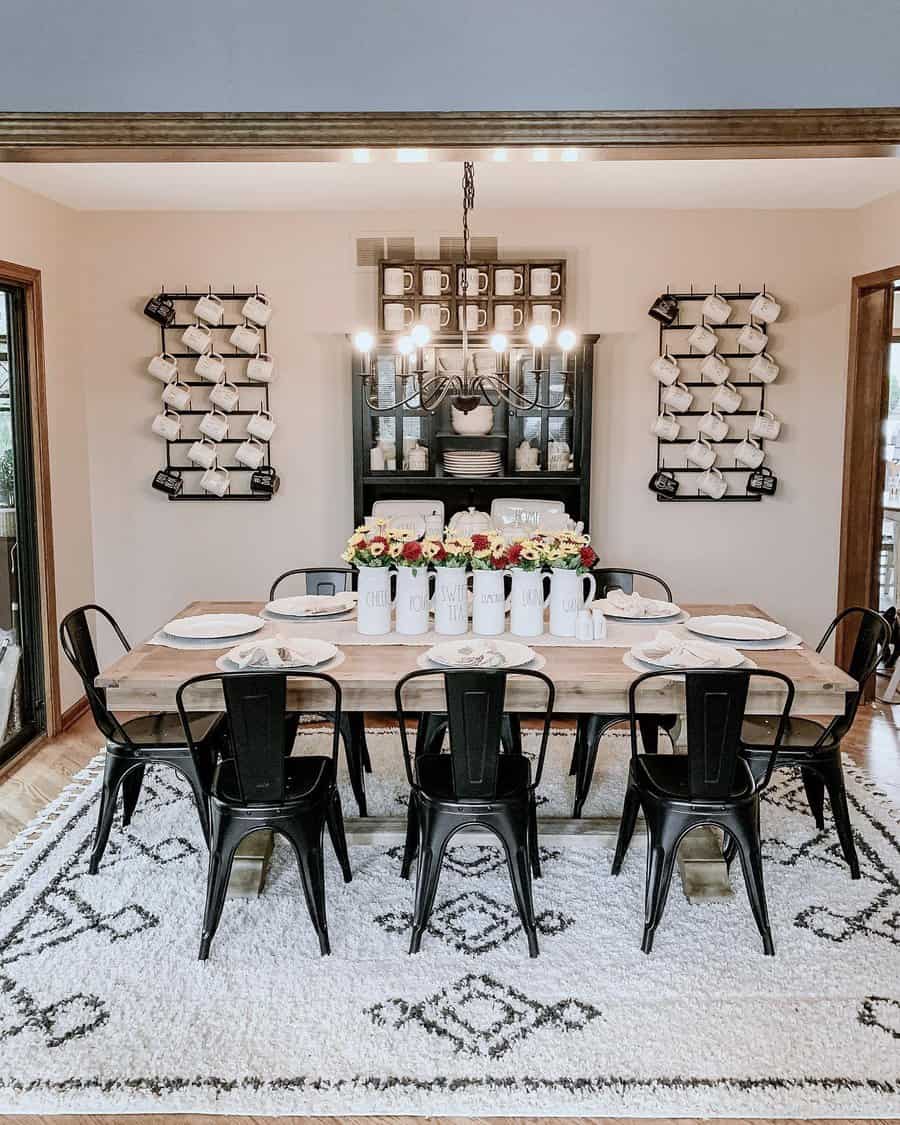
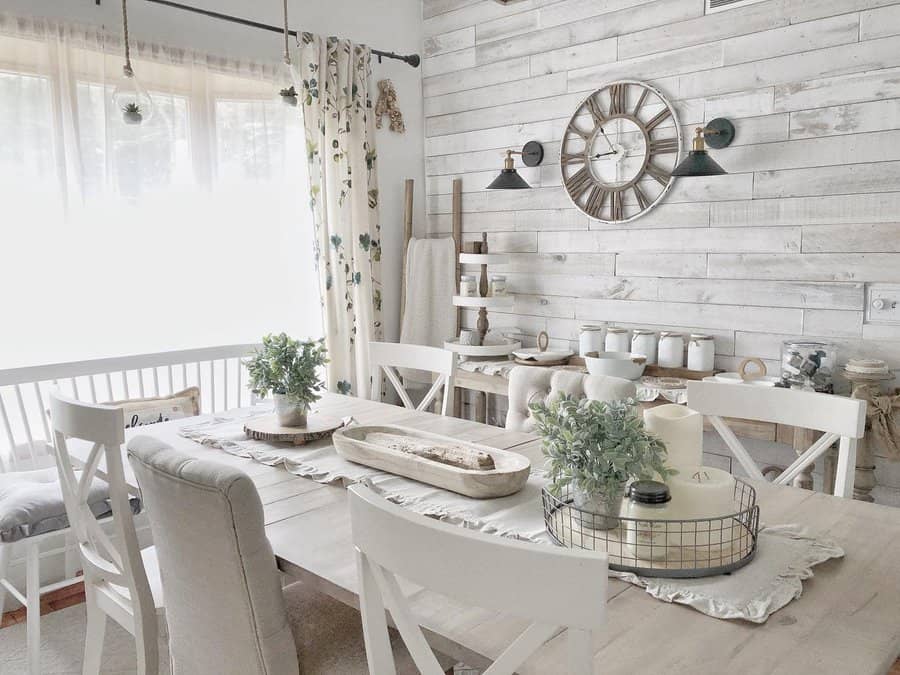
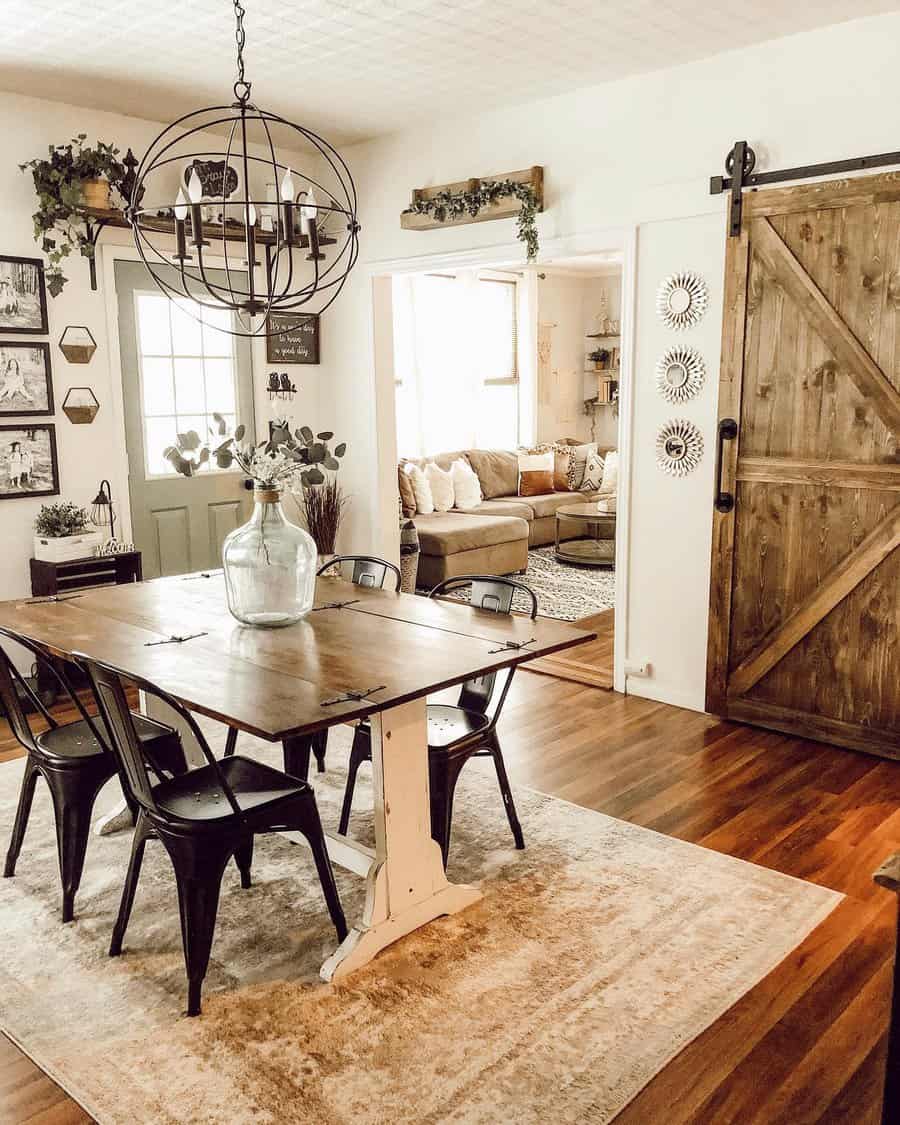
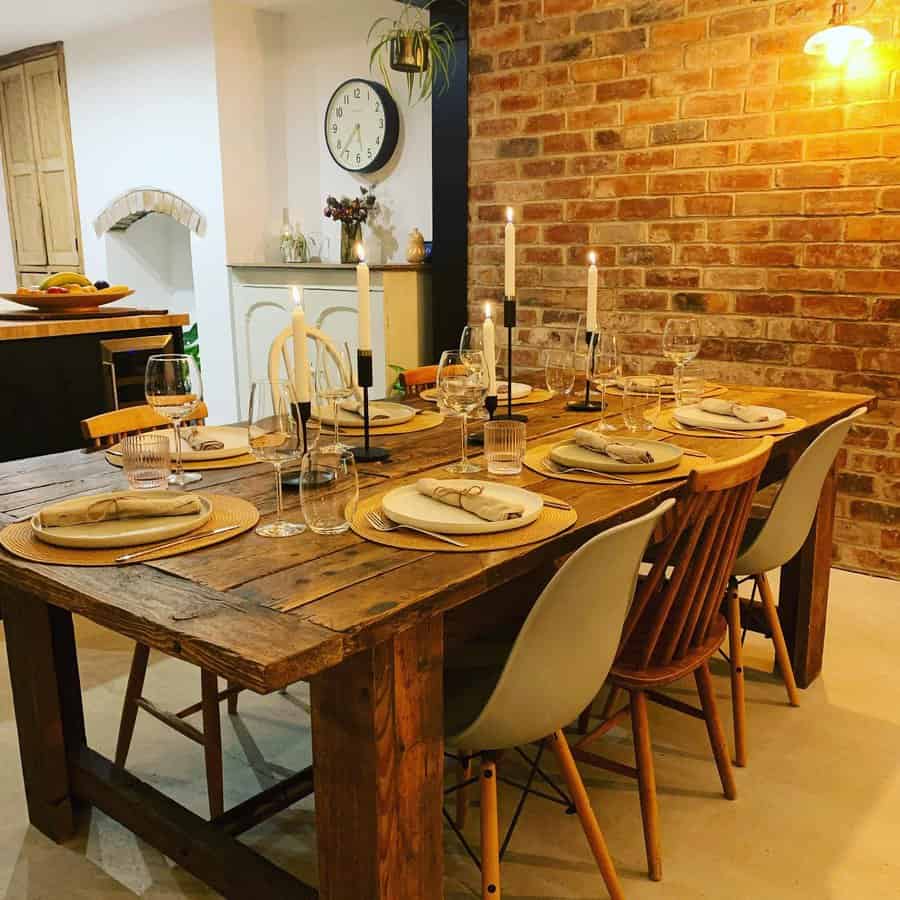
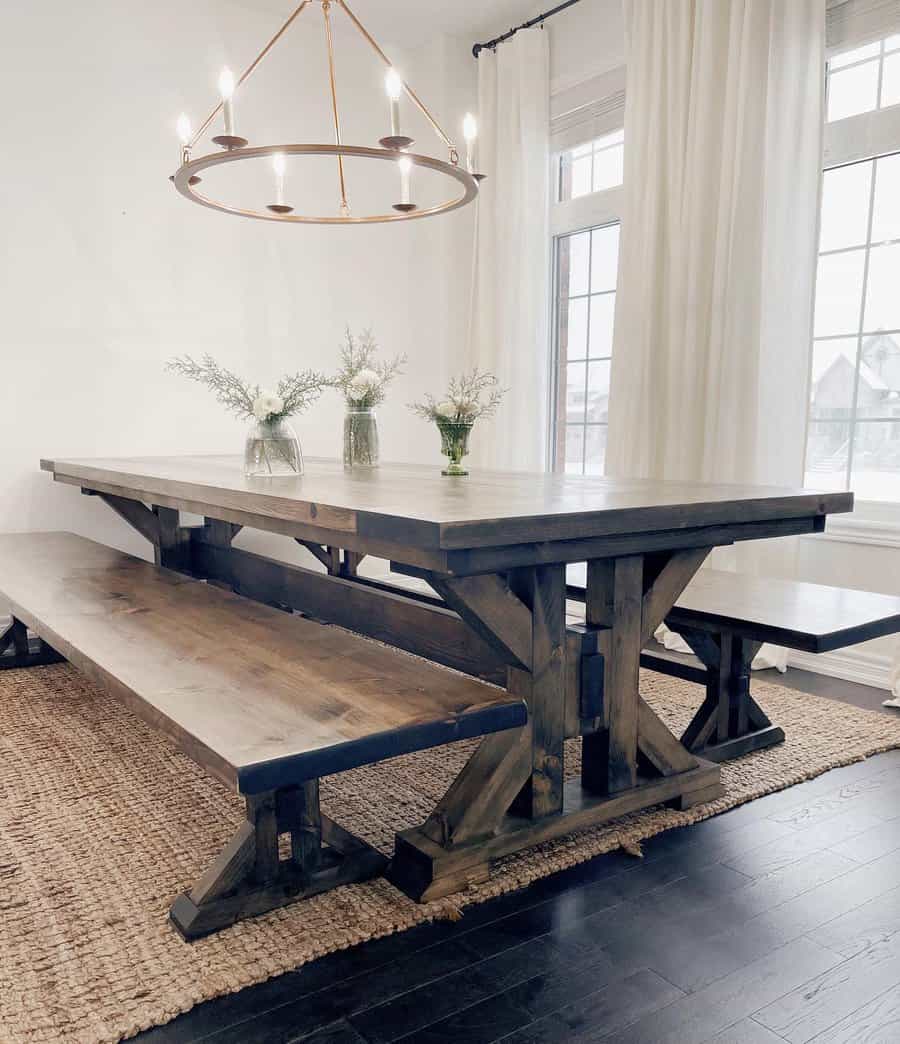
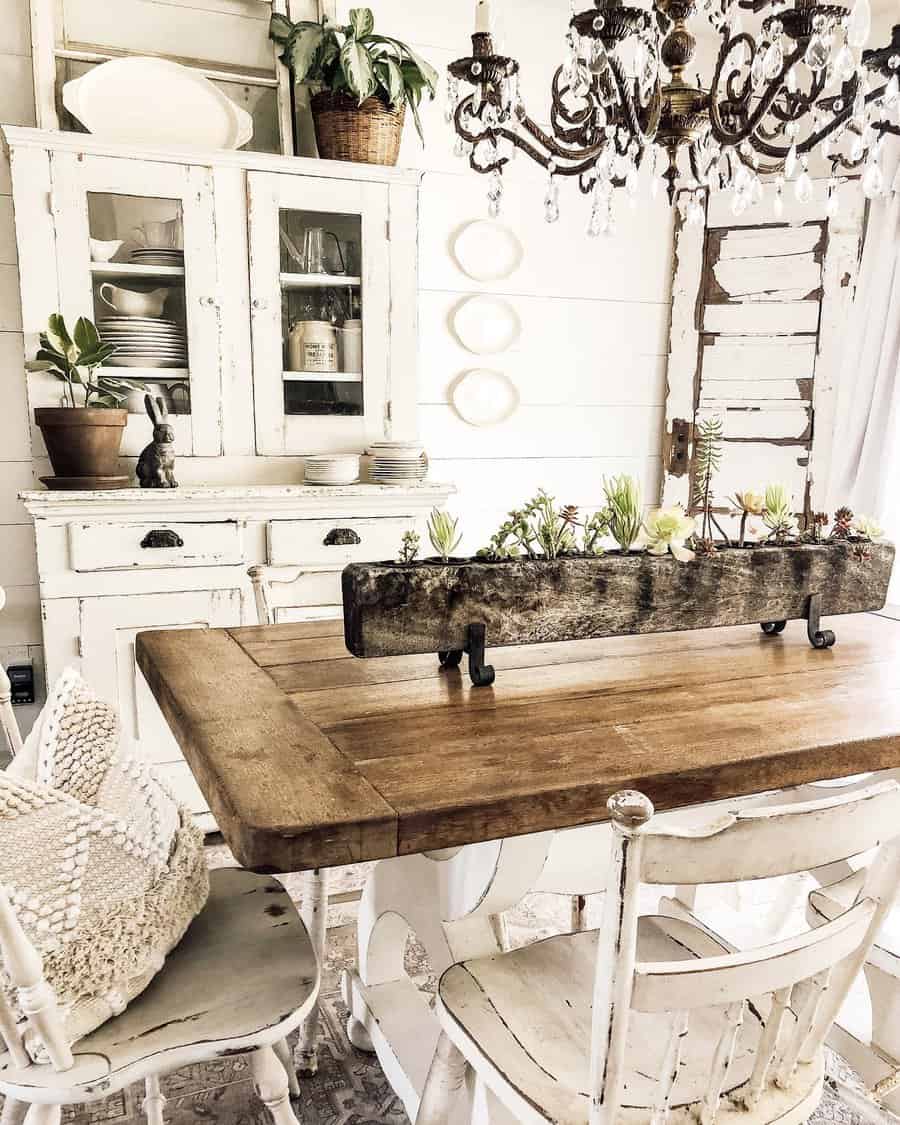
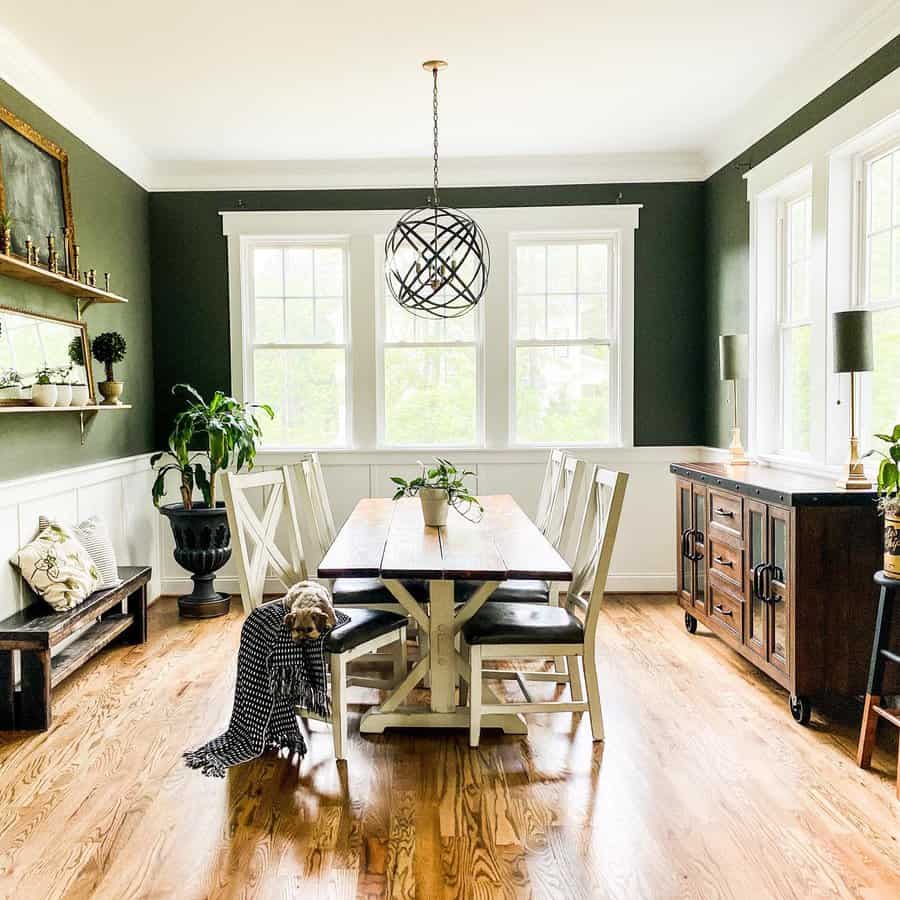
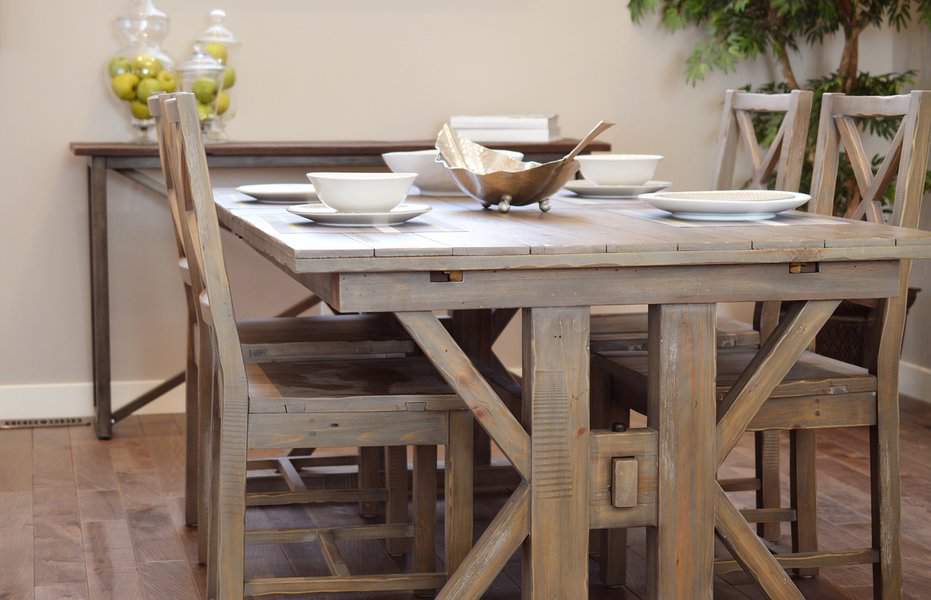
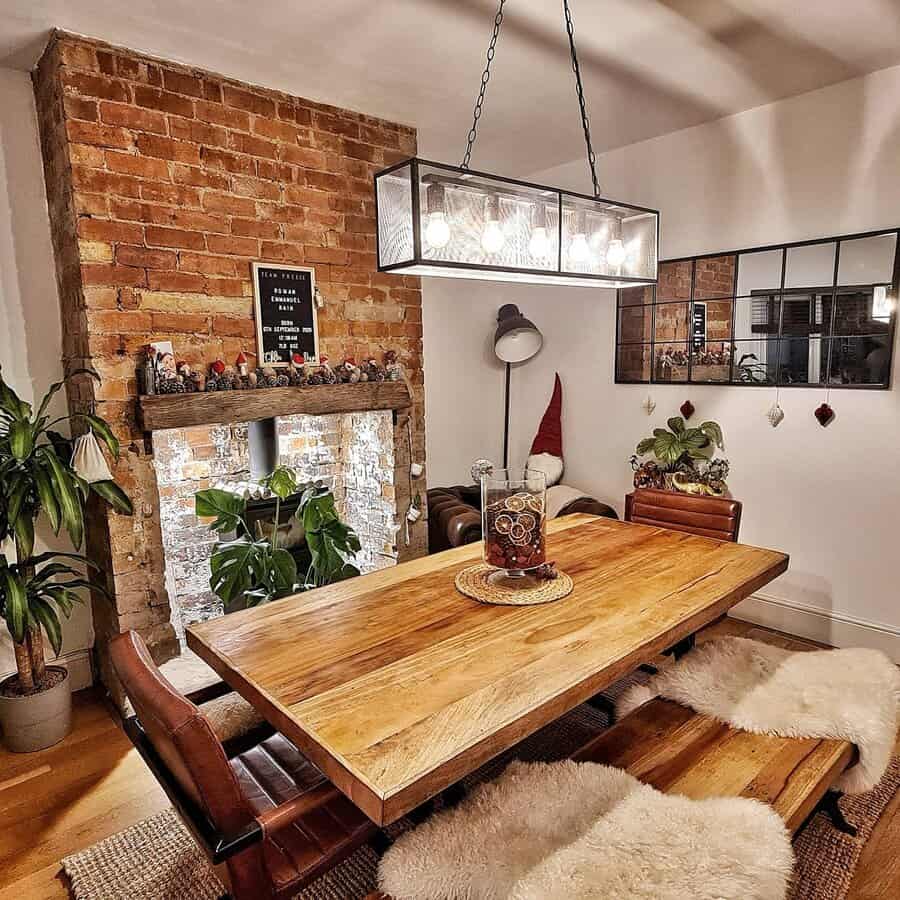
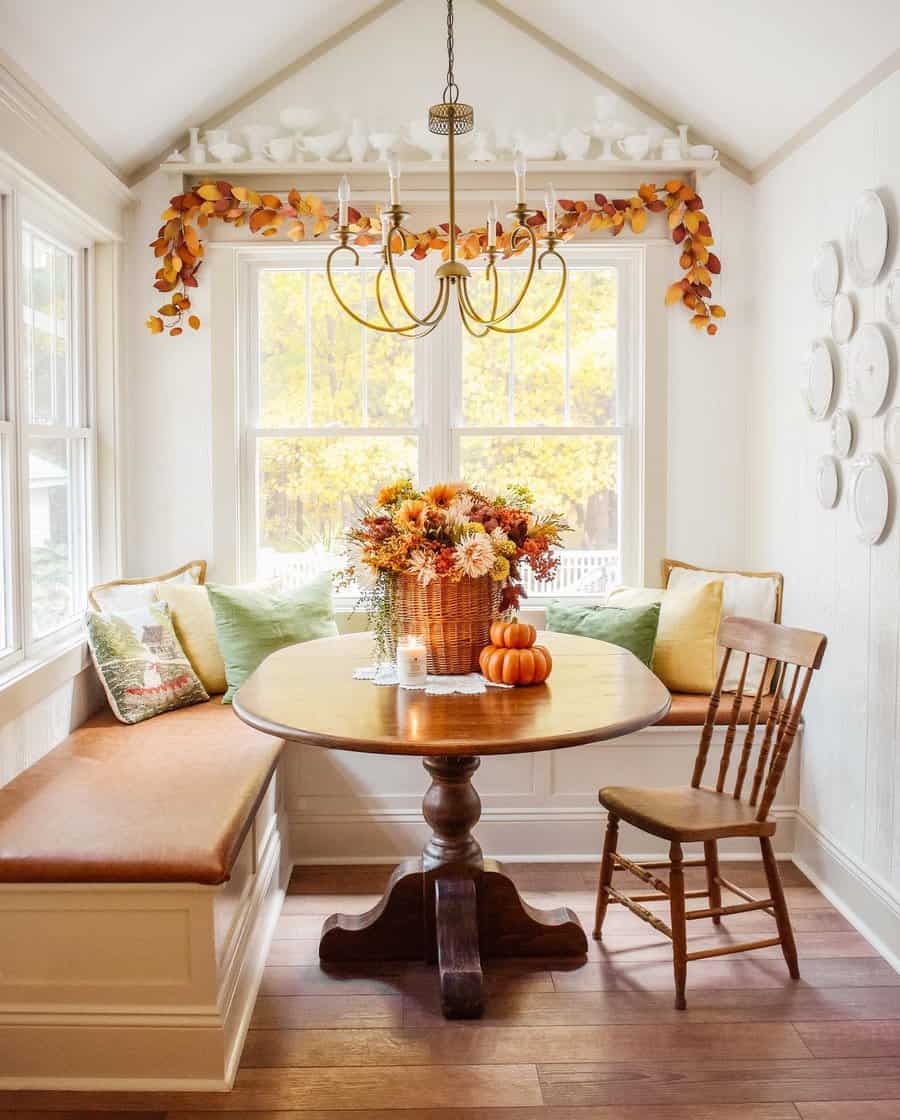
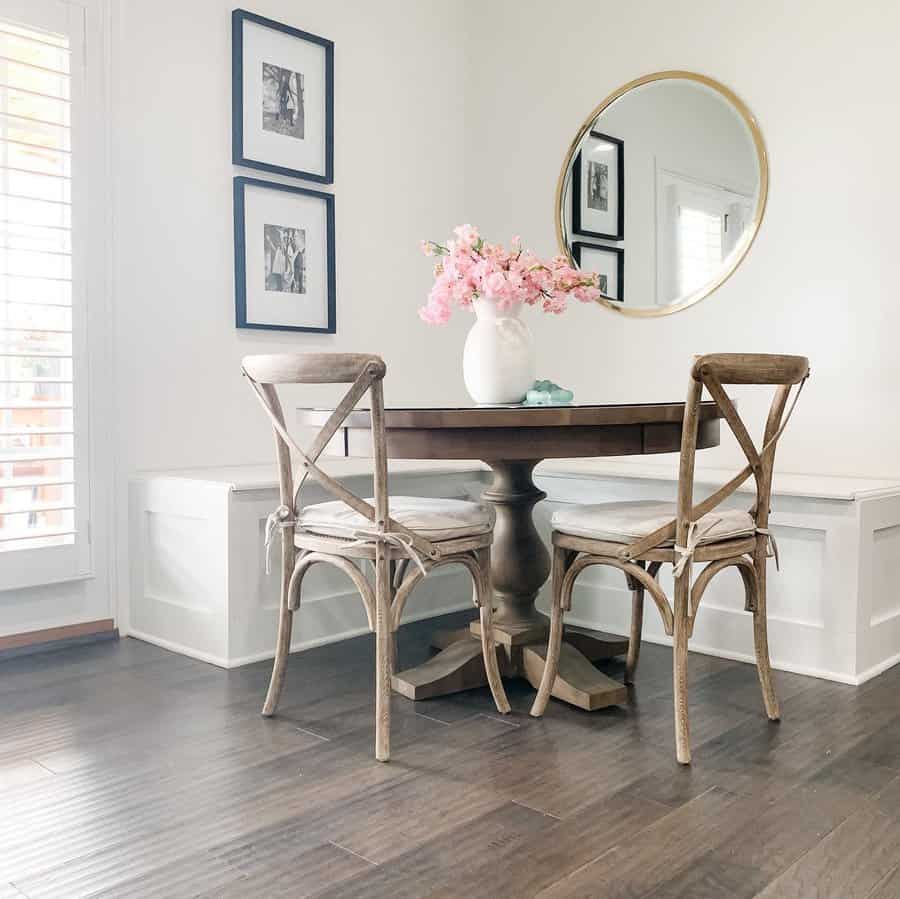
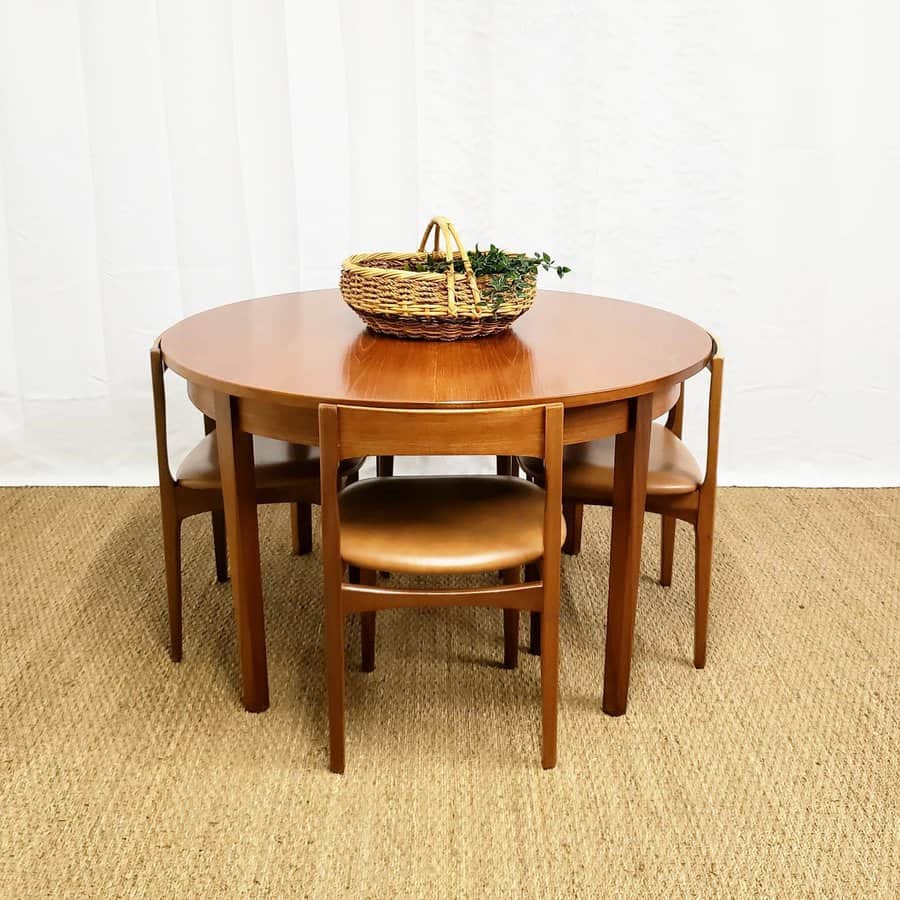
7. Style a Classic Farmhouse Dining Table
A farmhouse dining table anchors a room with its robust, rustic charm. Pair it with benches for a casual, communal feel, or upholstered chairs for a touch of elegance. Complement the table’s natural wood with earth-toned accessories and vintage-inspired dinnerware to complete the farmhouse aesthetic.
Source: @my.blessed.home via InstagramSource: @our.nohai.home via InstagramSource: @thefunkgypsy via InstagramSource: @buildinginthebubble via InstagramSource: @alexanderdesignsandco via InstagramSource: @designsbyashleyknie via InstagramSource: @hollybrowninghome via InstagramSource: @amyelizabethgoodman via InstagramSource: @weatheredandwhitevintage via Instagram
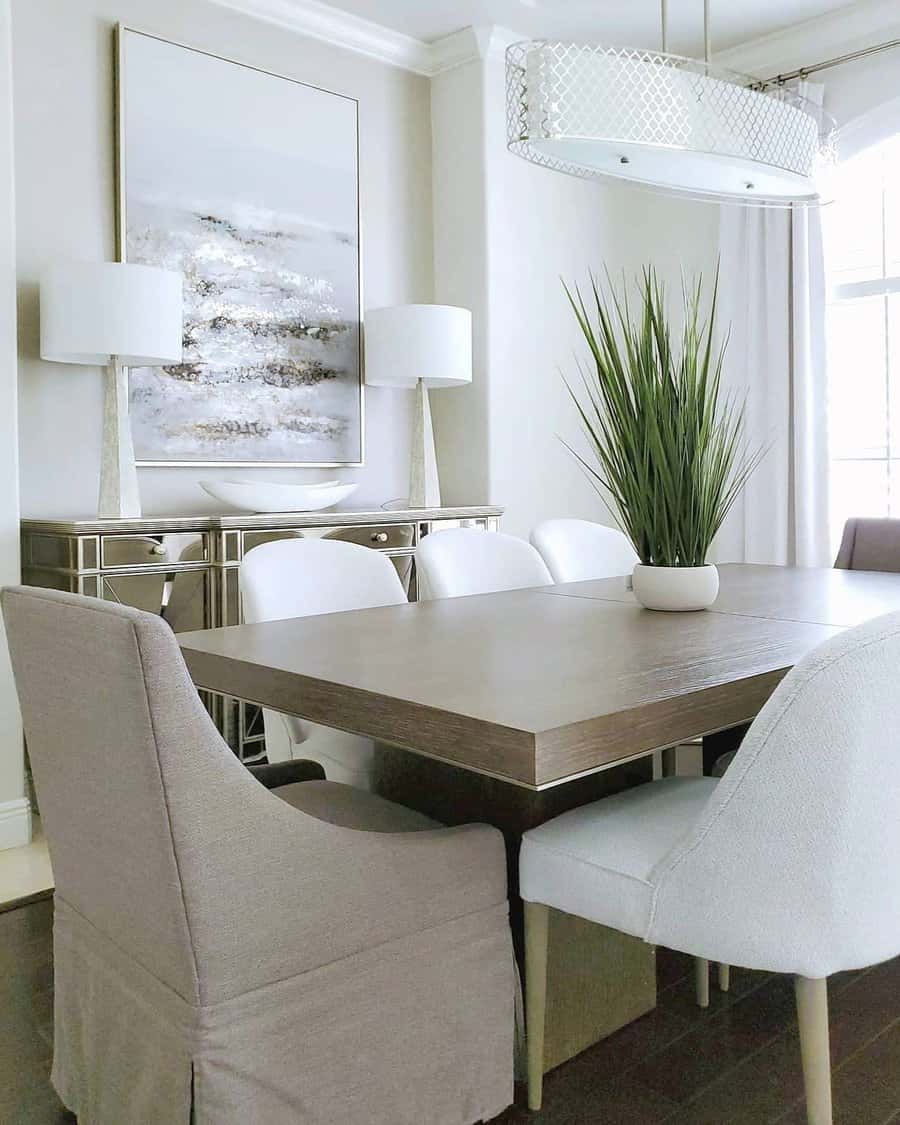
8. Achieve a Minimalist Scandinavian Dining Room
Achieve a minimalist yet cozy atmosphere in a Scandinavian dining room. Use a simple color palette of whites and greys, accented with soft blues or greens. Furniture should be functional with clean lines; think light wood tables and chairs with slender, tapered legs. Add warmth with textured throws or a woolen area rug.
Source: @cattailmarket via InstagramSource: @efratakerman_designer via InstagramSource: @charlycharlou_home via InstagramSource: @my.little.detached.home via InstagramSource: @jolitauk via InstagramSource: @tbailbot via Instagram
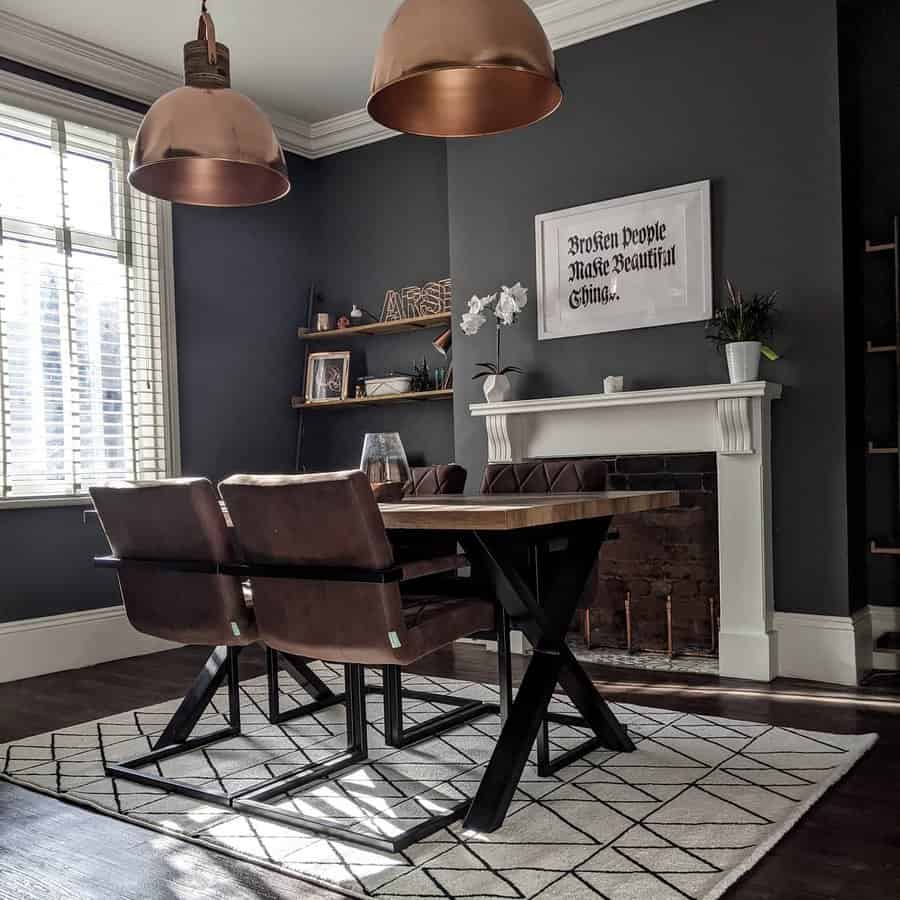
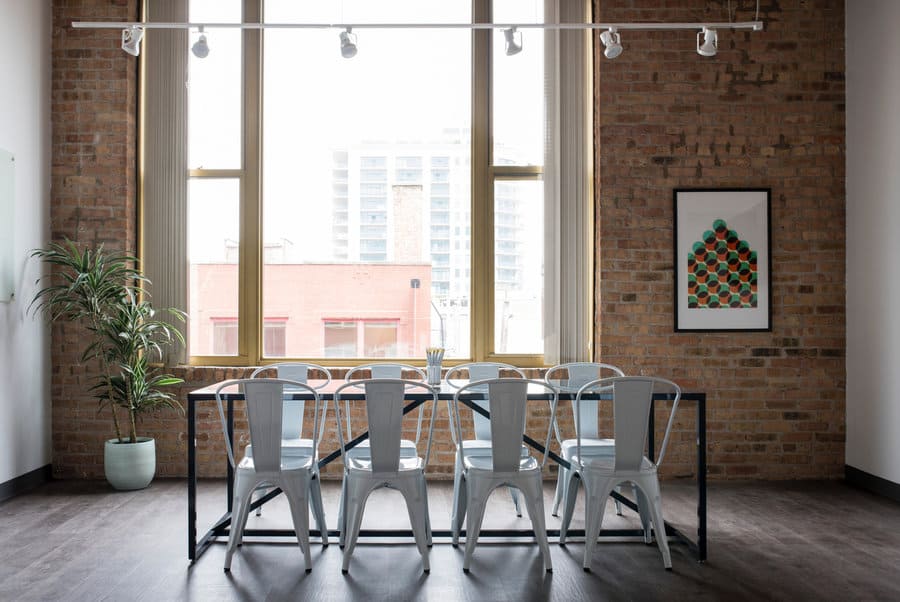
9. Embrace an Edgy Industrial Dining Look
An industrial dining room combines raw textures with sleek design. Expose brick walls, steel frames, and pendant lights with Edison bulbs to set the mood. A robust, metal-legged table paired with leather chairs can amplify this look. Soften the industrial feel with a plush rug or green plants.
Source: @teampreece via InstagramSource: @teampreece via InstagramSource: @nikolestarrinteriors via Instagram
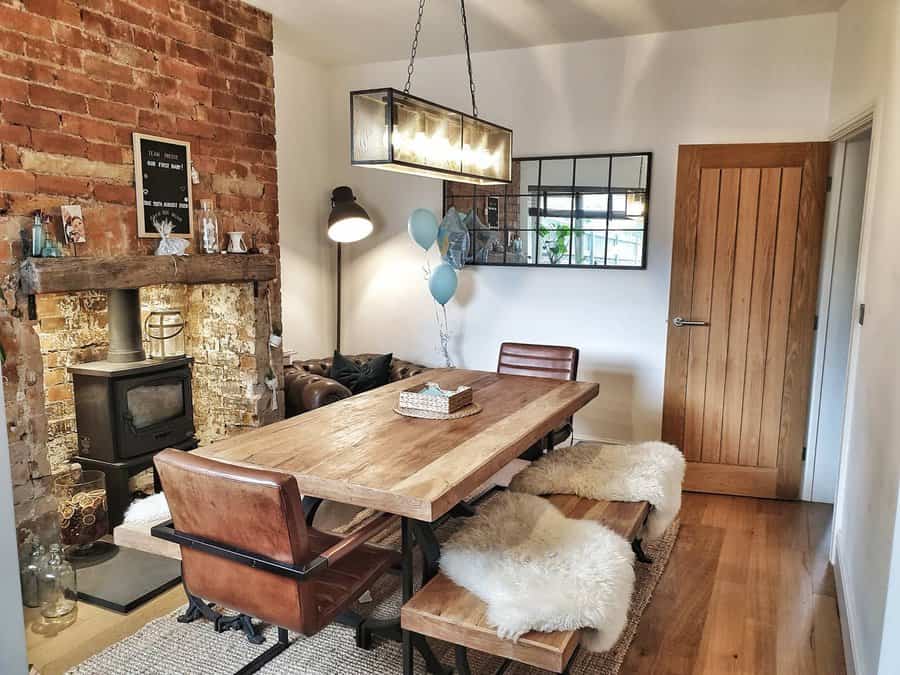
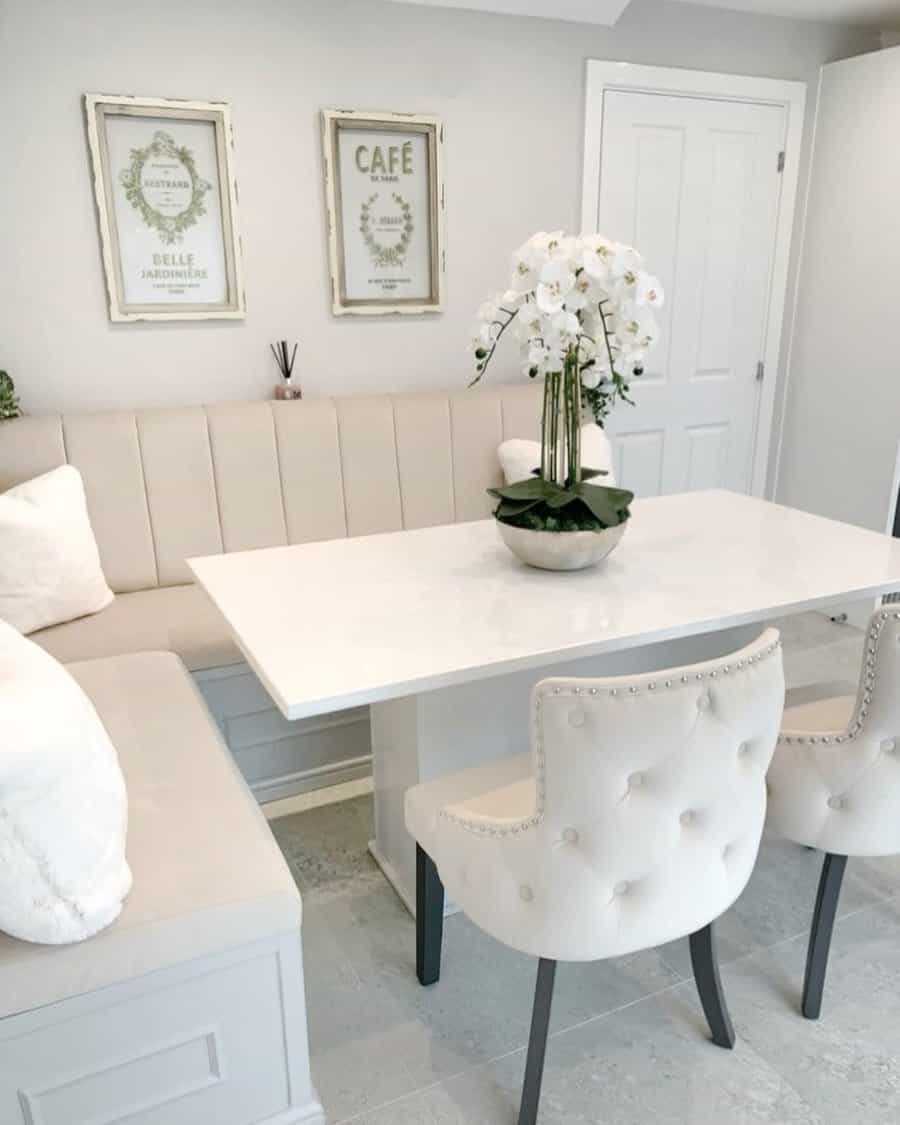
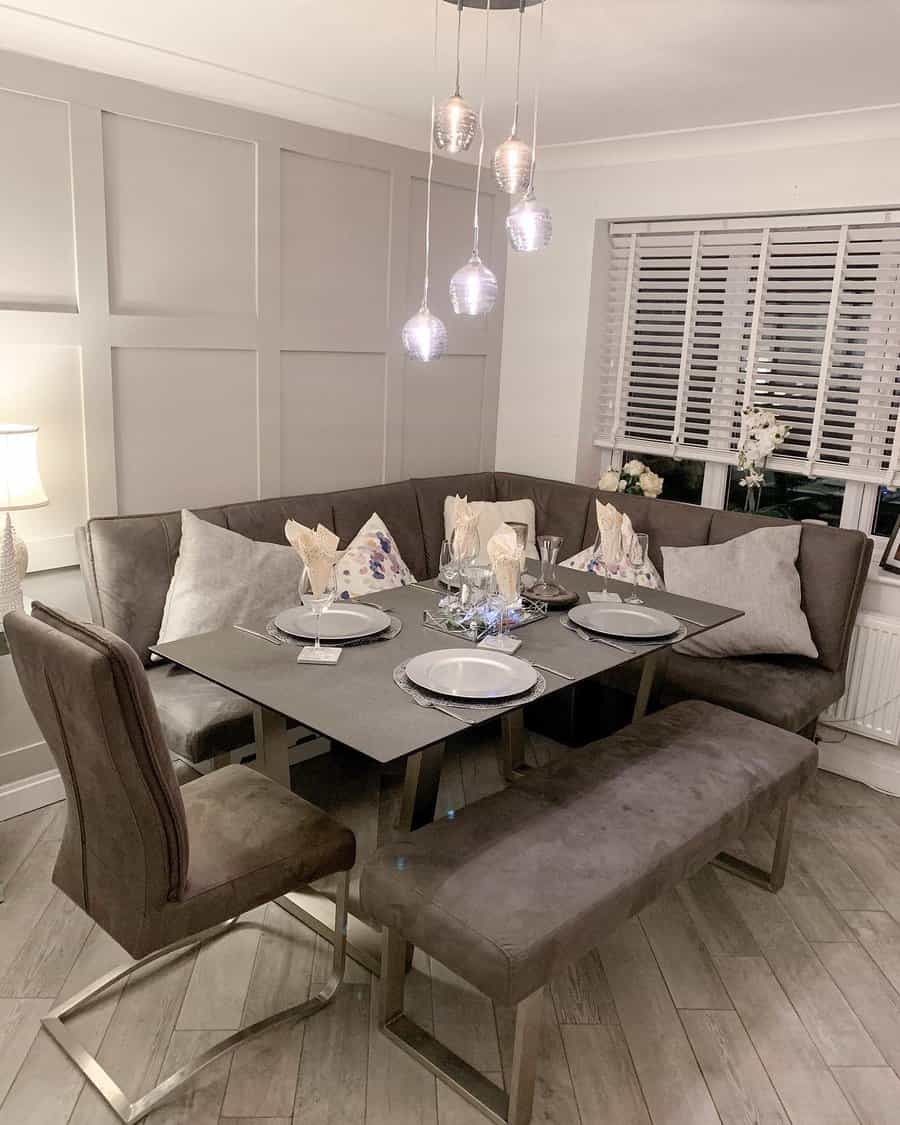
10. Utilize a Cozy Dining Banquette
Utilize a dining banquette to create a cozy nook. It’s ideal for smaller spaces, offering additional seating and storage solutions. Upholster the banquette in a durable fabric that complements your dining room’s decor. Pair it with a pedestal table to facilitate easy movement around the area.
Source: @anderson_home_39 via InstagramSource: @our_fairway_home via InstagramSource: @planionlinedesign via InstagramSource: @poconomountaincottage via Instagram
11. Add Luxury with Velvet Seating
Velvet seating adds a touch of luxury and comfort to any dining room. Choose rich, deep colors like emerald green or navy blue for a regal look, or lighter shades for a more subdued elegance. Maintain balance by keeping other elements in the room understated.
Source: @accentwall.eu via InstagramSource: @deco_design_officiel via Instagram
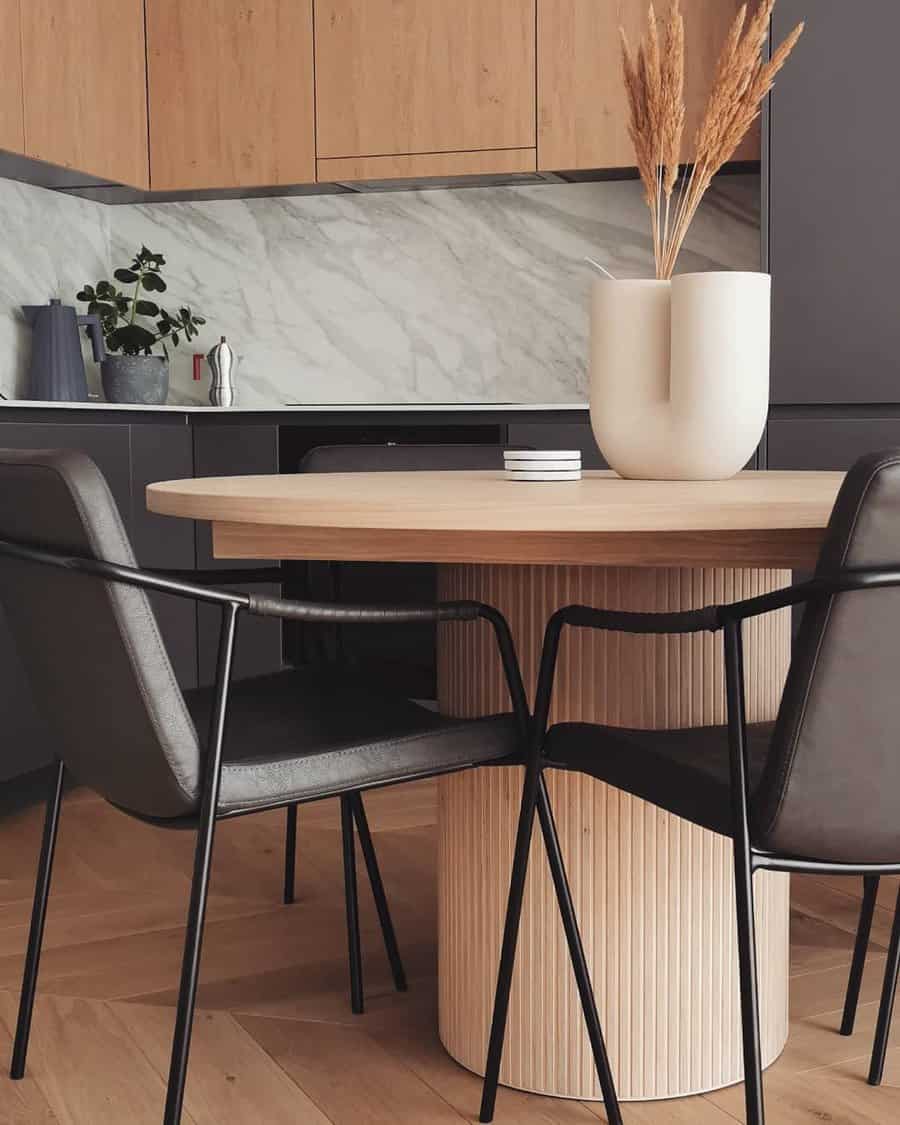
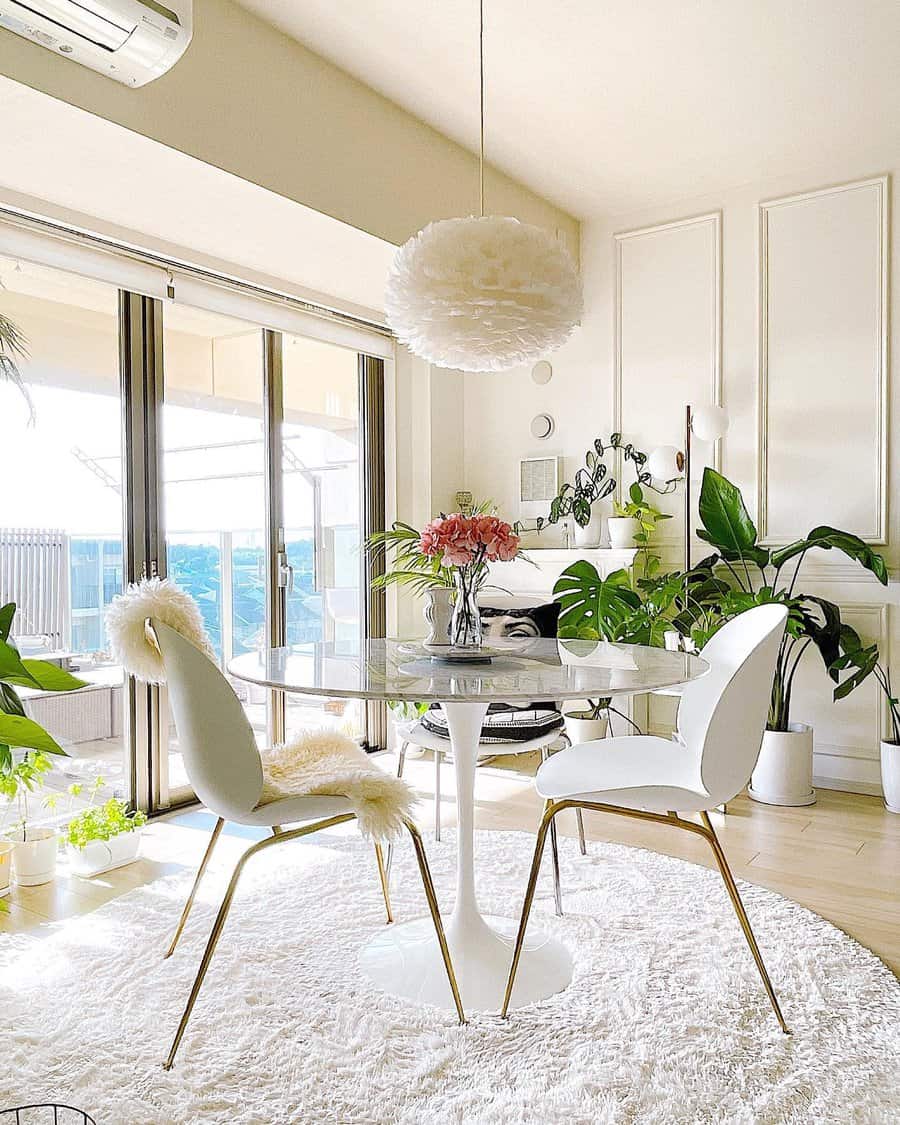
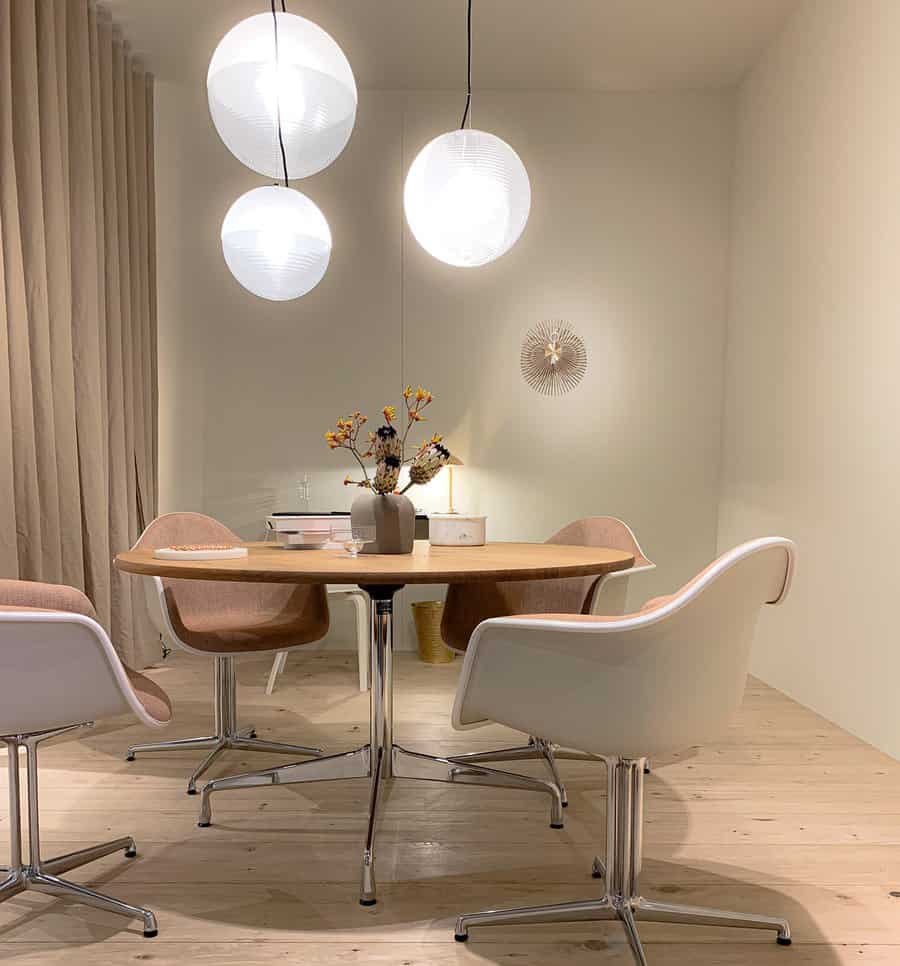
12. Select a Sociable Round Dining Table
A round dining table fosters an intimate and inclusive dining experience. It’s perfect for smaller spaces and ensures everyone at the table can converse easily. Pair it with curved chairs to echo its shape, and hang a statement light fixture above to highlight its central position in the room.
Source: @18bluebellgate via InstagramSource: @ebisu.home via InstagramSource: @husetpaavillumstad via InstagramSource: @ourperfectingmanor via InstagramSource: @themccraehome via InstagramSource: @it_is_fme via Instagram
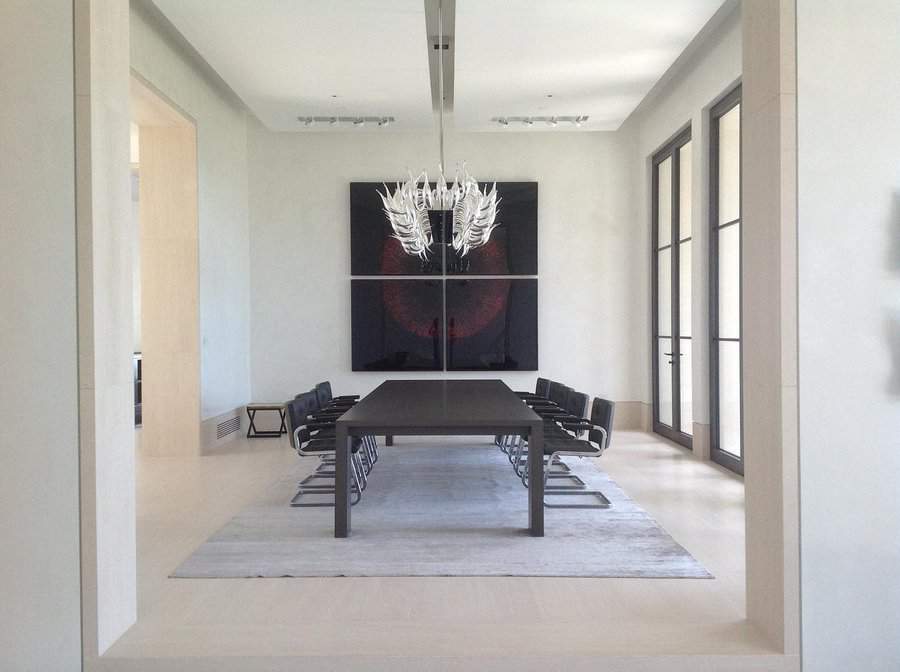
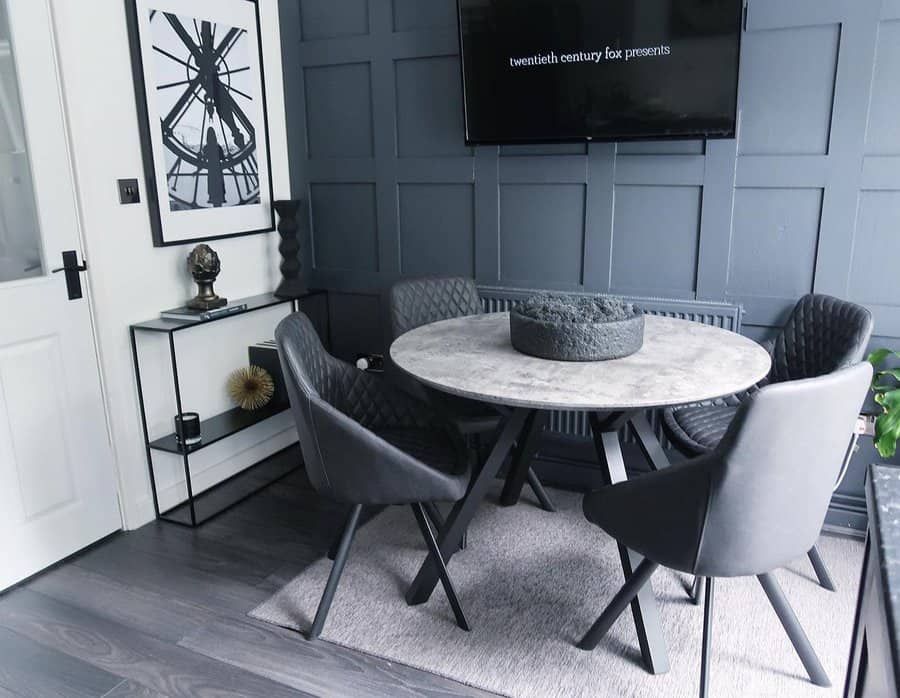
13. Revamp with a Modern Contemporary Touch
For a modern contemporary dining room, focus on clean lines and monochromatic color schemes. Use a mix of materials like glass, steel, and wood for a sophisticated look. Keep accessories minimal – a single, bold art piece or a sleek vase can make a strong statement.
Source: @ahrdesign via InstagramSource: @caseyevesdesign via InstagramSource: @chicaandjo via InstagramSource: @lemonhousekc via InstagramSource: @meghanbluminteriors via Instagram
14. Infuse a Midcentury Modern Vibe
Channel the timeless appeal of midcentury modern design. Use a palette of warm woods, muted hues, and geometric patterns. Iconic furniture pieces like Eames chairs or a tulip table instantly evoke this era. Accent with vintage accessories or light fixtures for authenticity.
Source: @cozywitholdies via Instagram
15. Transform with Decorative Wallpaper
Decorative wallpaper can dramatically transform your dining space. Choose a pattern that complements the room’s scale; large patterns for spacious rooms and subtle designs for smaller spaces. Balance the wallpaper’s boldness with more neutral furnishings to avoid overwhelming the room.
Source: @our.loved.place via Instagram
16. Detail with Chair Railing Moulding
Chair railing moulding adds architectural interest and a touch of elegance to any dining room. Paint the wall below the railing in a darker shade for a grounding effect, or use the same color throughout for a more unified look. This feature pairs well with traditional decor and can be used to create a visual division in open-plan spaces.
Source: @truelsen via Instagram
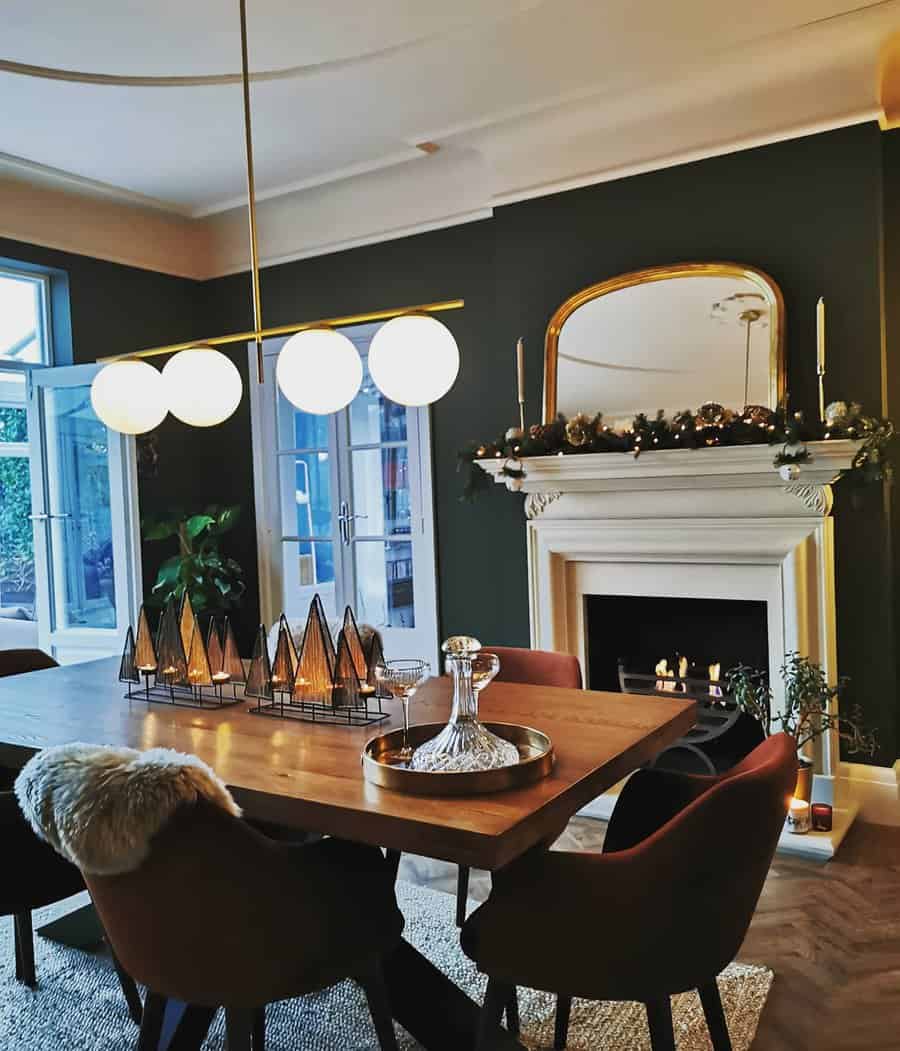
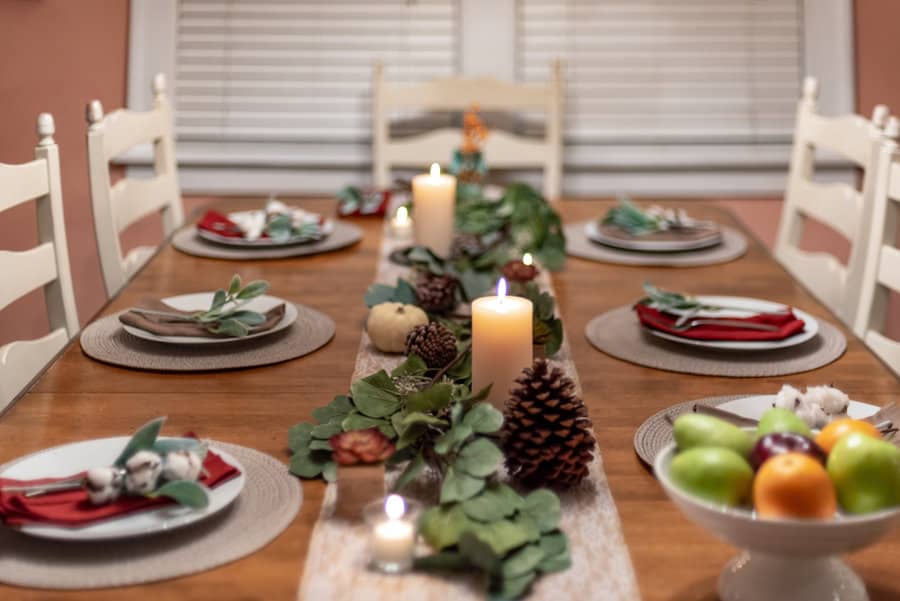
17. Arrange a Seasonal Dining Table Centerpiece
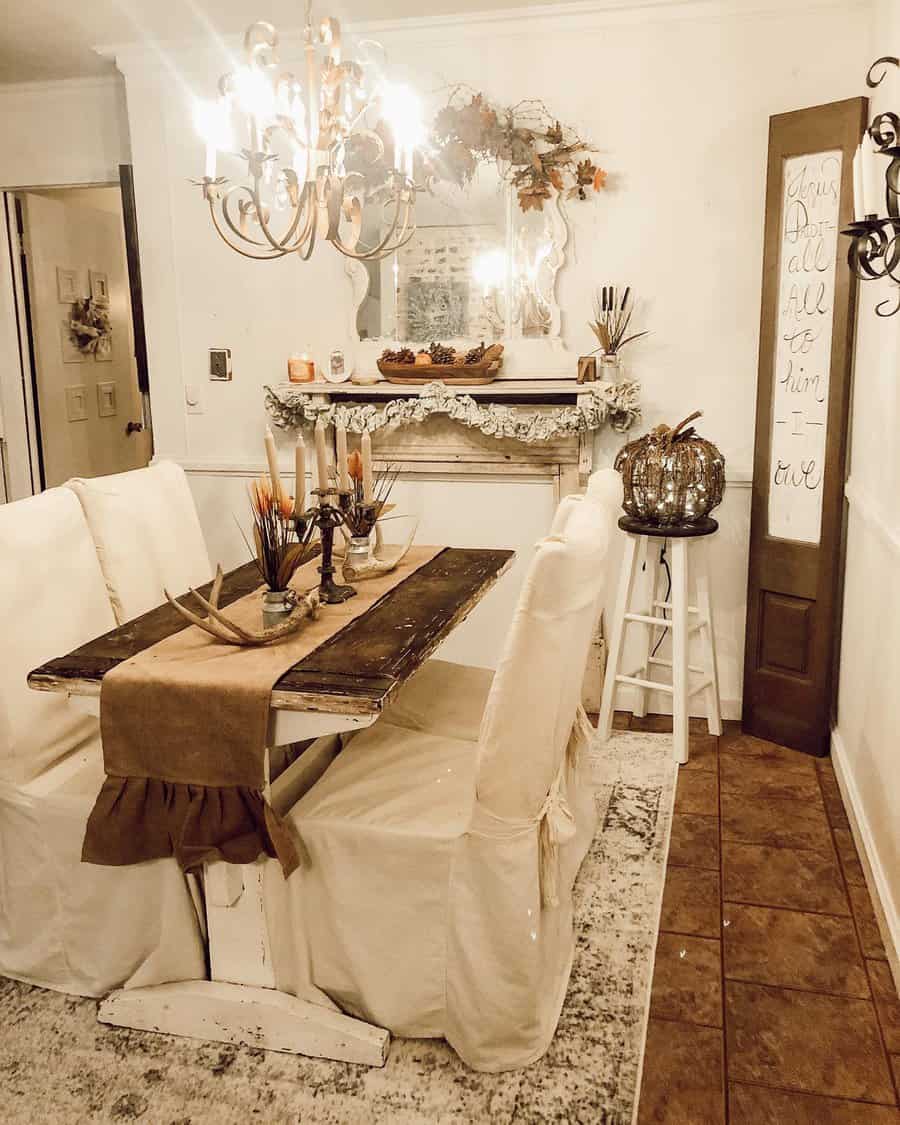
A centerpiece on your dining room table can be a dynamic focal point, reflecting either the simplicity of nature or the festivity of the season. For a floral arrangement, choose flowers that echo the room’s color scheme; consider low, sprawling arrangements for easy conversation across the table. For holidays, embrace themed elements – a pumpkin arrangement for fall, pinecones and candles for winter, or pastel eggs for spring celebrations.
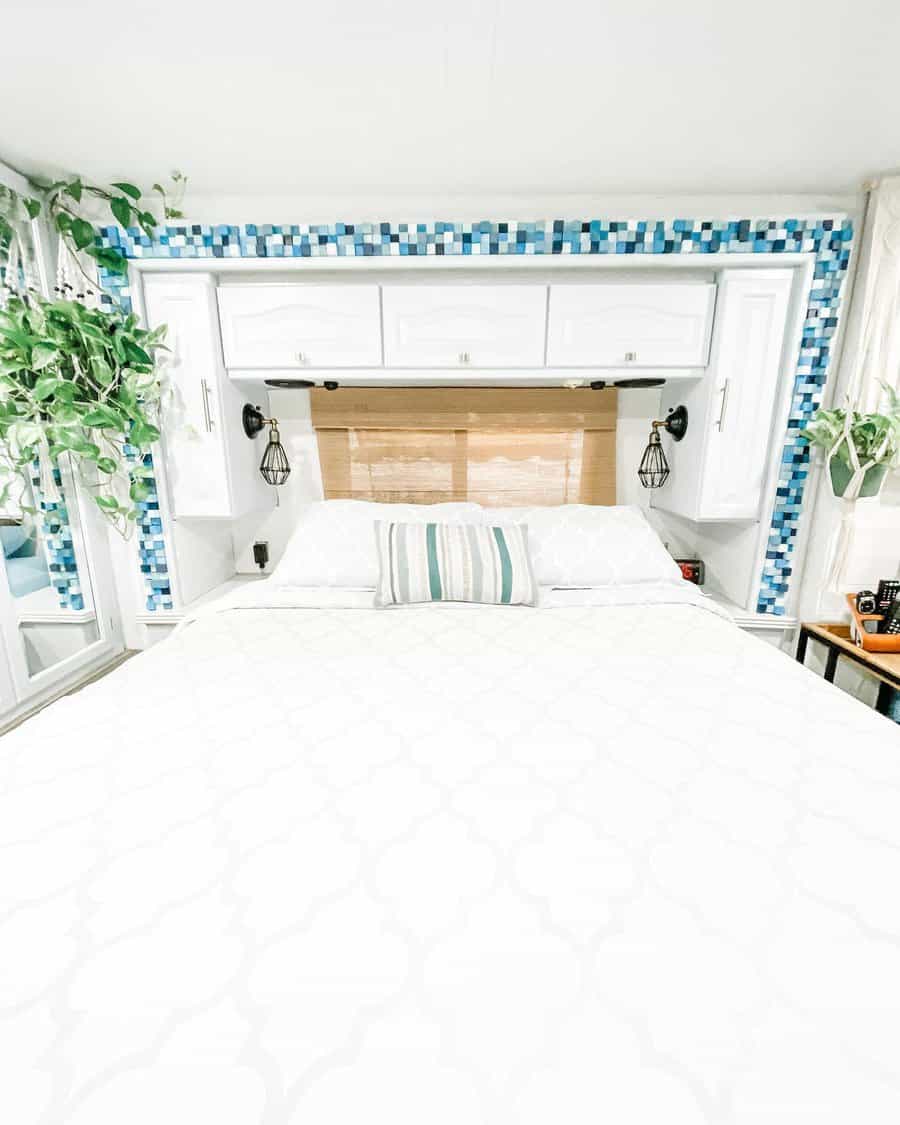
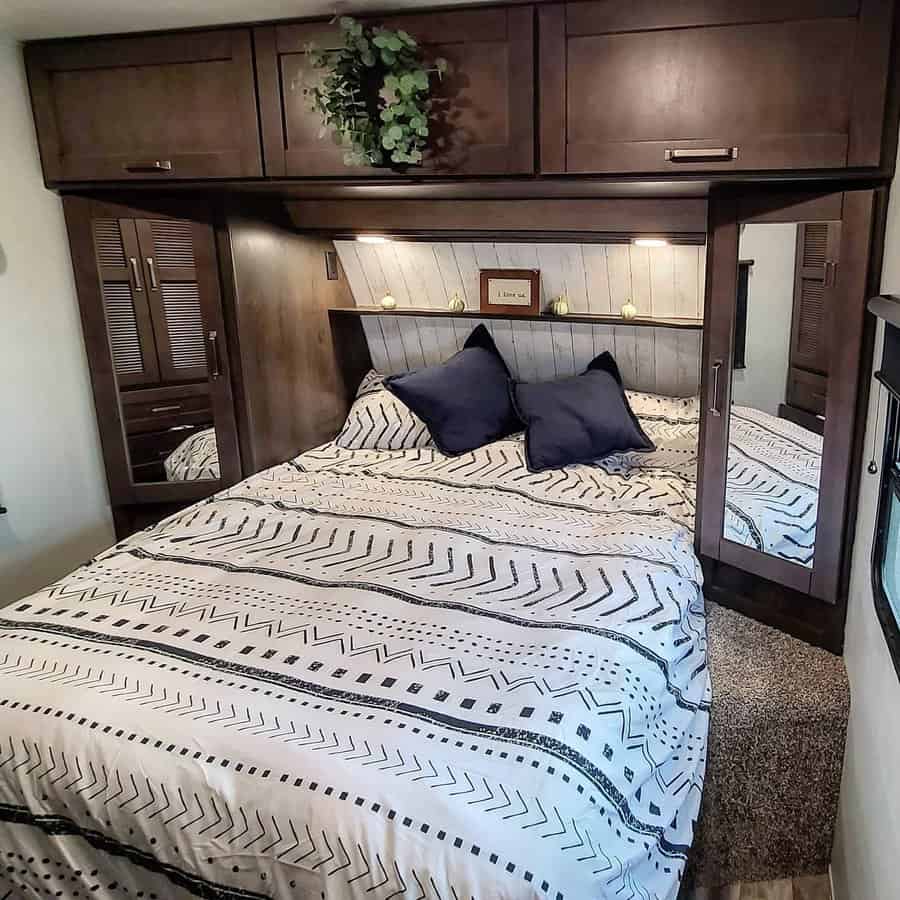
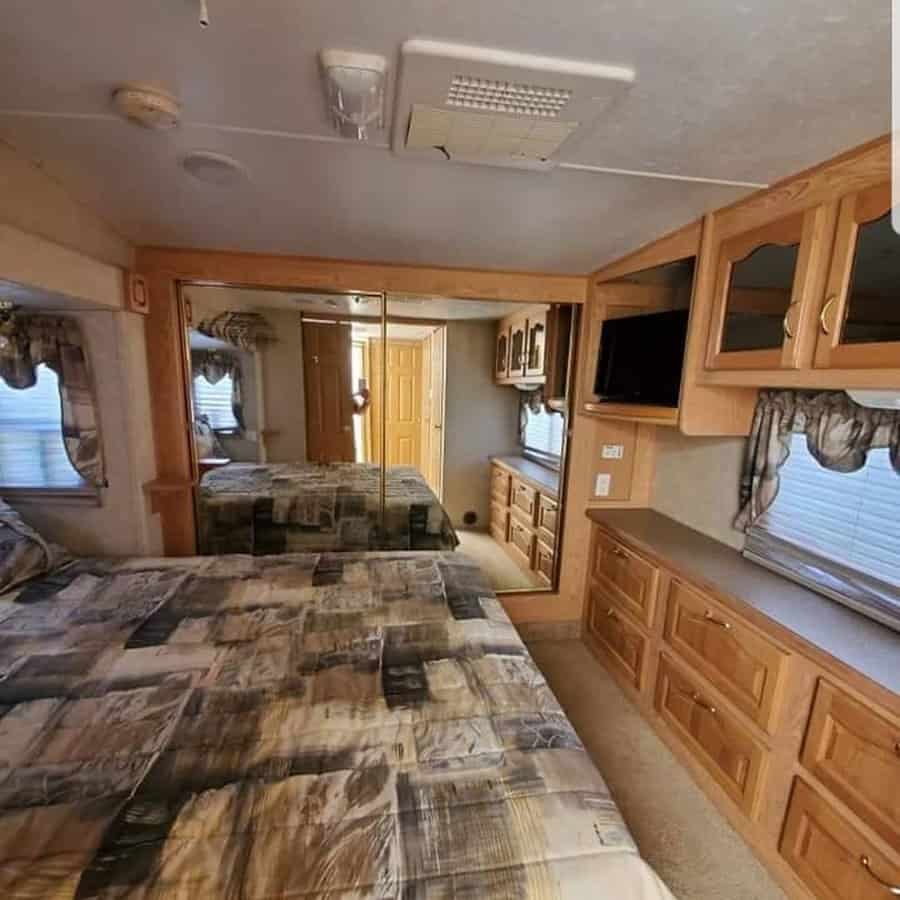
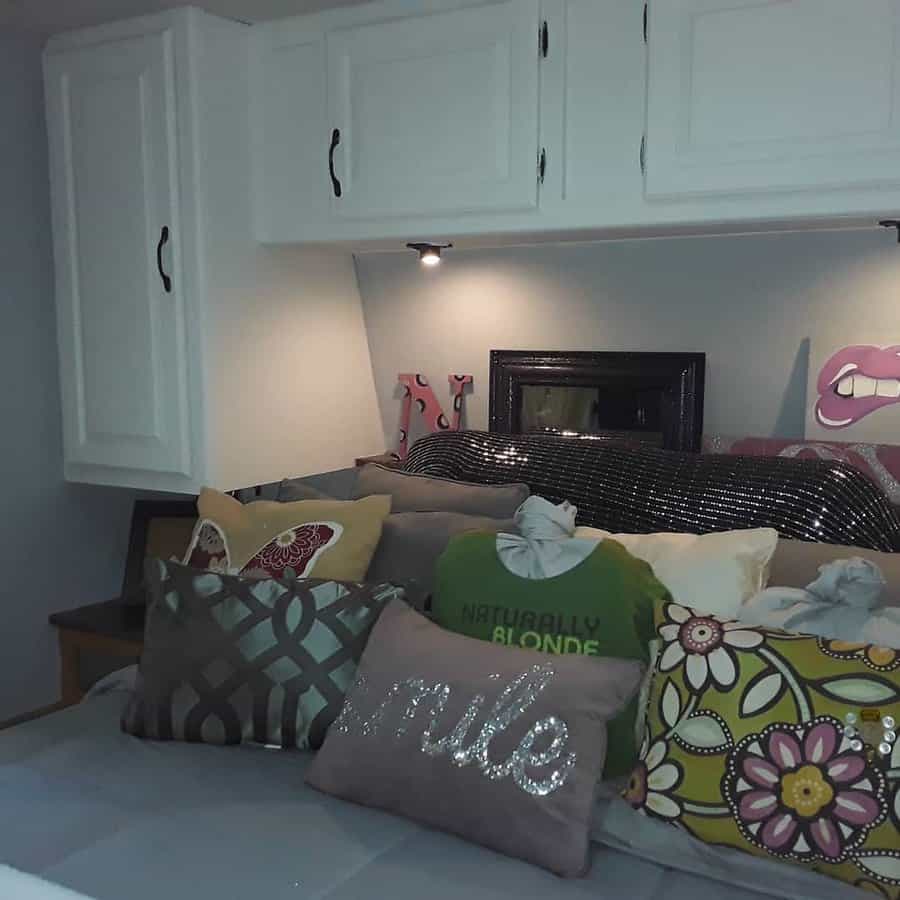
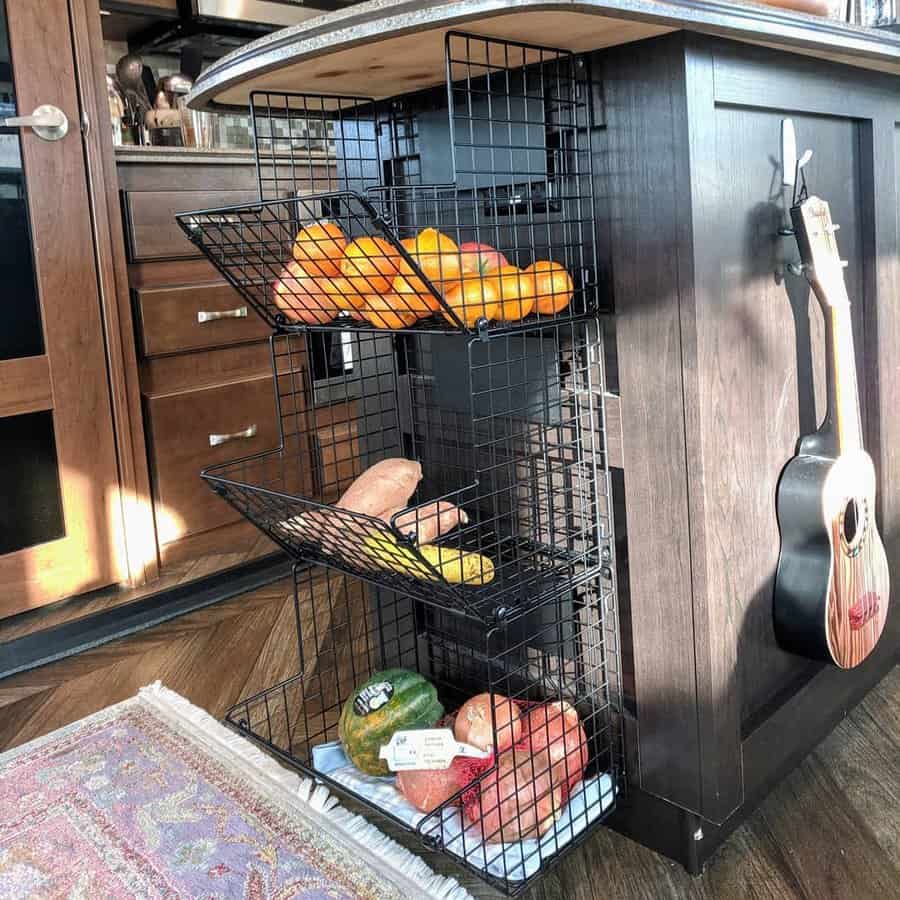
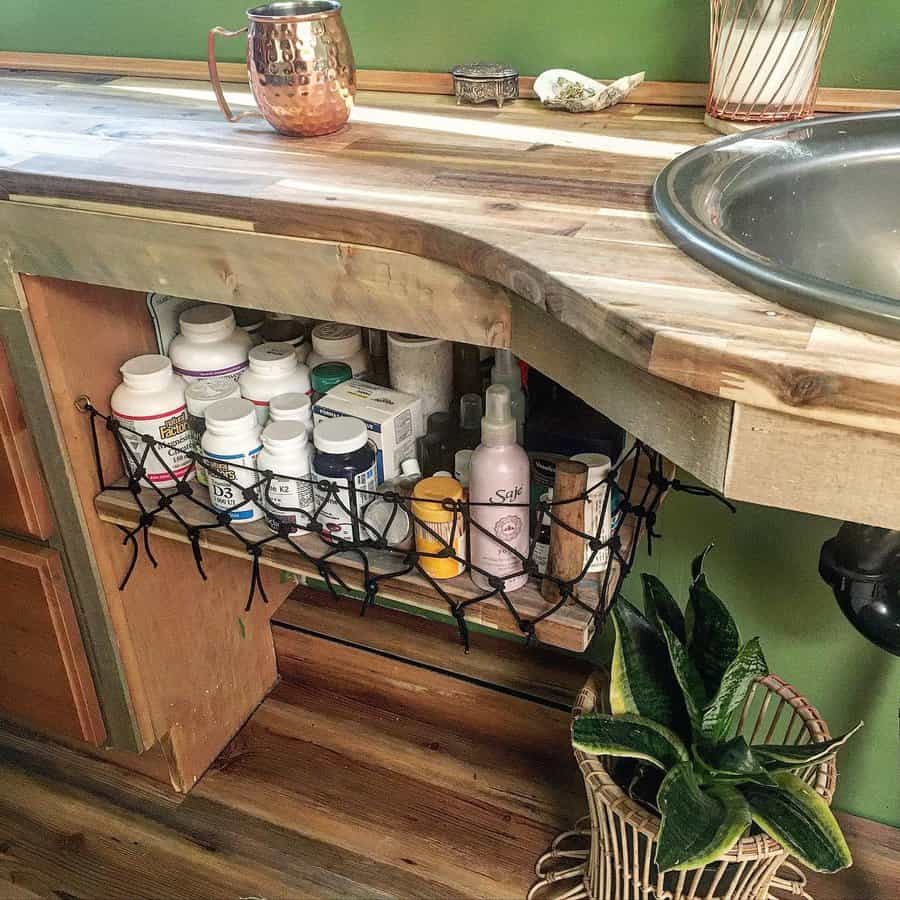
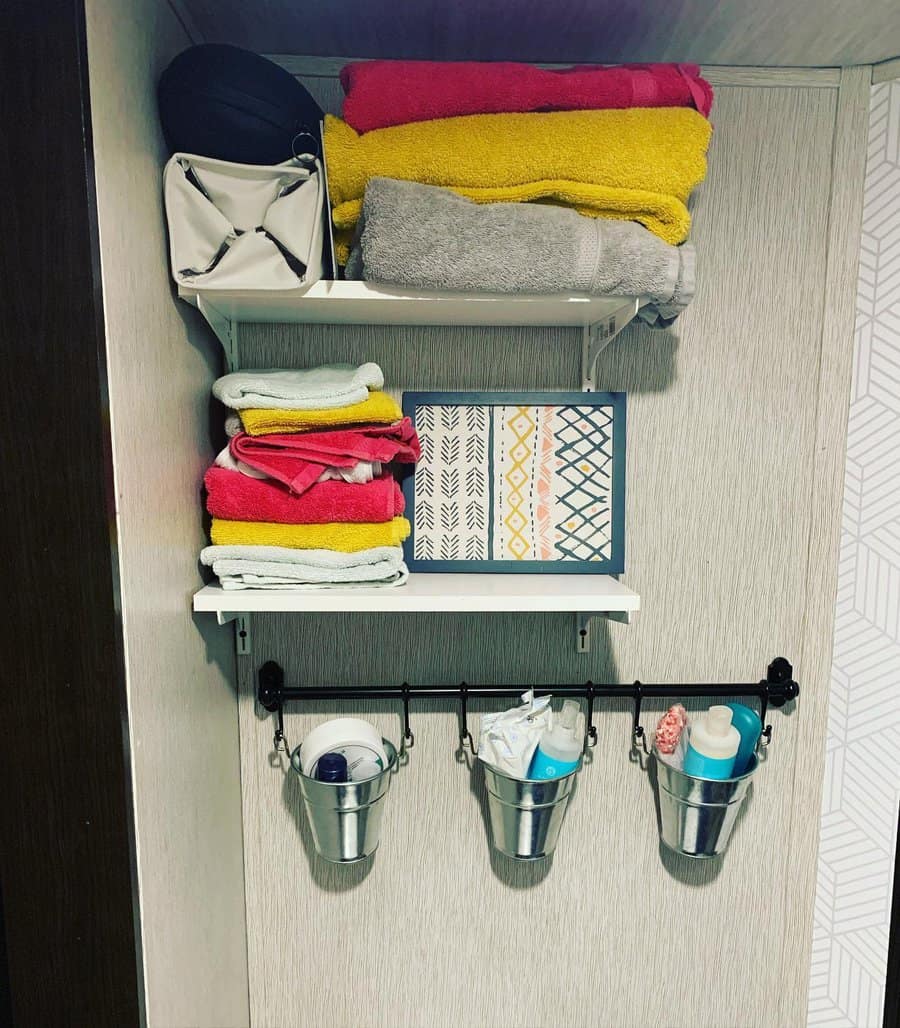
“On the road again, just can’t wait to get on the road again!” – Willie Nelson
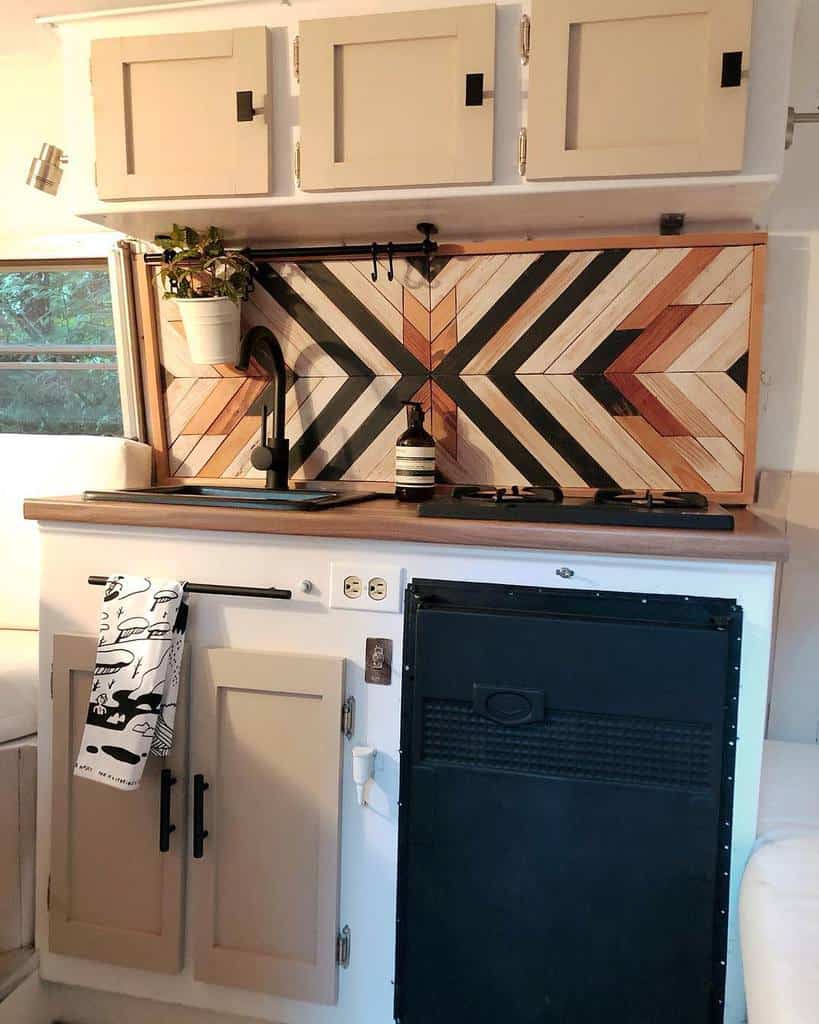
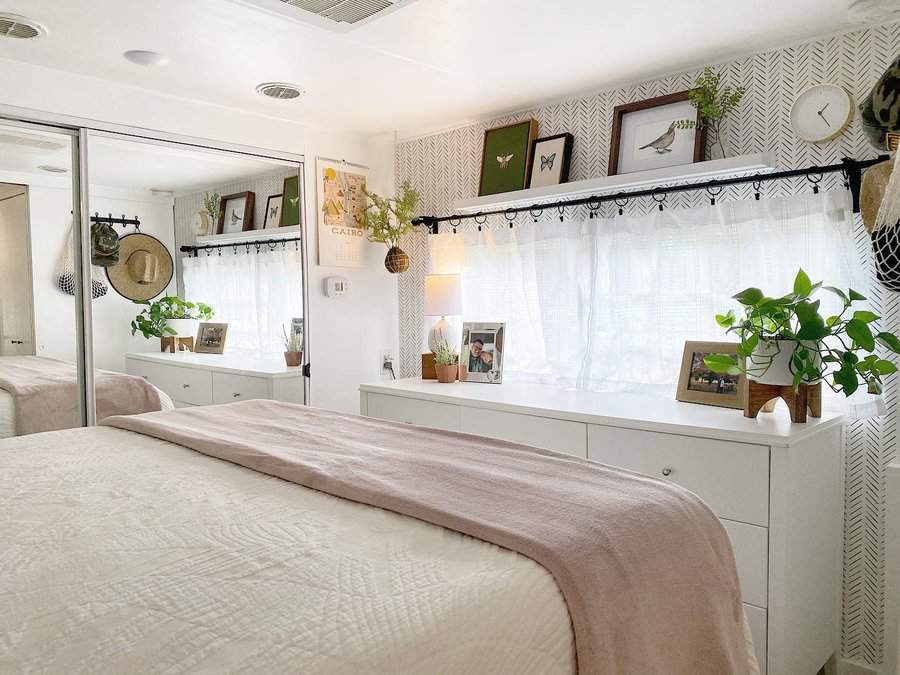
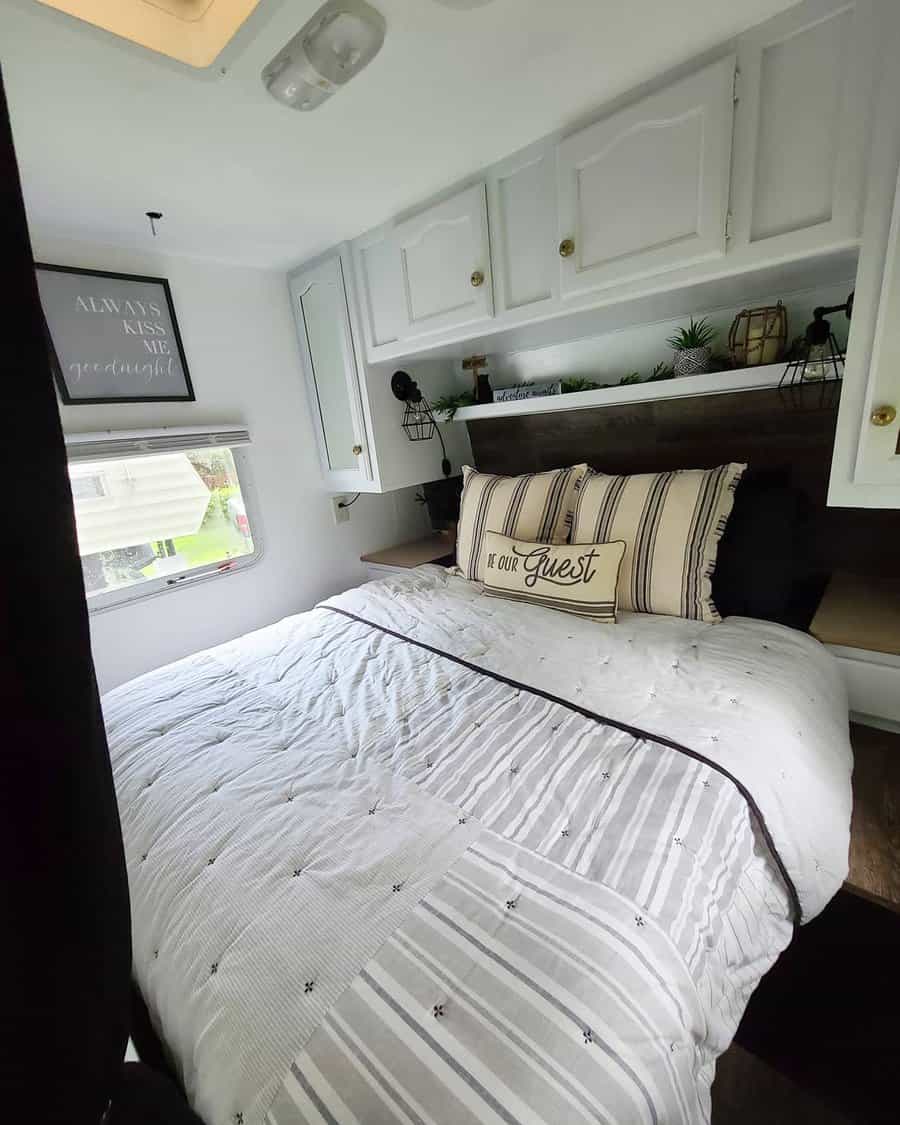
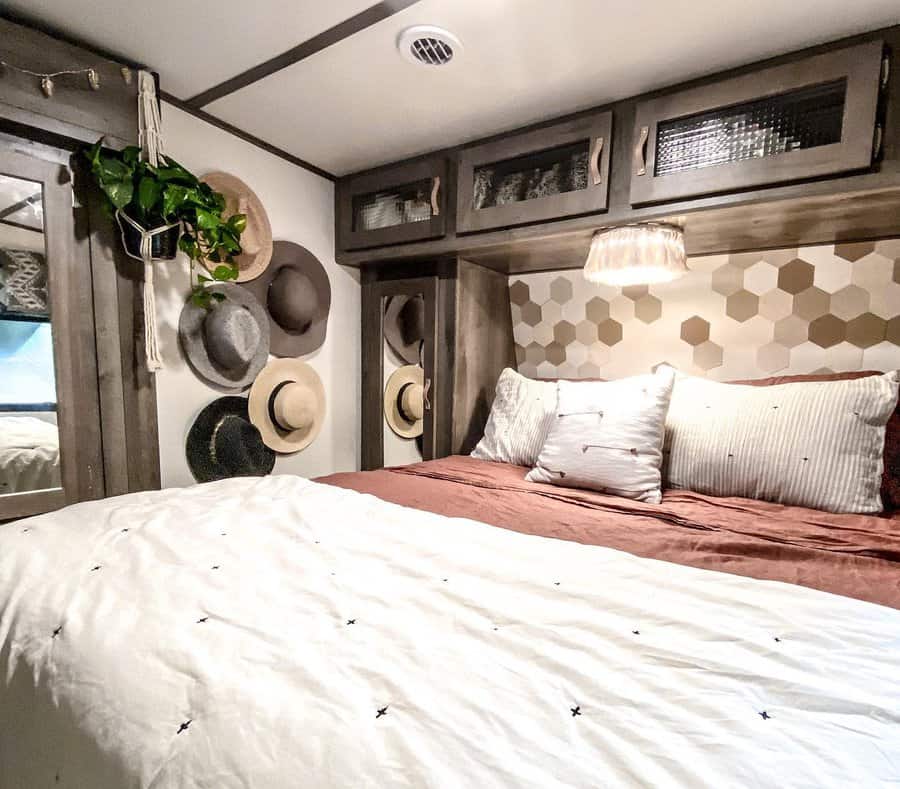
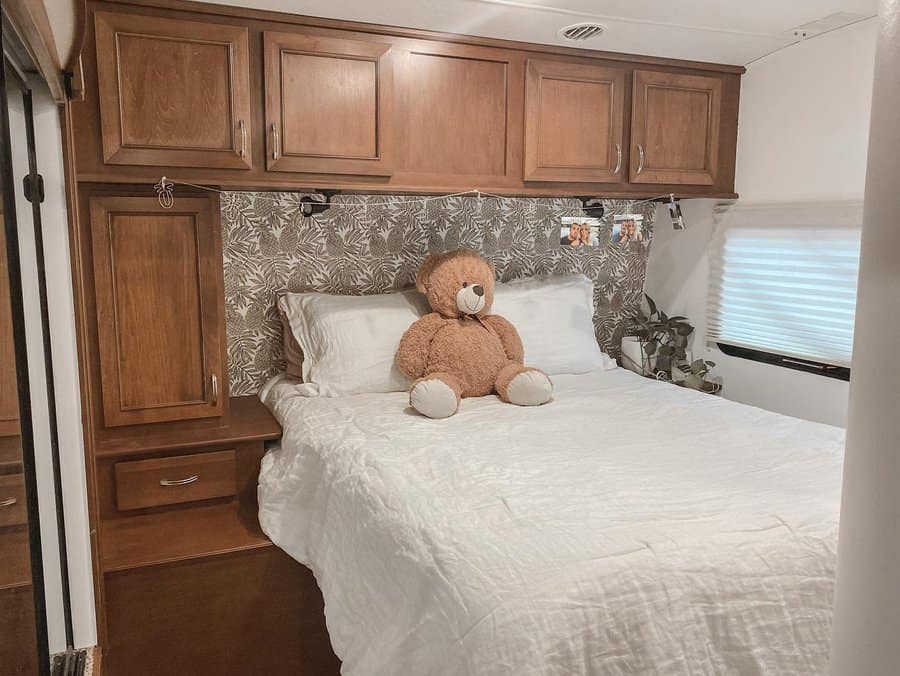
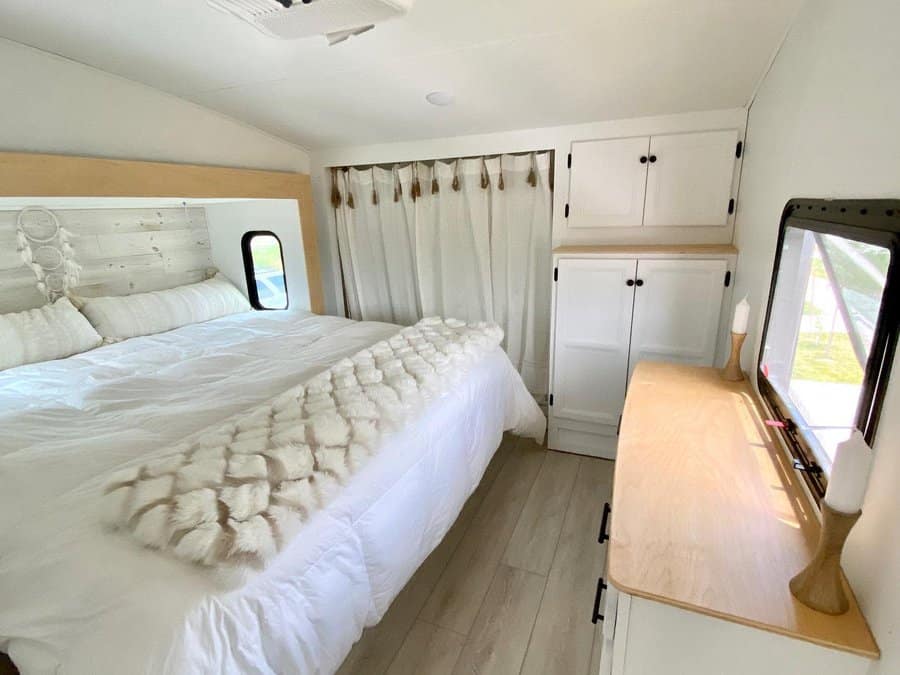
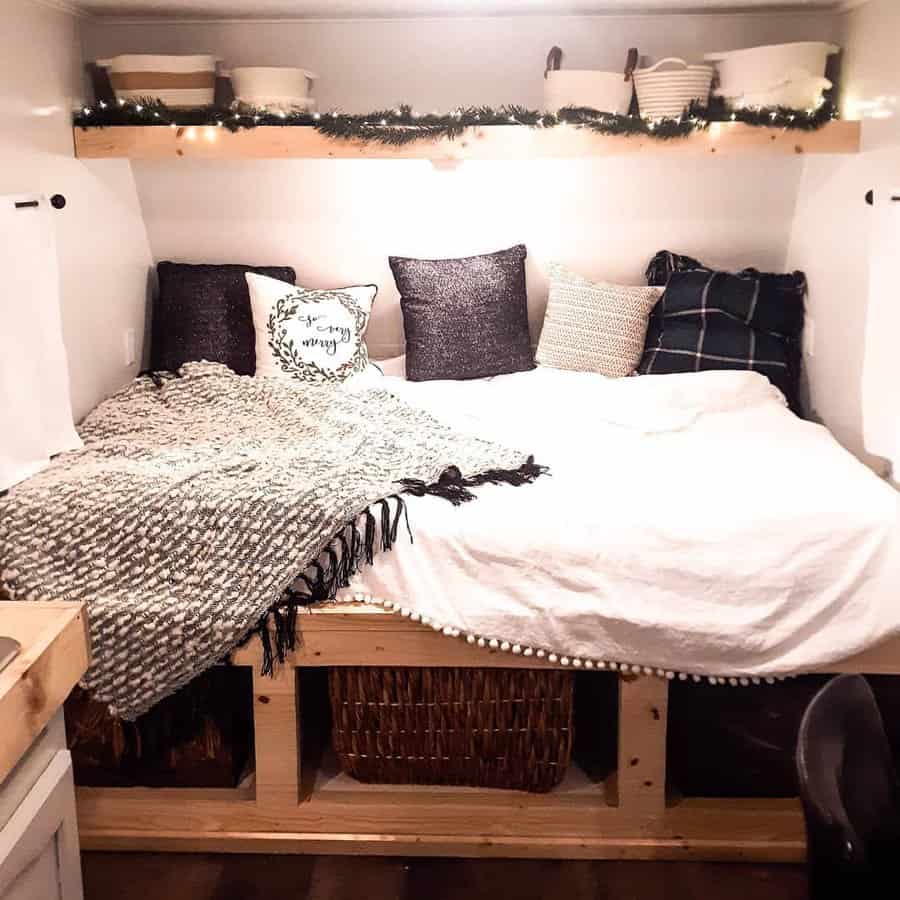
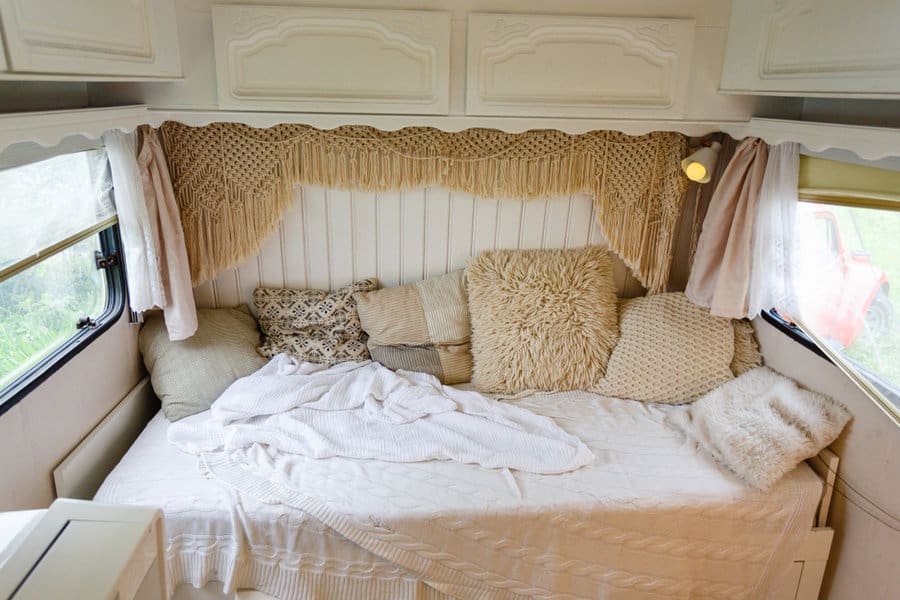
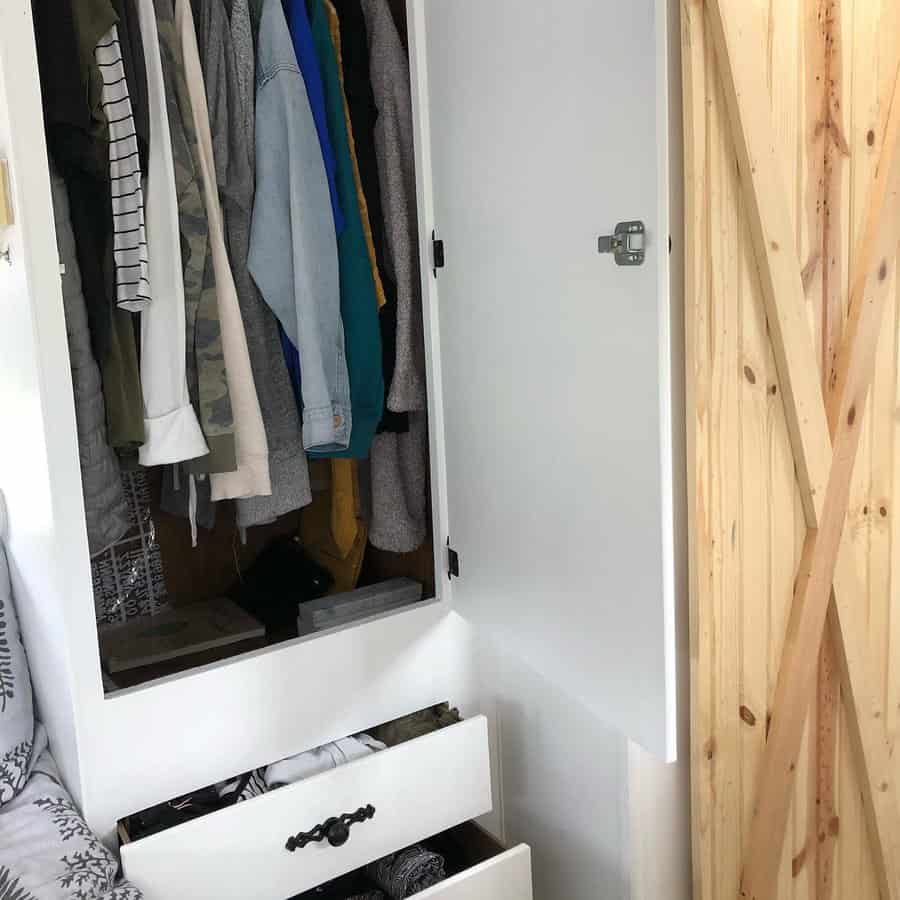
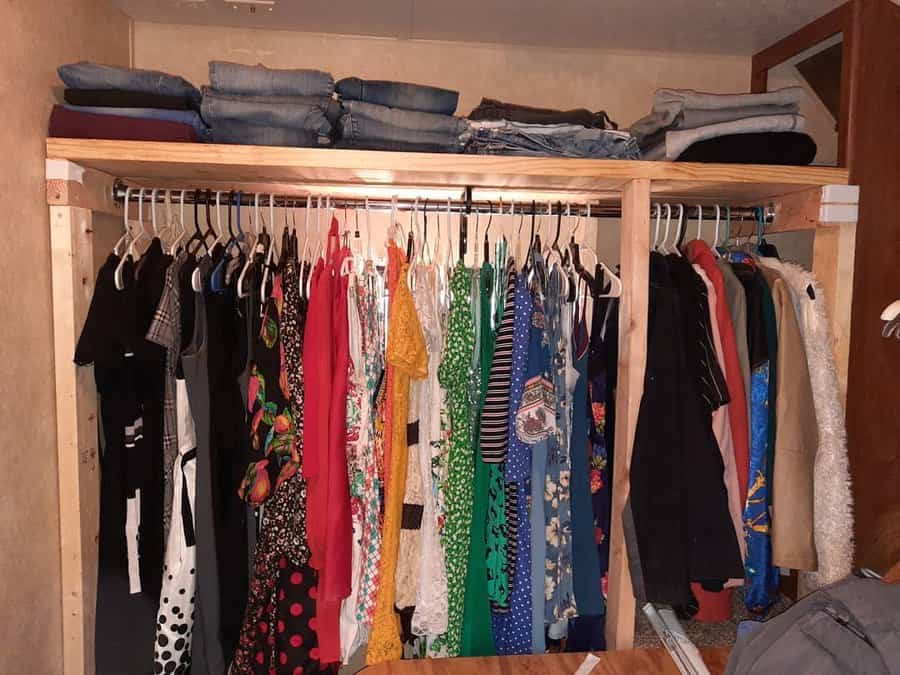
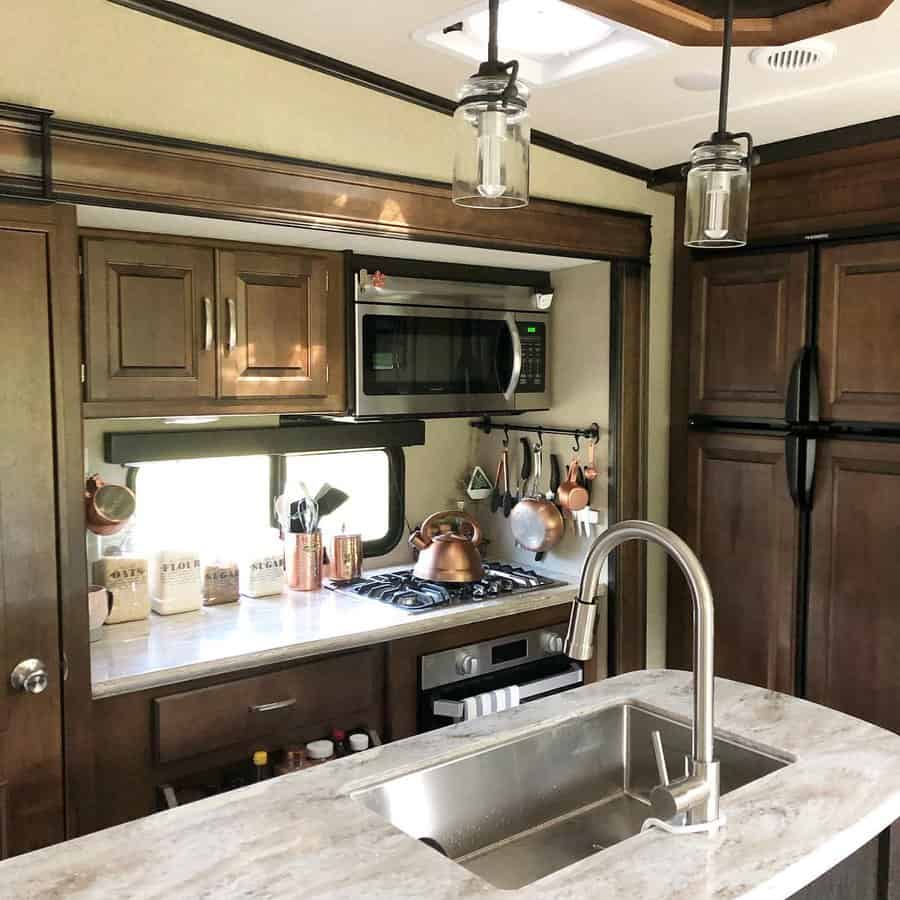
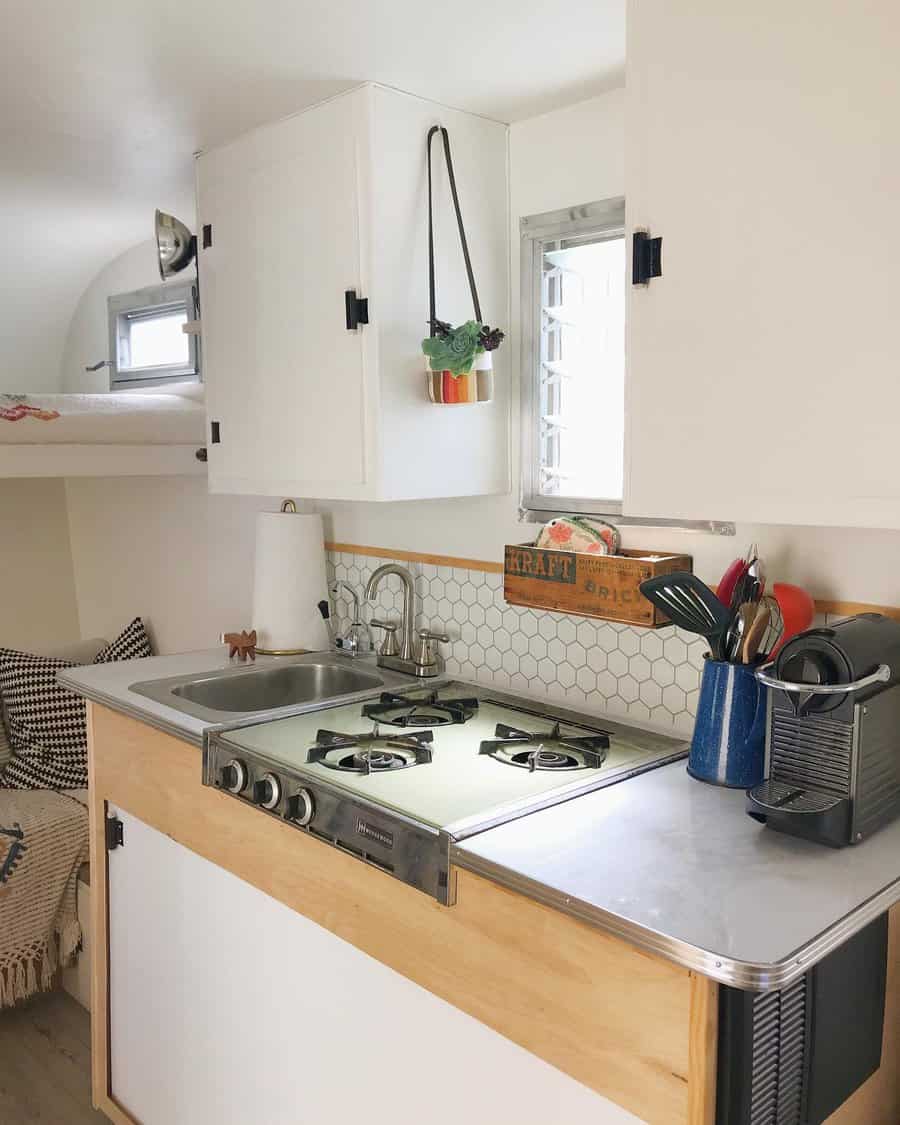
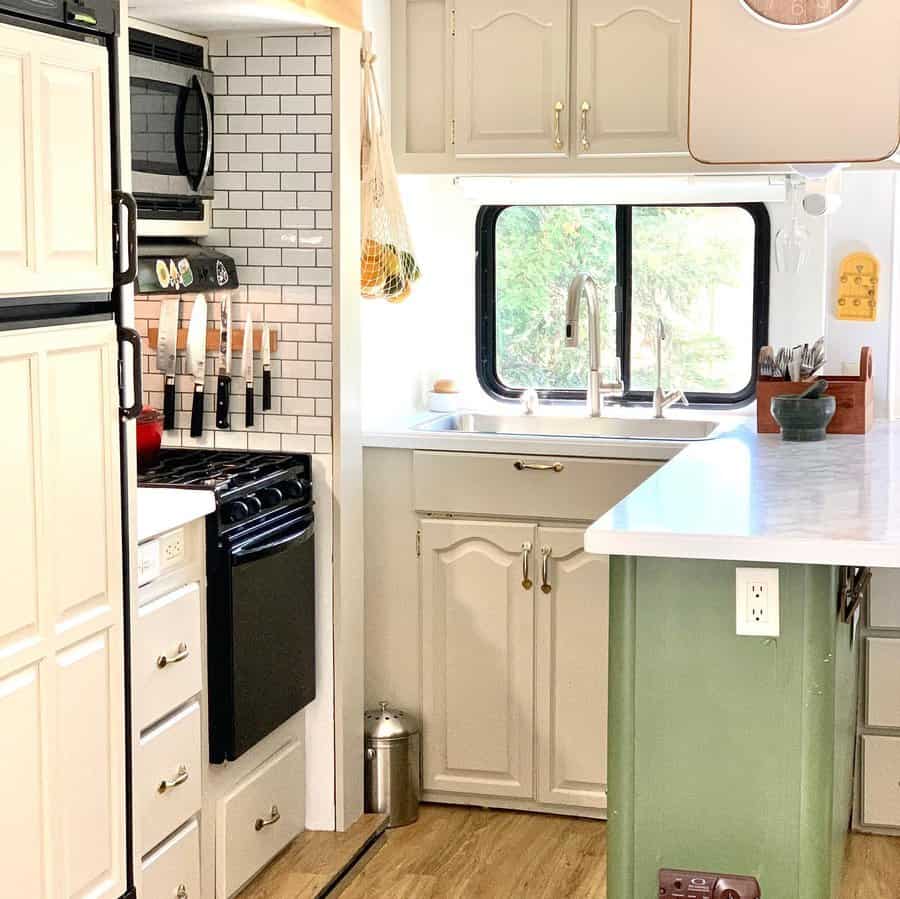
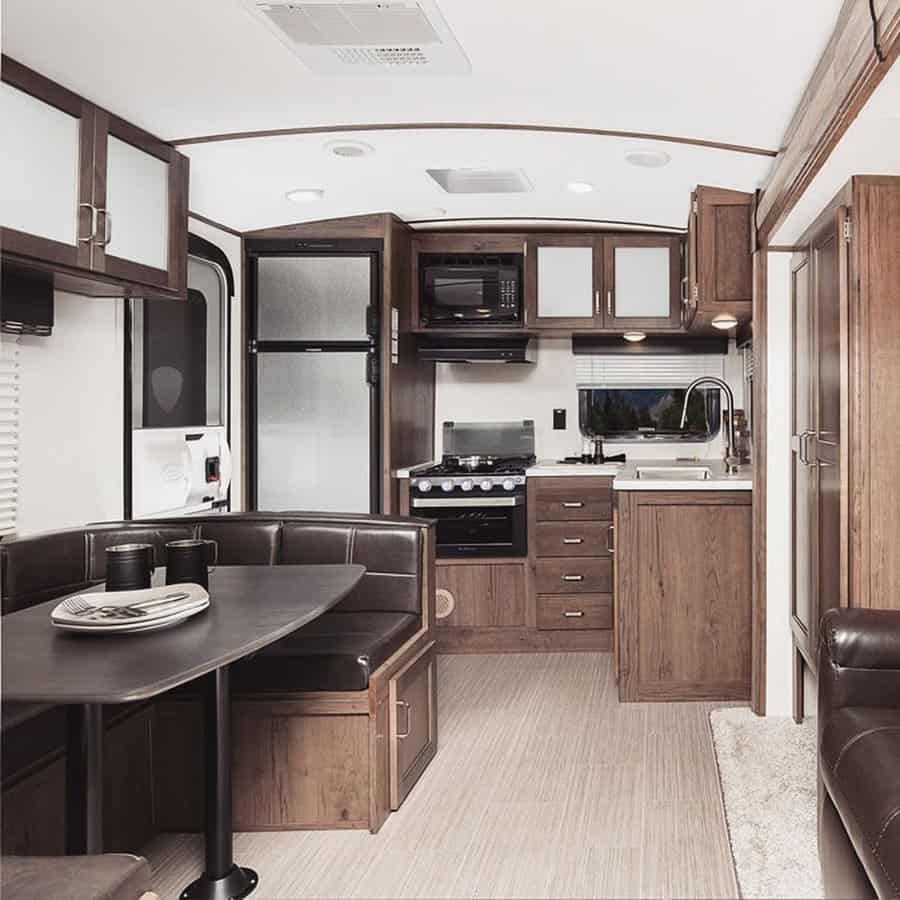
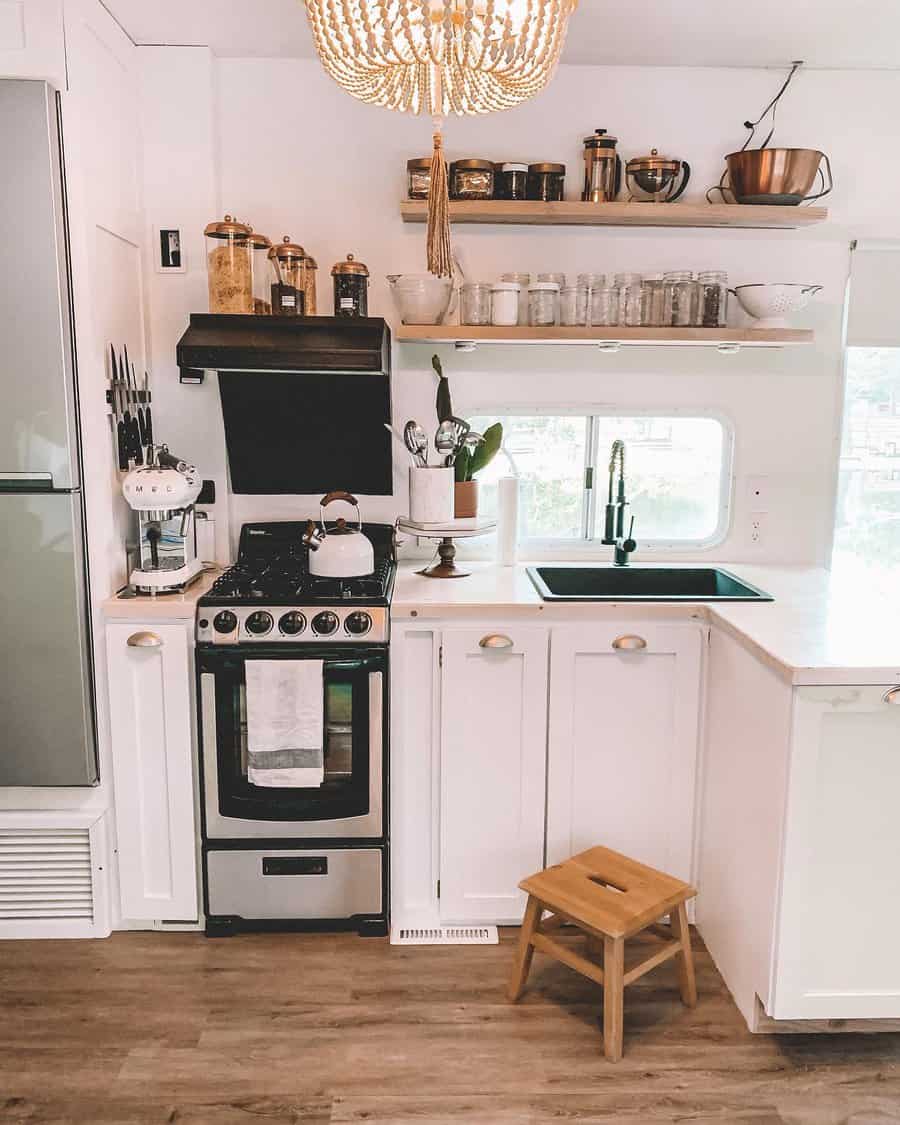
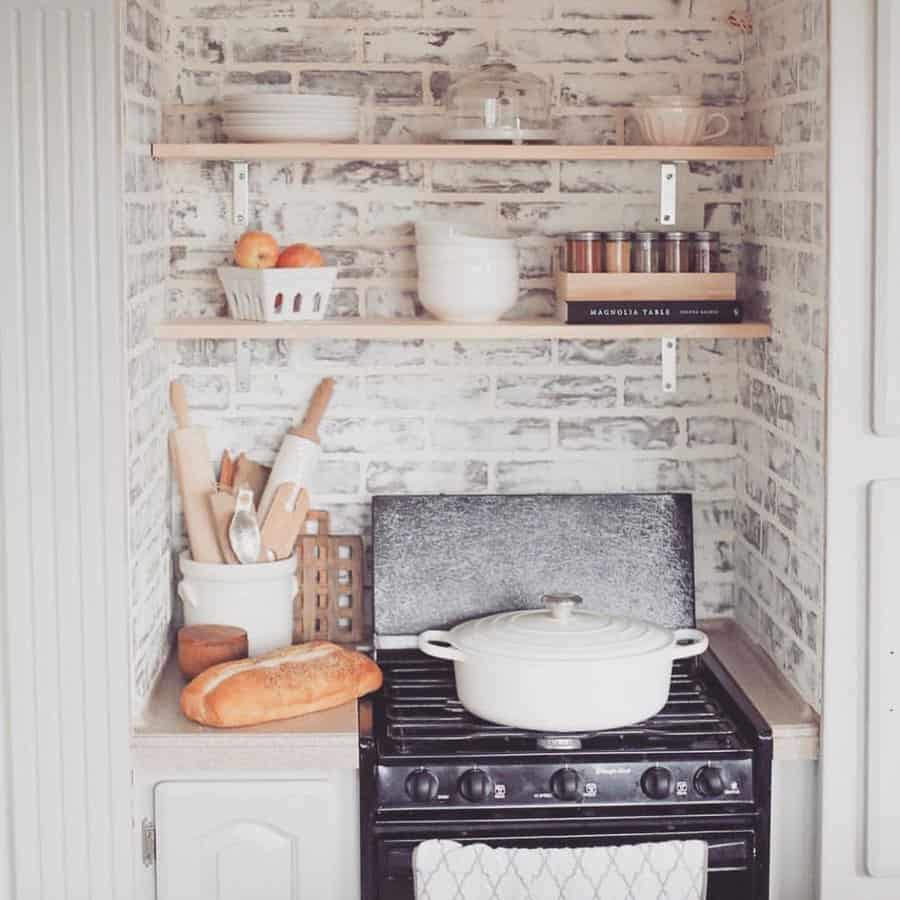
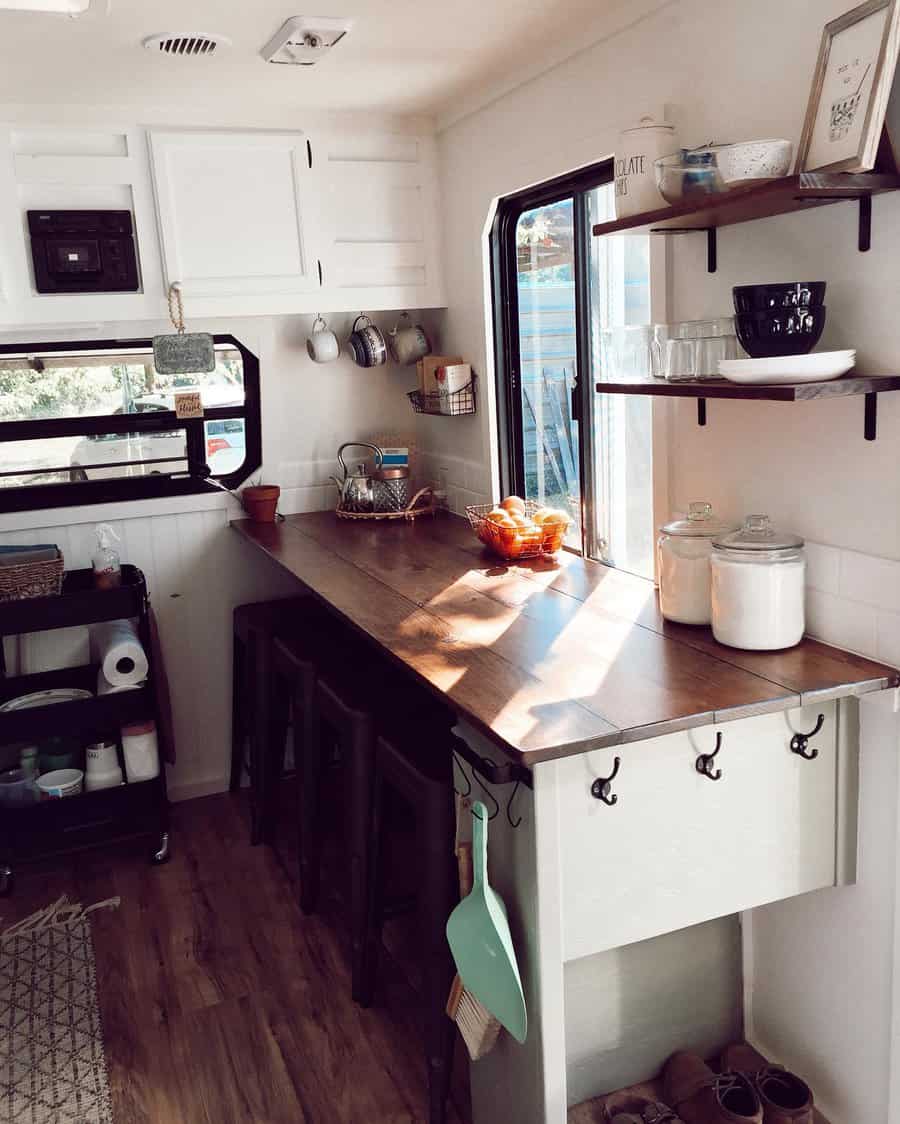
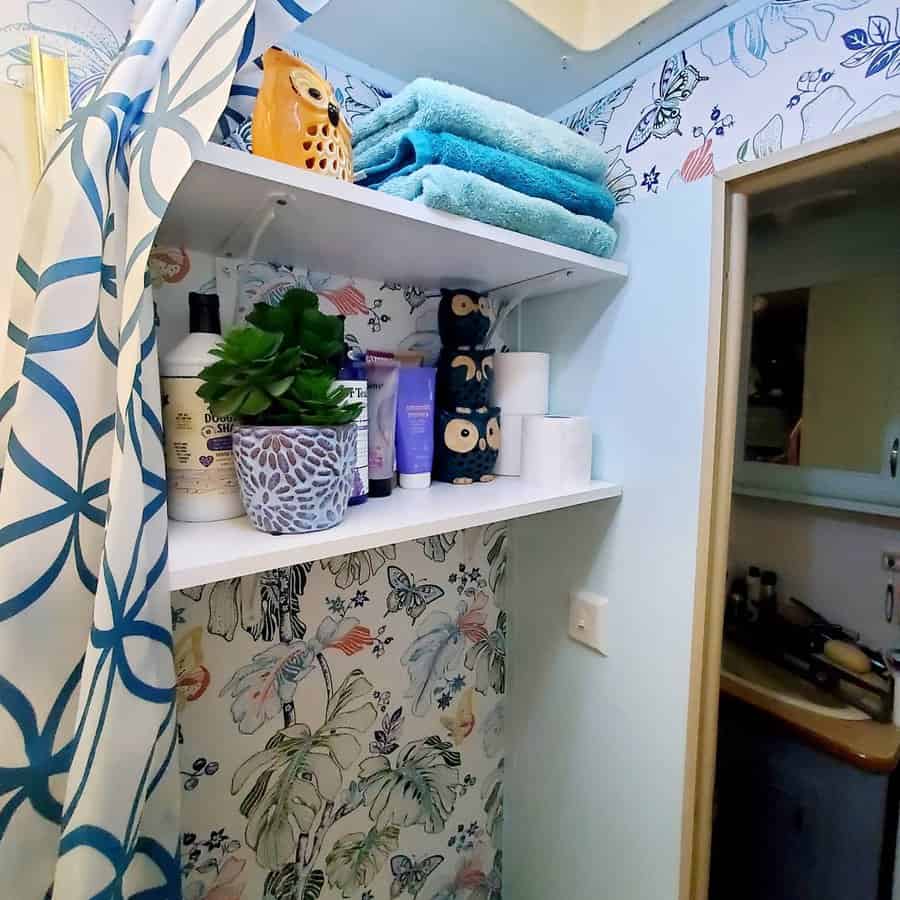
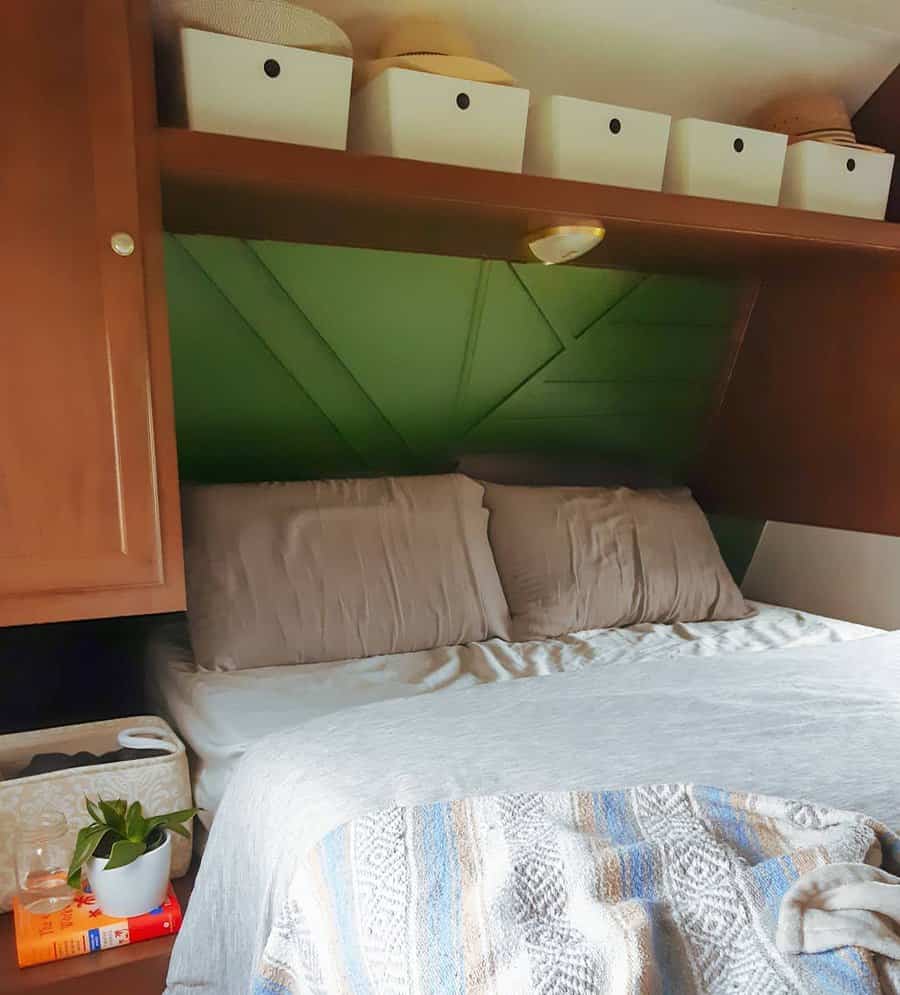
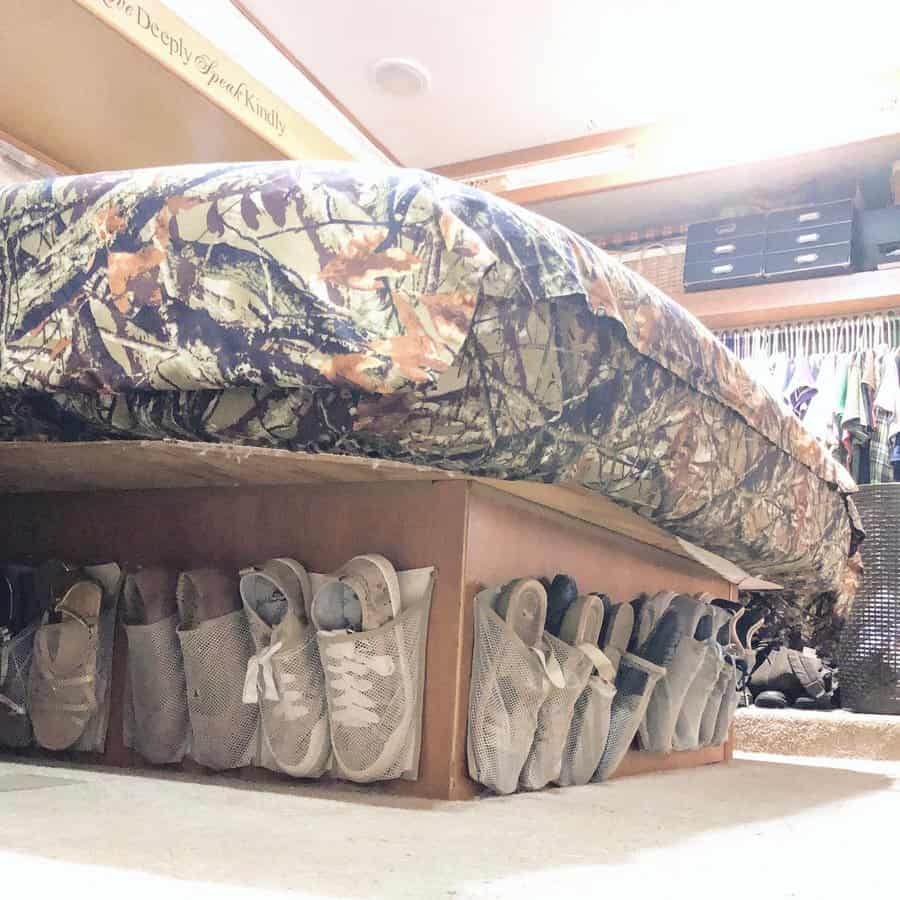
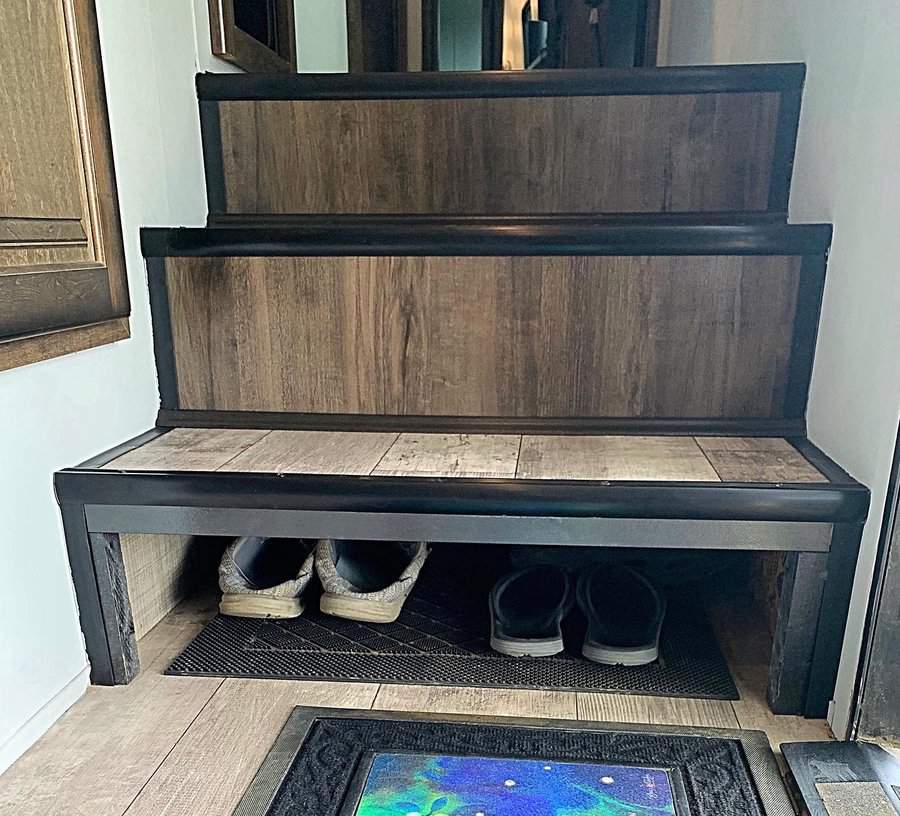
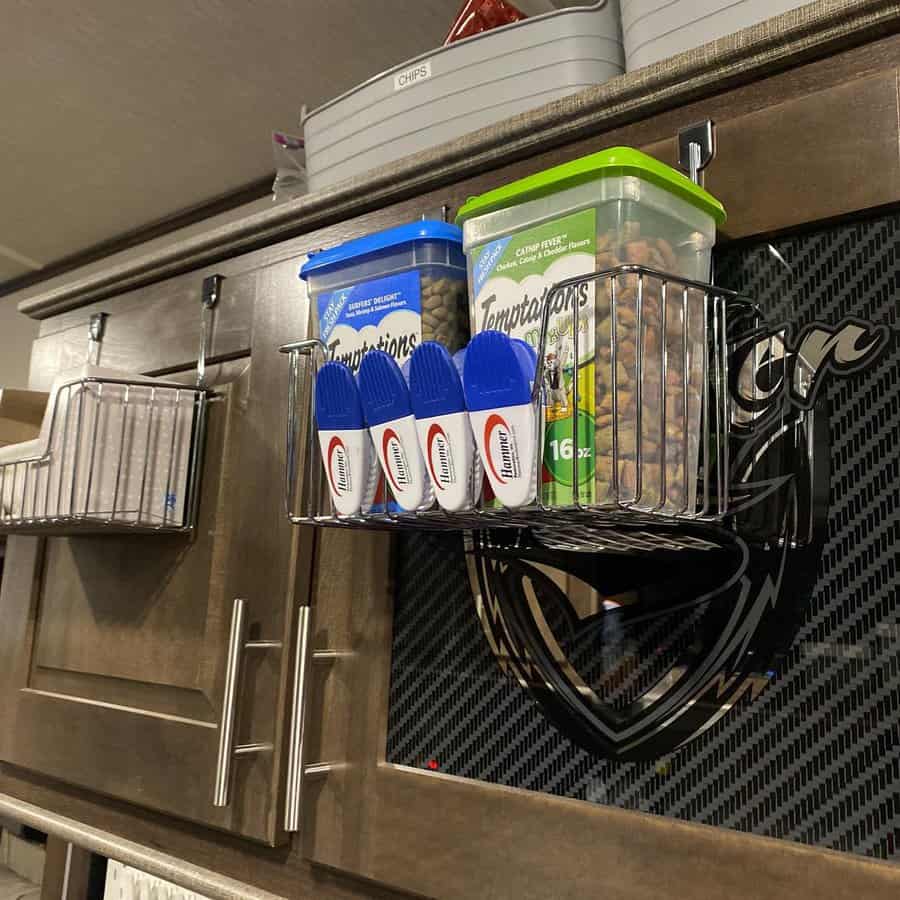
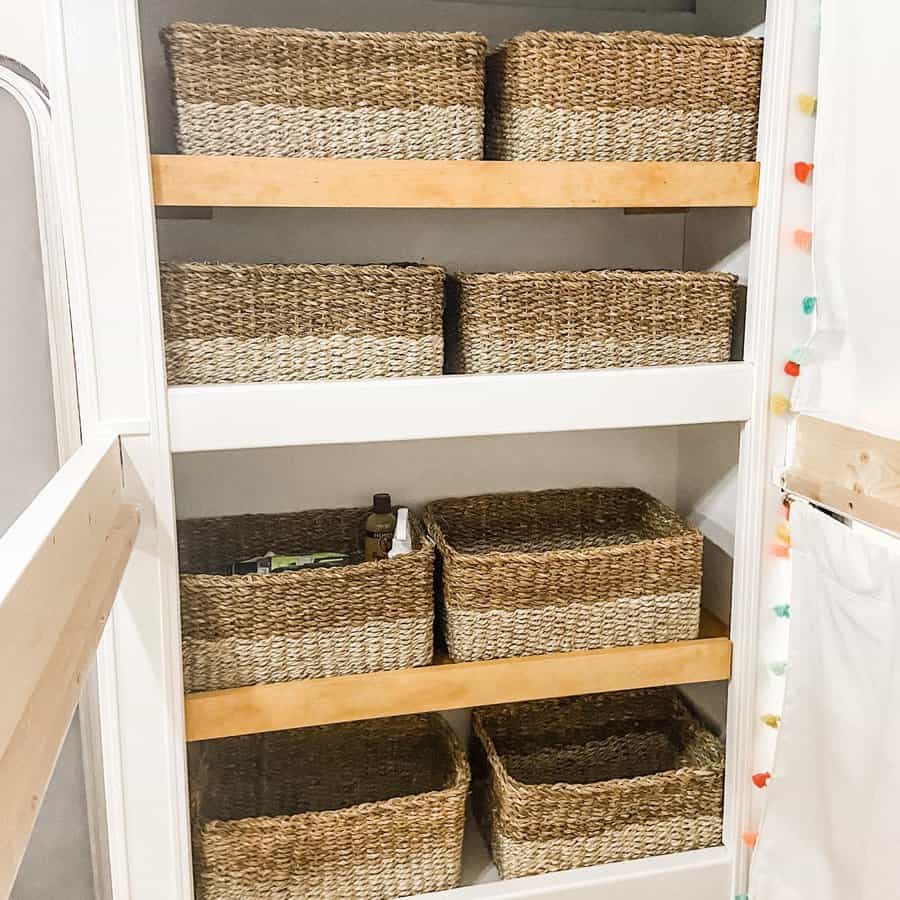
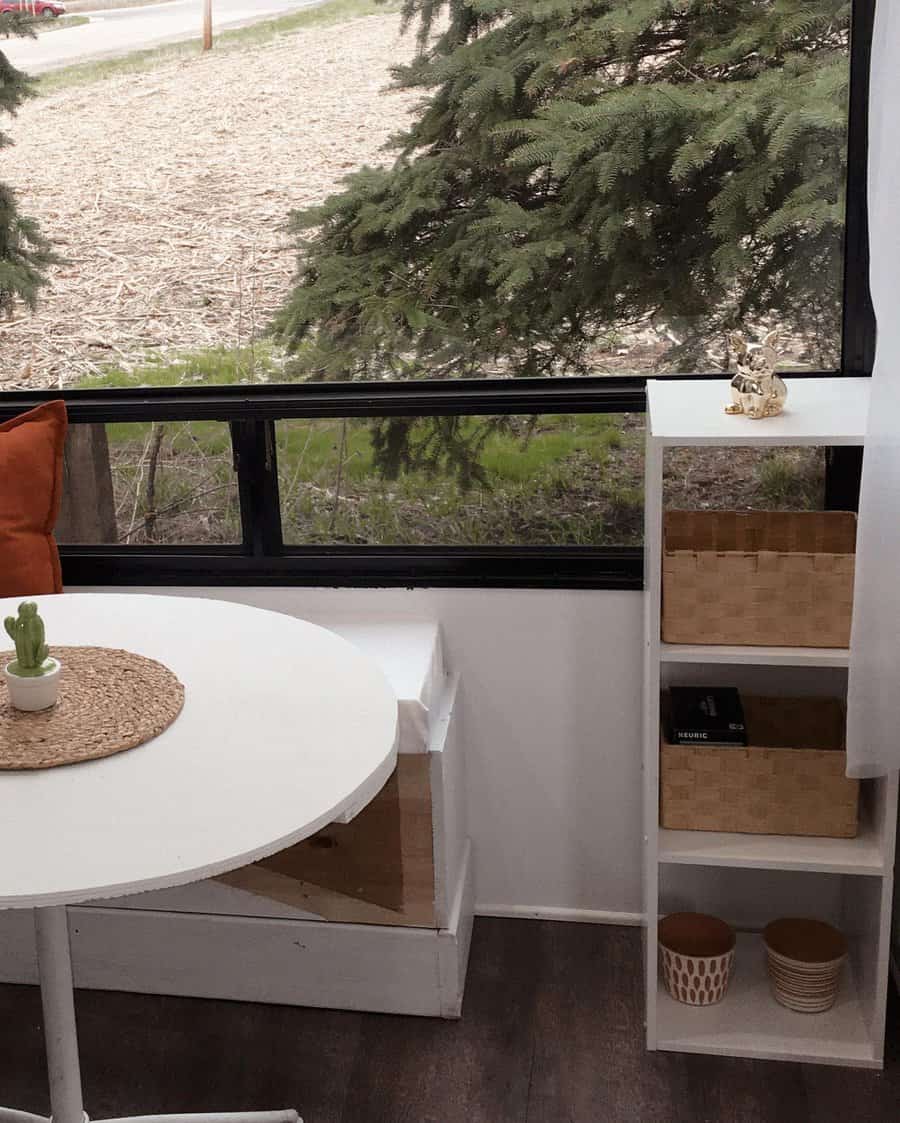
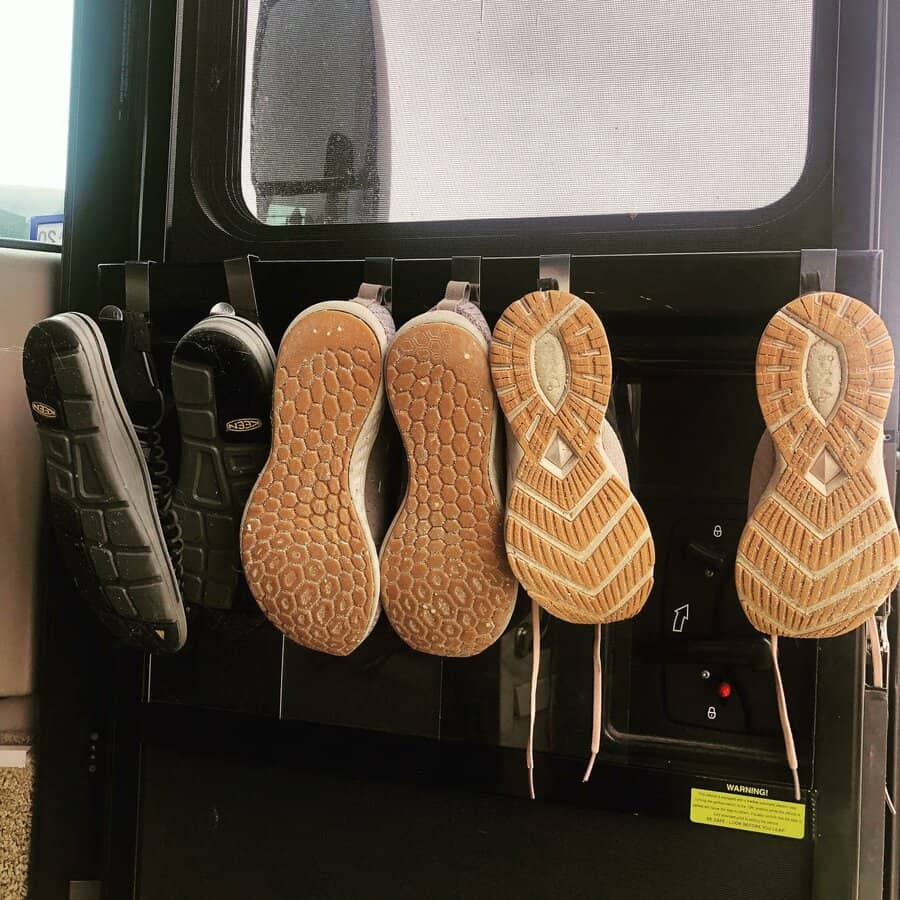
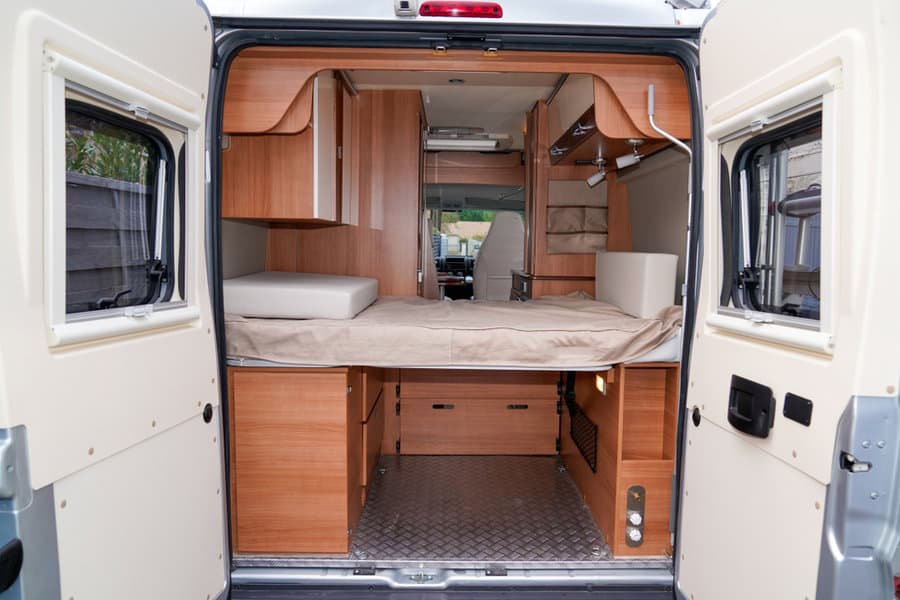
If you’re into the RV lifestyle, these lyrics are probably your anthem. Life on the road always brings something new just over the horizon, but certain aspects of RV life are less exciting.
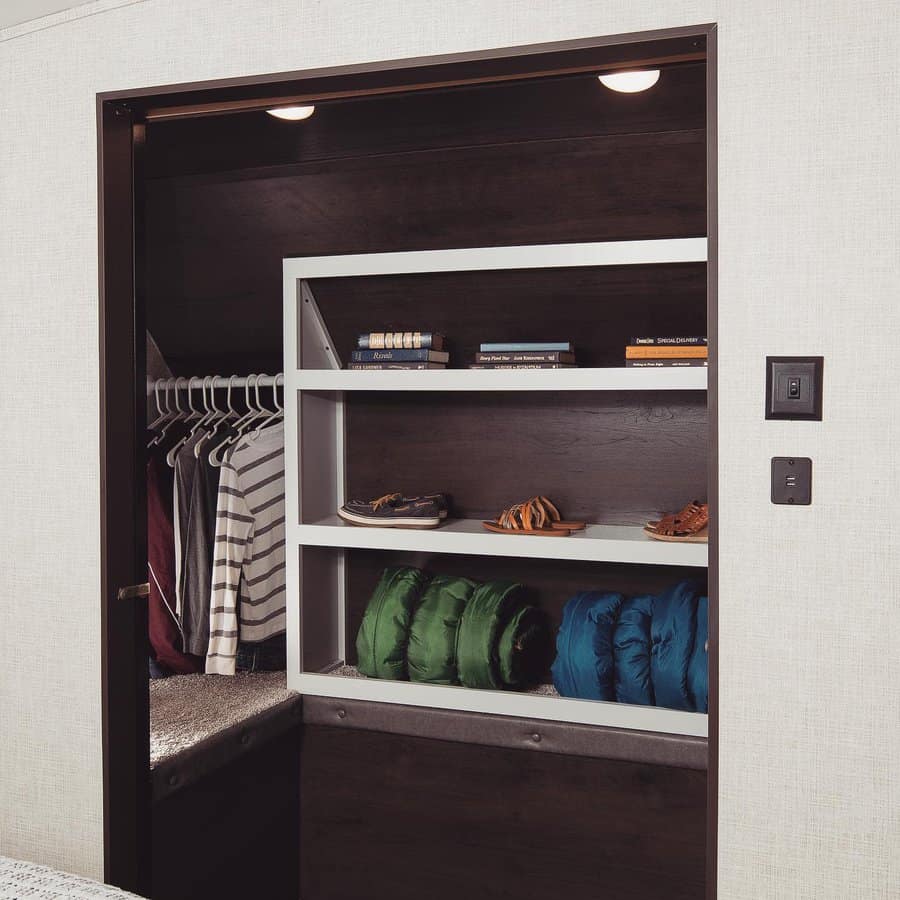
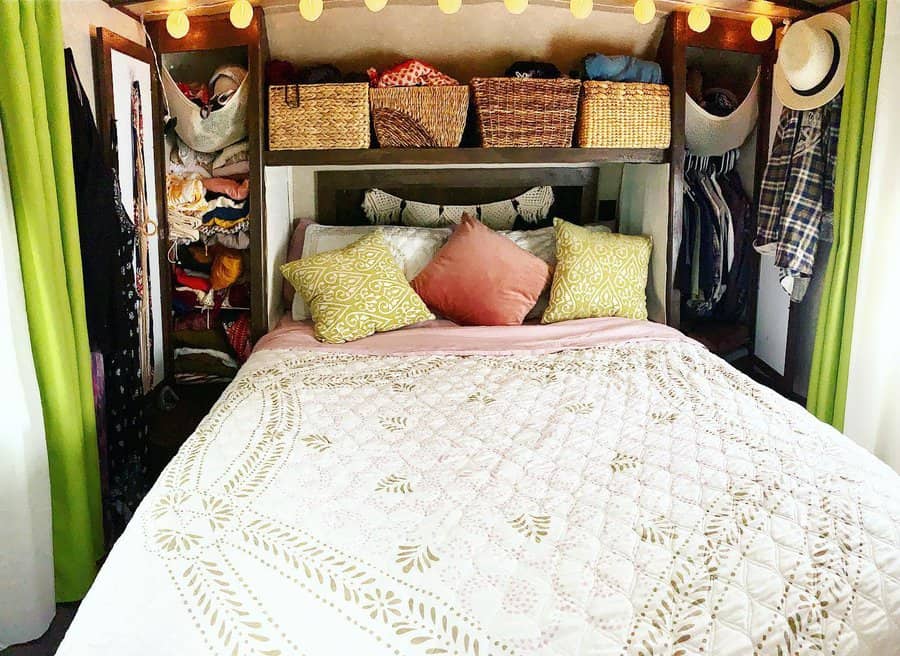
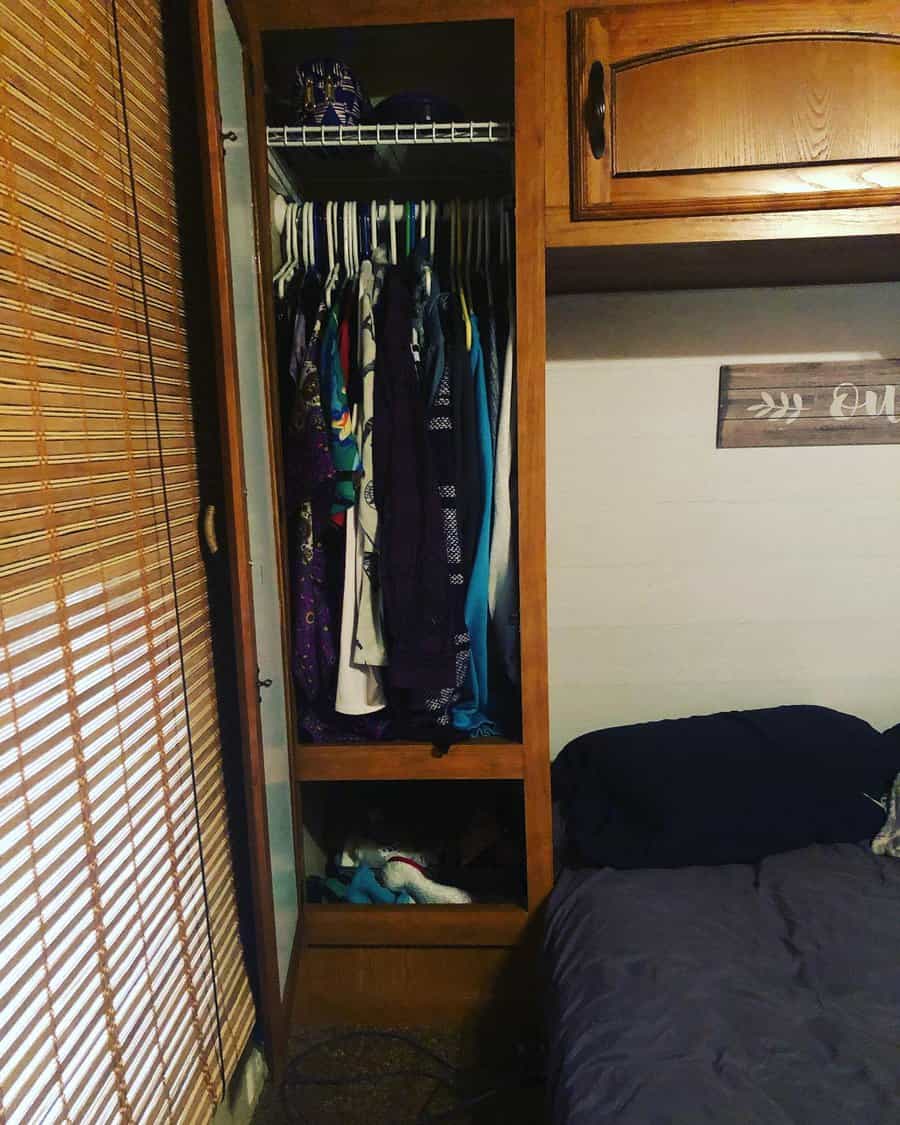
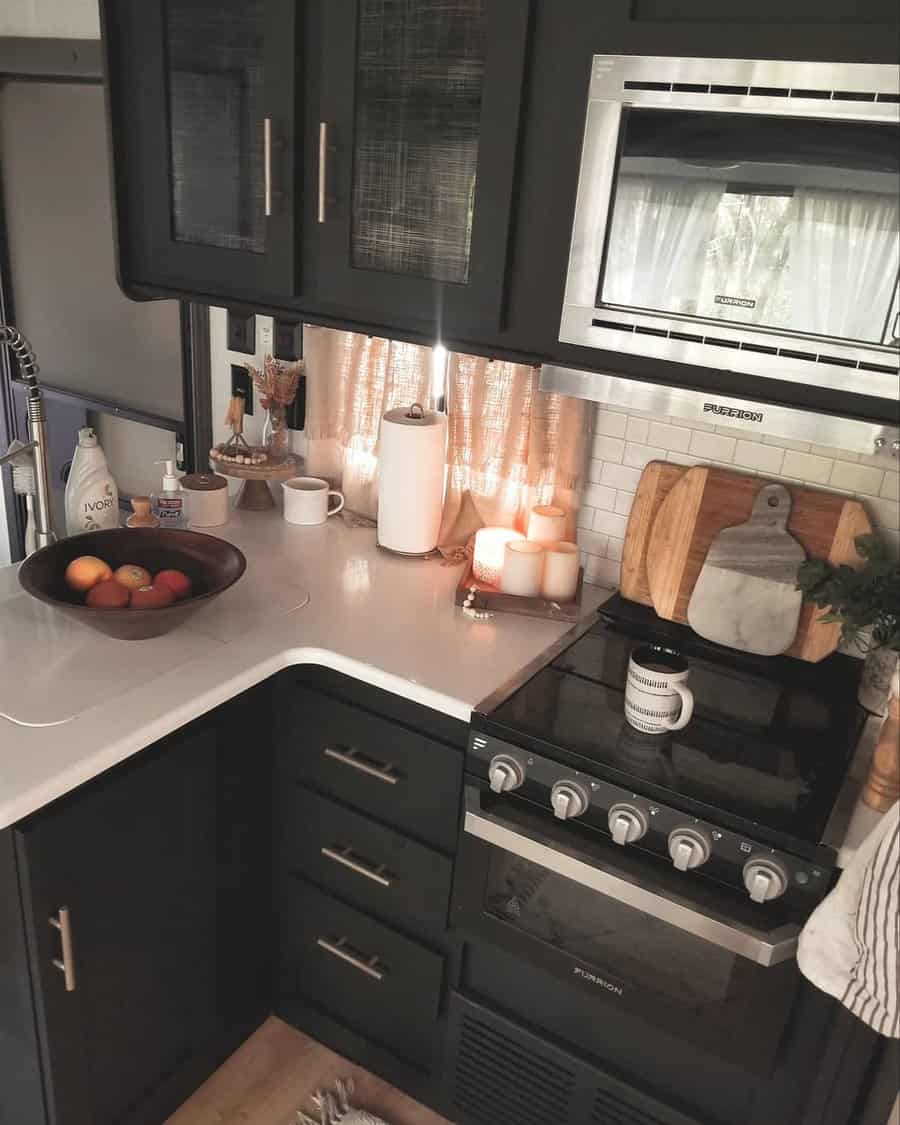
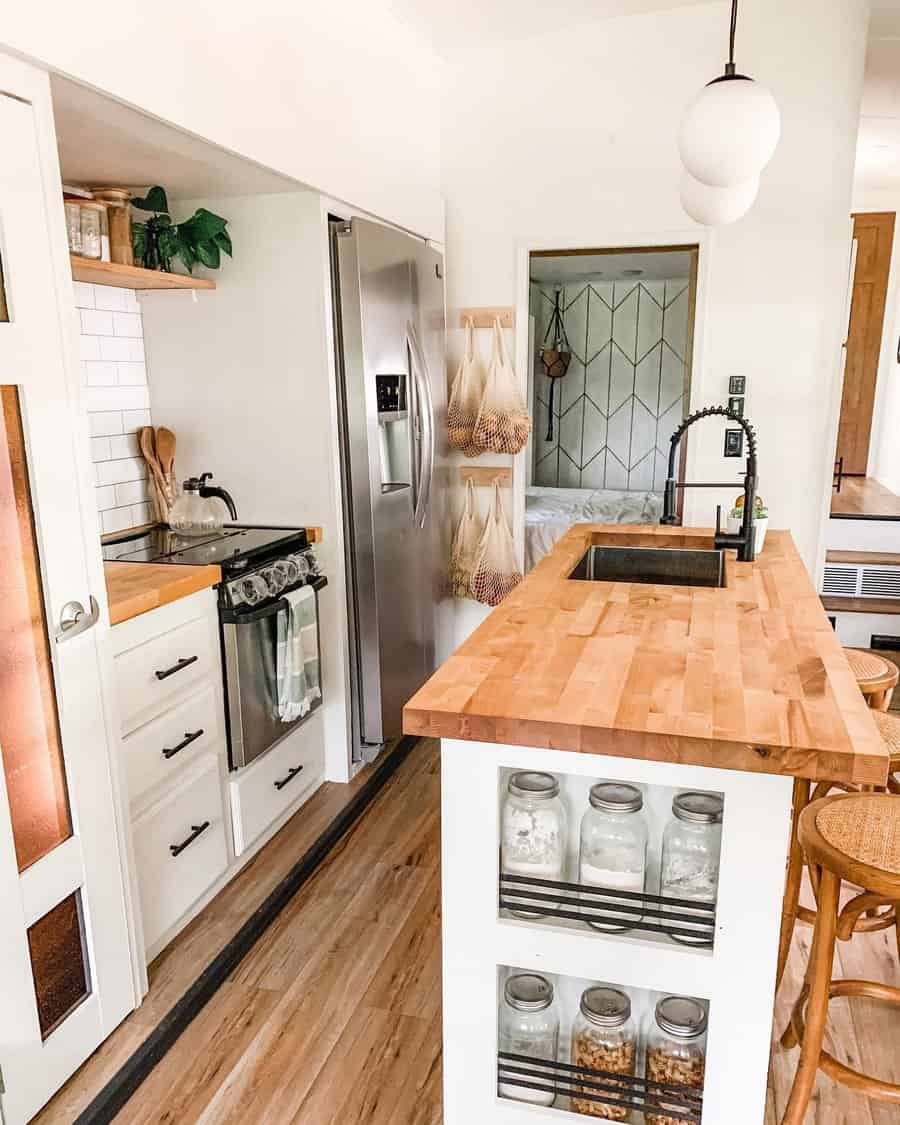
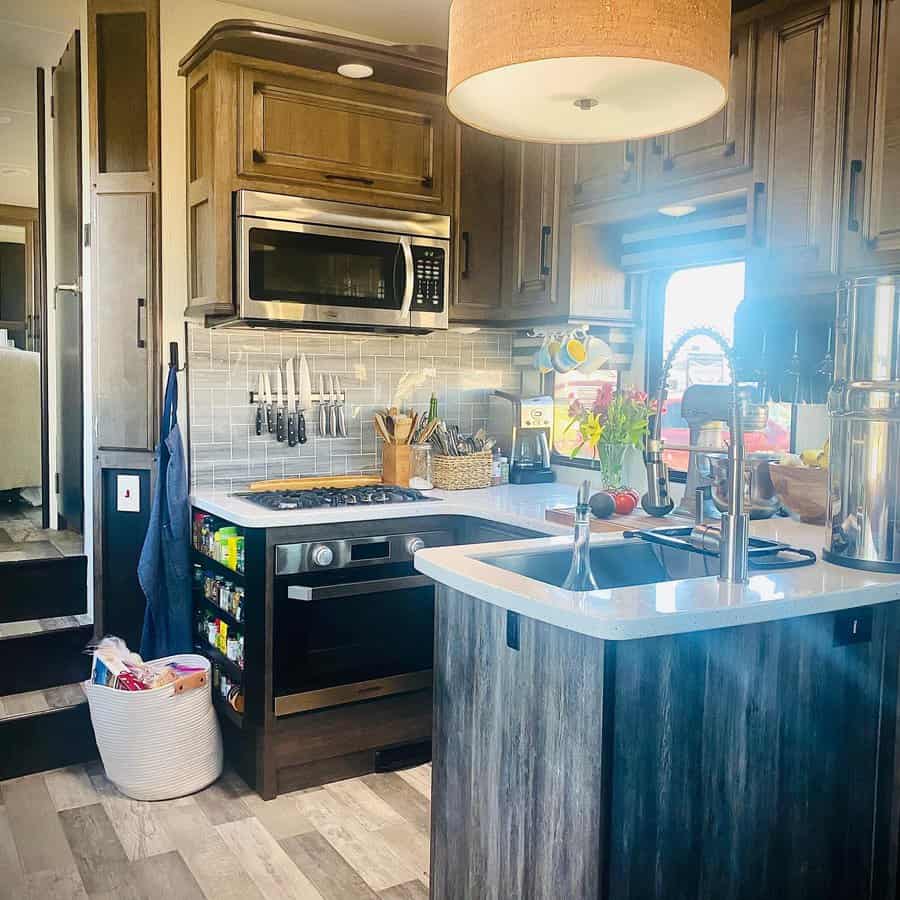
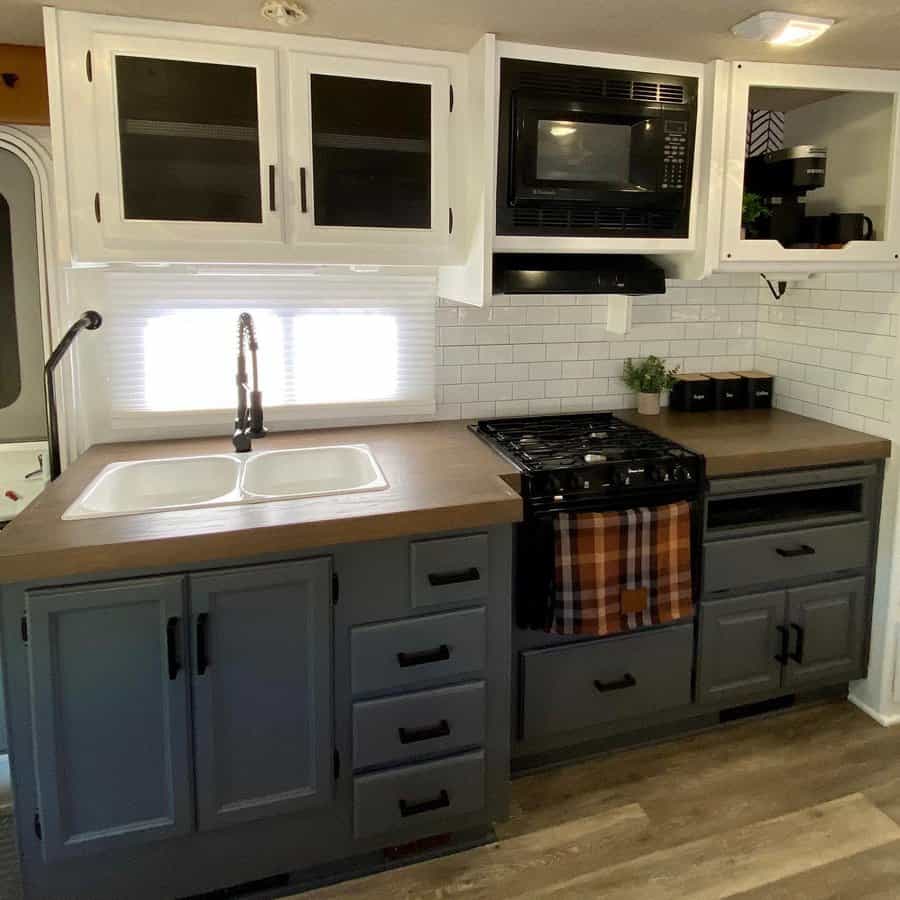
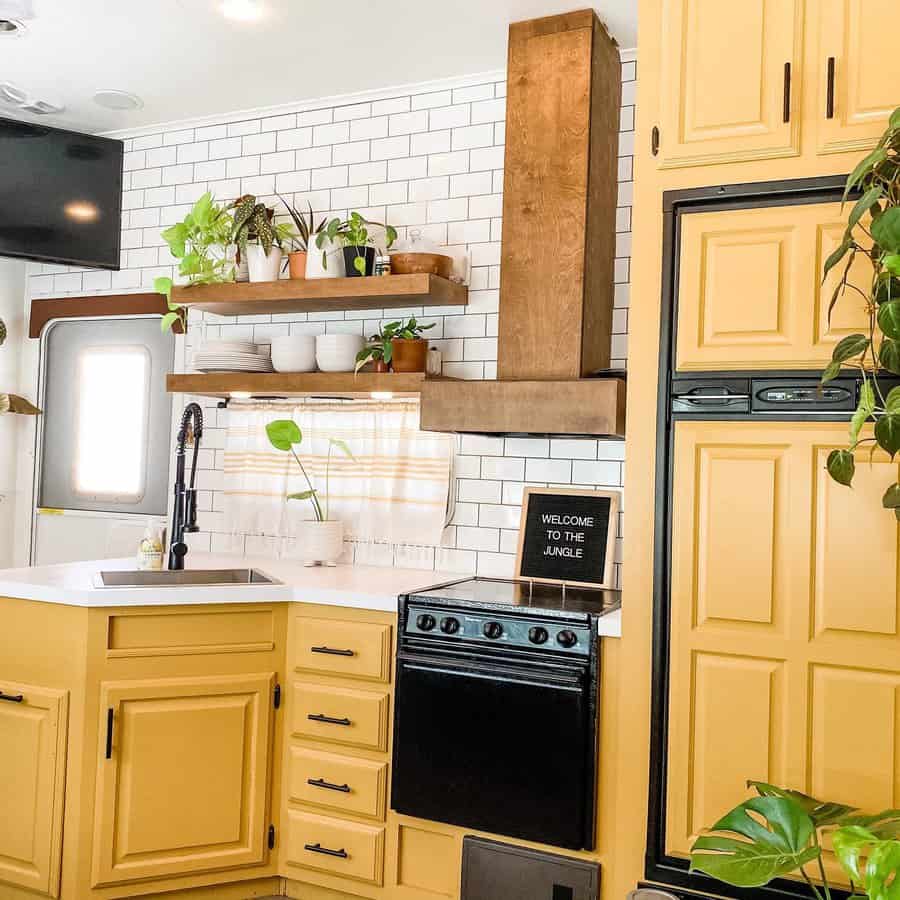
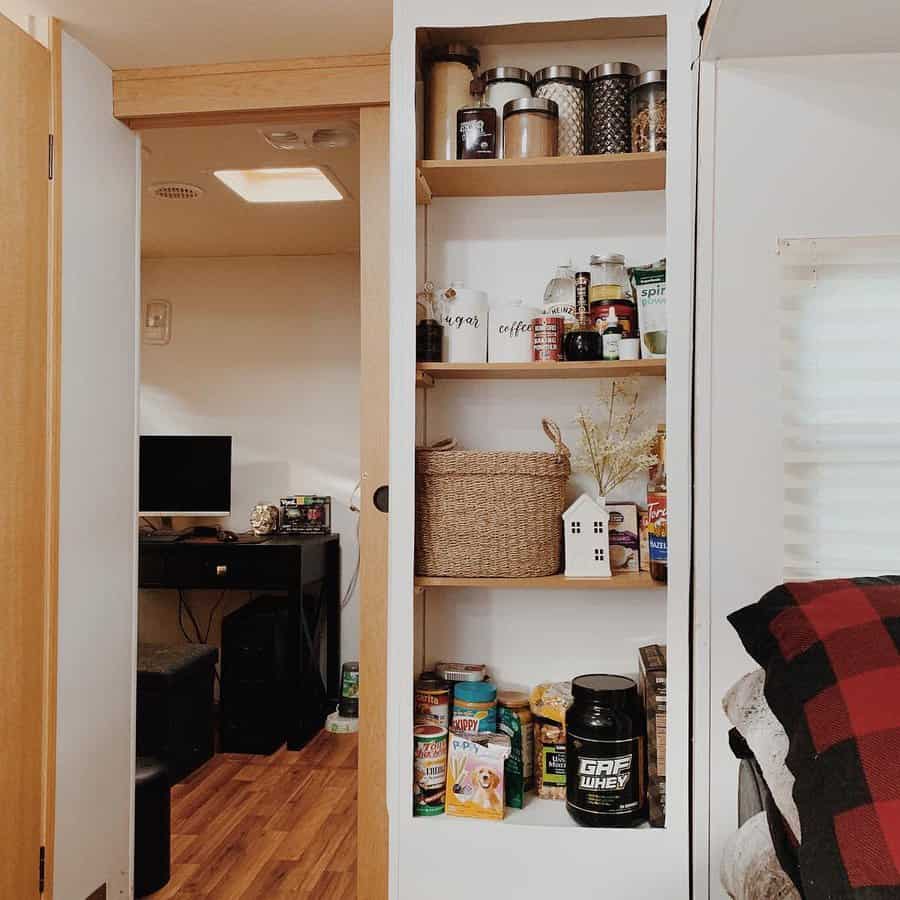
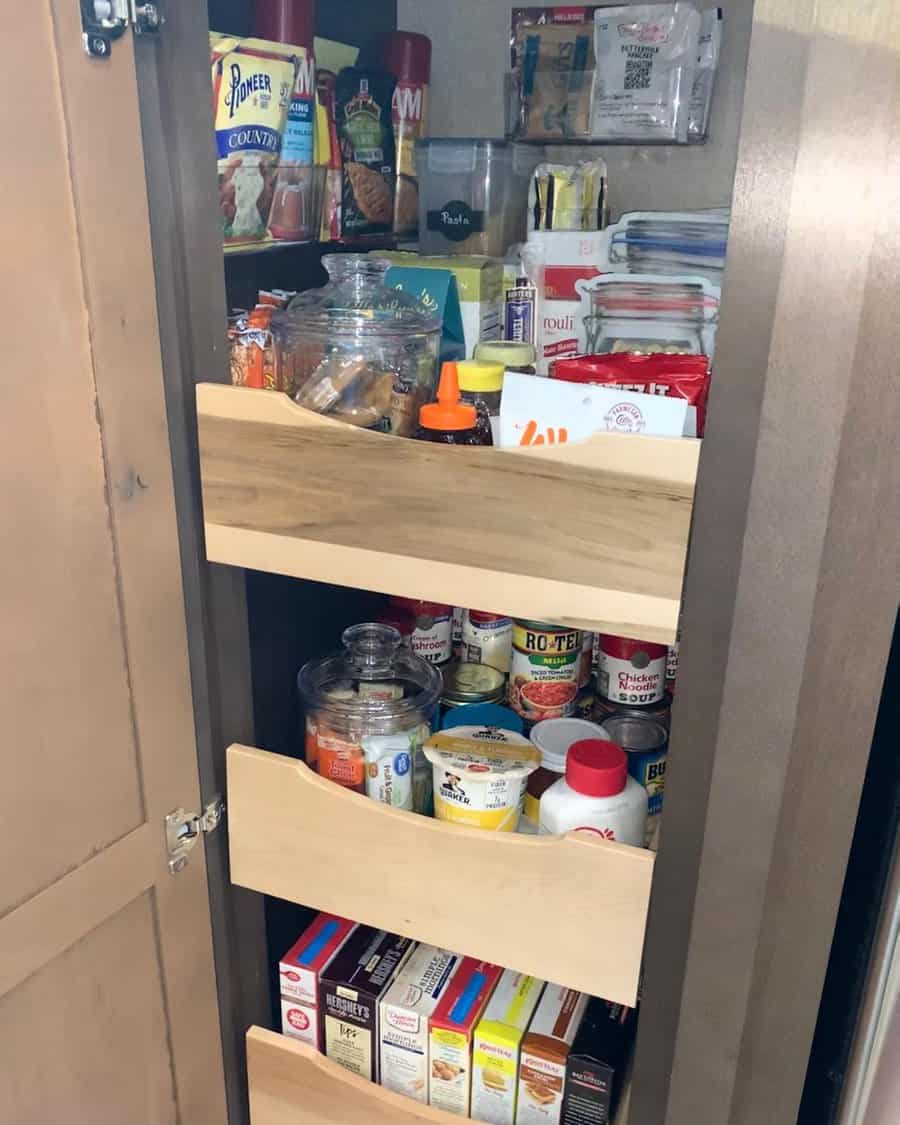
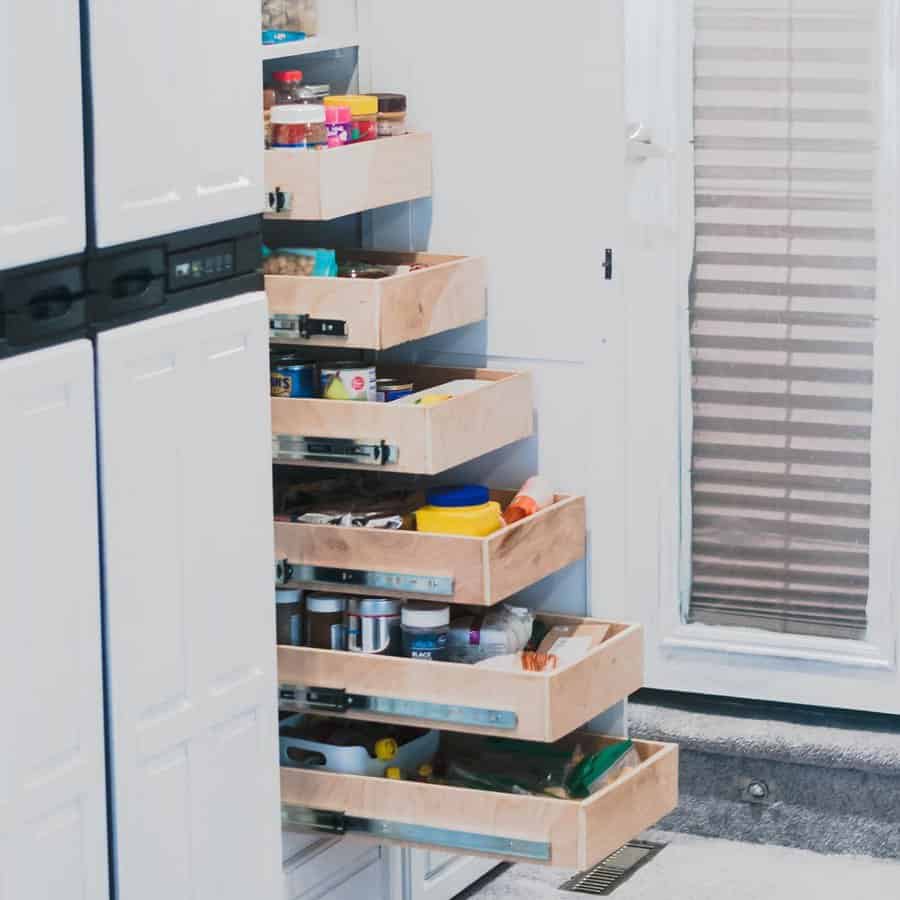
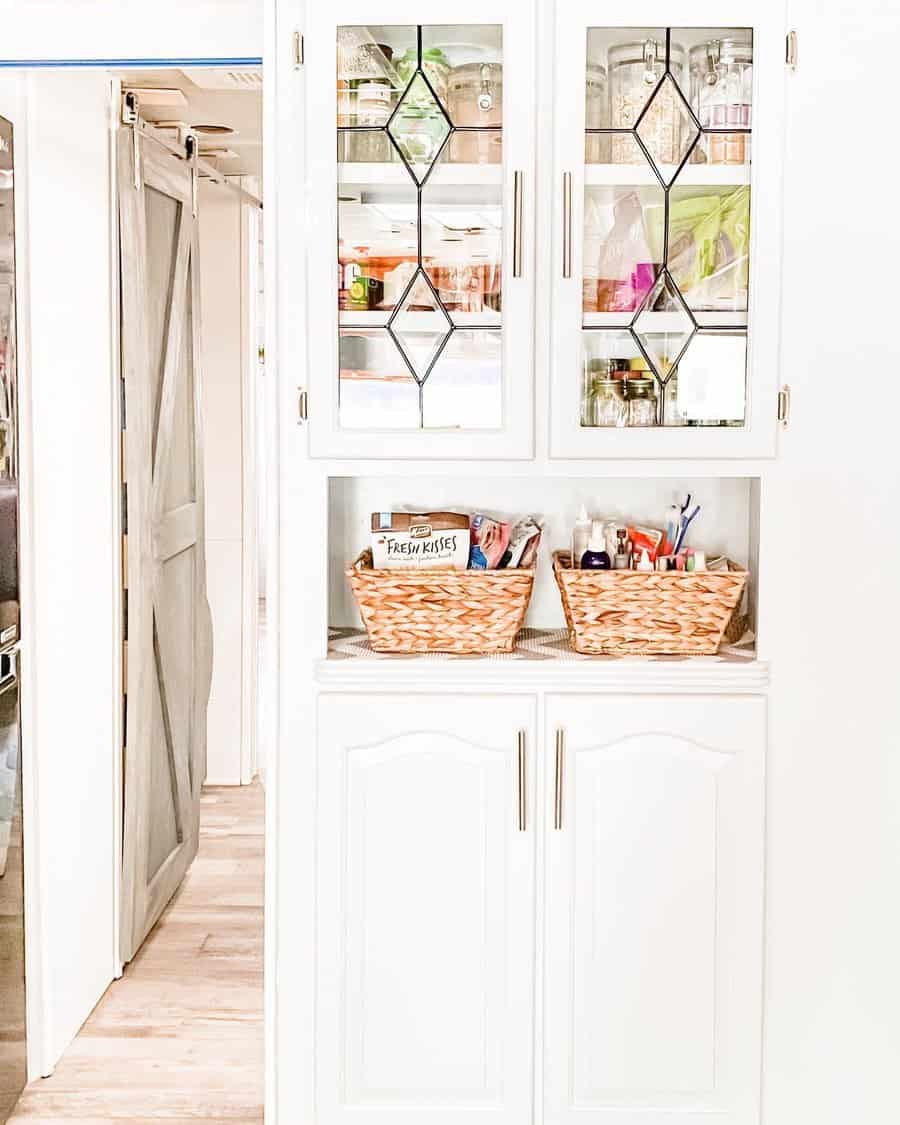
Storage is nearly always a challenge in an RV—unless you are a dedicated minimalist.
A new recreational vehicle is likely to have added innovative small space storage solutions.
Even so, figuring out a place for everything and keeping everything in its place is a challenge. Browse our best RV storage ideas and learn how to maximize the limited space inside your home on wheels.
[view_toc]
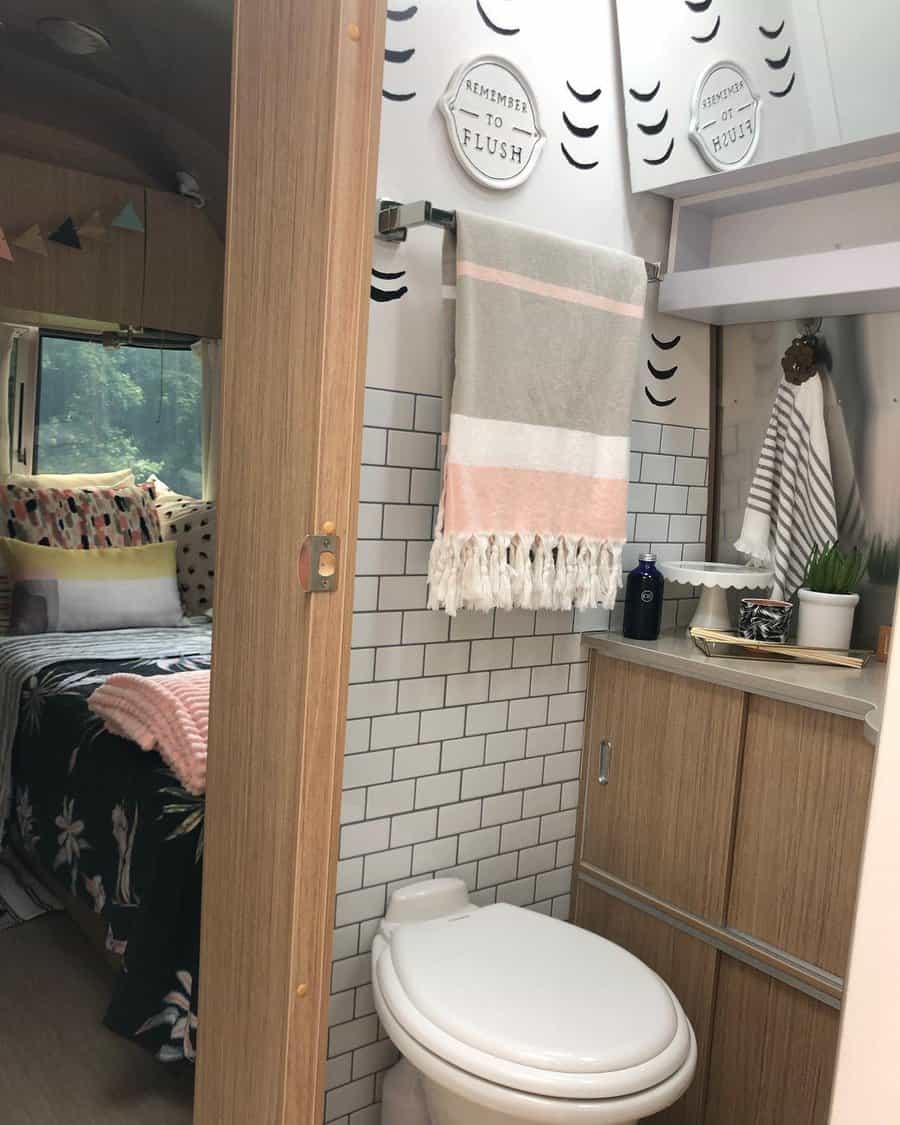
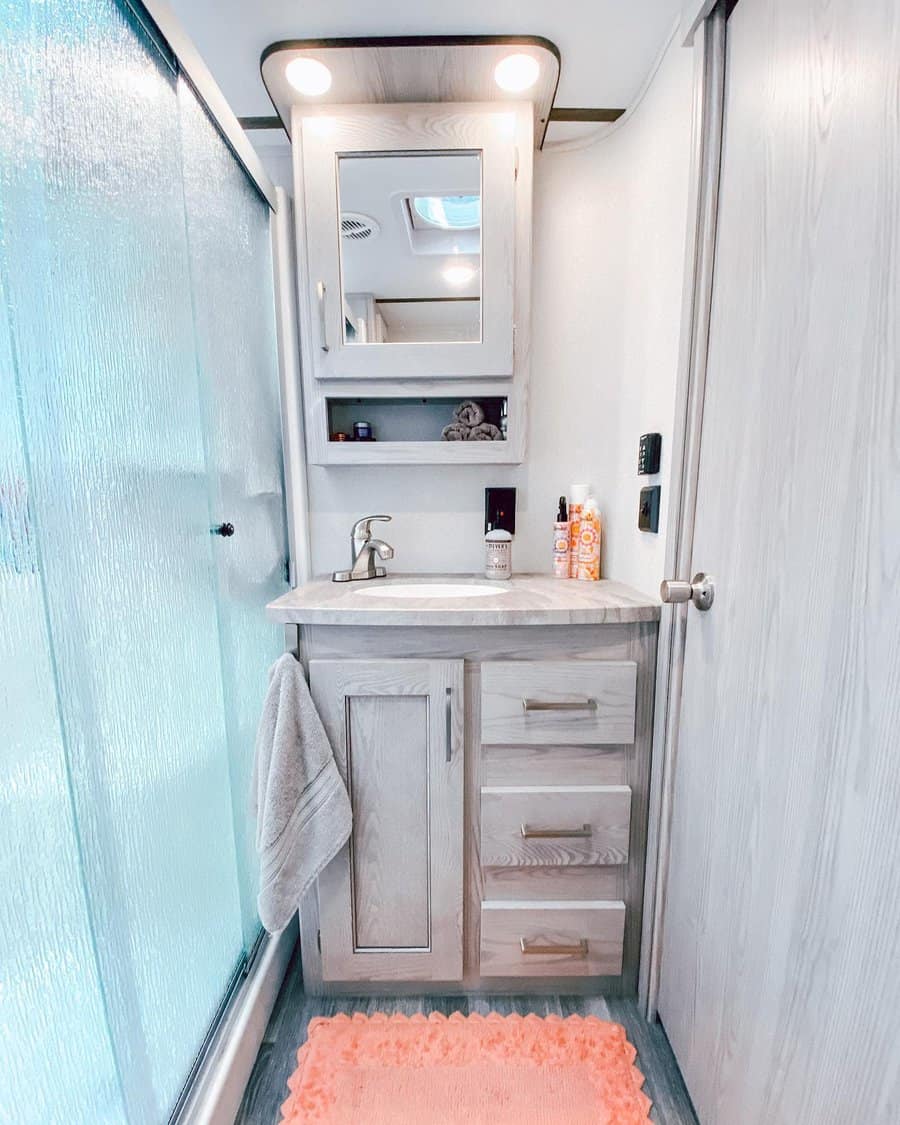
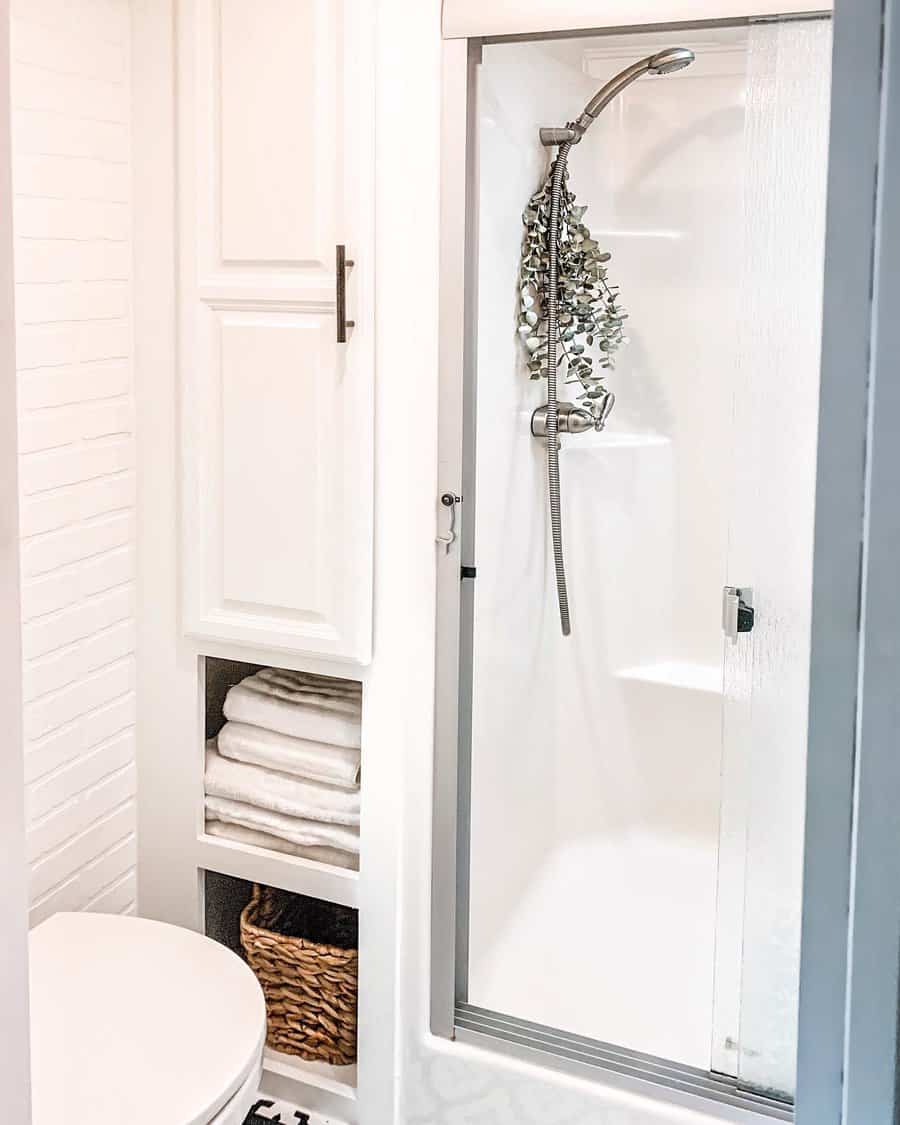
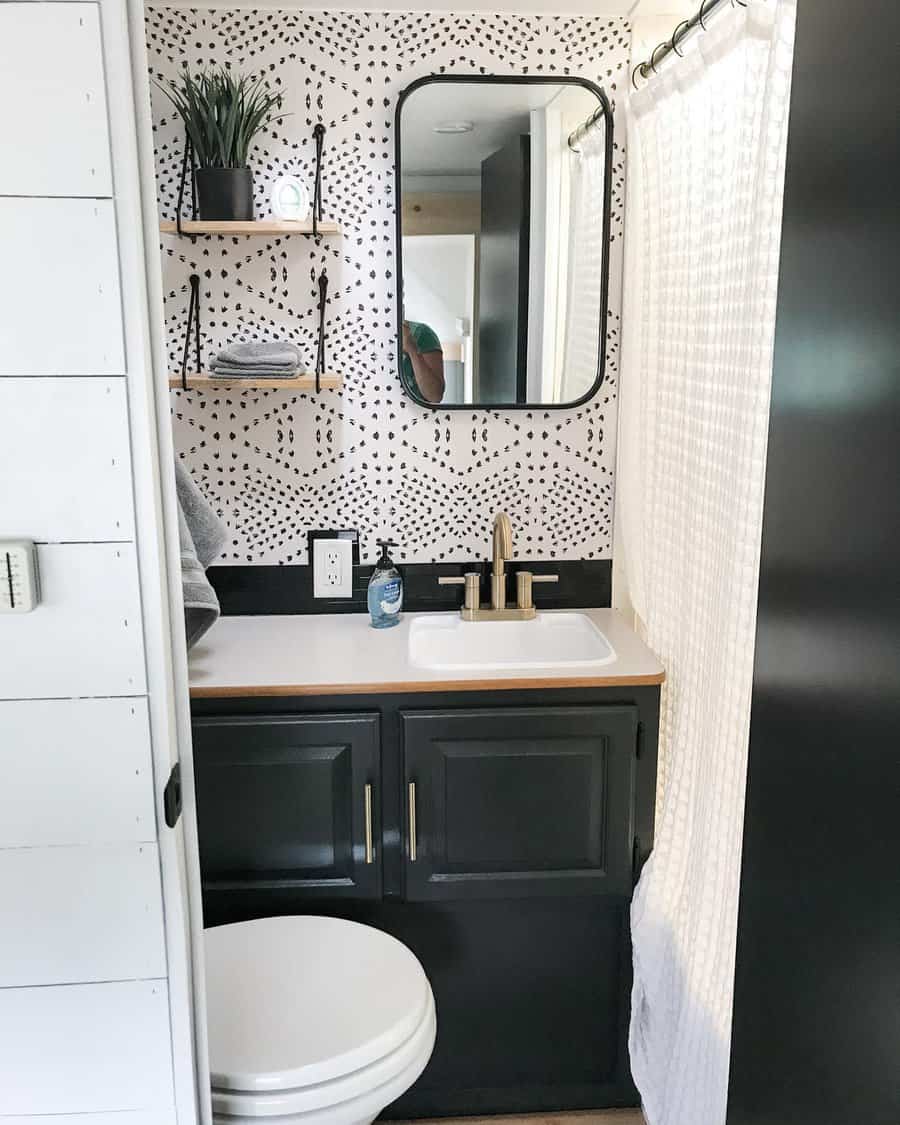
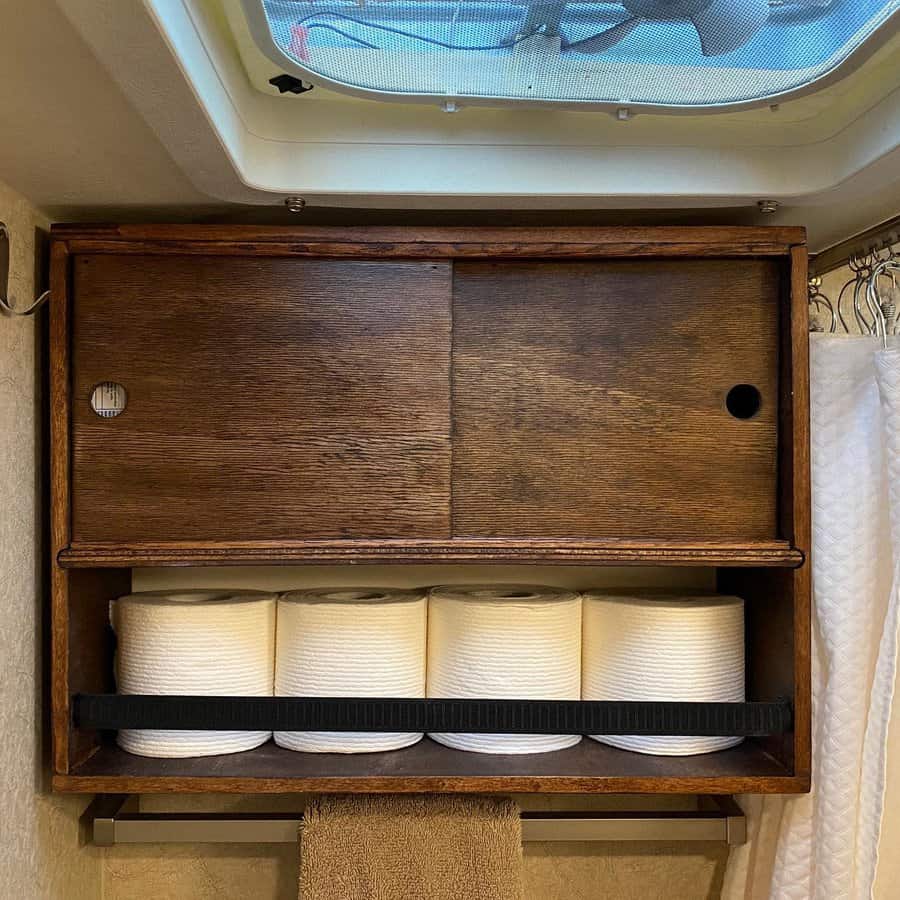
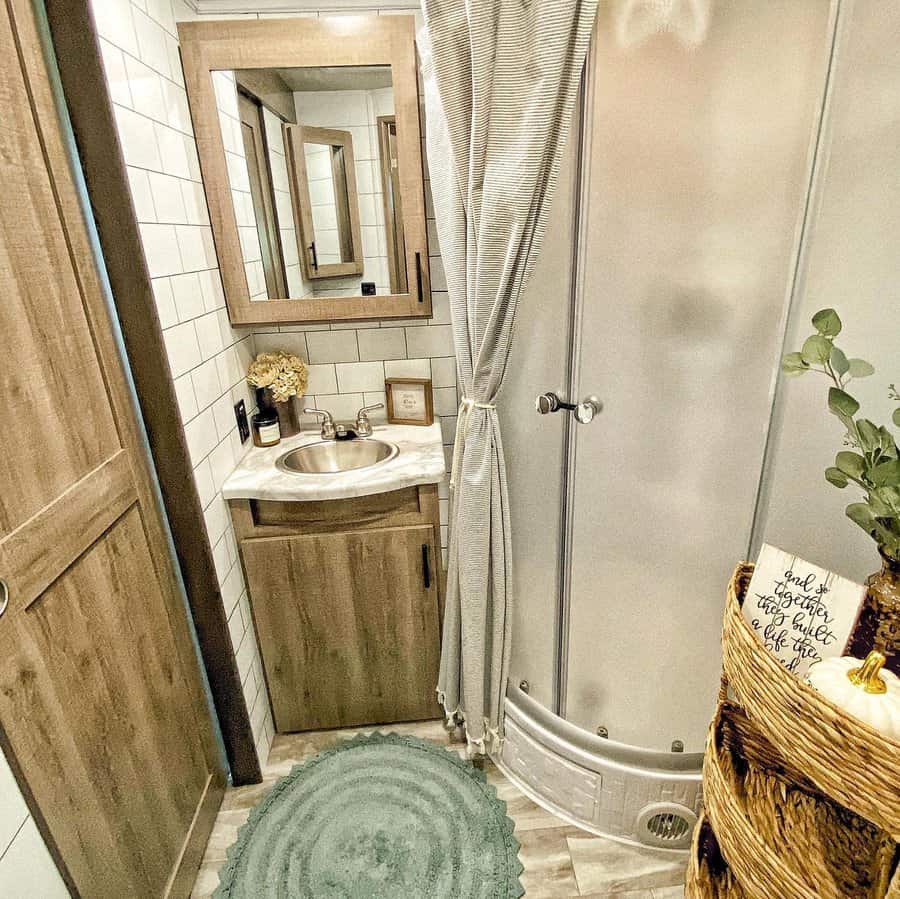
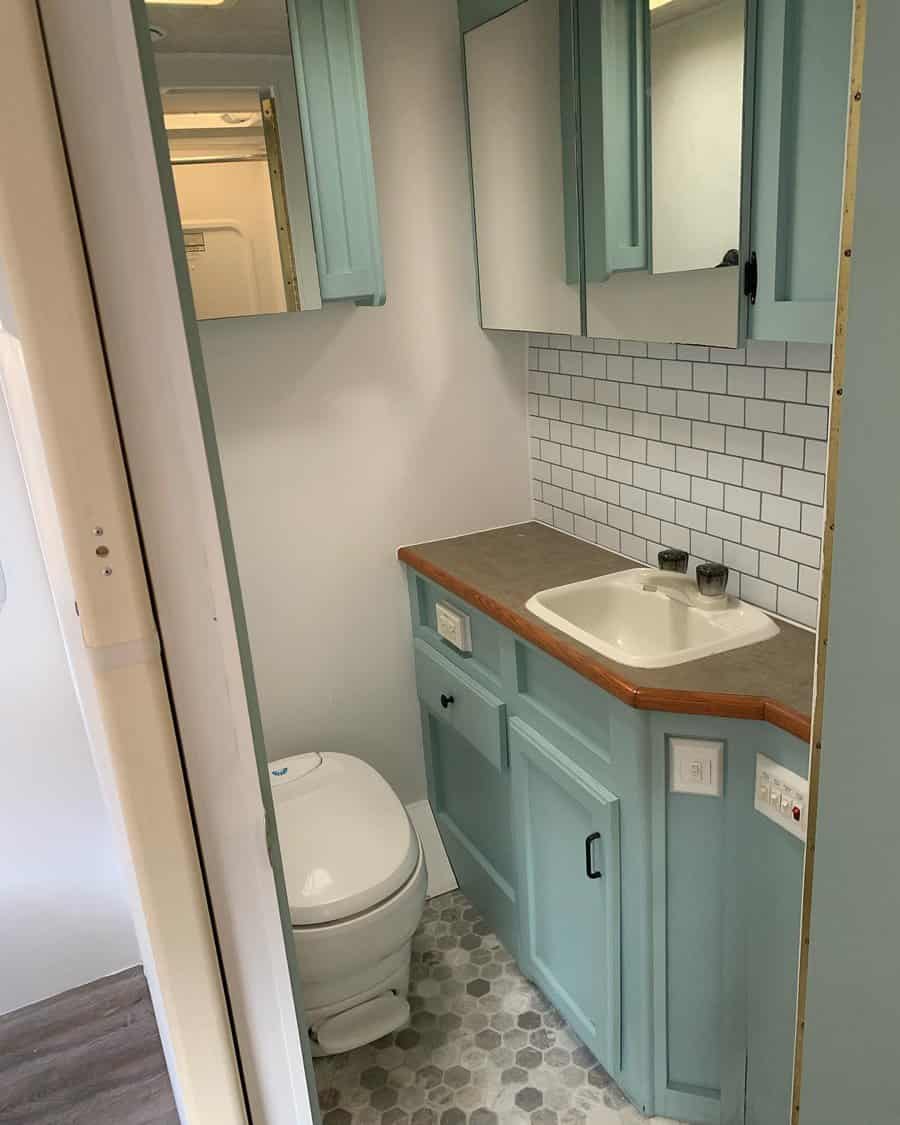
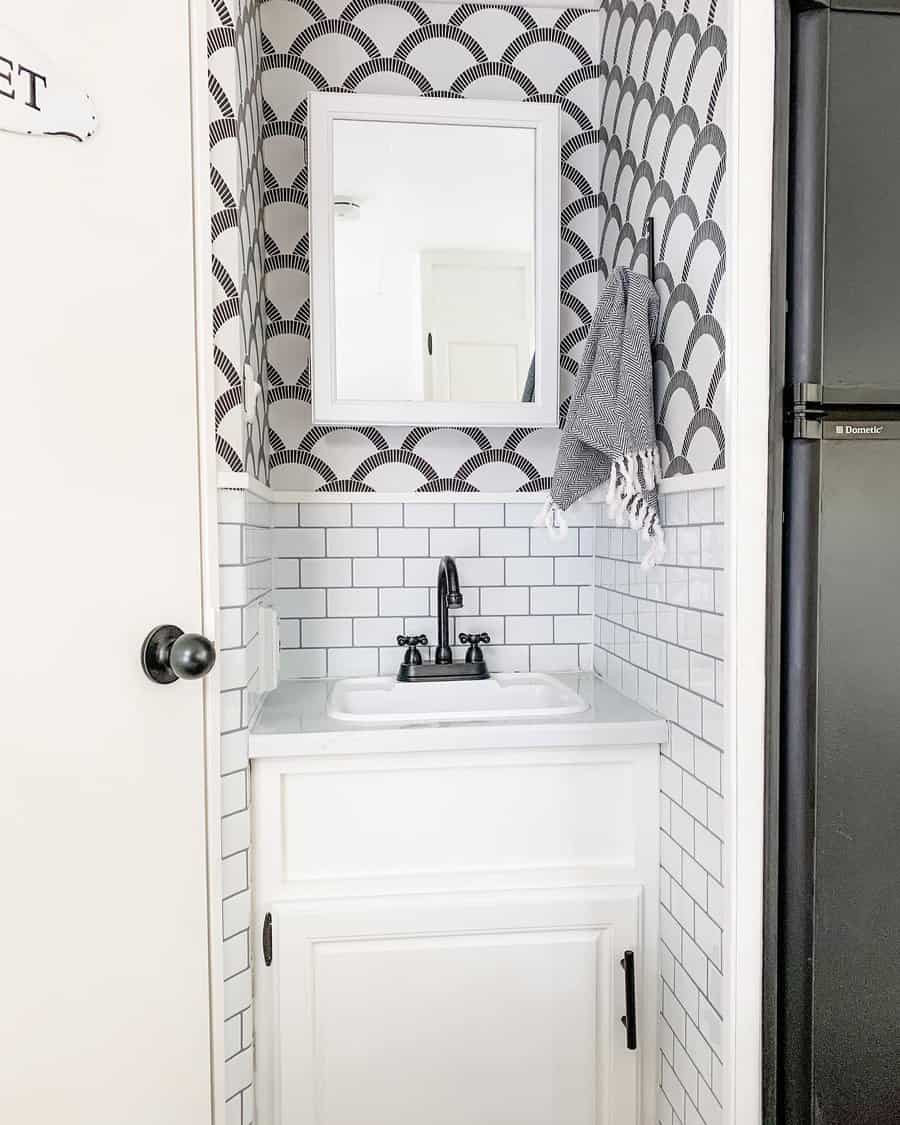
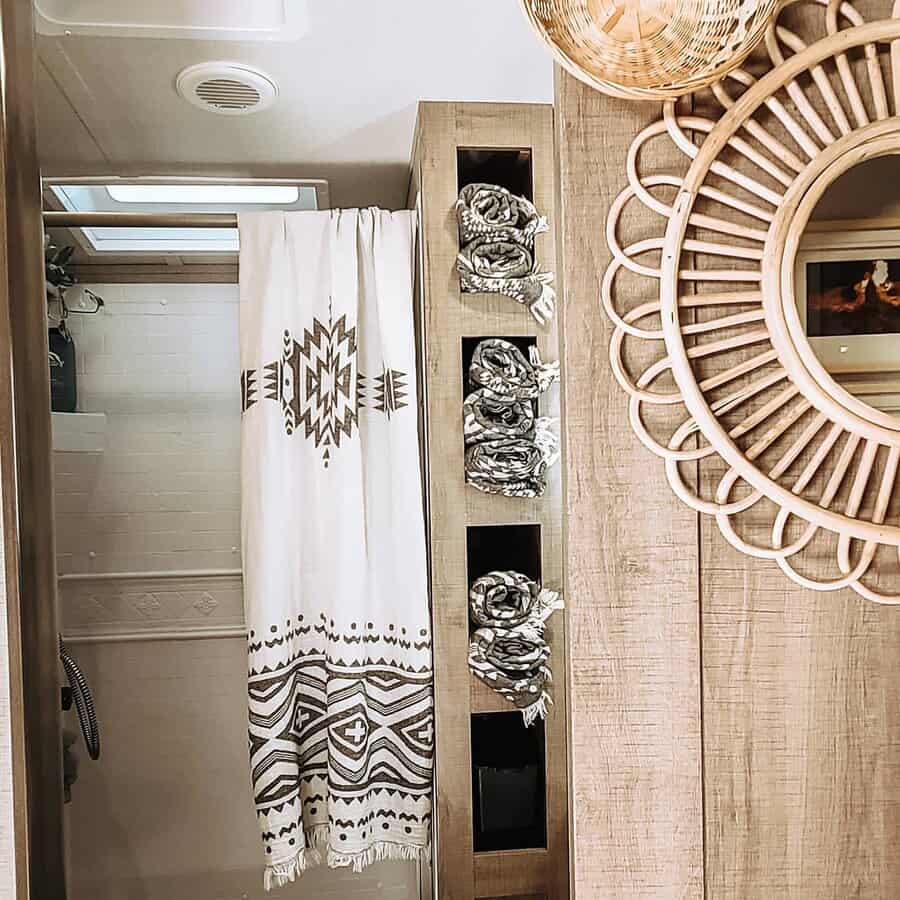
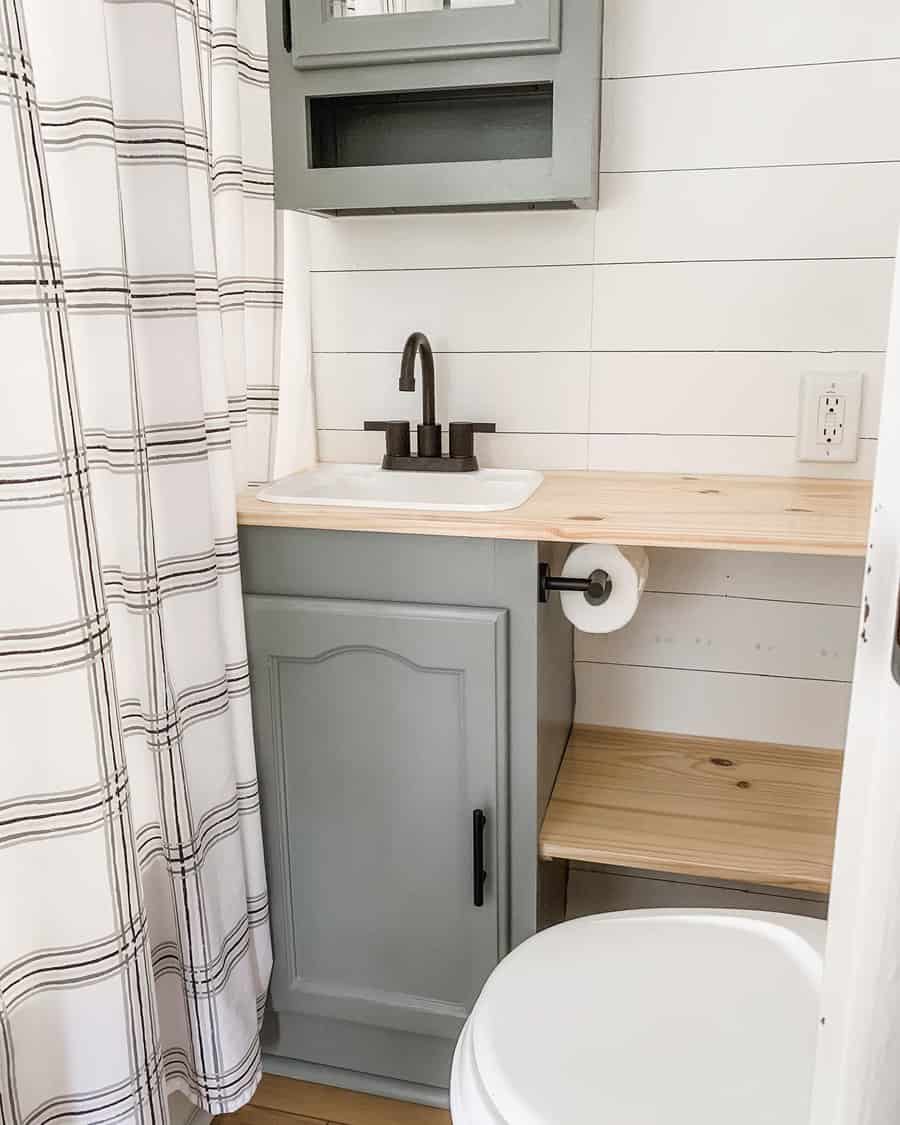
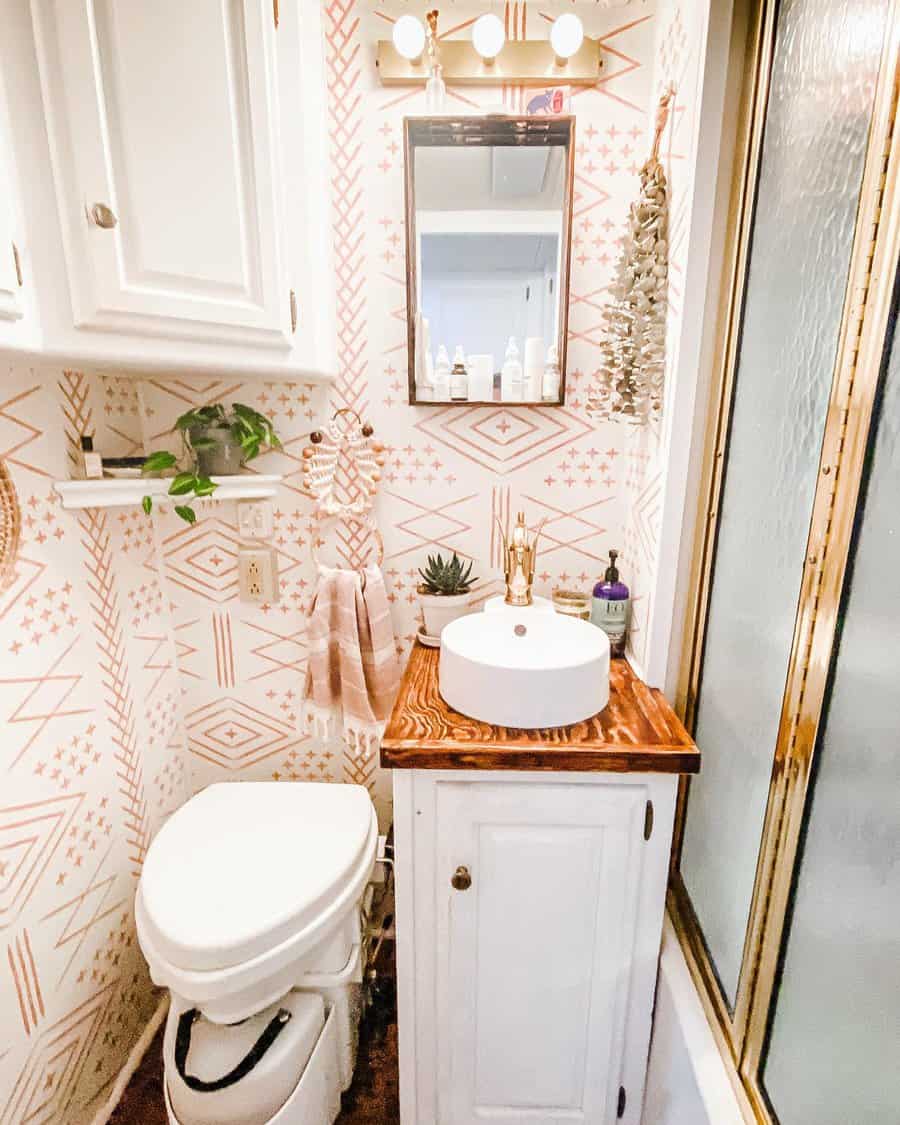
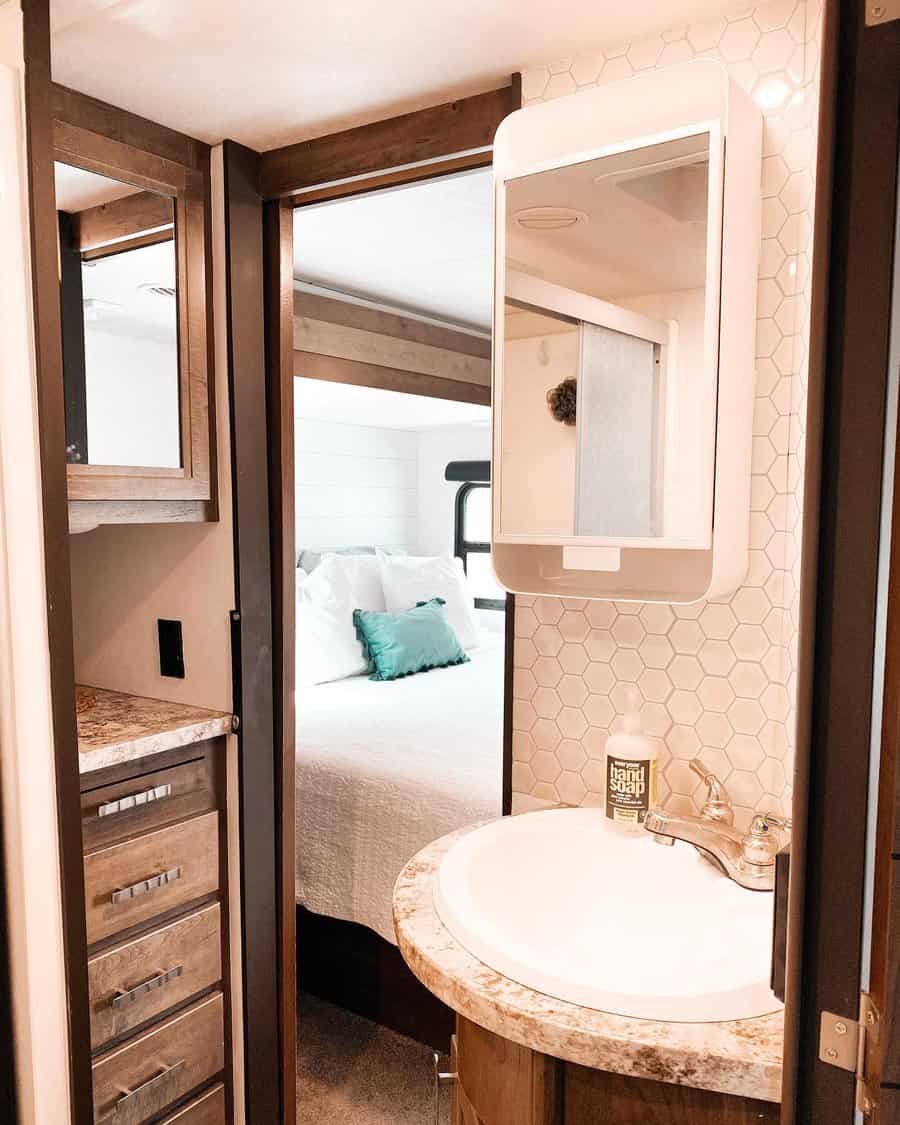
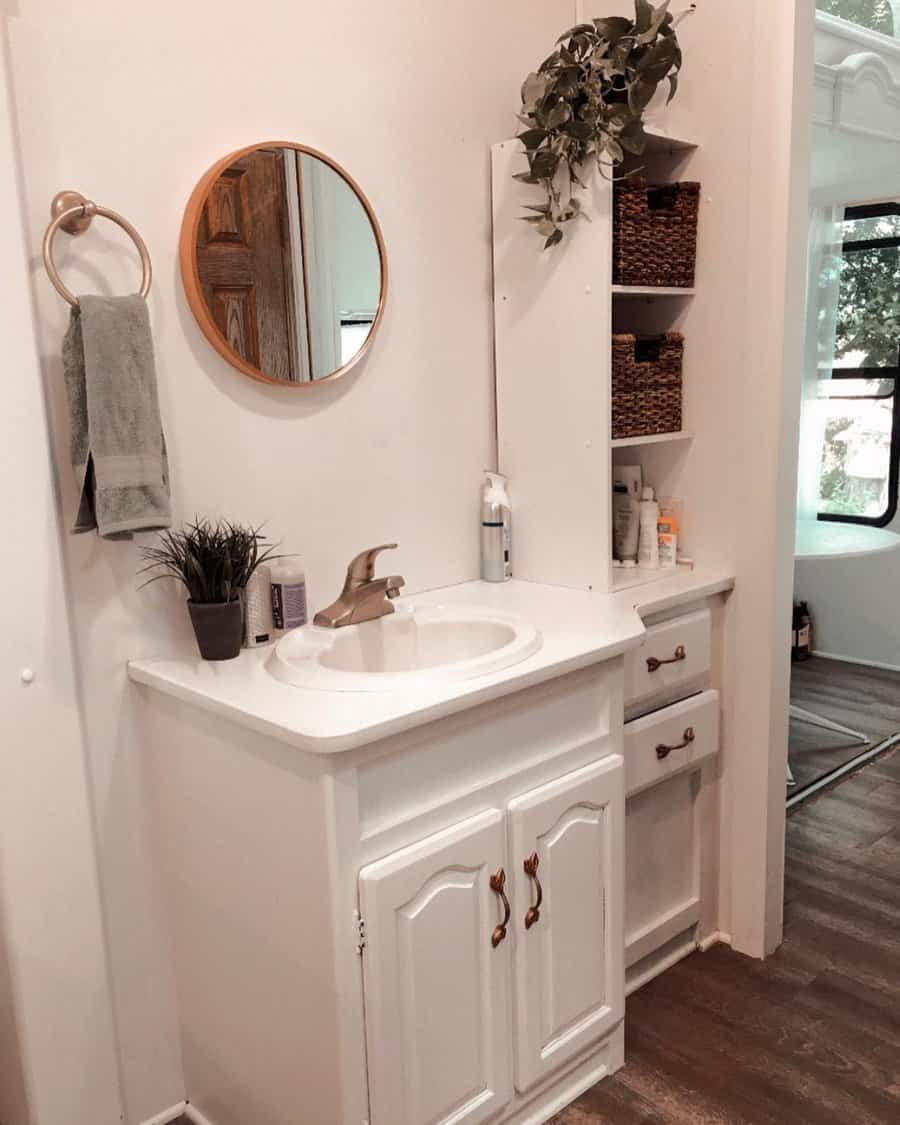
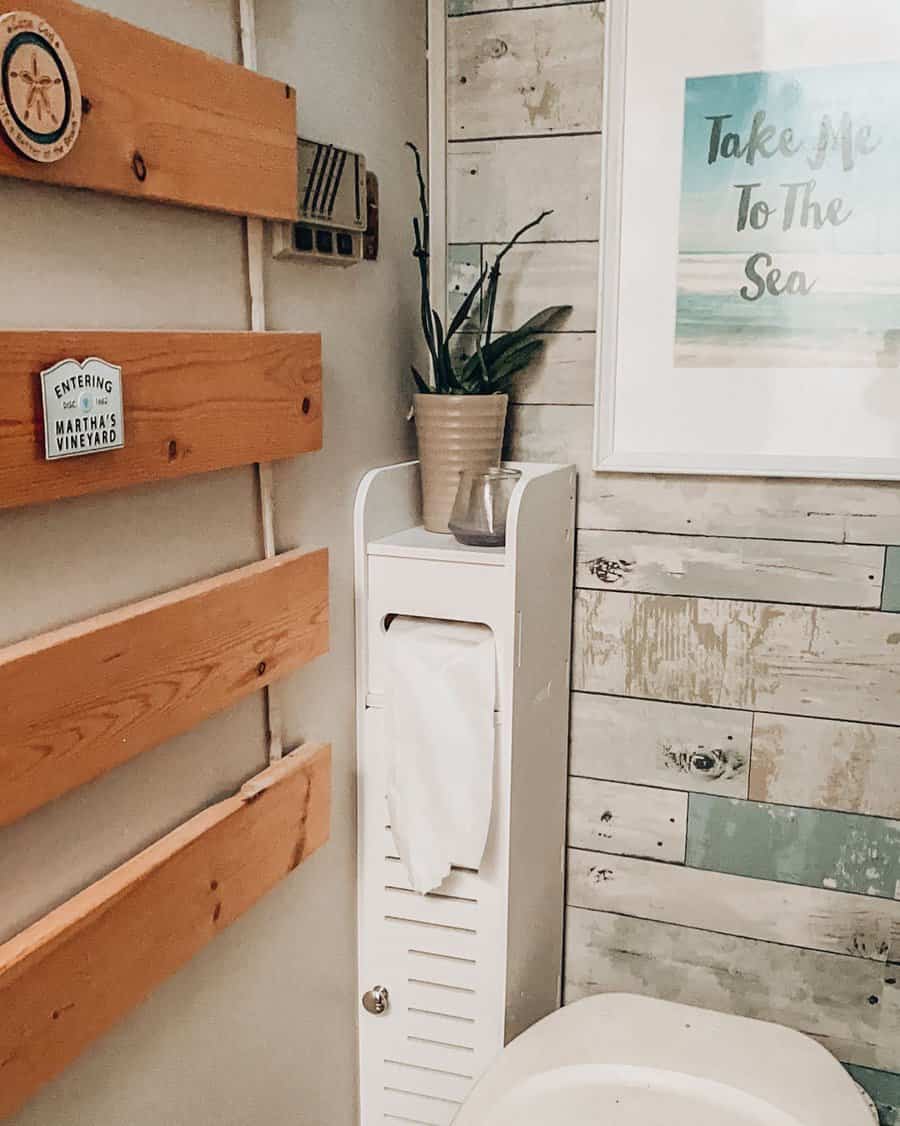
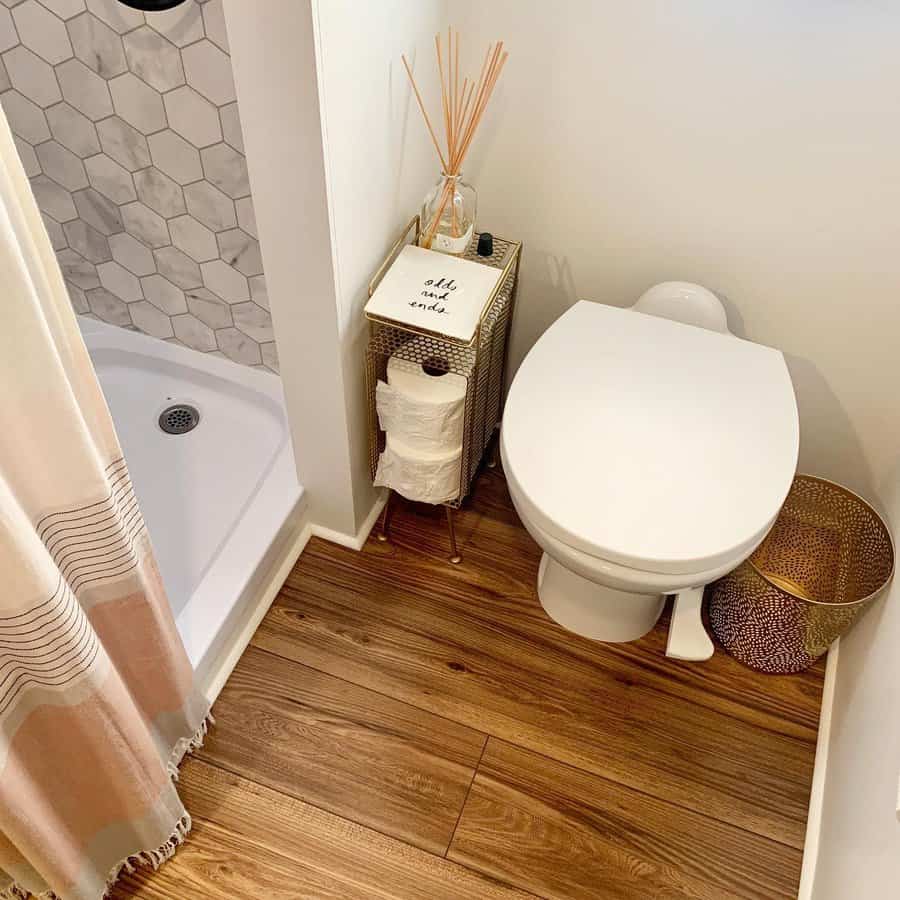
1. Bathroom
Even if your RV or camper van is spacious, its bathroom is most likely tight squeeze. RV living requires making the most of every inch of bathroom storage and counter space.
Even if RV storage in the bathroom is limited, you can use a few storage idea tricks to maximize what you have. For example, tuck an old magazine holder beside the toilet bowl to stash extra rolls of toilet paper.
Source: @airstreamameliabelle via InstagramSource: @jokotravels via InstagramSource: @laceyautumnbrooke via InstagramSource: @laceyautumnbrooke via InstagramSource: @nancyrodriguezcreations via InstagramSource: @ourlifeonlaketime via InstagramSource: @radarroadwarriors via InstagramSource: @recreationrenovation via InstagramSource: @revampingcamping via InstagramSource: @simplypaintedwhite via InstagramSource: @stairsup_handlein via InstagramSource: @tara.g.norman via InstagramSource: @the_ramblr_rv via InstagramSource: @thetinywallsfamily via InstagramSource: @wannittap via InstagramSource: @you.me.andwillowmakes3 via Instagram
Hang an extra towel rack on any free RV bathroom wall space, especially if you’re traveling with several other people.
Purchase “S” hooks to hang on the towel holder and you can hang five or six towels from one rod.
The wall is also a great RV storage spot for toothbrushes via a wall-mounted toothbrush rack. Free up extra space in the shower by having everyone use the same bottle of 3-in-1 soap.
2. Bed
An RV bedroom usually comes with cabinets and other integrated RV storage ideas, but there is always room for improvement.
Your RV storage space next to the bed may be limited—you might not have a nightstand at all.
If so, look for a caddy-style organizer that attaches to the bedside and use it to hold your phone, reading glasses, lip balm, lotion, and other items that would normally reside on your nightstand at home.
Source: @adamjoanieadventures via InstagramSource: @designed_tomove via InstagramSource: @diyrestoreandmore via InstagramSource: @doherty_digs via InstagramSource: @msmaytrailer via InstagramSource: @naturegirldesigns via InstagramSource: @ourlivelytribervrenovations via InstagramSource: @shererjoyjourney via InstagramSource: @stairsup_handlein via InstagramSource: @teamgrvliving via InstagramSource: @the_wanderflos via InstagramSource: @the_wanderingwebbs via InstagramSource: @thenegro_gypsy via InstagramSource: @wetriedcamping via Instagram
Look for bedside lamps that have an electric outlet and/or USB plug built into the base. “Multiplying” electrical outlets like this is an easy way to maximize tabletop and counter space.
If you can install a shelved headboard over the main bed, it’s a great RV storage solution for clothing and gadgets. A flat storage bin with plastic dividers is a great way to organize a large drawer under the bed.
3. Closet
As an RV owner, you know that every foot of RV closet space is precious. It’s challenging to consolidate all your camper storage into the available closet space.
However, you should take advantage of all great RV organization ideas so that clutter doesn’t make your camper feel claustrophobic.
Source: @adrianagliharealtor via InstagramSource: @campingfern via InstagramSource: @hooligans_outside via InstagramSource: @jillsato via InstagramSource: @katiegail79 via InstagramSource: @keystonervcompany via InstagramSource: @terra.mana via InstagramSource: @wanderingwithoutworry via InstagramSource: @williamses_wander via Instagram
An RV closet organizer hangs from a closet or tension rod and enables you to use all vertical extra space. A hanging shelf serves a similar purpose. Look for a fabric shoe organizer to hang on the back of the closet door.
Even if you don’t travel with that many shoes, the little pockets are handy places to stash socks, underwear, toiletries and other small items.
4. Kitchen
An RV kitchen might be small, but it’s possible to create a truly functional space even in the tightest kitchen quarters.
For instance, a collapsible dish tub takes up little RV space but can be used for several purposes. Remember that all your kitchen items don’t have to be stored in the kitchen area.
Make use of any unused compartments, such as under the bed or an RV closet shelf, and store excess RV kitchen materials there.
Source: @bowenwiththeflow via InstagramSource: @experiencingtinyliving via InstagramSource: @field.and.dreams via InstagramSource: @halinamann via InstagramSource: @keystonervcompany via InstagramSource: @laceyautumnbrooke via InstagramSource: @littleandalot via InstagramSource: @rv_by_m.e via InstagramSource: @simplyhannahlee via InstagramSource: @thegreenestacre via InstagramSource: @wander.into.wonder via InstagramSource: @wanderwomannmountainman via InstagramSource: @keystonervcompany via Instagram
If your RV freezer comes with an ice maker, you can remove it to increase your freezer’s storage space. Use narrow ice cube trays instead.
Keep plenty of zip-top bags on hand, so that when your coffee can or cereal box is half-empty, you can toss the space-wasting containers. Storing the remaining product in zip-top bags frees up more kitchen space.
5. Pantry
If your RV kitchen has a pantry, it’s important to utilize all available vertical space. Install spice rack strips inside the pantry door and hang under-shelf baskets to use what’s normally wasted space.
Look for products in square or rectangular containers instead of rounded ones, as they stack together tightly. This is one of the oldest camper storage ideas to maximize every inch of available space.
Source: @grovensrv via InstagramSource: @happy_rvers via InstagramSource: @korffexplore via InstagramSource: @teamgrvliving via Instagram
RV organization requires letting go of any bulk-buying habits you may have. Never buy more than will fit into your RV pantry. Keep the size of your RV storage space in mind when you shop.
A larger container might be a better bargain, but limited storage space means you should go for the smaller package. Use double-sided mounting tape to install hooks that can hold small items in bags on a cabinet door.
6. Shelves
Since indoor RV storage is so limited, it helps to hang shelves wherever you can.
While many recreational vehicle and camper trailer manufacturers already install shelving storage solutions, it’s easy enough to add more to suit your personal needs.
A good RV organization tip is to add hooks below shelves to hang mugs, keys, and other items you need while camping.
Source: @_tinyhouse_bigdreams_ via InstagramSource: @happy_rvers via InstagramSource: @itsme_irinaz via InstagramSource: @keystonervcompany via InstagramSource: @littlesartenfarm via InstagramSource: @rscraven2016 via InstagramSource: @rv.wandering.wanda via InstagramSource: @rvsandtrees via InstagramSource: @viola_the_rv via InstagramSource: @watsons.on.wheels via Instagram
Stack a variety of storage container options on your shelves, but make sure they’re secured so they don’t fall off while you’re driving.
Put a small elevated shelf behind the kitchen sink to reclaim a little counter space in that area. Designate RV storage zones to each family member, labeling a shelf or cabinet with each person’s name.
7. Space Saving
“Space saving” is the name of the game when it comes to RV storage ideas. Any way you can consolidate items is helpful, especially when camping with a large group of family or friends.
Look for nesting pots and pans, mixing bowls, and measuring cups to maximize RV storage in the kitchen.
Pop-up laundry hampers neatly fold away when not in use, and double as a pop-up trash can when lined with a plastic bag.
Source: @dashboarddrifters via InstagramSource: @happy_rvers via InstagramSource: @margielundy via InstagramSource: @our.gateway.adventure via InstagramSource: @radarroadwarriors via InstagramSource: @thecampingcostas via InstagramSource: @wannittap via InstagramSource: @williamses_wander via Instagram
A lazy Susan is a great space saving accessory for condiments. Keep it in an RV cabinet between meals and put it on the table when you’re eating.
It’s also easy to carry out to a picnic table while camping. Saving space wherever you can is perhaps the most essential RV organization tip of all.
Loved by beginners and professionals alike, chalk paint is one of the most popular formulas for giving old furniture new life. Yet many people still underestimate its versatility.
Despite what you may believe, chalk paint isn’t just for farmhouse decor. Chalk paint can be modern, rustic, contemporary, glam, and much more. And it does it all with very little prep work.
Ready to try your hand at chalk-painting your furniture? Keep reading for our favorite chalk paint furniture ideas and tips for how to recreate these projects on your own.
[view_toc]
1. Energize with Bright Chalk Paint Colors
Chalk paint is more renowned for its soft, matte appearance than for rendering bright color palettes. But the right technique can make your chalk-painted furniture incredibly vibrant.
Source: @fourfeathersfurniture via InstagramSource: @fullhouse.designs via InstagramSource: @haighyshomeinyorkshire via InstagramSource: @livys_finds via InstagramSource: @oneofasecondkinddesigns via InstagramSource: @shedeleven via Instagram
Make sure you start with the right color formula. There’s no point in trying to build up a muted pastel to your desired brightness. Many DIY furniture painters will mix several shades to get the exact color they want.
Don’t dinge up your color palette with tinted wax. Go with a clear topcoat with plenty of shine to make your brightly colored furniture really pop.
2. Create Drama with Dark Chalk Paint Hues
After years of light, airy neutrals dominating home decor trends, dark colors have finally made a resurgence. And there’s no better way to update your current dresser or nightstand than with a few coats of colorful chalk paint.
Source: @audreysshabbychicboutique via InstagramSource: @audreysshabbychicboutique via InstagramSource: @british_accents_furniture via InstagramSource: @fairymakes via InstagramSource: @fourfeathersfurniture via InstagramSource: @gadouryrestoration via InstagramSource: @marcella.mcclellan via InstagramSource: @popofpaintnc via InstagramSource: @thevintagedahliafurniture via Instagram
Black furniture goes with everything. Different finishes can have a huge influence on black paint’s final look, so play around with different waxes and sealants.
Remember that dark colors don’t need to be dull. Jewel tones are a gorgeous option for any piece of furniture you want to be the star of your room design (pair with gold hardware for maximum impact!).
3. Achieve Depth with Dark Shadow Techniques
Many DIYers start chalk-painting furniture because they fall in love with the look of shadows and highlights.
This technique uses several shades layered on top of each other to give the illusion that part of the furniture piece is in shadow.
Source: @maisonmarignyfurniture via InstagramSource: @perception_an_eye_for_treasure via InstagramSource: @the_upcycled_home via InstagramSource: @antiqueswithabuddy via Instagram
You can use varied shades for a dramatic gradient. This technique can also be incredibly subtle, to the point that an average onlooker wouldn’t even notice that the shadows aren’t real.
While the shadow and highlight technique is a great way to give a piece depth, it’s not the only way it can be used.
There are tons of creative examples of painters layering different colors to replicate the look of watercolor, engraving, and more.
4. Distress for Vintage Charm
While chalk paint is extremely versatile, there’s a reason it rose to popularity during the shabby chic era. It’s one of the best paints to use for a distressed aesthetic.
Source: @bellavintagedecor via InstagramSource: @chastaks via InstagramSource: @themarketon71 via InstagramSource: @theredroostervintage via InstagramSource: @vintagebirde via Instagram
The easiest way to give chalk paint a distressed look is with sandpaper. Once your paint is dry, sand down the highest points of your furniture piece to reveal the natural wood.
If you’re not sure where to start, think about where your piece would be bumped, scraped, and worn down with years of use.
Or you can give your finished dresser or coffee table an aged appearance with a layer of dark wax. This will also protect the paint underneath.
5. Embrace Rustic Elegance with Farmhouse Style
You can apply almost any finish over chalk paint. Still, chalk-style paint is one of the best options for achieving a matte finish. And that’s exactly what you need for a farmhouse-inspired makeover.
Source: @bellavintagedecor via InstagramSource: @foreverpinkvintage via InstagramSource: @houseonyough via InstagramSource: @popofpaintnc via InstagramSource: @raynorshinevintage via InstagramSource: @restoredheart517 via InstagramSource: @terracottafurniture via InstagramSource: @twitch_ankou via Instagram
To really bring out the farmhouse aesthetic in your painted furniture, allow some of the piece’s natural wood to shine through. You can do this by staining the top of your dining table or dresser and painting the rest.
Opt for light shades of blue, green, grey, and, of course, white or cream. You can maintain the matte finish of your chalk paint furniture by protecting the surface with wax. Use dark wax for a distressed look.
6. Personalize with Hand-Painted Detail
Chalk paint is remarkably easy to work with regardless of experience level.
If you want to test your skill with a paint brush, then designing a piece of furniture with your own pattern or miniature mural is a great place to start.
Source: @bowboutique via InstagramSource: @fff_collectibles via InstagramSource: @jellynonsense via InstagramSource: @surrey_lane_home via Instagram
Set yourself up for success with a clean surface and solid base coat. Chalk paint layers and blends with minimal effort, so don’t be afraid to add tons of detail to your imagery.
Unfortunately, not everyone has the skill needed to turn their old dresser into a piece of literal art.
Don’t be afraid to lay down guidelines with a stencil before going in freehand. (And don’t skimp on preserving your masterpiece with wax or a topcoat!)
7. Soften Your Space with Light Chalk Paint Shades
If you’re looking for paint ideas that will fit your feminine decor style, then chalk paint is an excellent go-to.
With minimal prep required and a full coverage formula, you can jump straight to covering up your furniture’s old paint with something new.
Source: @anarose_studio via InstagramSource: @antiqueswithabuddy via InstagramSource: @foreverpinkvintage via InstagramSource: @frenchlinenfurniture via InstagramSource: @interior_love_de via InstagramSource: @maisonmarignyfurniture via InstagramSource: @popofpaintnc via InstagramSource: @thehousewarmings via Instagram
Chalk paint is a great option when working with light shades because of how well it covers.
Depending on your furniture’s original finish, it may take as little as one coat. Other formulas, like milk paint, can take several coats when applying a light color.
You can pick up a light shade like Duck Egg or French Linen from a chalk paint brand like Annie Sloan. Or mix your own color using your favorite formula.
8. Add Glamour with Metallic Highlights and Accents
With the growing popularity of maximalist decor, metallic furniture is a big trend to watch! Metallic chalk paint isn’t really a thing. But you can easily layer metallic mineral paints over an existing coat of chalky paint.
Source: @furniture_restoration_art via InstagramSource: @kachafurniture via InstagramSource: @monsoondragonflyinteriors via InstagramSource: @secondchancestudios29 via Instagram
Despite the fact that chalk paint is synonymous with rustic, vintage-inspired design, it plays surprisingly well with metallic formulas. You can even combine the best of both worlds with gold or silver distress marks.
Another fun version of this trend is pearlescent glaze. Apply this glaze over your chalk-painted furniture to give the entire piece a shimmery finish or highlight accents like engraved dresser drawers.
9. Modernize with Sleek Chalk Paint Finishes
“Modern” certainly isn’t the first word most people think of when it comes to chalk paint. Yet it’s just as easy to complete a modern-style furniture makeover with chalk paint as any other formula.
Source: @bowboutique via InstagramSource: @creativelytayloreddesign via InstagramSource: @droy_realestatephotographer via InstagramSource: @marilynn8487 via InstagramSource: @ournest_thebelford via InstagramSource: @rede_fine_d via Instagram
No matter the paint color you choose, application is extremely important. Visible brush strokes or uneven coats will ruin your modern finish.
Err on the side of caution by applying more than one coat and gently sanding after each one dries.
While you want your finished piece to look sleek, shine is another matter entirely. Finish things off with a matte or satin clear wax and minimalist cabinet or dresser drawer pulls.
10. Harmonize with Neutral Chalk Paint Tones
Not everyone wants their furniture to stand out from the rest of their home decor. With that said, white chalk paint isn’t the only color you have to select from.
Source: @annahobbs123 via InstagramSource: @donnenrica via InstagramSource: @paperkitecreations via InstagramSource: @theatticbykay via Instagram
Creams, greys, and tans are all stylish alternatives to stark white furniture.
Finding the perfect shade is incredibly important when working with subtle neutrals. Pay attention to the warmth or coolness of your existing decor when selecting a color.
If your chosen color is a bit too vibrant, play around with saturation. You’ll be surprised how different a shade can look with a little bit of white mixed in.
11. Create Flow with Ombre Effects
Chalk-finish paint is very forgiving when it comes to layering, blending, and sanding. One way the DIY community has showcased this user-friendliness is by creating one-of-a-kind ombre designs.
Source: @british_accents_furniture via InstagramSource: @chalkandmirrors via InstagramSource: @due.south_ via InstagramSource: @galina.hughes via InstagramSource: @sissinghurstlocationhouse via Instagram
These pieces of painted furniture might look complex at first glance but the process is actually quite simple. The most difficult parts are choosing a color palette and having the patience to apply layer after layer of paint!
Beginners and those who want a more subtle finished product should start with a monochromatic ombre. If you’re confident in your blending abilities, try out a more advanced color scheme that incorporates several contrasting shades.
12. Revitalize Fabrics with Chalk Paint
Of course, chalk paint is many DIYers’ formula of choice for wood furniture like a dresser or coffee table. But did you know you can also use chalk paint on upholstery fabric?
Source: @adorewood_decor via InstagramSource: @dumpsterdaisies via InstagramSource: @kristy_agrippe via InstagramSource: @lashesandlaminate via InstagramSource: @laura_hayes_studio via InstagramSource: @mariesmaison via InstagramSource: @myprettyhipthings via InstagramSource: @rustyroostervintage via Instagram
While you can use chalk paint to literally coat old upholstery fabric, it’s better suited as a makeshift dye. Apply lots of water to each section of fabric before applying the paint for the best saturation.
This technique is a great way to revive an old accent chair or sofa. However, you should always paint a test patch before moving forward with the whole project to prevent disasters.
The ingredients in chalk paint might not always mix well with certain fabrics or previously used dying agents!
13. Make Patterns Pop with Chalk Paint
Chalk paint is wonderful for creating patterns because of how thick and pigmented the formula is. There’s no need to worry about working from light-to-dark colors or bleeding your layers together.
Source: @girl_in_blue_designs via InstagramSource: @lazydaysandsundays via InstagramSource: @marlen_reich via InstagramSource: @sublimedecor.nz_ via Instagram
Color-blocking is a fun, vibrant painting technique that is easy to replicate no matter your skill level. You can keep things simple with just two or three different colors or go bold with an entire rainbow.
Geometric patterns can be a pain to paint by hand. Use blue painter’s tape to plan out your project and get the cleanest lines possible.
14. Simplify Designs with Stencil Techniques
If you dream of updating your old furniture with elaborate designs but don’t trust your artistic talent to do the job, stenciling is the solution!
Source: @farbarela via InstagramSource: @leccentrica_ via InstagramSource: @perception_an_eye_for_treasure via InstagramSource: @surrey_lane_home via InstagramSource: @upcycle_arcade via Instagram
Again, chalk paint is one of the best formulas to use with furniture stencils because it is so full-coverage. It also dries faster than latex paint so you can finish your project in record time. Invest in a specialty stencil brush for the easiest and quickest application.
You can find tons of fun, quirky, and elegant stencils through major retailers or independent sellers on platforms like Etsy. It’s also possible to make your own stencil by hand or with a crafting machine like Cricut.
15. Two Tone or Multi Tone
You can achieve great color payoff with chalk paint, even compared to other highly pigmented formulas of furniture paint. It’s the perfect option for any project where you want to play around with contrasting colors.
Source: @ajt_inspirations via InstagramSource: @fourfeathersfurniture via InstagramSource: @secondchancestudios29 via InstagramSource: @theculturedpearlrestorationco via InstagramSource: @vintagefeatherfurniture via InstagramSource: @wildwoodwallingford via Instagram
Multi-colored designs can be extremely subtle or in your face. For example, you can create a multi-toned chalk paint dresser by painting the drawer interiors different colors. Or by choosing an entirely different shade for each drawer front.
If your painted furniture piece has an open design, such as a bookshelf or oddity cabinet, use a contrasting color for the interior walls. This will give the piece dimension and make the items inside really stand out.
16. Unique
Furniture paint doesn’t come in just one formula — spray paint, latex paint, milk paint, and even acrylic paint are all quite versatile. But there are very, very few projects that chalk paint can’t handle.
Source: @dogheaddesigns via InstagramSource: @handmadecolorlife via InstagramSource: @lisasbackyardworkshop via InstagramSource: @othermanstreassure via InstagramSource: @patience_and_gough via InstagramSource: @re.picks_ via InstagramSource: @shedeleven via Instagram
One of our favorite chalk-painted furniture trends bridges the gap between bold colors and natural wood grain.
For this look, apply your chosen color of paint over just part of your furniture piece. Feather the paint’s edge so it fades into the wood underneath for a one-of-a-kind dresser or tabletop.
The online DIY community is an incredible resource if you’re looking for creative inspiration. Check out platforms like Instagram, YouTube, and Pinterest for how-to tips and ideas!
17. Vintage
Recycling old furniture is a great way to cut down on waste and save a few bucks. Meanwhile, chalk-painting is a quick and easy way to cover up blemishes and outdated finishes.
Source: @ayeshagelahi via InstagramSource: @popofpaintnc via InstagramSource: @themadisonstockexchange via InstagramSource: @vintage_painted_charm via InstagramSource: @zainasfineinteriors via Instagram
Antique furniture and chalk paint have a complicated relationship. Many collectors view chalk-painting furniture as “ruining” it. When used responsibly, though, this paint can restore vintage pieces that would otherwise end up in the trash.
Also, remember that chalk paint requires very little surface prep. It’s possible to update a piece of furniture without ruining the original finish underneath. So if you ever change your mind, you can remove the paint and restore the piece to its former glory.