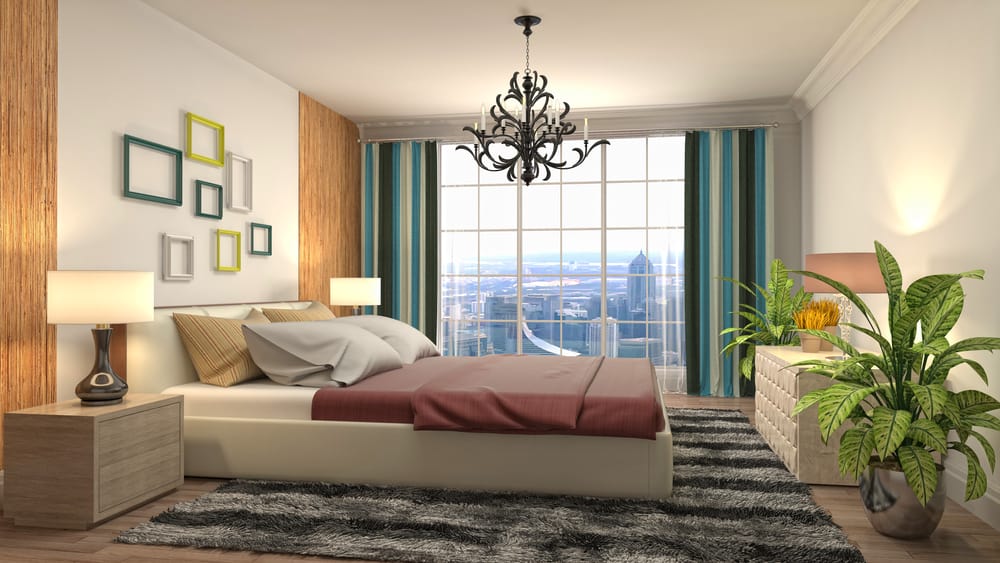
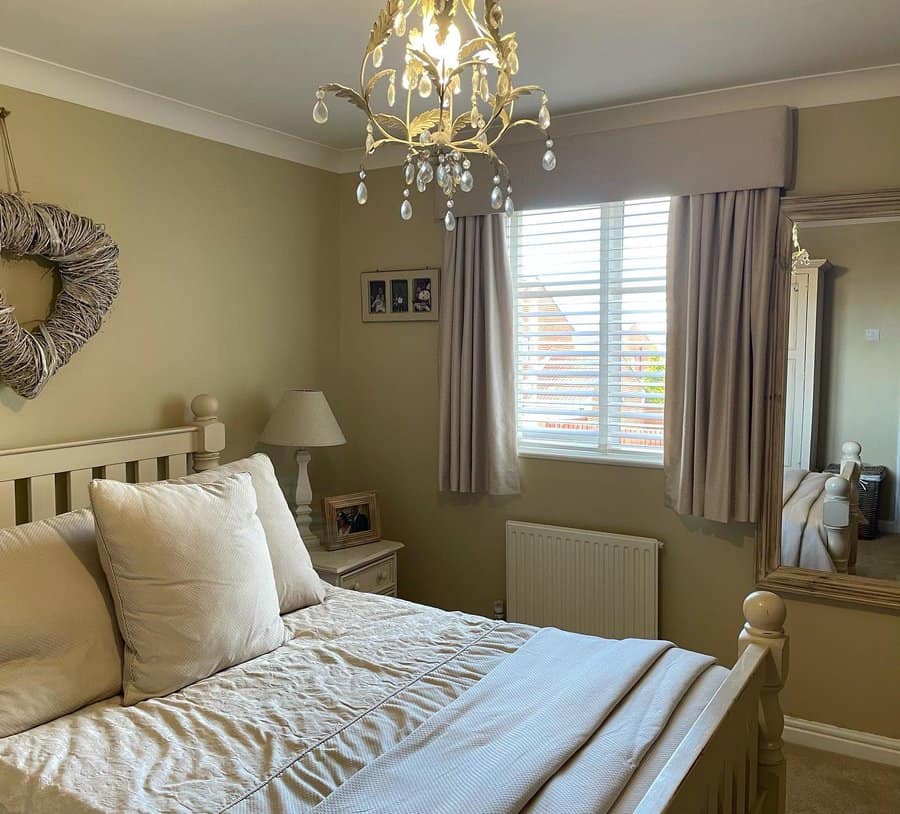
Adding curtains to your bedroom gives style and functionality to your window. They are the finishing touch to your room, like icing on a cake. They frame the window, adding texture, color, and pattern. In addition, adding curtains to your windows is a perfect opportunity for creating layers, which makes your bedroom feel comforting and cozy.
Check out these design ideas to figure out which bedroom curtain ideas will work the best for your bedroom.
[view_toc]
1. Transform Your Bedroom with Versatile Blind and Curtain Combos
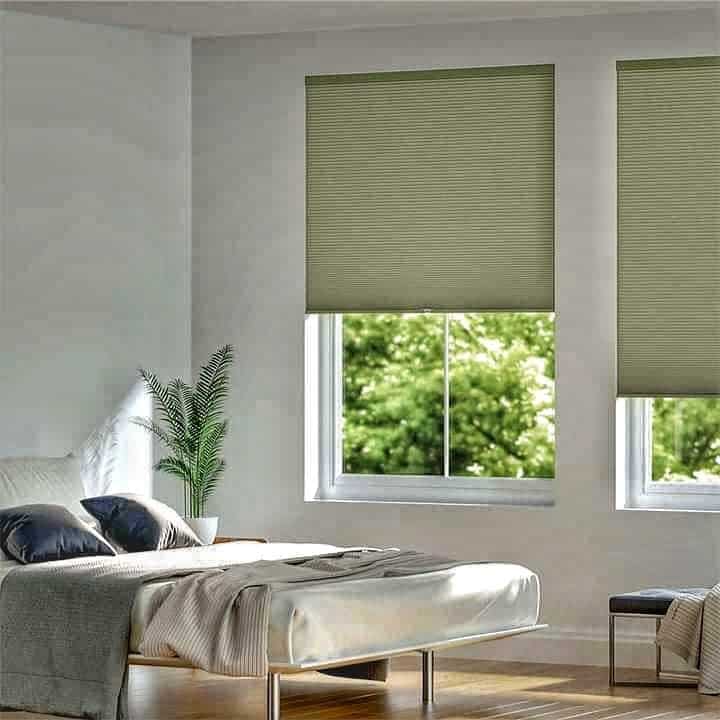
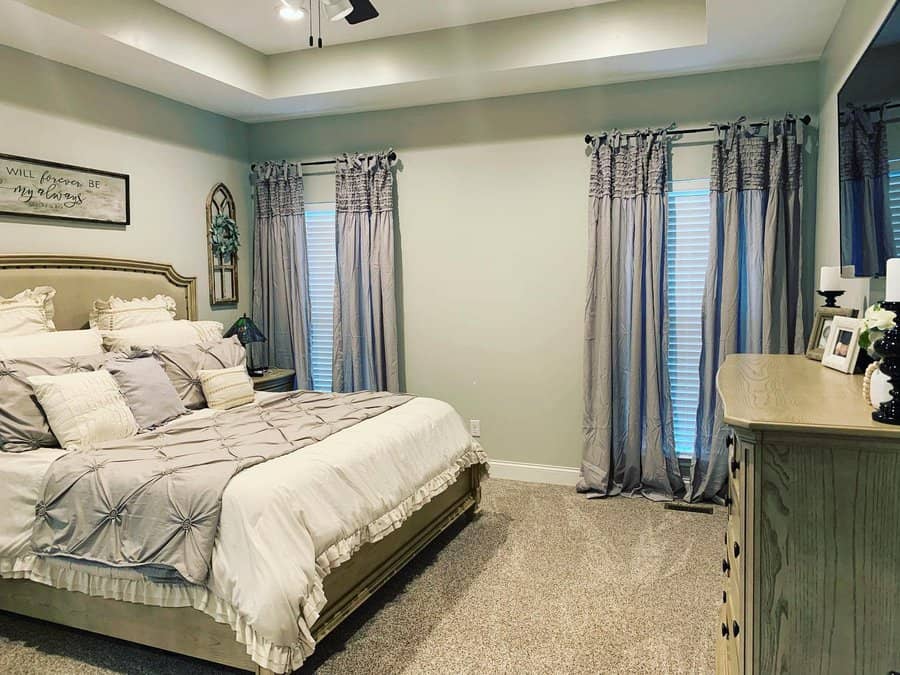
You can hang curtains on a window even if it already has blinds. The blinds are functional but don’t do much for the room’s aesthetics. Adding curtains to blinds elevates the look of your windows.
Source: @fabritexhome via InstagramSource: @foxwoodinteriors via InstagramSource: @jk_dalby via Instagram
Leaving the blinds on the window allows you to better control the amount of light coming in the window. You can also angle them to direct the light where you want it or create privacy. Your blinds and curtains shouldn’t get in the way of each other.
2. Create a Serene Retreat with Elegant Blue Curtains
If you are going to hang plain curtains on your windows, consider choosing the color blue for your drapery. For an elevated curtain design that looks professional, consider pairing your plain curtains with a set of patterned curtains. A darker blue will help block out natural light so that you can sleep better.
Source: @homeatderrycourtneymanor via Instagram
A lighter blue can feel uplifting and refreshing. Additionally, consider the fabric your blue curtains are made out of. Velvet will be dense and heavy, blocking out the most light. A lighter weight fabric like cotton or linen will allow more natural light in.
3. Achieve Perfect Darkness with Stylish Blackout Curtains
For some homeowners, curtains serve a very important purpose. They block out all light so that their bedroom is as dark as possible. Blackout curtains are a must. These aren’t curtains that you would hang anywhere else in your home, such as in the living or dining room. The front side of the curtains is fabric.
Source: @beckybbell via InstagramSource: @flippingour4ever via InstagramSource: @ourcharltonhome via Instagram
The backside of the curtains is a special coating that thickens the fabric and blocks light from coming through. These curtains aren’t always the most attractive. They typically come in a plain color or a basic pattern, such as the Moroccan print.
4. Elevate Your Decor with Custom-Designed Curtains
Designing your window treatment is about more than just mounting a curtain rod on the wall and hanging a curtain from it. Decorative curtains dress up white walls and bring color, pattern, and texture into the room.
Source: @clares_stripes_and_spots via InstagramSource: @myhome2home via InstagramSource: @nivannainteriors via Instagram
Choosing curtains starts with the size. Measure the window and then measure the wall itself. Decide where you want to mount the curtain rod and how far down you want the curtains to reach. Mounting the rod close to the ceiling and then further out on either side creates the illusion that the window is bigger than it really is. Mounting the rod further out to the left and right allows the curtains to hang next to the window, framing it. This curtain style minimizes the curtain blocking the window when they are open, maximizing natural light.
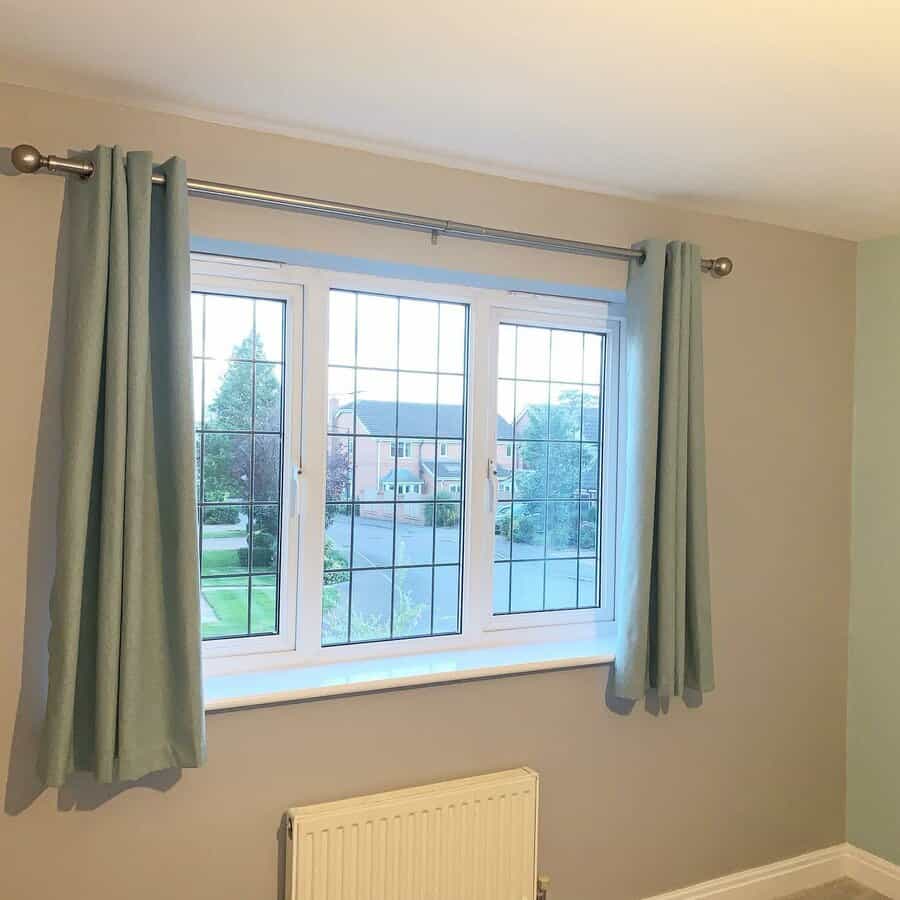
5. Bring Nature Inside with Tranquil Green Curtains
Green is a perfect color for your bedroom window curtains. Green is an earthy color that inspires feelings of calm. It pairs perfectly with other earthy neutrals like greige, beige, tan, burnt orange, or moss.
Green can also bring life into an all-white room. Soft mint green is calming, while a jewel tone like emerald will add drama and sophistication. Instead of just using plain green curtains, consider curtains with a leafy pattern. This simulates the look of plants without having to grow plants in your bedroom.
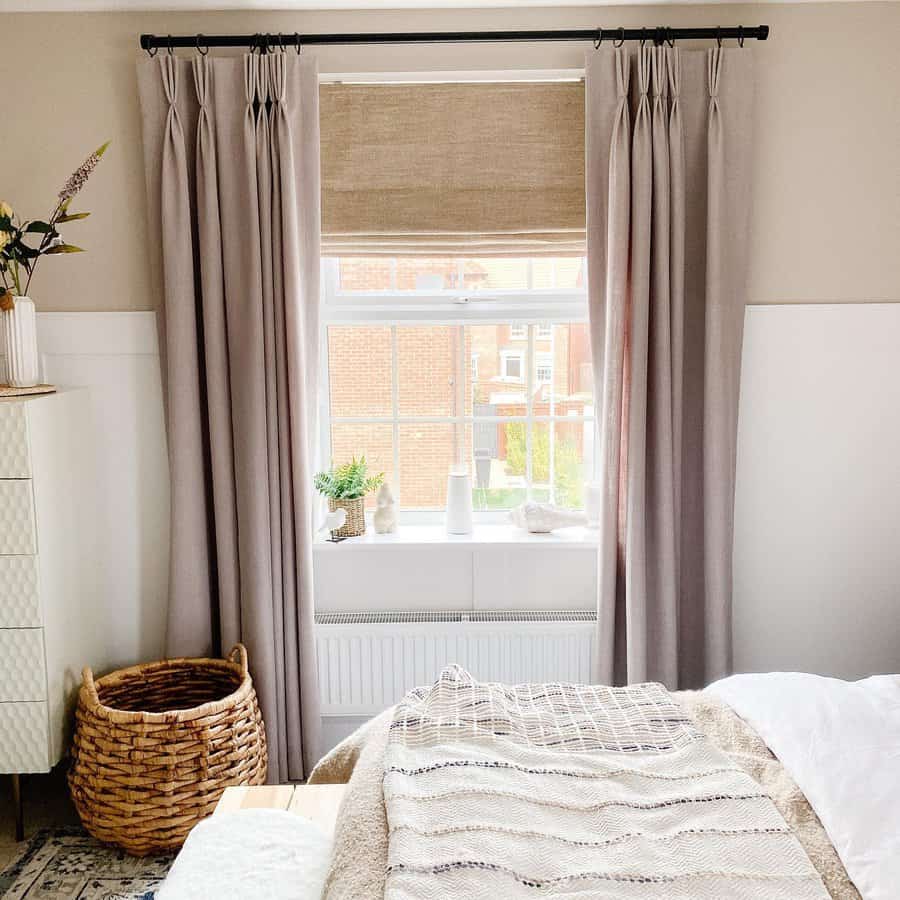
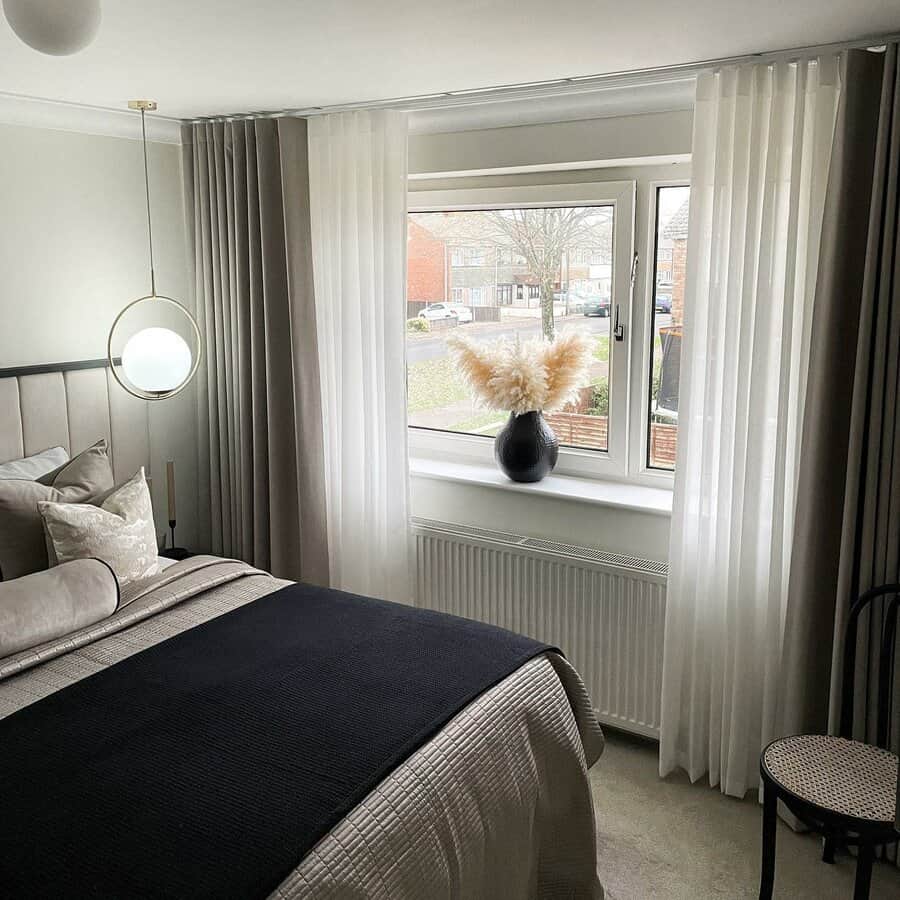
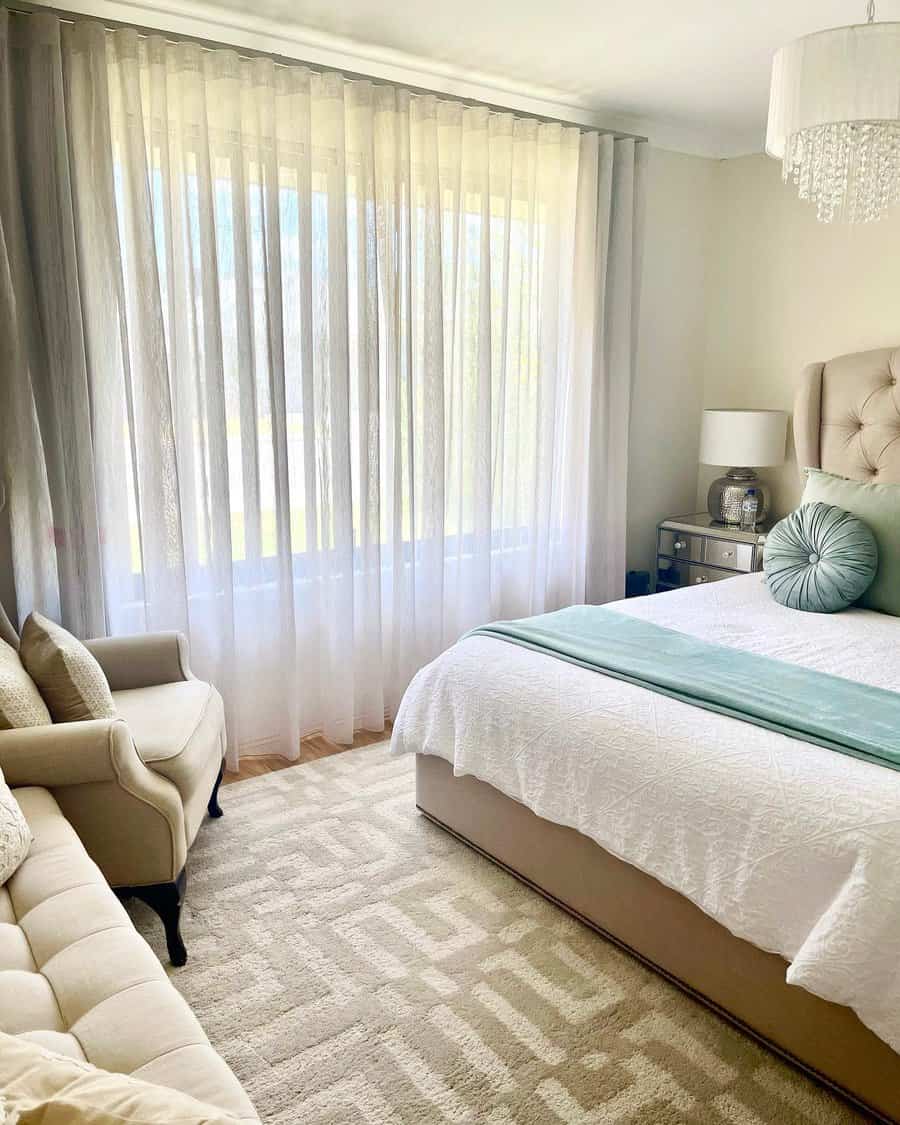
6. Brighten Your Room with Light and Airy Sheer Curtains
Hang sheer curtains on your bedroom windows to gently filter the light coming in through the window. The curtain material should be lightweight with either fine fibers or a loose weave. You can almost see through the sheer fabric, but the view is obscured. It creates a similar effect as linen curtains on a glass door.
Source: @athomeinthemanning via InstagramSource: @turning_number2_into_new_ via InstagramSource: @valentin_decor via Instagram
These curtains are good for daytime use when you want to temper the amount of natural light coming into the room during the day. If your bedroom faces the afternoon sun, then they are also good for keeping the room cooler.
7. Embrace Modernity with Contemporary Curtain Styles
Despite curtains being used for centuries, they are still a part of modern interior design. Instead of choosing overly ornate or outdated-looking curtains, opt for modern curtains with a clean design. They could be flat panels that frame the window on either side.
Sticking with a traditional curtain design with a modern patterned print is another option. They could have a single accent line across the top. Or they could have a geometric pattern that covers the entire curtain. Don’t forget about the curtain rod, as it can reinforce the modern design of your window treatments.
8. Opt for Practicality with Chic Short Curtain Designs
Instead of buying extra long curtains that extend to the floor, you can opt for short curtains instead. They will extend just past the bottom of the window sill. These are a better option when you have furniture in front of the window. That way, the curtains are short enough to not get tied up in the furniture so that they move smoother and more easily.
Source: @amandabakersoftfurnishings via InstagramSource: @home_at_no.51_ via InstagramSource: @kingswood_renovation via Instagram
Short curtains can also be good if you have pets or children. The shorter curtains won’t get as dirty or covered in hair.
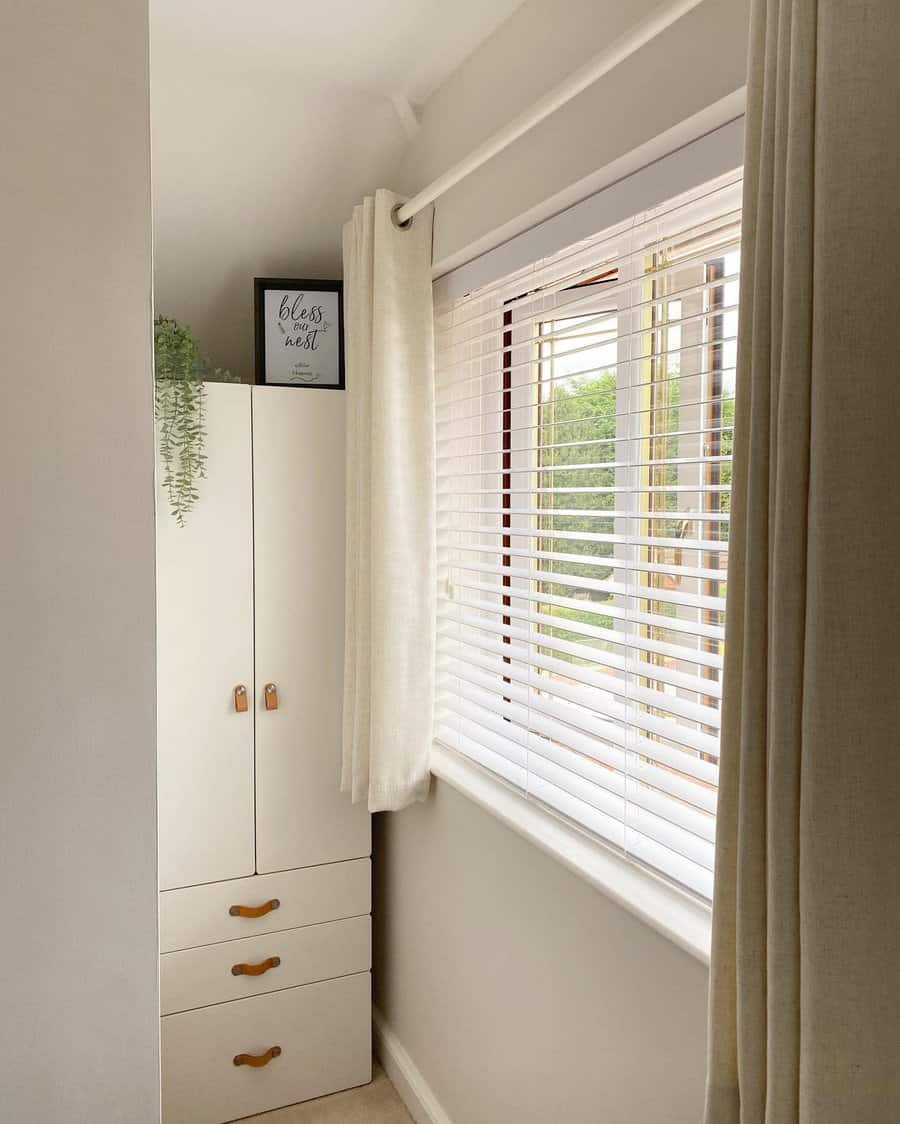
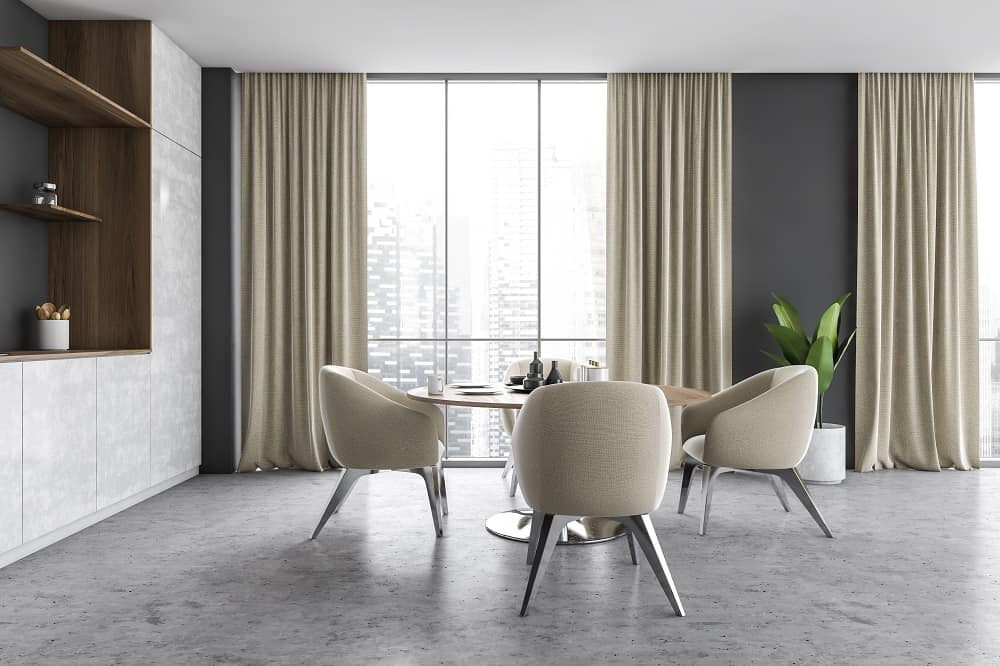
9. Illuminate Your Bedroom with Classic White Curtains
Adding white curtains to your bedroom is the perfect accent to your bedroom design. They add a lightness to your bedroom. While white master bedroom curtains won’t block very much light, they are perfect for highlighting your bedroom windows.
Source: @elena_curtainworld via Instagram
If you want to add white curtains to your bedroom, consider layering them with another color. Even if that other color is a beige neutral. Hang your curtains on a dual set of curtain rods so that you can open and close the curtains independently of each other.
A small backyard is still a backyard, and you don’t need a giant garden to make a huge impression. So many landscaping ideas work equally well in small or large backyards.
Even a tiny backyard can be transformed into a charming outdoor living space. Scroll through our best small backyard design ideas and see how simple it is to maximize the space you have.
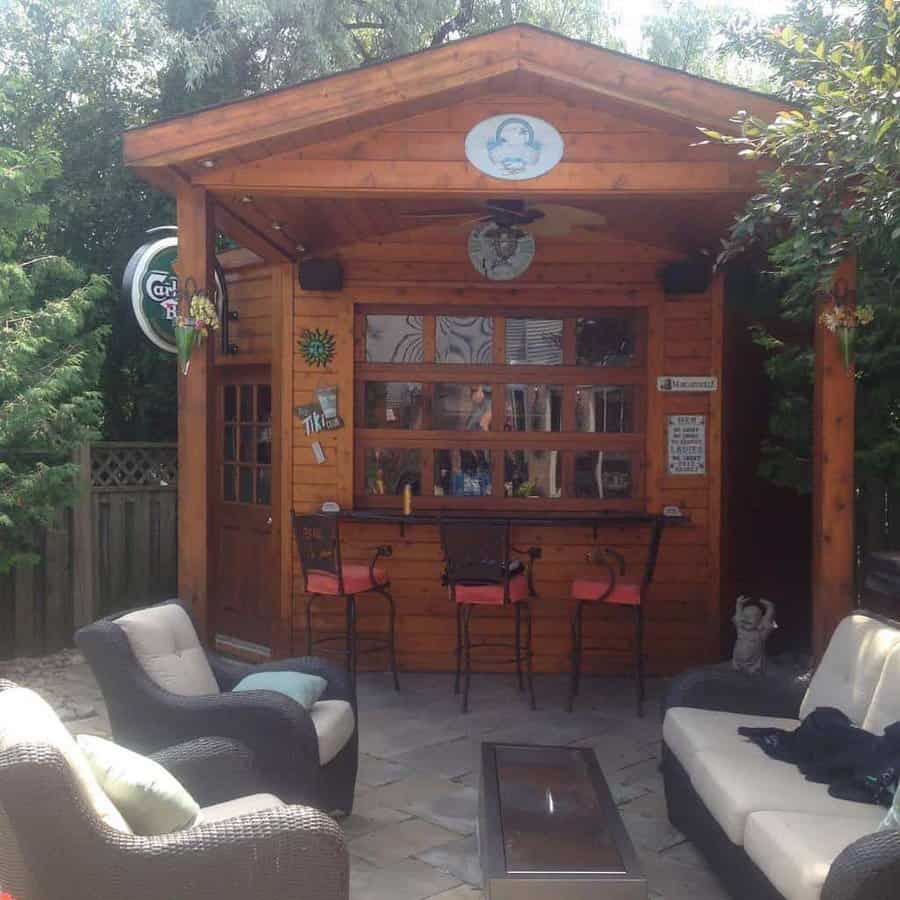
1. Transform Your Backyard with a Charming Tiki Bar
A backyard bar makes outdoor entertaining fun. Even a simple bar idea provides extra seating and an inviting place for you and your guests to sip and sit a while.
Source: @dottycx via InstagramSource: @dukesdecorli via InstagramSource: @m.mart.71 via InstagramSource: @tonyconnect via Instagram
Try building a small bar on an existing patio or porch, or attach one to a backyard shed or other outbuilding. Make it feel like a vacation year-round by going for a tiki bar design complete with a thatched grass roof and island decor.
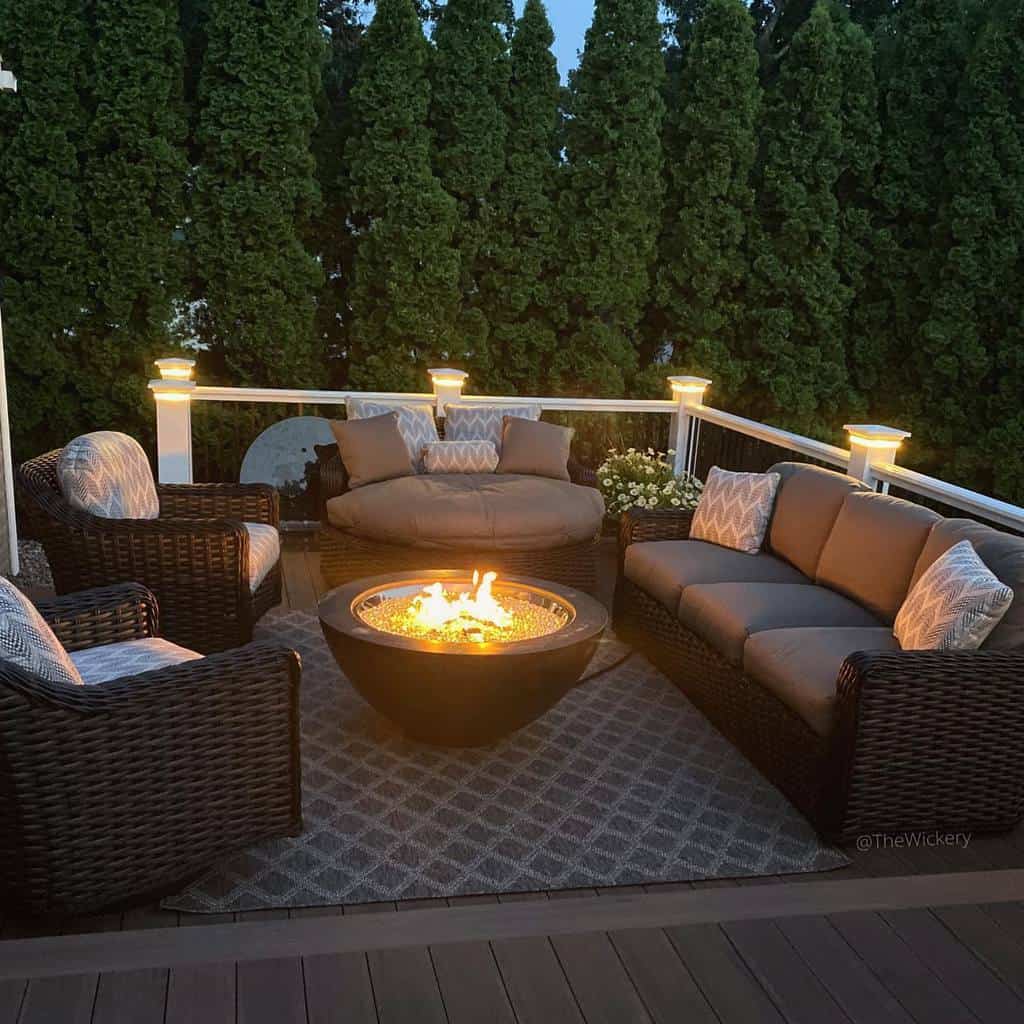
2. Elevate Your Small Backyard with a Cozy Fire Pit or Chiminea
Nothing adds nighttime ambience to an outdoor space quite like a fire pit. If there’s room to add one to your list of small backyard ideas, try to make it happen. Firepits don’t have to be big or expensive. In fact, anyone can build a simple fire pit out of concrete blocks, as shown in this video:
If you’d rather not build a fire pit from scratch, a chiminea is a good alternative. It occupies a smaller footprint than a traditional fire pit and adds rustic, western charm to your yard or patio.
Source: @bbqbills_nv via InstagramSource: @home_is_where_the_bart_is via InstagramSource: @realstonegranitefirepits via InstagramSource: @turquoiseandtrine via Instagram
Another affordable backyard fire idea is to purchase a small metal firepit. You can find basic models for under $50, and some double as a charcoal grill. Others include a cooler insert that’s great for holding beverages when it’s too hot for a fire.
3. Furnish Smart for Your Small Outdoor Space – Measure, Choose Wisely
Anytime you’re trying to furnish a small space, it’s vital to keep scale in mind. Oversized outdoor furniture will make a small backyard space feel cramped and crowded. To avoid this, be sure to measure before ordering any type of patio furniture, including sofas, tables, and chairs.
Source: @backyarddiscovery via InstagramSource: @chairkingbys via Instagram
When you’re measuring for furniture, leave enough open space to walk around comfortably. A bar and barstools are ideal for a small patio because they occupy less space than an ordinary dining set.
Take your local weather into consideration when buying furniture for an outdoor living space. If it’s particularly windy in your neighborhood, choose weightier pieces. If sun beats down on your patio all day, choose lighter-colored furniture that’s not prone to fading.
4. Create a Beautiful Garden in a Limited Space
It’s easy to get carried away when you see all the lovely plant and greenery options at your garden center. And it’s really easy to overestimate your planting space when planning small yard landscaping ideas.
Source: @thehollygrovegarden via Instagram
Do a little homework before you hit the garden center. Find out how much planting space you have in the yard, then research the kind of plants that you like—and that will grow well in your area. Design your garden accordingly, remembering to include concrete pavers, garden bed edging, and other landscaping touches.
5. Maximize Your Small Yard with a Lush Green Lawn
A green lawn is a beautiful addition to any yard. However, space for growing grass might be limited in a particularly small backyard. Even if that’s the case, planting grass—even just a small section—is one of the best traditional landscaping ideas. If you have a dog or small children, a little patch of green lawn is practically a must.
Source: @suncitylandscapingllc via InstagramSource: @suncitylandscapingllc via InstagramSource: @suncitylandscapingllc via InstagramSource: @suncitylandscapingllc via InstagramSource: @suncitylandscapingllc via InstagramSource: @suncitylandscapingllc via InstagramSource: @suncitylandscapingllc via InstagramSource: @suncitylandscapingllc via Instagram
Grass adds valuable open space to your garden design, something that’s vital to keep your backyard ideas from visually crowding a small yard. Fine fescue grass is a good low-maintenance choice for a small backyard.
You may prefer to install rolled turf instead of waiting for grass seed to grow and fill in naturally. If you want a truly no-maintenance grass in your small backyard, shop for artificial turf.
6. Transform Your Small Yard with Strategic Landscaping and Hardscaping
Small backyard landscaping might initially feel challenging, especially if you don’t have a lot of experience with yard work. However, limited space is actually a blessing in disguise because it drives you to focus on what you feel is most important to include in your backyard design.
Source: @lopez.landscape via Instagram
A layered landscape design mimics nature, with low groundcovers, flowers, shrubs, and trees lining up from short to tall. This is a great design starting point regardless of your yard’s size. Choose greenery, flowers, and other plant options based on how tall they will be when full grown.
Don’t forget to budget for hardscaping when you’re finalizing your small backyard ideas. Path pavers, fences, walls, and borders provide the boundaries for your garden and are an important design element.
7. Elevate Your Small Backyard with Thoughtful Outdoor Lighting
Most people use their patio as an outdoor room, enjoying comfortable seating and dining space day and night. Just as with interior home decor, your outdoor space needs adequate lighting. This means including task lighting and accent lighting sources.
Hard-wired patio light fixtures can provide your main source of task lighting. Place weatherproof lamps on patio end tables, and stake lanterns on posts for other big light sources.
Source: @sagelantern via InstagramSource: @alyssabmomof3 via InstagramSource: @jcantertx via InstagramSource: @lns0214 via Instagram
String lights come in so many creative shapes and styles now and add a magical glow to night gatherings. Hang them over your seating area, along a fence, or string them between trees for a lighted canopy.
Path and step lights are crucial for safe navigation through the yard at night. Install a few spotlights to illuminate your garden focal point, such as a sculpture or arbor.
8. Revamp Your Small Backyard with a Stylish Concrete Paver Patio
If your small backyard lacks a patio, it’s fairly easy and inexpensive to hire a contractor to lay a simple concrete paver patio. Make it a design feature by choosing beautiful pavers and borders, perhaps adding a paver path leading to a water feature or bench.
Look around the patio for creative small garden ideas. Attach window boxes to your railings or windows, and hang potted plants from the rafters. Both are great small backyard ideas for adding pops of color without taking up any square footage on the ground.
Source: @creeksidenwi via InstagramSource: @fiveacrehome via InstagramSource: @howtohardscape via Instagram
Consider hanging a vertical garden on one or more of your patio walls. It’s a beautiful backyard idea that adds greenery to an otherwise blank vertical space. You can make a vertical garden by hanging up a wooden pallet and arranging small potted plants in the gaps. Succulents are also particularly beautiful in a vertical small garden.
9. Enhance Your Small Yard with a Charming Wooden Pergola
A pergola may seem too large to be included as a small yard idea, but remember: in a small outdoor space, scale is everything. A wood pergola or arbor may be just the focal point your small garden needs.
Source: @cospiconsa via InstagramSource: @skyliftroofriserhardware via InstagramSource: @jenbenshoof via InstagramSource: @qphia via InstagramSource: @the_sumpter_house via InstagramSource: @truetimbercraftco via Instagram
A simple square pergola with open rafter roofing is gorgeous over an outdoor dining area. It also provides a frame for hanging light strings. Grow climbing plant varieties around the pergola posts if you want the structure to provide shade in the future.
10. Elevate Your Small Backyard with the Tranquil Beauty of Water Features
Water features are fantastic backyard landscaping ideas. A well-designed small pond can add sound, motion, and life to your little outdoor retreat. It also provides a place for different plant varieties to grow, such as cattails and water lilies.
Source: @bethanyem via InstagramSource: @dayleenvann via InstagramSource: @growwithitgarde via InstagramSource: @ladylandscape via InstagramSource: @michael.workman.1088 via InstagramSource: @plantingdirt via InstagramSource: @switchloaf via InstagramSource: @wildmancrowe via Instagram
A small waterfall is relaxing to observe, with its flowing water and gentle splashing sounds. Koi fish are a great addition to a small backyard water feature, but do require a bit more maintenance. Even without fish, a backyard pond will draw water-seeking wildlife to your yard including frogs, dragonflies, and birds.
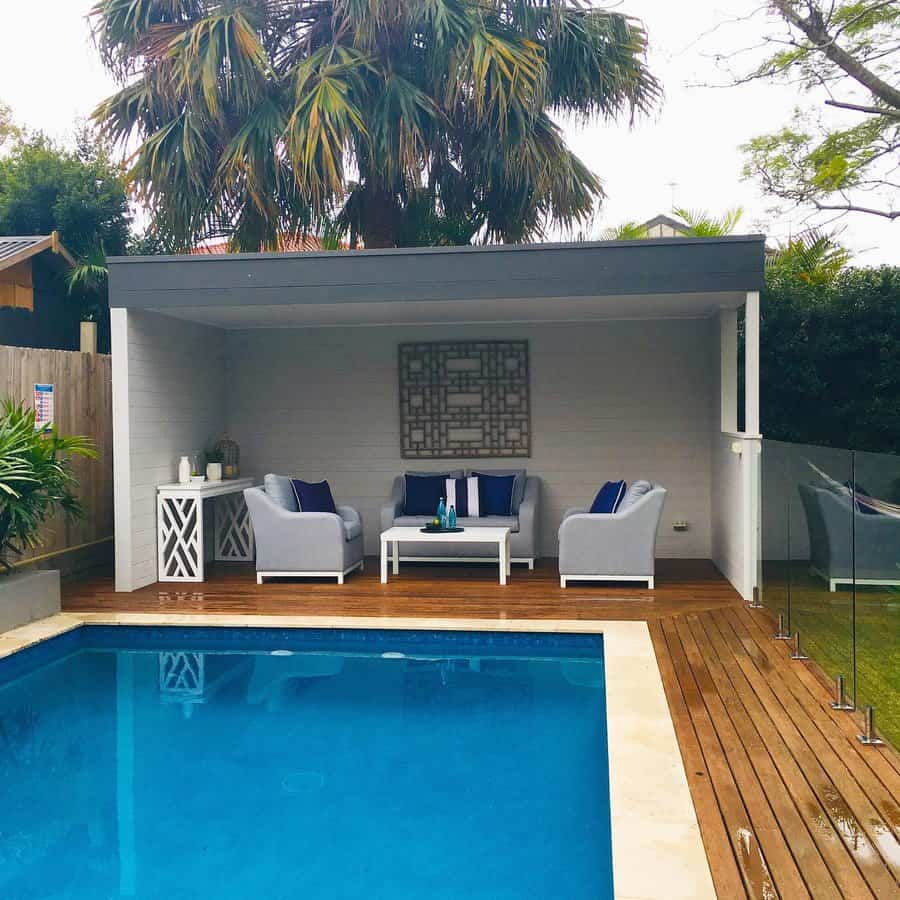
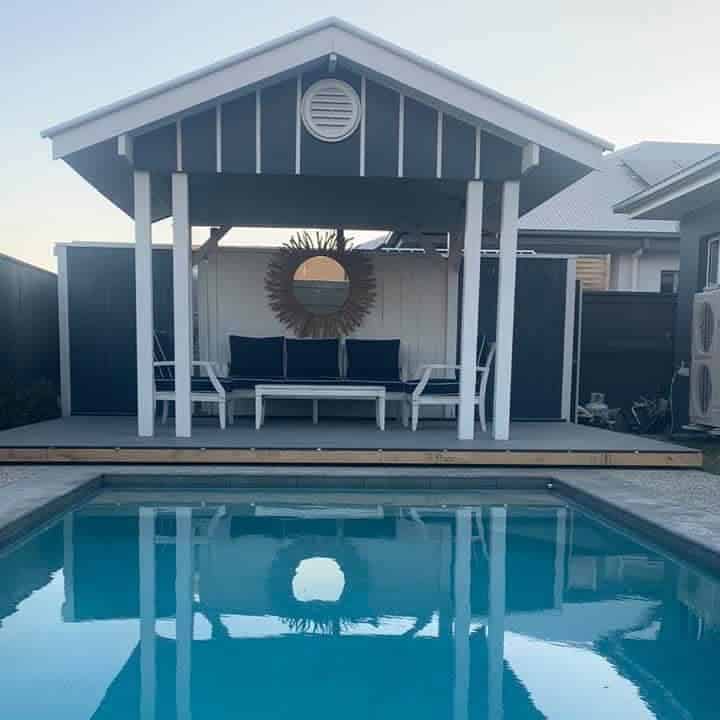
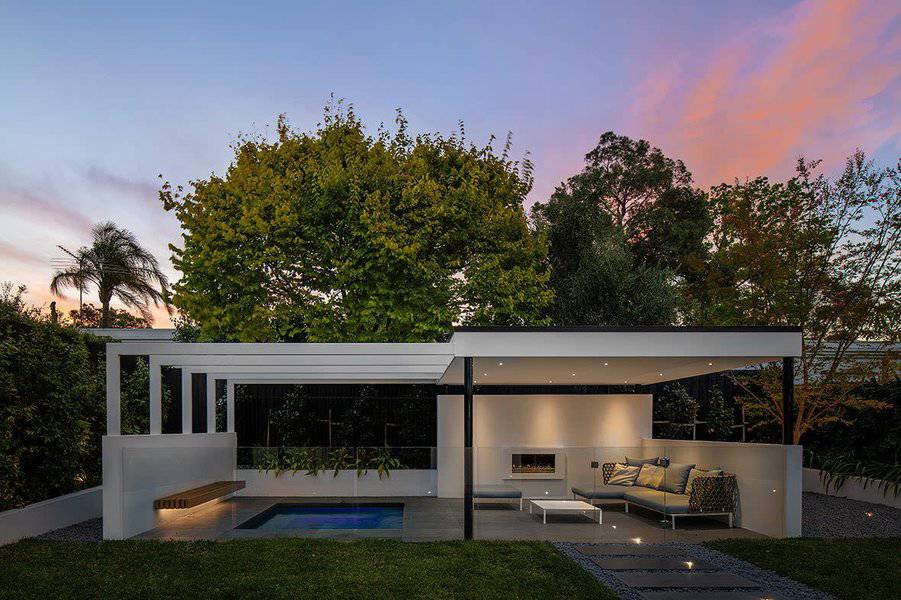
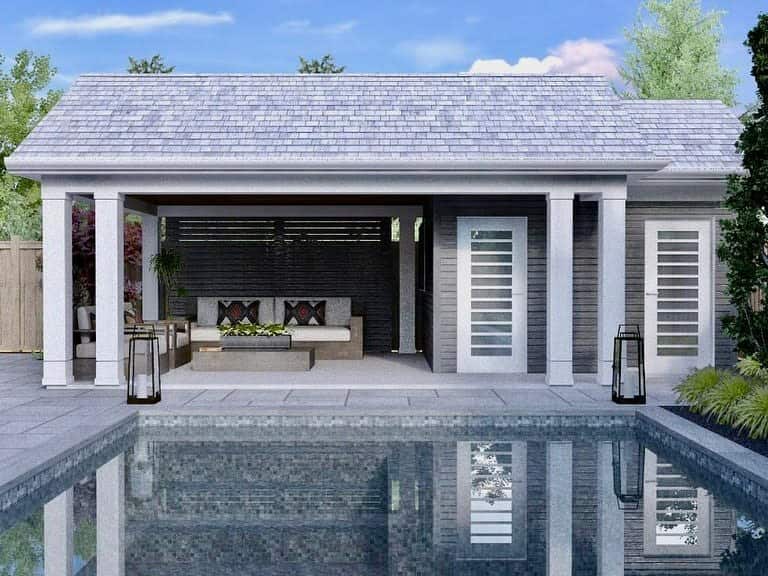
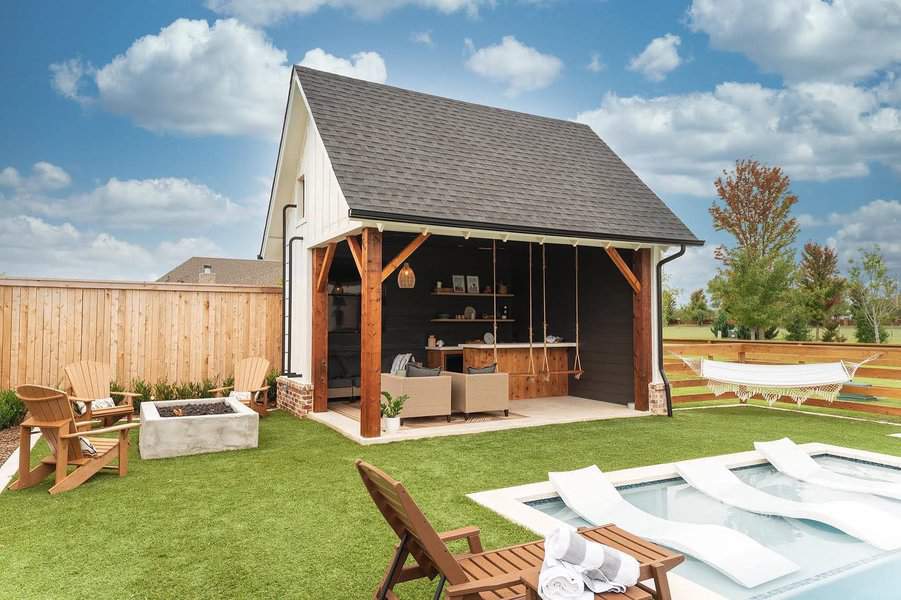
A cabana or pool house adds a lot to your backyard pool area. Not only is a cabana a welcome source of shade on hot summer days, it can include a changing room and space to store pool equipment.
Before settling on a pool cabana design, it’s important to consider what functions you expect it to fulfill. If you want a full miniature house with a bathroom and kitchen, you’ll need to look at pool house design plans instead of a basic cabana.
Whatever your intent for this poolside structure, check out our favorite cool pool cabana ideas. They will guide you in designing the perfect backyard cabana.
[view_toc]
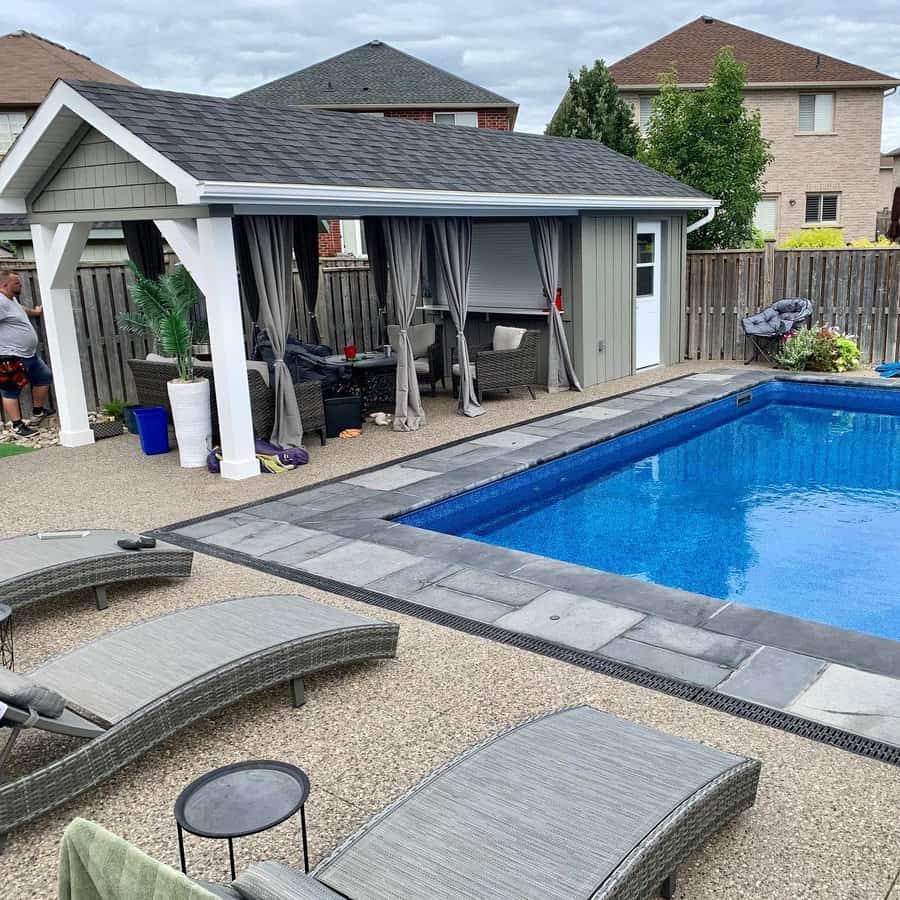
1. Deck-Friendly Pool Cabana
A pool cabana can be built directly on top of your existing pool deck. Or, you can plan to build it atop its own separate deck located near the swimming pool.
Source: @artepatio via InstagramSource: @ascher_smith via InstagramSource: @ildesign_irislev via InstagramSource: @our_hamptons_dream_in_aura via InstagramSource: @pep_build via Instagram
Whether you have a wooden, stone, tile, or concrete deck, choose a pool cabana style that complements the existing decking material. Unlike a pool house, a cabana’s three-sided construction will leave the deck material visible so make sure it’s something you love. It’s a bonus if it feels good under bare feet.
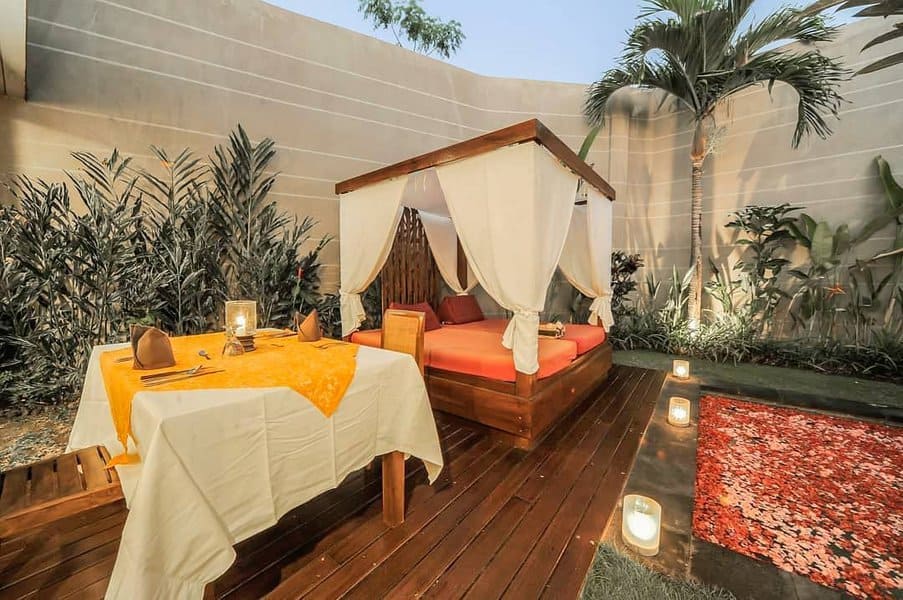
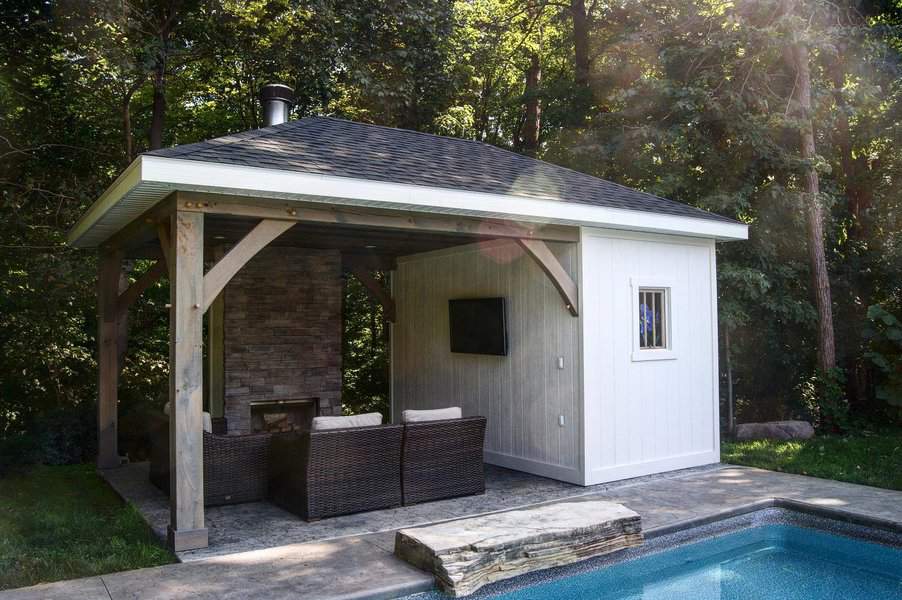
2. Enclosed Pool Cabana Design
By definition, a cabana has a roof, three walls, and one open side. However, some cabanas could be called a pool house cabana, with a fourth wall instead of a totally open side.
Source: @lizcarpenterinteriors via InstagramSource: @phoenixprince99 via Instagram
These enclosed style cabanas usually have large French doors or retractable doors along the front. This makes a particularly stylish pool cabana that’s open when you need it to be, but looks more like a pool house when the doors are closed.
Even classic three-walled cabanas often have a small enclosed area for privacy while changing clothes. Some also include an enclosed storage room for pool supplies.
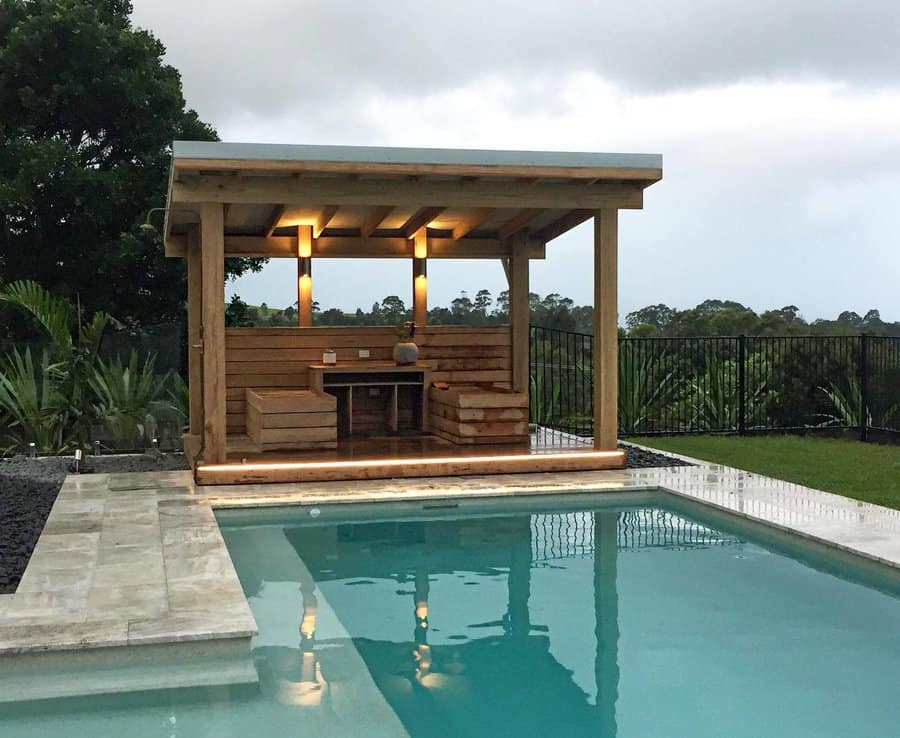
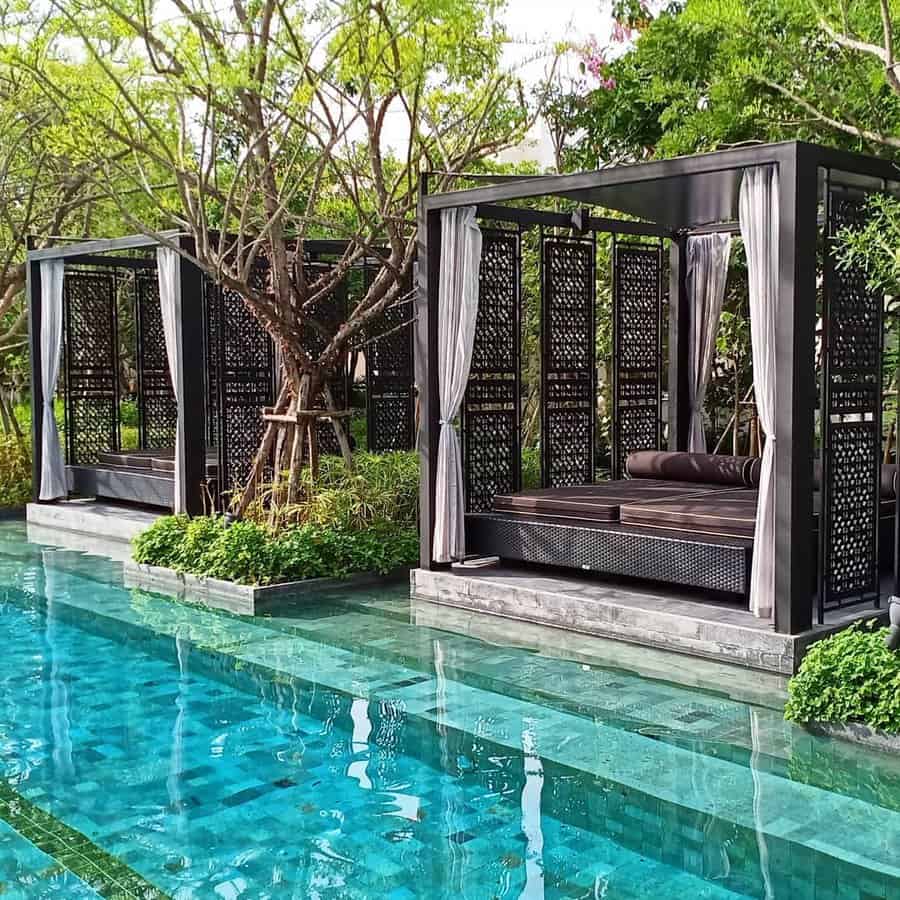
3. Hut-Style Cabana for Your Poolside Oasis
A hut-style cabana brings a decidedly tropical flair to your backyard. Instead of three walls and one opening, a cabana hut is often styled more like a pergola, with a thatched roof held up by four posts. If there are walls, they’re often made of bamboo or woven mats.
This kind of tiki hut outdoor space is also a great shelter over an outdoor kitchen or poolside bar. A hut cabana with an outdoor bar can make you and your guests feel like you’re visiting a favorite beach retreat.
4. Spacious Backyard Pool Cabana
Because there are no limits on how big a backyard cabana can be, some end up being quite large. If you have a large inground pool and hot tub—and are a frequent pool party host—a large cabana might be exactly what you need. After all, if you have a lot of guests, you’ll need a lot of patio furniture to accommodate everyone, and plenty of covered porch space to provide shade.
Source: @paulnbrowarchitect via Instagram
It’s common to build in extra storage into a larger cabana or pool house. You can include open attic space and use it to store all types of backyard toys and garden equipment.
With a large cabana space, consider screening part of it—especially if you live in an area with lots of mosquitos or stinging insects. A screened outdoor living space will allow you to relax in the shade without being bothered by pests.
5. Budget-Friendly: From DIY Pavilions to Pop-Up Tents
It’s possible to have a great poolside cabana even on a tight budget. A simple roofed pavilion or pergola can suffice, whether built by scratch or from a kit.
Source: @philipsmithphotography via InstagramSource: @swedish_eliza via Instagram
One of the cheapest ways to achieve the shade and ambience of a cabana is to purchase a 10’ x 10’ pop up tent. Available for around $100, these temporary structures are easy to put up and take down. Some even come with fabric curtains or sides that give the tent a true pool house cabana vibe.
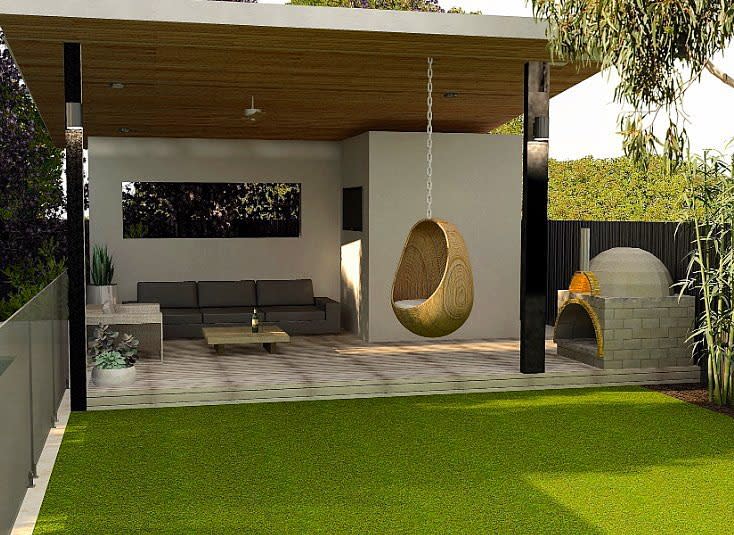
6. Luxurious Pool Cabana Retreat
Luxury pool cabana ideas are usually big open spaces with multiple outdoor room features. These custom pool house hybrids might include a firepit with vent, a changing room, bathroom, kitchen, and bar.
Source: @jba_interiordesign via Instagram
A luxury pool cabana is made from high-end materials, such as teak, mahogany, or other imported exotic hardwoods, and surrounded by lavish landscaping. Often, such impressive structures are adjacent to an infinity pool positioned above a breathtaking view.
7. Contemporary Cabana Design for Modern Pools
Like other forms of modern architecture, a contemporary cabana will be designed with clean lines and minimalist materials. It looks best beside a modern pool design that features a similar type of simplicity.
Source: @livinlodge_by_carpentier via InstagramSource: @out_from_the_blue via Instagram
Open beams are a stylish pool cabana accent for modern architecture. Make part of the roof solid material and part open beams to add character to your minimalist design.
8. Outdoor Furniture Essentials for Your Cabana
Outdoor furniture is a must in any outdoor living space. A backyard cabana should include several patio chairs and perhaps a dining set. If it’s a particularly spacious cabana, a hammock is a welcome place to relax poolside.
Source: @armjub via InstagramSource: @weoholidaybali via InstagramSource: @lundersrealestate via InstagramSource: @mark.kaufman_architect via Instagram
If you have a small pool cabana, you may wish to use pop up camping chairs instead of full size outdoor furniture. That way you have extra seating when guests visit, but can enjoy a more open space when it’s just you and your household in the backyard.
Consider buying lounge chairs that have wheels on the back. This will make it easier to move them beside the swimming pool when you want to bask in the sun, and roll them back into the shade again.
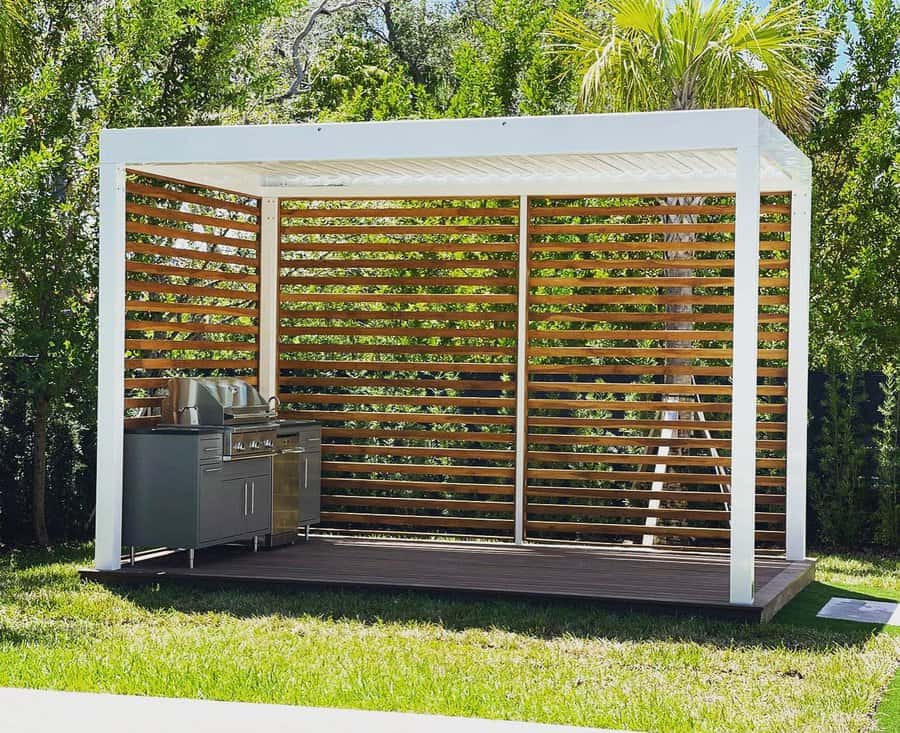
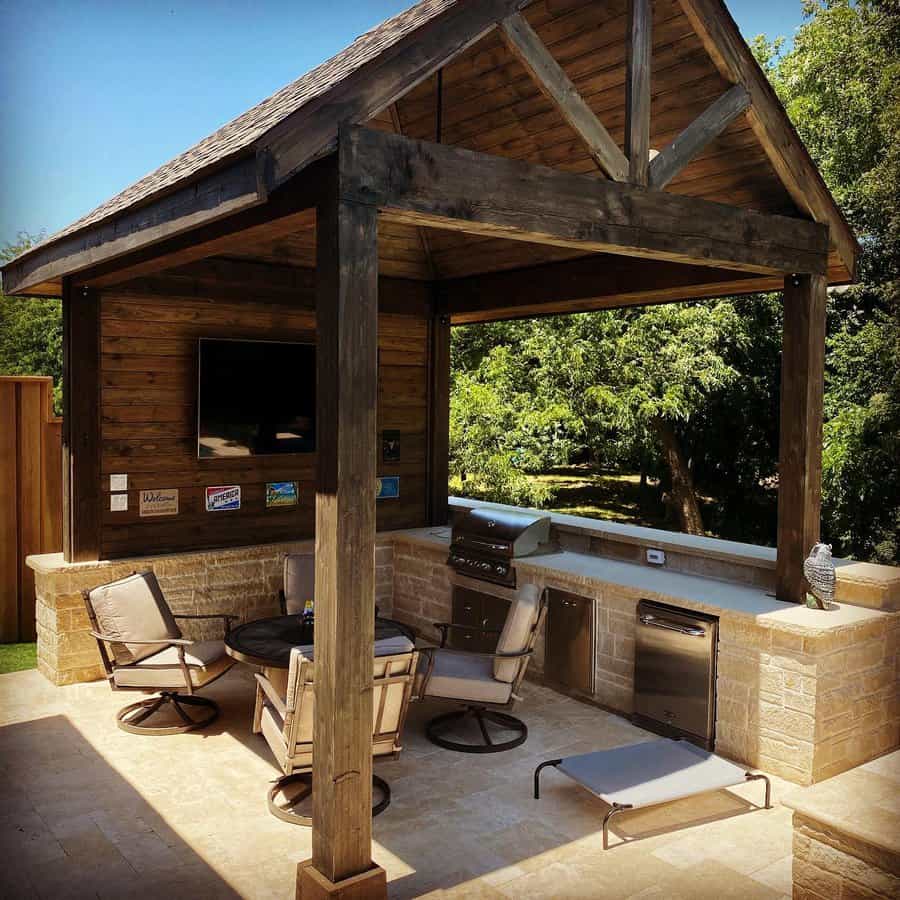
9. Set up an Outdoor Kitchen Bar
Cooking outdoors is a fun change of pace from cooking inside. Although grills and smokers have long been popular ways of preparing food outside, modern outdoor kitchens are stocked as well as their interior versions.
Source: @caldwellpainting via Instagram
It’s important to choose weather resistant appliances specifically designed for outdoor kitchen use. You can find outdoor ranges, ovens, refrigerators, and even dishwashers to create a full kitchen on your backyard pool cabana.
If you don’t have electricity in your outdoor pool area, a bar would be a more reasonable choice than a kitchen. Chill beverages in a large cooler or galvanized tub filled with ice. Store liquor and barware in cabinets or shelves surrounding the bar. Add a gas or charcoal grill for outdoor cooking.
10. Pool Pavilions: Versatile and Open-Air Cabana Alternatives
A pool pavilion is essentially just another type of cabana idea, although by definition, a pavilion has four open sides. Like park pavilions, a swimming pool pavilion is used for shelter or entertainment.
Source: @rhi_customcontracting via Instagram
A pavilion can have a hard roof or a more tent-like covering. While a cabana usually has three walls and one open side, a pavilion may have one wall and three open sides. The solid wall is usually along the back of the pavilion and is a great place to mount a big screen TV for watching movies from the swimming pool.
11. Prefab Pool House
Prefab pool house and cabana kits can be more cost effective than building the structure yourself. They can also be customized to match your home’s exterior, available in everything from modern minimalist to barnlike design.
Source: @backyard_getaways via InstagramSource: @davlocontracting via InstagramSource: @ontario.exterior.solutions.inc via Instagram
You could probably use any prefab storage shed as a small pool house, but it would lack certain features most people want in a pool cabana. Look for a prefab building that has an enclosed storage or clothes-changing area and a porch for lounging in the shade. Some prefab cabanas include a bar, bathroom, or outdoor shower.
You can order prefab buildings online or from a local company. The 10’ x 20’ Sanara pool cabana by Summerwood Products is a great example of a modern, stylish prefab pool house.
12. Creating a Rustic Cabana with Natural Flair
A rustic cabana will be made from natural materials, such as a wood frame with a stone base, topped with a vintage tin roof. If rustic cabana has curtains, canvas, linen, or thin burlap are good fabrics to use.
Source: @littleprawn3 via InstagramSource: @scott_design_build via InstagramSource: @sdstyle via InstagramSource: @vonbumannhomes via Instagram
Decorate the walls with vintage signs and add wrought iron accents wherever you can. For a fun, whimsical touch, hang simple rope swings from the cabana’s open rafters. Rustic lighting options include metal lanterns and strings of Edison light bulbs.
13. Maximizing Your Space with Small Pool Cabana
Even a small pool house is better than no pool house at all. Where else can you lounge in the shade beside the pool, or store all your pool equipment? Additionally, a pool house or cabana adds value to your home because it turns a basic backyard pool into a multi-purpose outdoor living zone.
Source: @nadinesucculents via Instagram
If you have a tight budget, it’s a good idea to keep your cabana small—but build one that includes the features you need. Of course, you might need a small cabana due to space restraints. If so, choose a narrow design that provides the most shade possible.
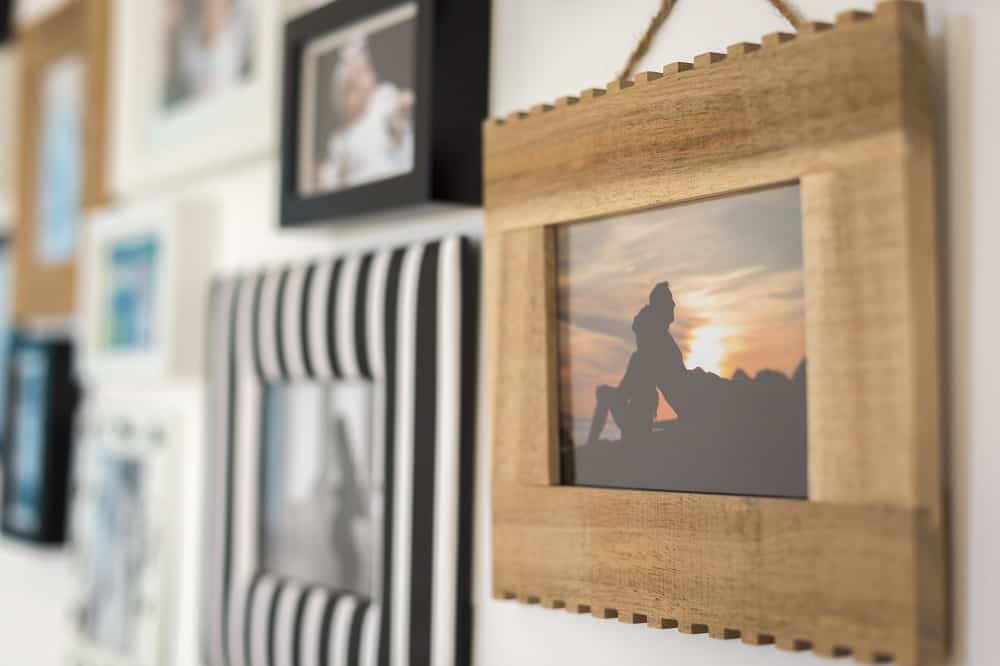
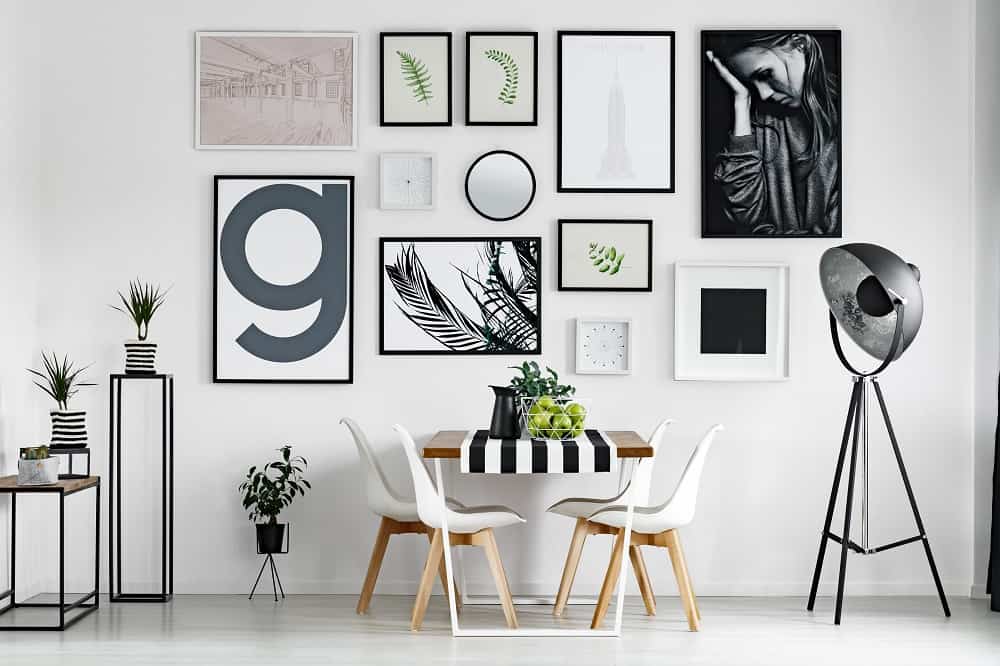
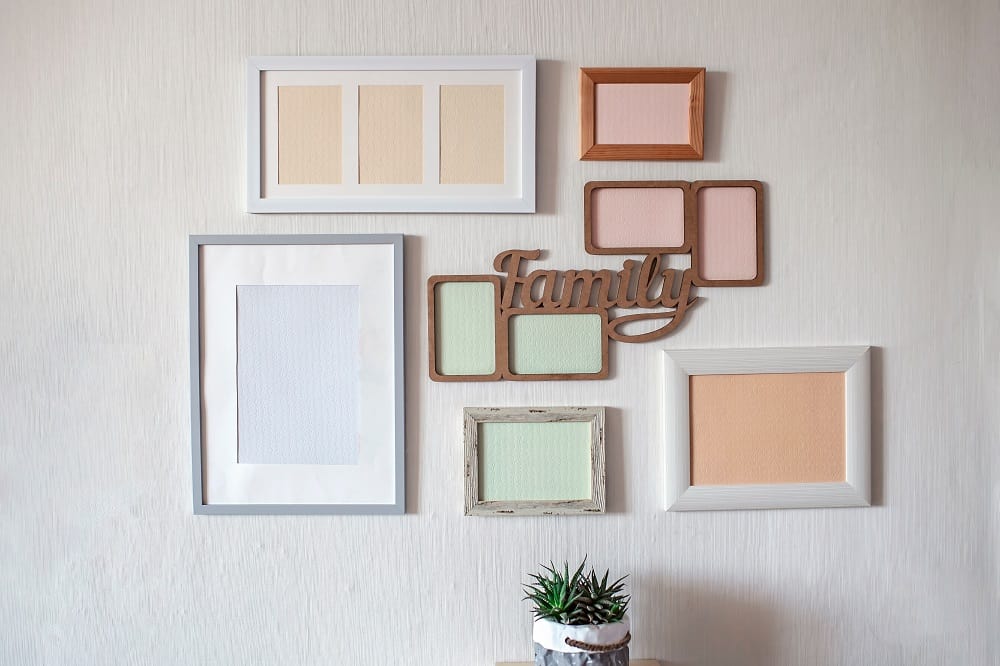
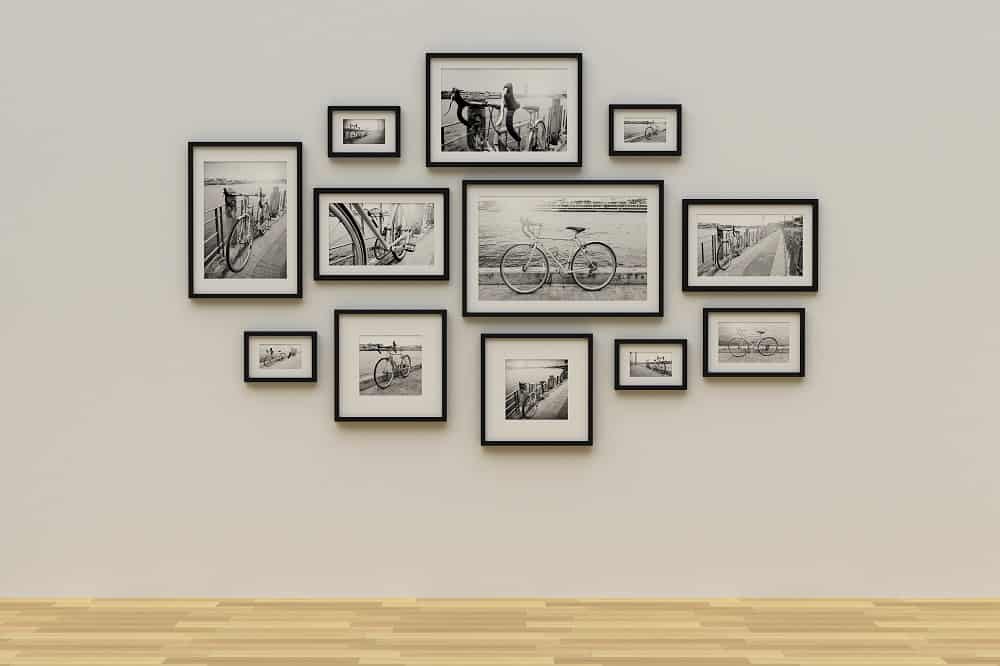
A gallery wall—or photo and artwork collection—is a great way to showcase your favorite memories. Although many gallery wall layout ideas include pictures that are all the same size, most have pictures of different sizes. Putting them together in a way that’s pleasing can feel like trying to solve a difficult puzzle.
If you’re wondering how to arrange pictures on a wall when they’re a mishmash of different shapes and sizes, certain techniques will help you out. Here are some of our favorite ways to create the perfect picture arrangement on your gallery wall.
What type of wall is the best to arrange pictures on? Any bare wall is a good candidate for an impressive art display. Factor in the size of your artwork and the number of pieces you want to hang up. You may discover that you don’t need a large wall to display your artwork collection.
In the living room, over the sofa is a logical place to locate a gallery wall. Look for blank wall space over other pieces of furniture, and consider wrapping your picture display around a corner for an interesting effect.
Don’t forget the staircase wall when planning where to hang pictures. It’s a great idea to hang family photos in a timeline that you get to relive as you go up and down the stairs each day.
Remember that you don’t have to hang pictures on every bedroom or living room wall. In fact, it’s a good idea to leave some blank wall space in every room. This keeps the space from looking cluttered and gives your eyes a chance to rest.
Choose a Theme
While there are no hard rules for filling a space with picture groupings, adhering to one central theme per wall is often preferable. For example, a symmetrical grouping of botanical art prints adds traditional elegance to a space. For a more casual theme, choose family photos, perhaps mixing professional portraits with favorite casual shots.
As a rule, black and white family pictures look more formal than the color version of each photo. For landscape photo collections or even drawings, black and white conveys a more modern home decor style.
Keep in mind that virtually every visitor to your home will see the wall art in your living room, so keep the images professional and appropriate. While silly or low-brow artwork may accurately reflect your personality, it’s better to leave those images in your bedroom or another more private space.
Coordinate Frames
Depending on your home decor style, all the frames on a gallery wall don’t necessarily have to match. If you have a casual, bohemian style, each picture frame can be different. However, for a more refined look, go with frames that coordinate.
Matching frames makes it clear that all the images were meant to be displayed together. If you choose a simple frame design, it will be easier to find the same white or black frame in different sizes.
Whether you choose wood, metal, black, or white frames, make sure they look good with both the artwork and the rest of the room’s decor.
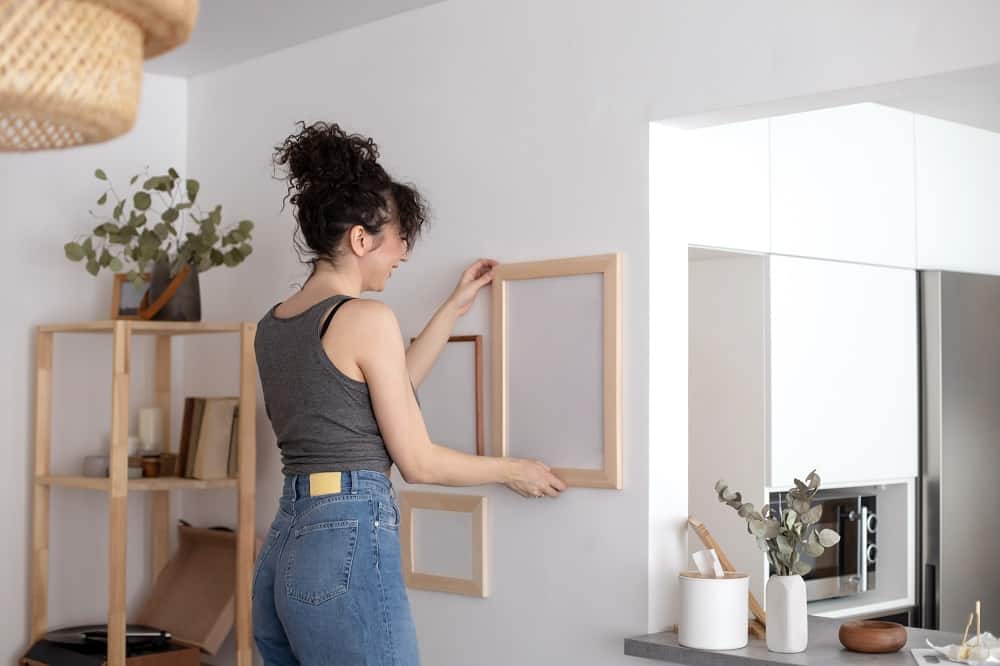
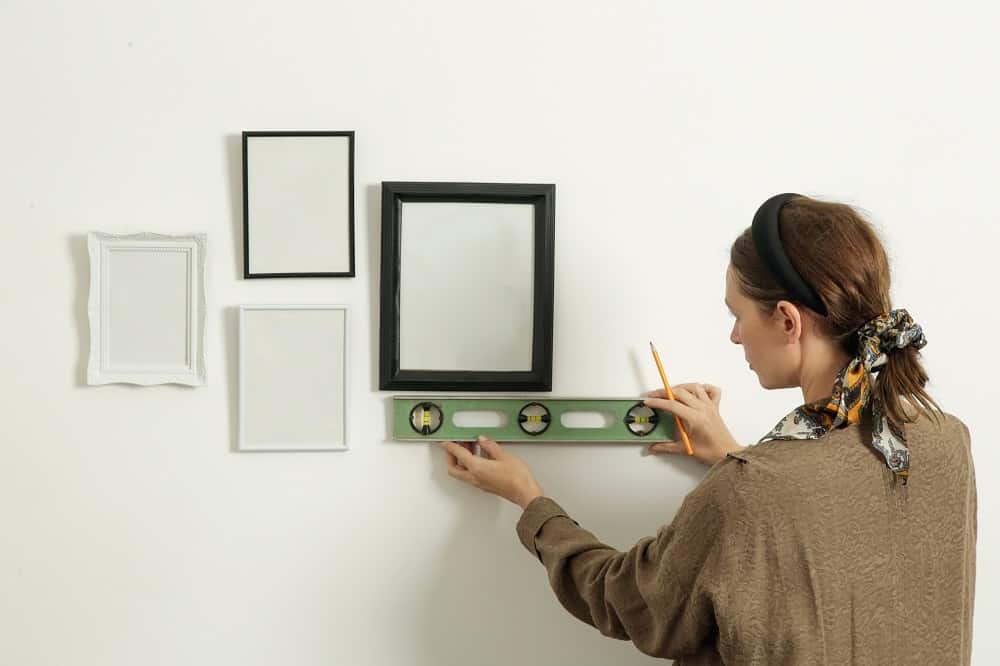
Practice Composition
Sketch out picture groupings before you commit to hammering nails into the wall. Creating a rough blueprint of your gallery wall is a good way to get an idea of how many pieces you want to include and exactly where each piece should go.
Focus on big pictures first. A larger picture deserves a prominent place in the gallery wall. Surround it with smaller picture frames and related articles that go with your theme. For example, intersperse metallic starburst wall medallions between photos of the night sky.
Making paper templates is an easy way to see how all your hanging pictures will look on the wall. Lay your pictures on a roll of craft paper and trace around each frame with a pencil. Cut them out and label them so you don’t get confused about which piece is which.
Using a loop of painters tape, attach the paper templates to your gallery wall in the same arrangement you sketched out earlier. If you don’t like the way it looks, it’s easy to reposition them until the arrangement suits you.
You can also have someone hold up each piece to the wall while you stand back and see how it looks. Make sure you cover the picture hook with masking tape first, to keep it from scratching the wall.
Seek Symmetry
Arranging pictures in perfect symmetry can be rather boring, but some degree of symmetry is necessary to keep the room from looking unbalanced. Think of each frame as carrying a weight related to its overall size. Especially with traditional or formal decor, you want to balance weights along each side of the wall.
For example, place a large piece in one of the lower corners of your gallery wall space. Put the second-largest picture in the upper corner diagonal from the biggest piece. Then arrange the remaining multiple pictures in the unoccupied corners to balance the overall space.
Another visually pleasing space for hanging pictures is a few inches above a chair rail. It may seem too low initially, but this positioning serves the dual purpose of showing off your artwork while drawing attention to the architectural trim. Use your carpenter’s level to ensure each piece is neatly aligned.
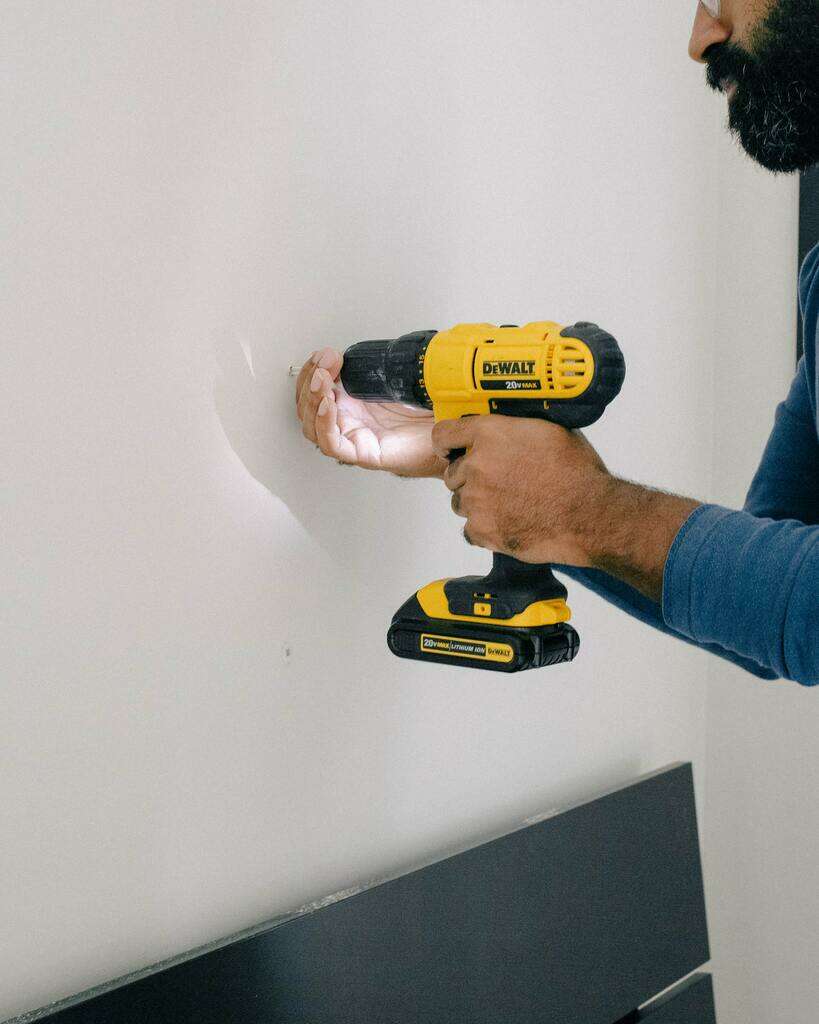
Gather Supplies
In addition to kraft paper, painters tape, and a pencil, you’ll need a measuring tape and a level to professionally hang your wall decor. You’ll need a picture hanger for each frame, screws and a screwdriver, and/or a hammer and nails.
Many interior designers recommend using two picture hangers on each piece—especially large artwork—to keep them from tilting or swinging. Wall plugs and drywall anchors provide extra support, especially in brittle drywall.
A wall anchor is better than an ordinary nail or screw for supporting heavier artwork and decorative wall art pieces. Drywall anchors are a screw that includes a spring-loaded winged nut that spreads open behind the drywall. Its “T-shaped” design keeps the weight of your art piece from pulling the screw out of the wall.
Unless your gallery idea is a freeform, organic layout, you shouldn’t leave measurements to guesswork. Accurate measurements are what makes your display look professionally installed. You must use measurements if you’re creating a grid or even row of frames.
Follow the instructions in the “Formula for Hanging Pictures” section below. Use a tape measure and a carpenter’s level to determine where each nail, screw, or wall anchor should go. Mark each spot lightly with a pencil.
A Formula for Hanging Pictures
Hanging pictures can feel like trying to solve a puzzle—especially if your wall art is in different shapes and sizes. If you bought a hanging art set from Pottery Barn or another retailer, it’s easy enough to just copy the way they had the pieces displayed. But if you’re creating your own photo wall from scratch, this formula can help ensure a balanced composition.
To hang artwork at average eye level, the center of the piece should be between 57 and 60 inches above the floor. Find the center by dividing the height of the frame by two. Then measure the distance from the top of the frame to the hanging hardware and subtract that from the first number.
Add that figure to 57, 58, 59, or 60. This final sum is the height where your nail or wall anchor should go, as measured from the floor.
How to Hang Eclectic Groupings
Although it’s recommended to have a common thread tying your gallery wall picture collection together, it’s not required. In fact, the beauty of your particular grouping might be its whimsical diversity. It’s perfectly acceptable for photos, sketches, paintings, macrame, wall sculptures, and baskets to occupy the same wall space.
It can be a bit more challenging to make an eclectic collection flow together harmoniously. Start by hanging pictures that mean the most to you at eye level—but feel free to move them higher or lower to work around your furniture and architecture. Extend your collection into the rest of the space by hanging a small picture or decoration above a door or window.
Remember that your instinct is the most important factor when it’s time to hang pictures—or do any type of home decorating. You live in the space. If your picture display makes you happy, that’s all that matters.
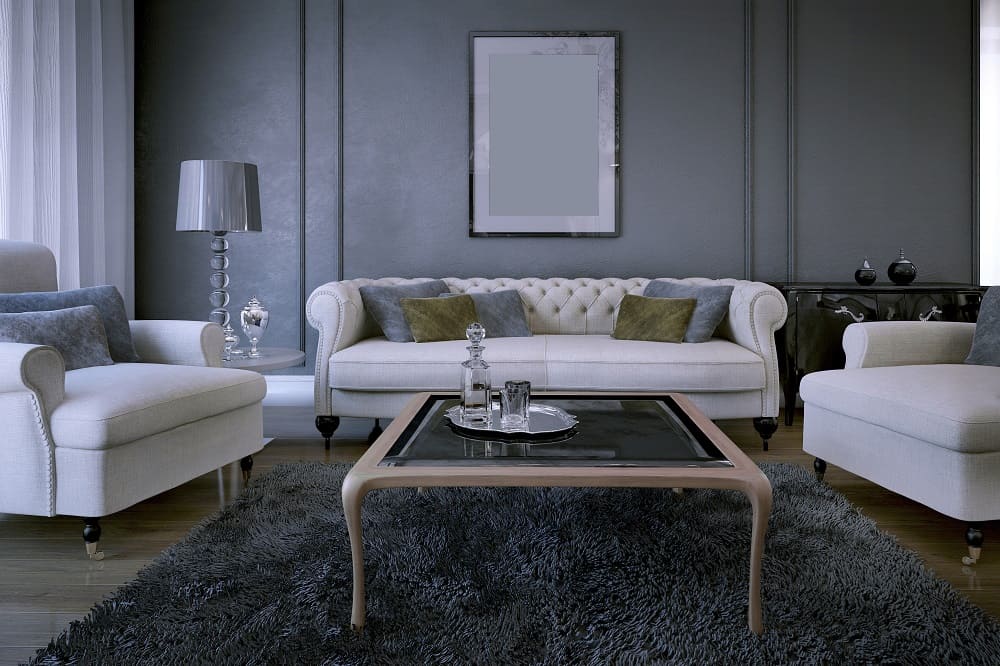
Grey might just be the ultimate neutral color. Dark enough for drama, but light enough to convey spaciousness, grey walls are the perfect background for just about any colour curtains.
Grey is a suitable color in everything from a modern condo to a sprawling farmhouse. It might be easier to ask what colors don’t go with grey than to ask, “What color curtains go with grey walls?” Here are a few of our favorite pairings of grey walls and colored curtains.
There are far more than 50 shades of grey when it comes to paint color choices. Grey is like its own rainbow, with warm brownish grey at one end and cool bluish grey at the other.
Grey also shows up in a wide value spectrum. There are pale shades just a notch above white, and deep charcoals just a few steps below black. So choosing grey curtains is a great option, especially if you’re into chic monochromatic decor.
Choosing a textured or patterned grey fabric is a good way to add sophisticated detail to the room. Look for a floral grey monochromatic window treatment, or a classic pattern like stripes or plaid. Silvery grey sheer curtains are a great choice to hang behind heavier curtain panels.
You can break up the grey a bit by including some white walls in the room. For example, install wainscoting up to chair rail height and paint that part of the room white.
Black
Black curtains are a classic choice when it comes to room decor. Not only is black a sophisticated hue that goes with anything, it is a popular color for blackout curtains and other thermal curtain options. Having black thermal curtains can help you save money on your air conditioning bill in the summertime.
Matching curtains to furniture is a good idea for maintaining a balanced color scheme. Pair black curtains with a black leather sofa and a rug that incorporates all the grey and black hues in the room. If black colored curtains feel too harsh for your decor, go with dark charcoal grey curtains for a similar but less drastic vibe.
White
White curtains always carry a fresh, clean vibe. Hanging white curtains on a grey wall is a classic combination favored by many an interior designer. This particular combination allows the furniture to be the focal point in the room.
With grey walls and white curtains, you have the freedom to choose a couch and accessories in any color you wish. White textured curtains add subtle detail to the room without taking anything away from your other design elements.
Warm grey color paint looks better with a warmer shade of white. Pair it with a soft ivory curtain color instead of a bright white curtain.
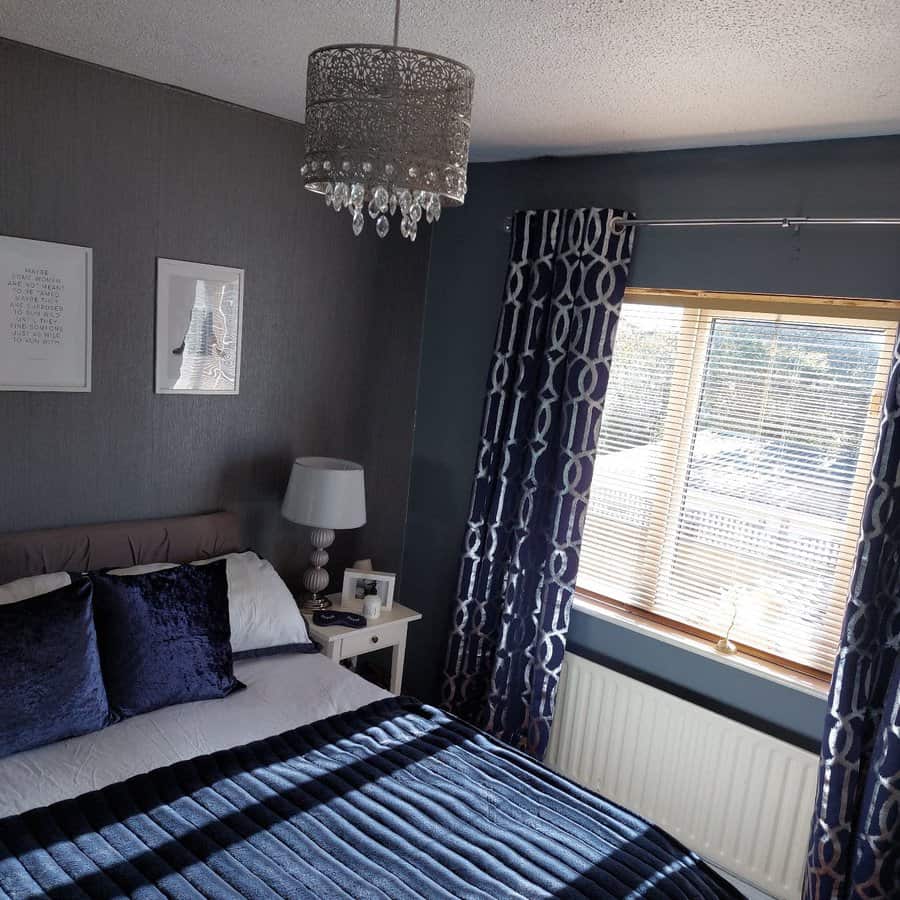
Blue
Blue colored curtains are a peaceful, impactful choice in just about any room with grey walls. Blue and grey are a classic color duo, whether you have blue curtain panels on grey walls, or blue walls behind grey curtains.
Navy or light blue curtain panels stand out against grey walls, especially when the room includes other blue accents. Teal curtains also look great against a medium grey wall, as its warm bluish-green looks extra brilliant against a solid neutral.
Light grey walls and pale blue curtains give the room the cooling ambience of a cloudy day. Brushed nickel curtain rods look amazing with this color combo.
Pink
Choose pink curtain fabric to add a soft warmth to a room with grey walls. Grey wall paint looks amazing with all shades of pink, especially blush pink or dusty rose. Hang sheer white curtains behind your pink drapes to soften daylight filtering through the window. This will look especially nice if your room has white furniture.
Light grey wall paint and pale pink decor has long been a favorite in a baby nursery or little girl’s room. However, this color scheme is also soothing in any room and can be quite sophisticated. Pink is one of the colors that will go equally well with warm or cool grey wall paint.
Green
You can probably get away with any green color curtain against your grey wall, but earthy shades of green look particularly good next to grey. Olive green curtain panels merge well with a grey based wall color and adding brown and other warm neutrals completes the look.
Emerald, jade, and other brighter green curtain choices can also work well with grey, provided that the color is included in the room’s accessories, rugs, and wall decor.
Beige
Like grey, beige has its own color spectrum. From pale oatmeal to deep tan, it’s one of the best curtain colors if you want a room that’s neutral but warm. Greige is a new color that combines the best of beige and grey and is a good companion to both.
Warm grey walls and beige curtains are a great background color scheme if you have a lot of brown furniture in the room. Warm grey walls and beige curtains go great with a brown leather sofa and natural wood finishes on tables and bookshelves.
Bright Colored Curtains
Most bright color options look great beside neutral grey walls, so don’t be afraid of this curtain and wall pairing. Purple, orange, hot pink, or red curtains add a cheerful, whimsical vibe to a room. Putting these brilliant hues next to calm grey makes them pop even more.
Yellow is another bright color that looks amazing with grey. While a soft, buttery yellow is a classic color to use with grey, brighter hues can work as well. Mustard yellow curtains or deep golden drapes stand out nicely against charcoal and other darker shades of grey.
Bright floral patterns, colorful plaids, and batik prints are also great in a grey room—especially if they include a bit of grey that goes with the wall color. Just be sure to use the printed fabric’s main color other places in the room, such as on throw pillows, rugs, and wall art.
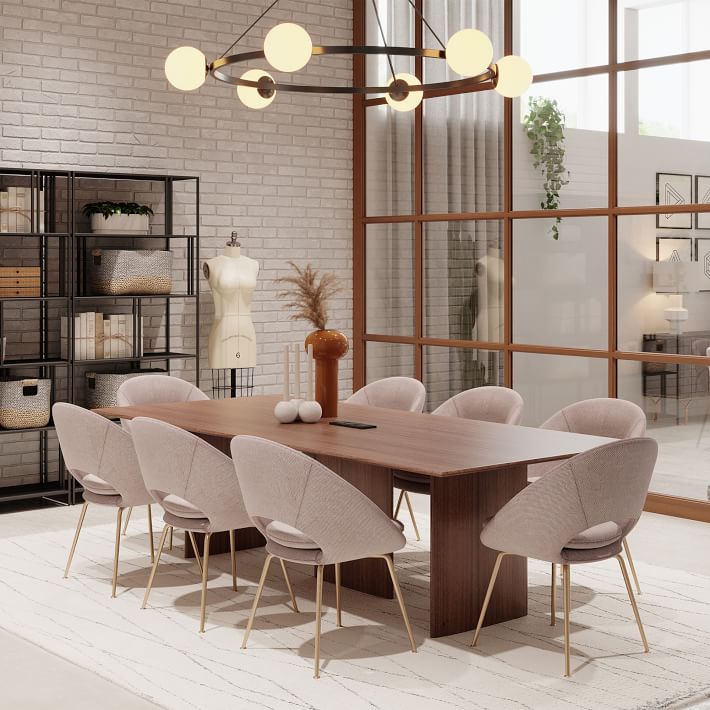
The dining room table is where you gather with friends and family to share a meal. You need a table big enough to accommodate everyone while also fitting into your home.
The best dining room tables are more than just a flat top on legs. They have style and quality that elevates the look of your home. Their large size means they have a big visual impact in the space, so choosing the right one sets the tone for the rest of your interior design.
We have researched and found the best dining room tables for your home.
[view_toc]
Top Picks
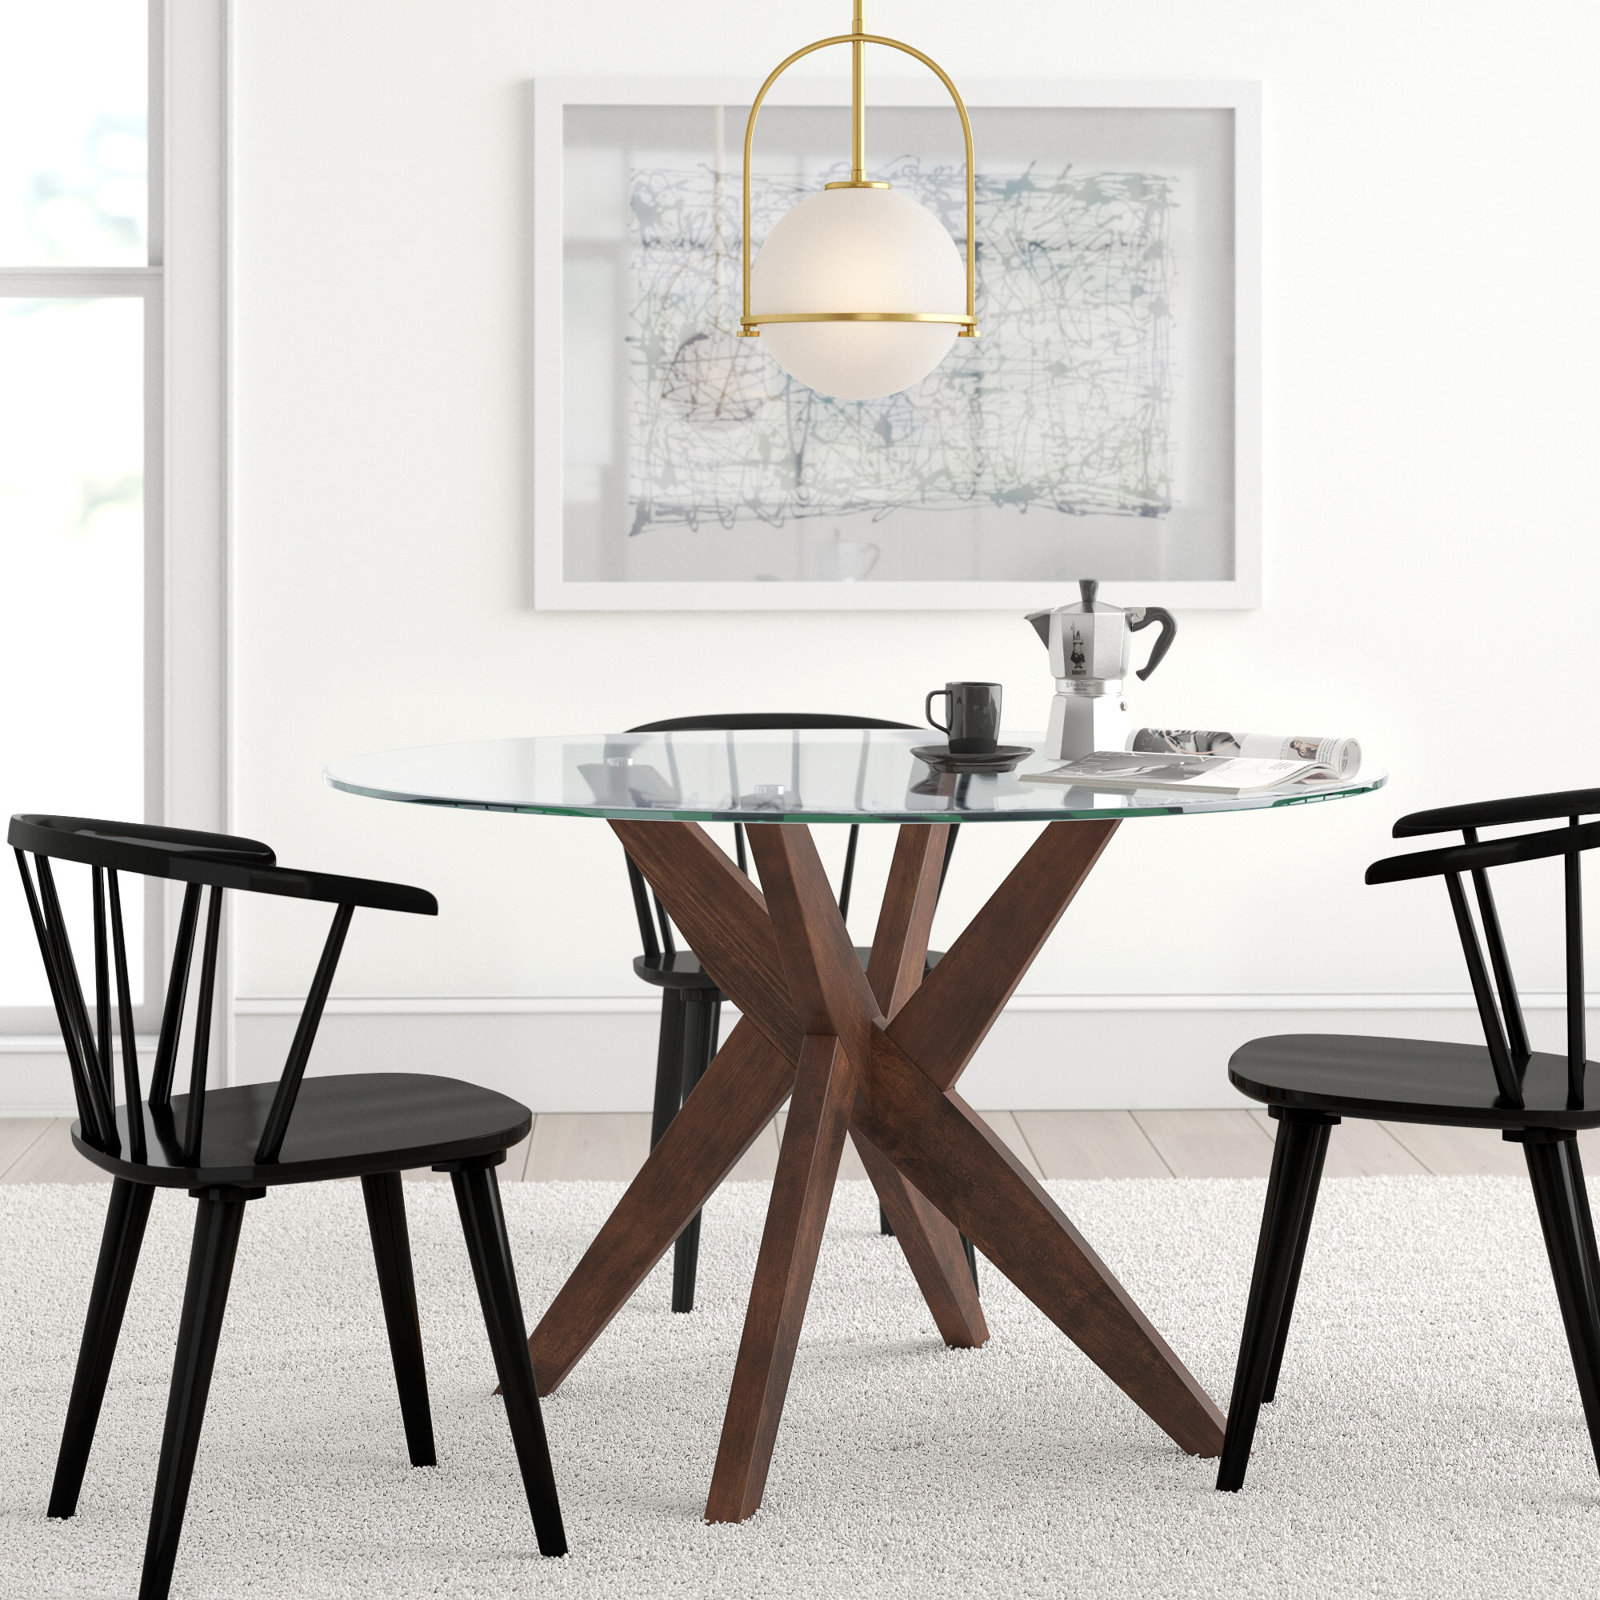
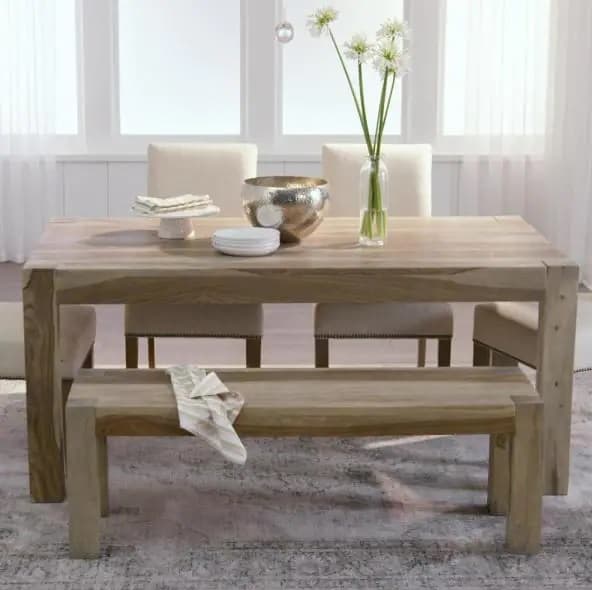
Best Overall: Tabor Pedestal Dining Table
Courtesy of wayfair
Specs:
Dimensions: 48 L x 48 W x 30 H inches
Material: Birchwood and glass
Seating Capacity: 6 people
This unique table oozes personality with a pedestal that features multiple angular legs that protrude out in all directions. The pedestal design gives the table a mid century feel that also looks modern as it embraces modern geometric trends. The glass tabletop is safety treated to ensure its stability and strength while also allowing you to view and admire the unique pedestal below.
Unlike smaller round tables, this one can comfortably accommodate up to six people. The 48-inch diameter gives you plenty of room for place settings, serving dishes, and a centerpiece. Embrace the rich dark wood coloring with chairs that also have it. For softness, choose chairs that are upholstered with fabric. This table is not just good looks, though; the birchwood construction elevates the quality of this table.
The drawback of this table is that it is a nightmare to keep the glass clean. The angular legs can also be cumbersome to sit around, causing some people to have to adjust around them.
This affordable table may look simple, but it is the perfect accent to a living space. The long, slender legs are round with a tapered design that gives this table a mid century modern design. The legs are placed right at the corner to give you maximum space for seating.
There are two finishes to choose from, dark espresso, and a lighter natural wood. Both of these finishes are a perfect complement to your warm color palette. The smaller size of this table helps to create a more intimate dining space. The slender styling of this table works well in smaller spaces where it won’t be visually imposing.
A slight drawback of this table is that it could be stronger and more stable. However, it can support up to 100 pounds as long as the weight is evenly distributed.
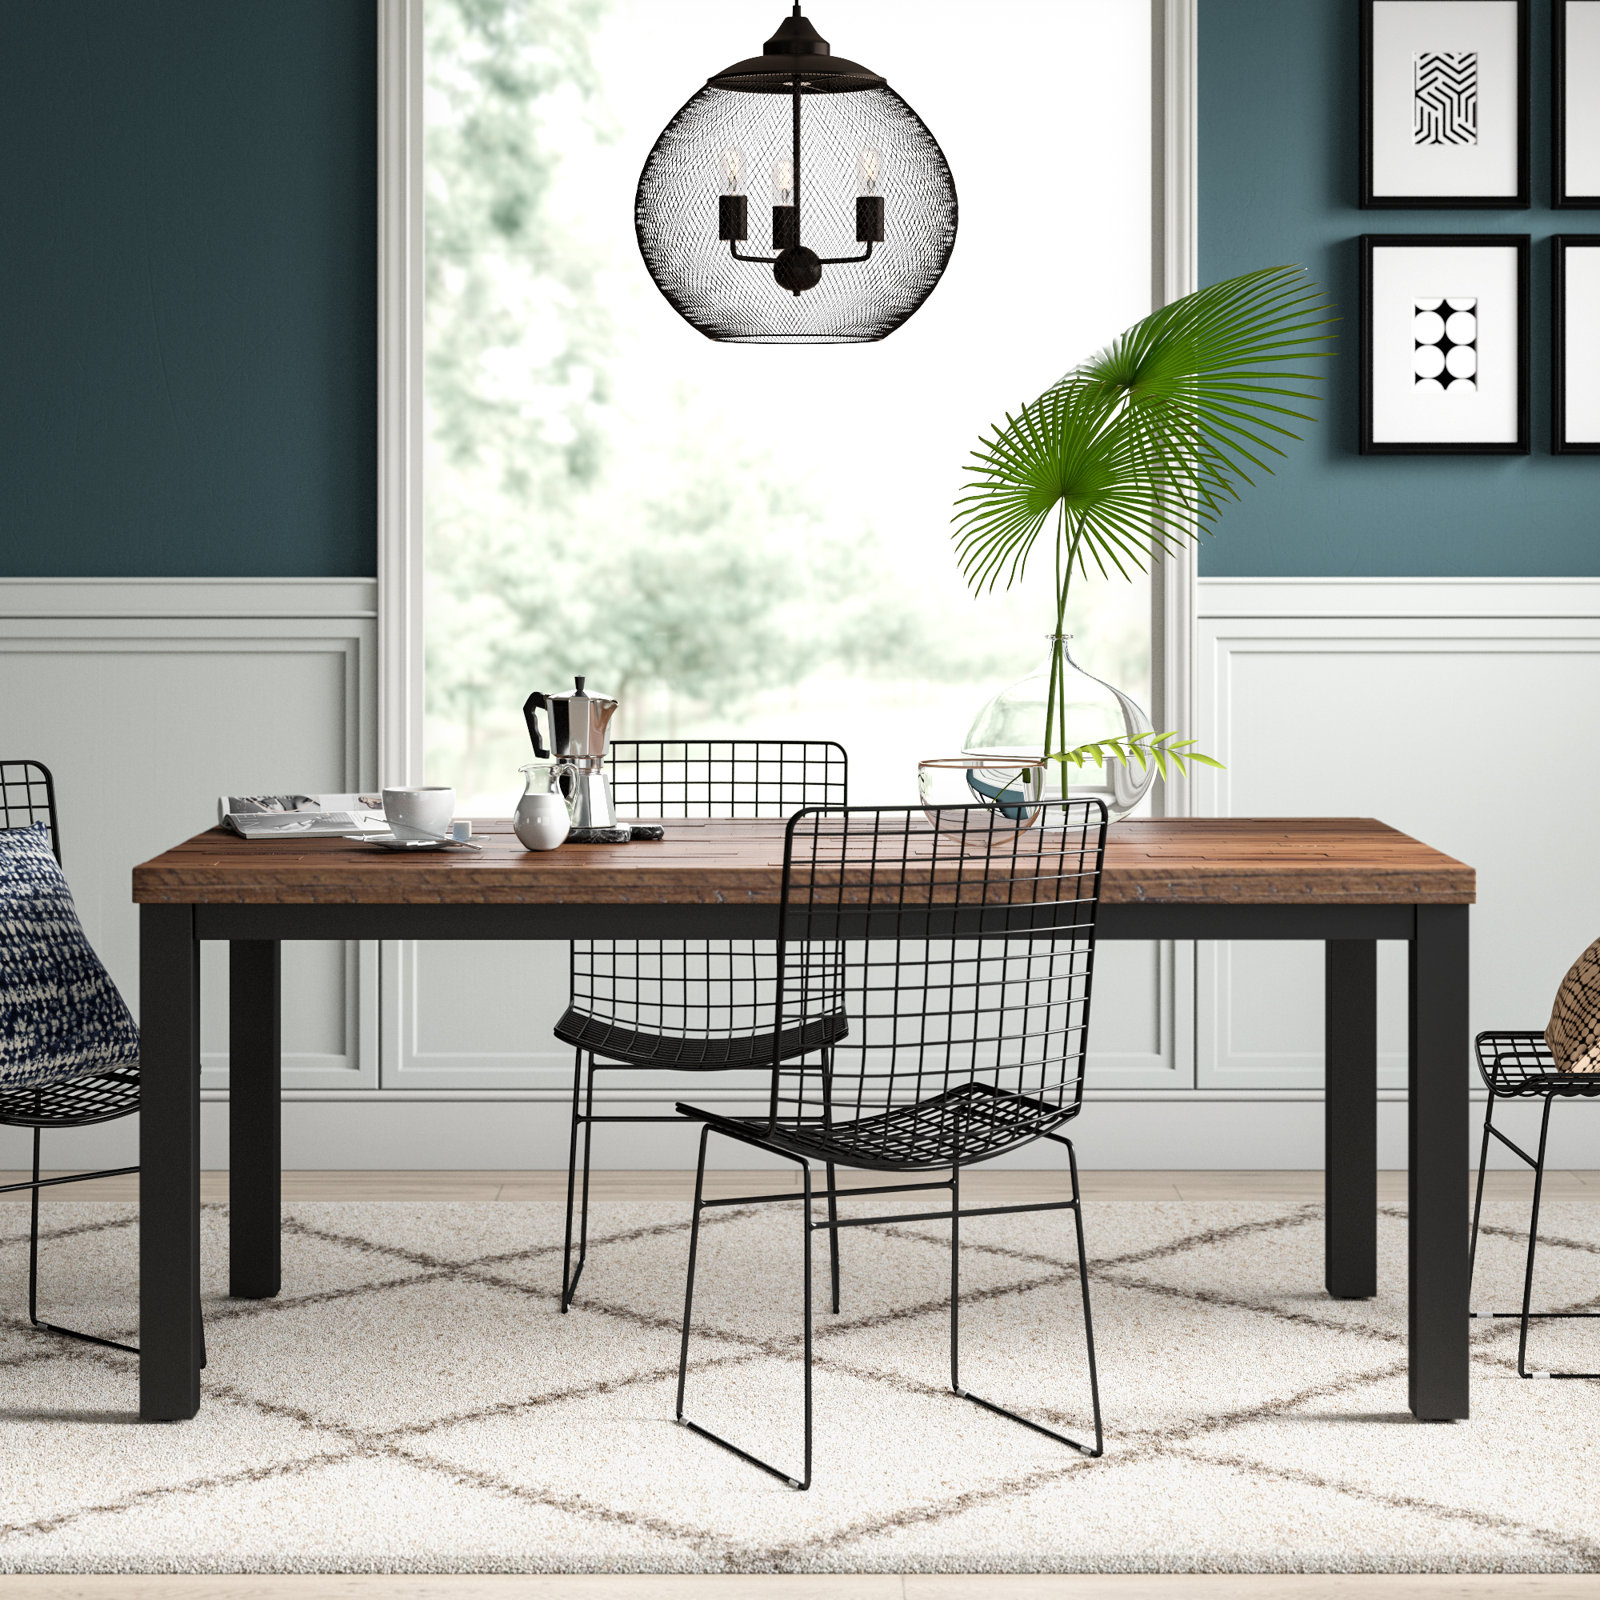
A little rustic, industrial, and modern, this table perfectly blends multiple design styles to make this table versatile. The tubular steel frame and legs are powder-coated black to give them a finished look and improve their durability. Placed on top is a butcher block solid acacia wood tabletop that is been given a distressed brown finish.
A nice touch to the table is the nylon glides on the bottom of the legs that prevent scuffing or scratching of your floors. Unlike other rustic tables, this one will continue to look just right, thanks to the matte NC lacquer treatment. This heavy glaze accents the natural variations and coloring of the wood while also protecting it from unwanted staining.
One potential issue with this table is that it is made from solid natural wood. This makes it susceptible to moisture, which can cause the table to swell and shrink. While minimal amounts of this are normal, places with high humidity could have a negative impact on the overall structural design and integrity of the table.
The beauty of this table is in its elegant simplicity. Its unique design features a slim tabletop and three flat supports for the legs. This unique design maximizes support and stability while minimizing interference with your seating. There are five finishes to choose from, making it possible to find the perfect look for your room. Choose from ebony ash, sand oak, walnut cherry, driftwood oak, and natural walnut.
Depending on the chairs that you choose to pair with this table, it can look modern, minimalist, or mid century modern. A standout unique feature of this table is that it has an optional power hookup. This is perfect for creating more elaborate centerpiece displays or just charging your phone. You can have confidence that this table will last with its contract grade rating.
One drawback of this table is that it looks a bit plain. It lacks style and personality. This can make the table by itself boring. You can accommodate this by adding additional decor to the room.
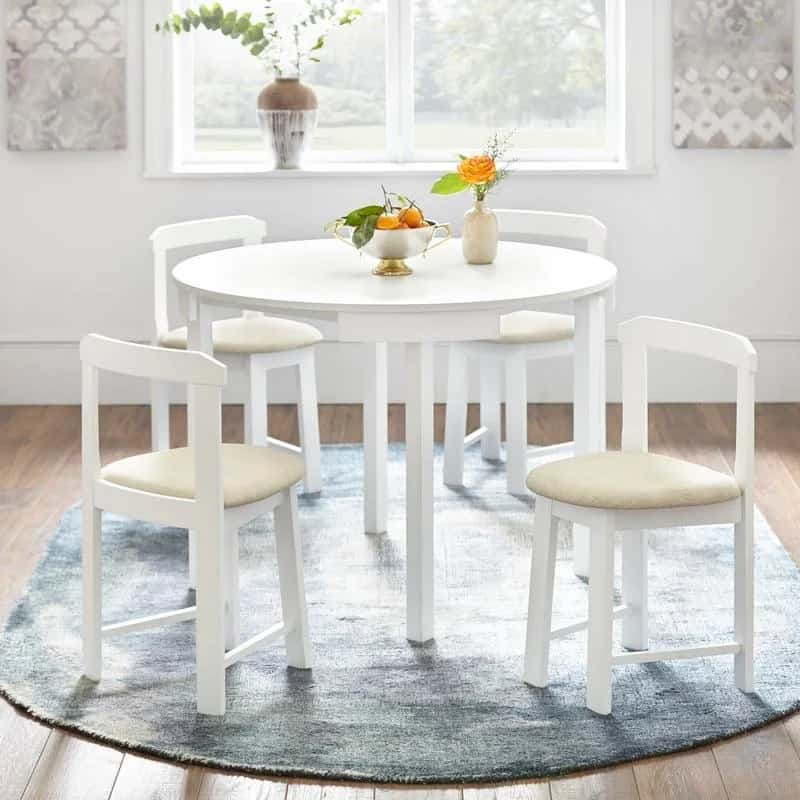
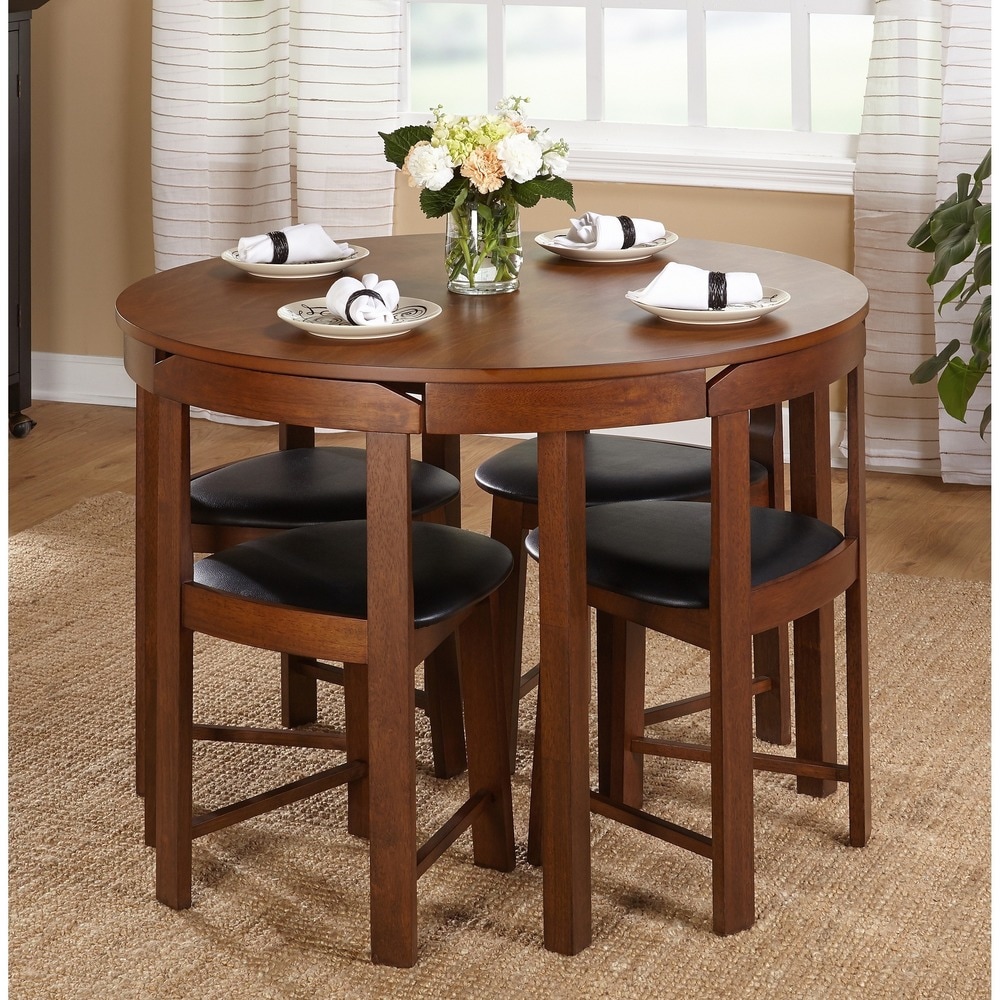
Best Small Space Pick: Harrisburg Tobey Compact Round Dining Set
Courtesy of overstock
Specs:
Dimensions: 41.3 L x 41.3 W x 29.6 H inches
Material: Solid rubberwood, MDF, and veneers
Seating Capacity: 4 people
Just because you have a small space does not mean you have to give up on having a dining table. This round design is perfect for even the smallest of apartments and homes because it comes with four chairs that tuck neatly under for maximum space. It comes in three colors, gray, walnut, and white.
It is also affordable, thanks to the MDF and veneer construction. The table’s round shape helps you maximize the available space without feeling cramped. Choose the dark walnut finish, and it will add a rich warmth to your room. It is then complemented by the faux leather upholstered matching chairs.
The drawback of this table is that it is not as strong or durable as the other tables on this list. In addition, the MDF makes it susceptible to water. It is also a really small table, so you will need somewhere else to put serving dishes if you want to have a centerpiece.
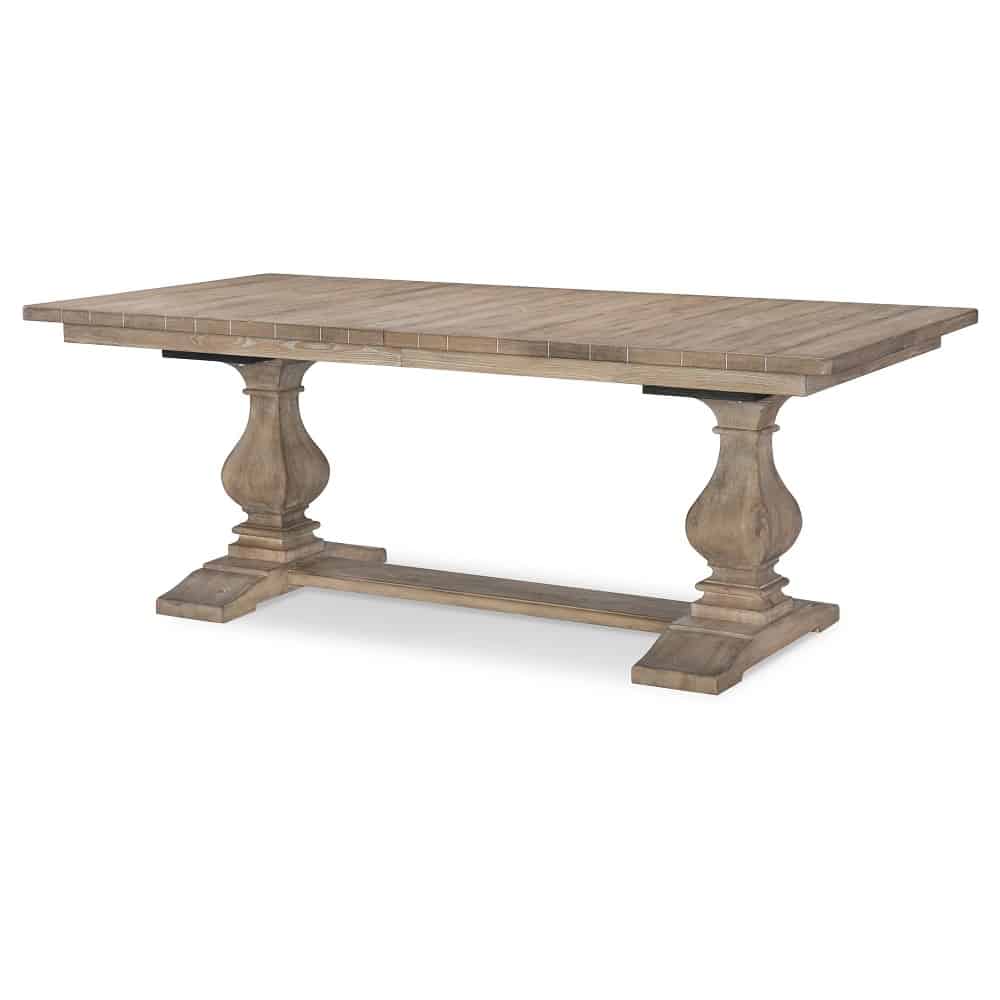
Best Traditional Pick: Sun-Bleached Cypress Complete Rectangle Trestle Table
Courtesy of Home Depot
Specs:
Dimensions: 120 L x 42 W x 30 H inches
Material: Pinewood
Seating Capacity: 10 people
The hallmark of a good farmhouse design is the big solid wood table that everyone gathers around for big family meals. This is that table. It has solid sculpted central supports that are connected by a trestle design.
What makes this table really stand out, though, are the two 18-inch leaves. This means you can comfortably seat up to 10 people if needed. When you do not need such a large table, you can take the leaves out and have a smaller table for a more intimate meal.
The construction is solid pine with a knotty cypress veneer for a casual rustic but not shabby design. With a weight capacity of 150 pounds, you do not have to worry about overloading the table.
One drawback of this table is that it does not have a smooth tabletop design. It is styled to look like multiple wood planks, which can create an uneven surface for your settings and centerpiece.
Best Modern Pick: Walker Edison Andre Modern Solid Wood Dining Table
Courtesy of amazon
Specs:
Dimensions: 72 L x 36 W x 30 H inches
Material: Solid pine wood
Seating Capacity: 6-8 people
The combination of weather wood tabletop and painted wood legs give this dining table a distinctly industrial feel. It is perfect for giving your home an urban-cool vibe. Choose from four colors for the wood tabletop, grey, mahogany, darker brown oak, and rustic oak.
The oversized dimensions of the table allow it to really fill a large space while giving you plenty of room for your settings and arrangements. The strong solid pine top and legs enable this table to support an impressive 200 pounds. Style your industrial table with the matching bench or weathered black metal chairs with a commercial feel.
One potential problem with this table is the placement of the legs. Because they are set in from the end of the table, they have the potential of being in the way of your legs. However, they are also set in from the sides to accommodate this.
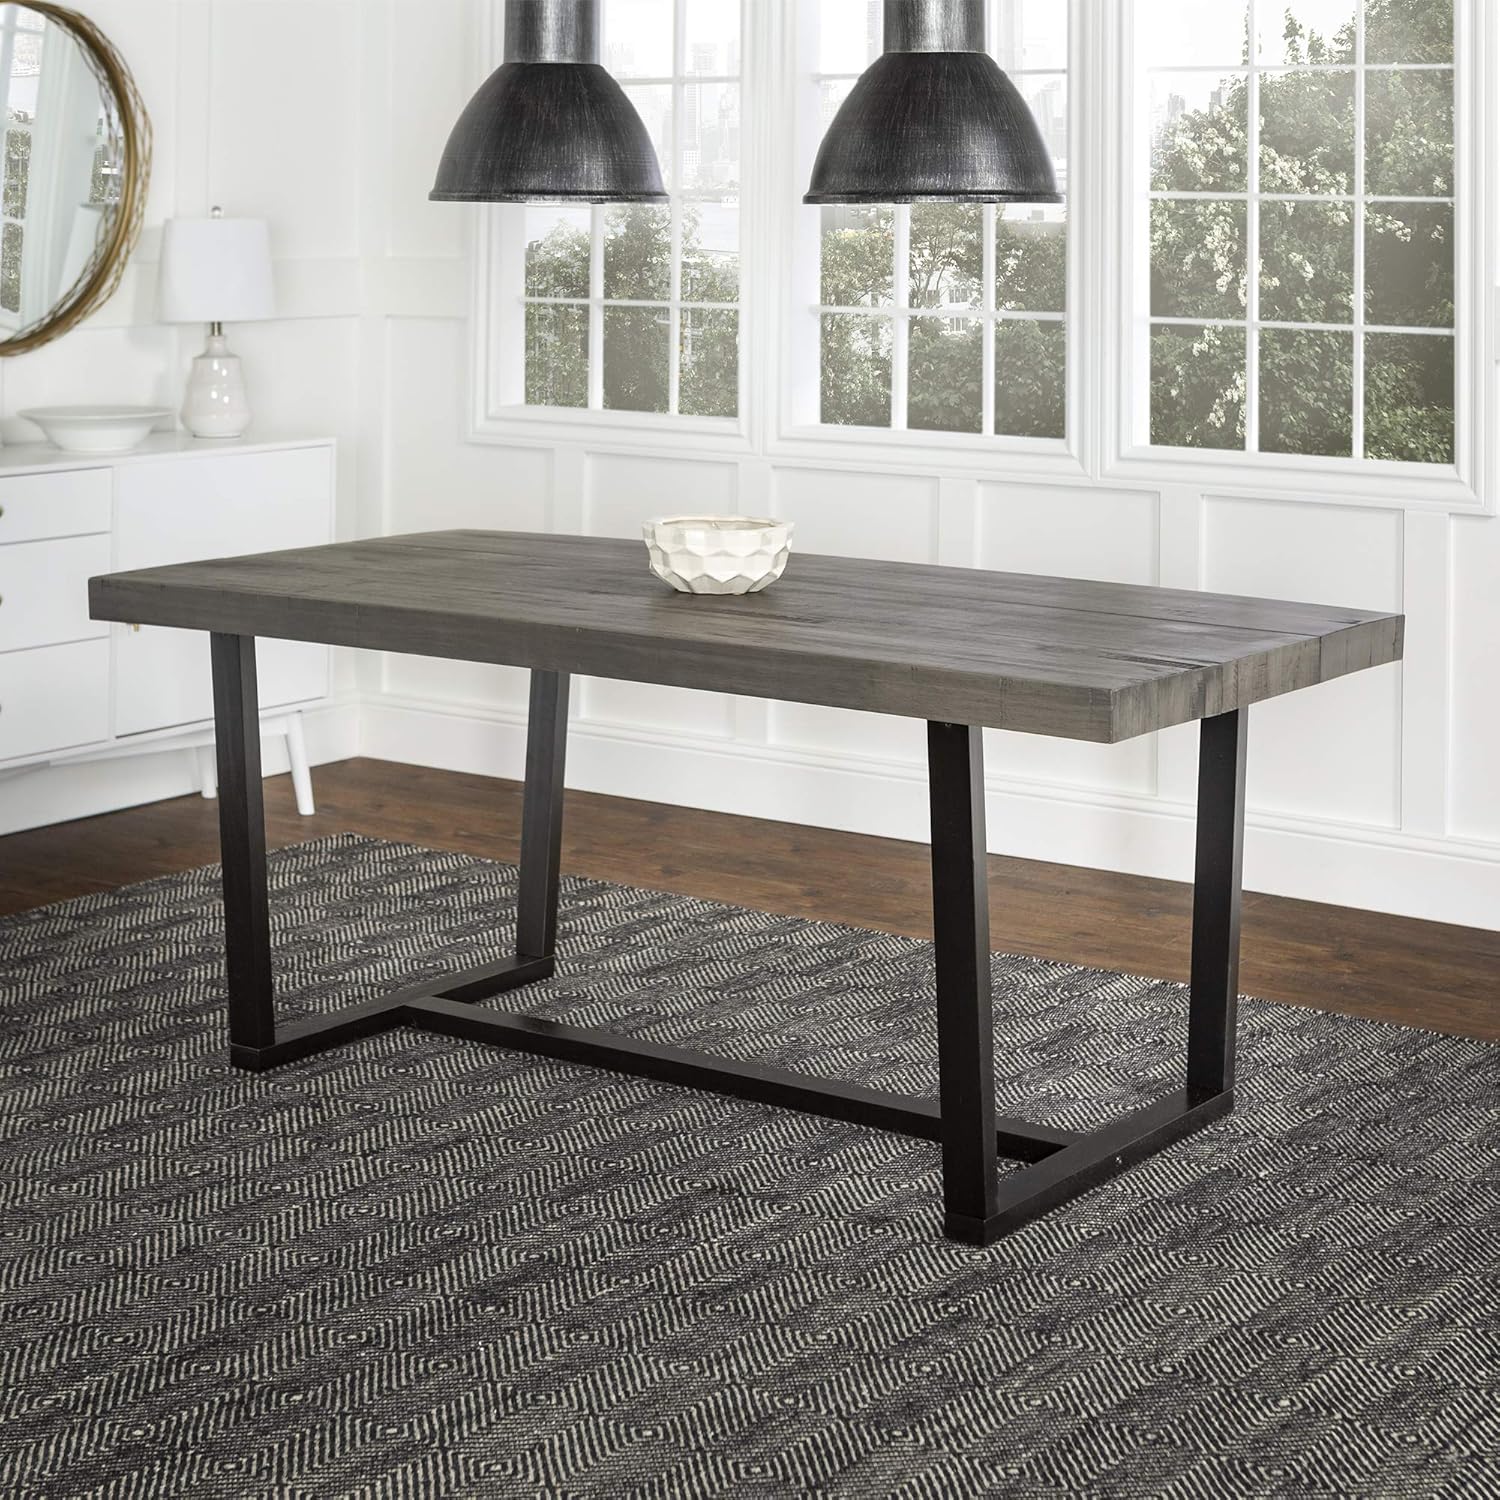
Best Farmhouse Pick: Home Decorators Collection Edmund Smoke Grey Dining Table
Courtesy of Home Depot
Specs:
Dimensions: 68 L x 36 W x 30 H inches
Material: solid wood
Seating Capacity: 6 people
Crafted of solid hardwood, this beautiful table will become a statement piece in your home. Its smoke grey finish gives the wood a modern touch that helps it to feel fresh and contemporary.
What makes this table stand out is its all-wood solid construction. It will feel strong and sturdy as it commands attention. The wideset legs make it possible to use chairs or benches for the seating.
You could complete the farmhouse look with matching solid benches. Or you could elevate the look of the table by pairing it with vibrant velvet chairs. Metal chairs will bring out the industrial feel of the table.
Unfortunately, the wood is not varnished or sealed in any way. This leaves the raw wood exposed, making it vulnerable to stains. If you are looking for a rustic farmhouse table, then this won’t be a big deal. However, if you are looking for something a bit more polished, the stains will detract from the table’s overall look.
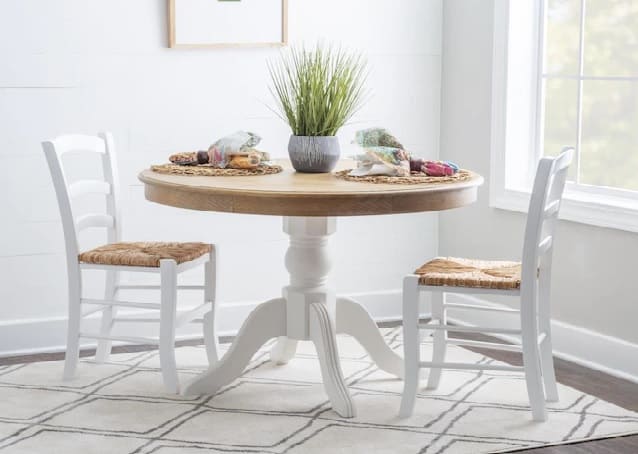
Best Round Table Pick: Linon Tobin Round Traditional Dining Table
Courtesy of Lowe’s
Specs:
Dimensions: 30 H x 42 Diameter inches
Material: Solid pine
Seating Capacity: 4 people
This round table is perfect for homes with a small dining room or homeowners who do not host large dinners. You can comfortably sit four people around the table. However, the pedestal style frame means you can easily fit additional chairs in if needed.
The solid pine tabletop features a rich honey grain that adds warmth to the space. It also gives the table strength and durability to give you plenty of years of service. The 42-inch diameter gives you plenty of room on the table for everyone’s place setting, serving dishes, and centerpiece. Style this tale with matching wood chairs or ones with a woven seat and back.
One drawback of this table is that it can look a bit rudimentary and outdated. However, it would look perfect in a farmhouse styled space. In addition, its casual design can make it better suited for a kitchen breakfast nook than a formal dining room.
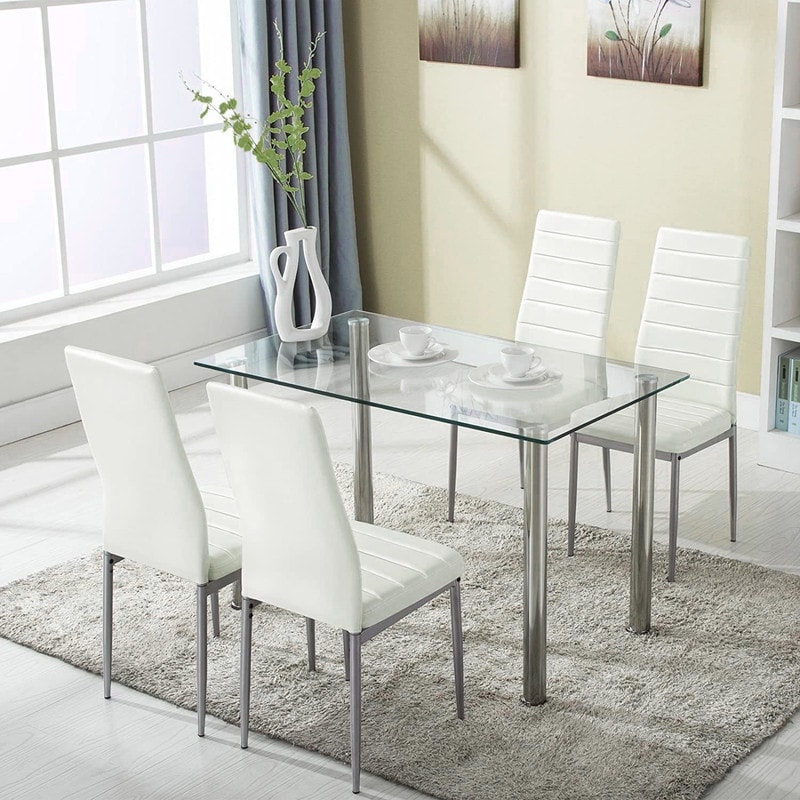
Best Minimalist Pick: Faux Leather and Glass 5-piece Kitchen Dining Set
Courtesy of overstock
Specs:
Dimensions: 44 L X 28 W X 29 H inches
Material: Metal and glass
Seating Capacity: 4 people
This sleek and modern dining set comes with a glass table and four faux white leather chairs. The thick tempered glass of the tabletop ensures it is safe and sturdy enough for your home. It is then mounted on a rust-resistant steel frame and legs, ensuring the table is stable.
The glass top is perfect for smaller spaces where you are trying to keep an open feeling. Because you can see through it, the table takes up minimal visual space, helping it to feel light in the room. The leather chairs then add a softness to the table. The set has a curated and custom look that you do not typically get with sets. This elevates the look of your dining room.
The drawback of this table and chair set is that the white leather can be hard to keep clean. The table is also narrow at less than 30 inches wide, which can make it hard to have a centerpiece or anything else on the table while eating.
The size of your dining table can make or break your entire living room. Choose a table that is too small, and you won’t have enough room for everyone, their plates, serving dishes, and centerpiece. Choose a table that is too large, and you won’t be able to move around the room, making it feel cramped. Measure the dimensions of your room and choose a table that leaves at least 36 inches of clearance around the outside of the table. Do not choose a table with a width smaller than 36 inches, or you won’t have enough room on the tabletop.
Seating Capacity
The seating capacity is the number of people you can comfortably sit with at the table. This does not account for cramming in extra chairs at family reunions or holidays. The number of chairs refers to the chairs that you can comfortably arrange around the table as a styled set. Consider the number of people you will regularly entertain at the table. You do not need a supersized table that seats 8-10 if you regularly only invite 4 guests to join you. Additionally, consider how the table fits in your room. It may seat six, but you can only fit five chairs around the table.
Table Legs
Nothing is more annoying than sitting at a table awkwardly because the support legs are positioned right where your legs are supposed to go. You spend the entire dinner with your legs crammed to one side or straddling a bar. The legs of your chosen dining table shouldn’t invade the space of the people sitting at it. Some tables have a central pedestal, which can look elegant but also create instability on long rectangle tables.
Material
The material of your table will influence its quality and price point. Balance your budget with the style and longevity of the table. Wood is popular and the traditional material. Solid wood is the most expensive but also the most long lasting. Wood-look and veneer are more affordable but not nearly as durable. Stone, like wood, is solid and long lasting. While stone-look mimics the look of stone at a lower price point but is not as durable. Other options are glass, metal, plastic, polycarbonate, and laminate. These materials are less common but can be worth the investment to achieve a specific look.
Construction Quality
The better the construction quality, the more expensive the table will be. If you are investing in a central piece of furniture that you plan to use for years to come, opt for high-quality construction. If you move frequently or plan to upgrade in the near future, then opt for a more affordable table that may not have top-quality construction. To determine quality, look at the joinery. This is where the table’s pieces are fitted together and the method used for assembly. Wood on wood joinery is the highest quality, while staples and glue are the lowest quality.
Our top pick for the best dining room table is the Tabor Pedestal Dining Table with its central pedestal and elegant glass tabletop. Its quality construction will translate to the room, elevating your dining room’s design and visual sophistication. For a more affordable option, the Zinus Jen 47 Inch Wood Dining Table won’t let you down. While it could have better construction, it is an affordable table with a classic design that fits well into smaller spaces.
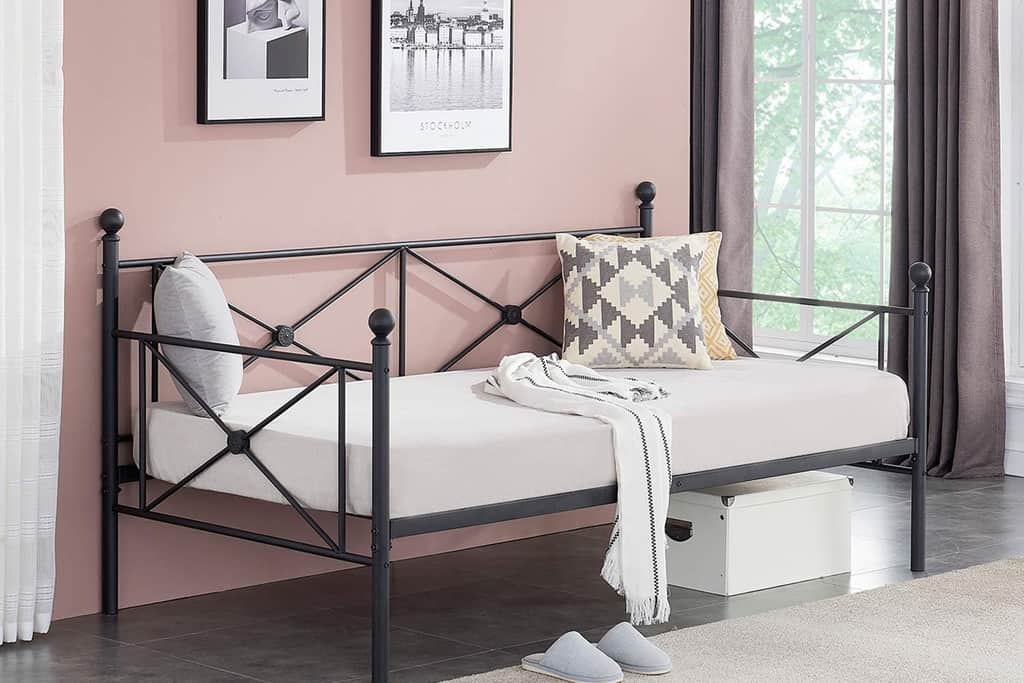
Having a spare bedroom is useful for when friends and family come to visit. But dedicating an entire room to the single-use as a guest bedroom is not practical in today’s world. This does not mean you have to give up the idea of having a guest space. It just means you need to think outside of the box.
A daybed is a perfect solution because it is a versatile furniture piece that you can use daily as a sofa and occasionally as a guest bed. Consider adding one of these high-quality daybeds to your home.
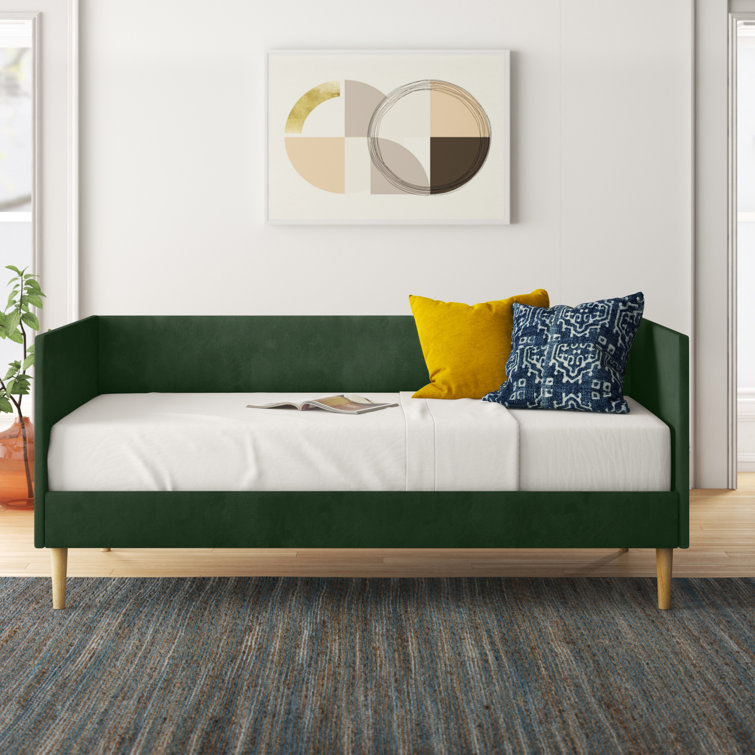
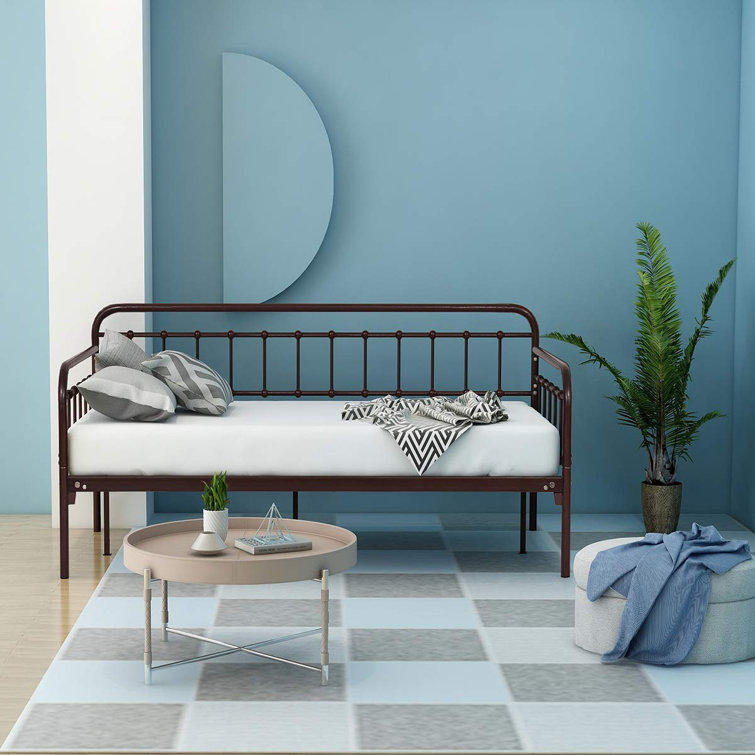
The classic mid-century modern styling of this daybed makes is the perfect timeless accent for your home. The slim straight lines of the legs elevate the daybed off the floor to give it a lighter and more spacious feel. The slim design makes it ideal for small spaces, such as an apartment.
What makes this daybed stand out is what you cannot see. The slatted base improves air circulation, keeping the bed cooler and fresher. The uniquely designed base ensures that the slats stay securely in place for maximum support and comfort. Choose from twin, full, or queen for the size of the bed. This lets you customize the size of the daybed to fit the space in your home.
One potential drawback of this daybed is that the slats are slender and thin. This can make them susceptible to breaking. It probably won’t be an issue of occasional use, but not good if you plan to use this daybed daily.
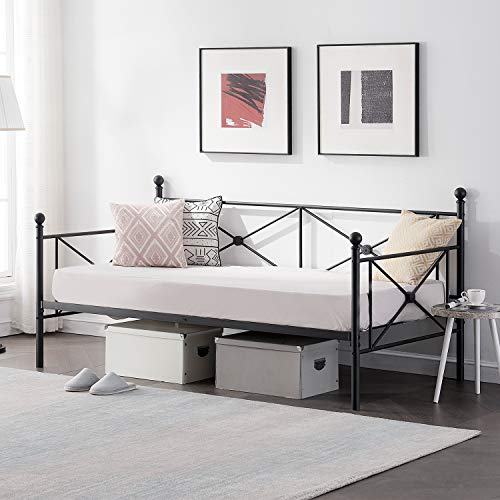
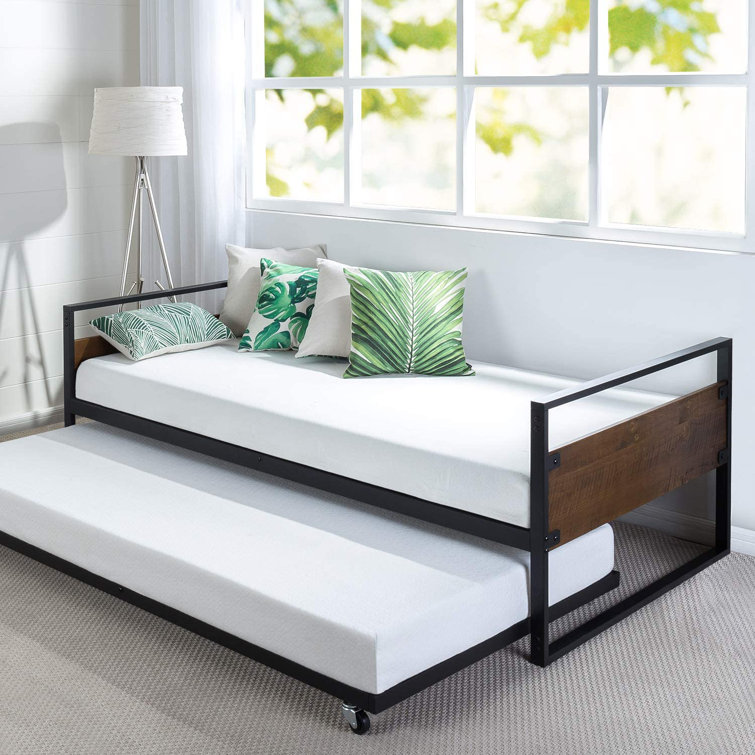
If you have a small space or are looking for a minimalist design, then this is the perfect daybed frame to add. it is made of metal and black in color. The slender design leaves plenty of open spaces. Unlike other designs, this one features an X design that helps hold the mattress in place.
Another nice feature is the totally open space underneath. This leaves room for adding a trundle bed later or large storage bins. The metal frame gives the daybed strength and stability, so despite its slender design, it is quite strong.
Unfortunately, the metal is not corrosion-resistant treated, so it will rust if exposed to high moisture levels. It will also begin to creak over time, which will be annoying and disruptive when trying to sleep on it. you will also want to add caps or rubber feet to it, or you will risk scratching or scuffing your floor.
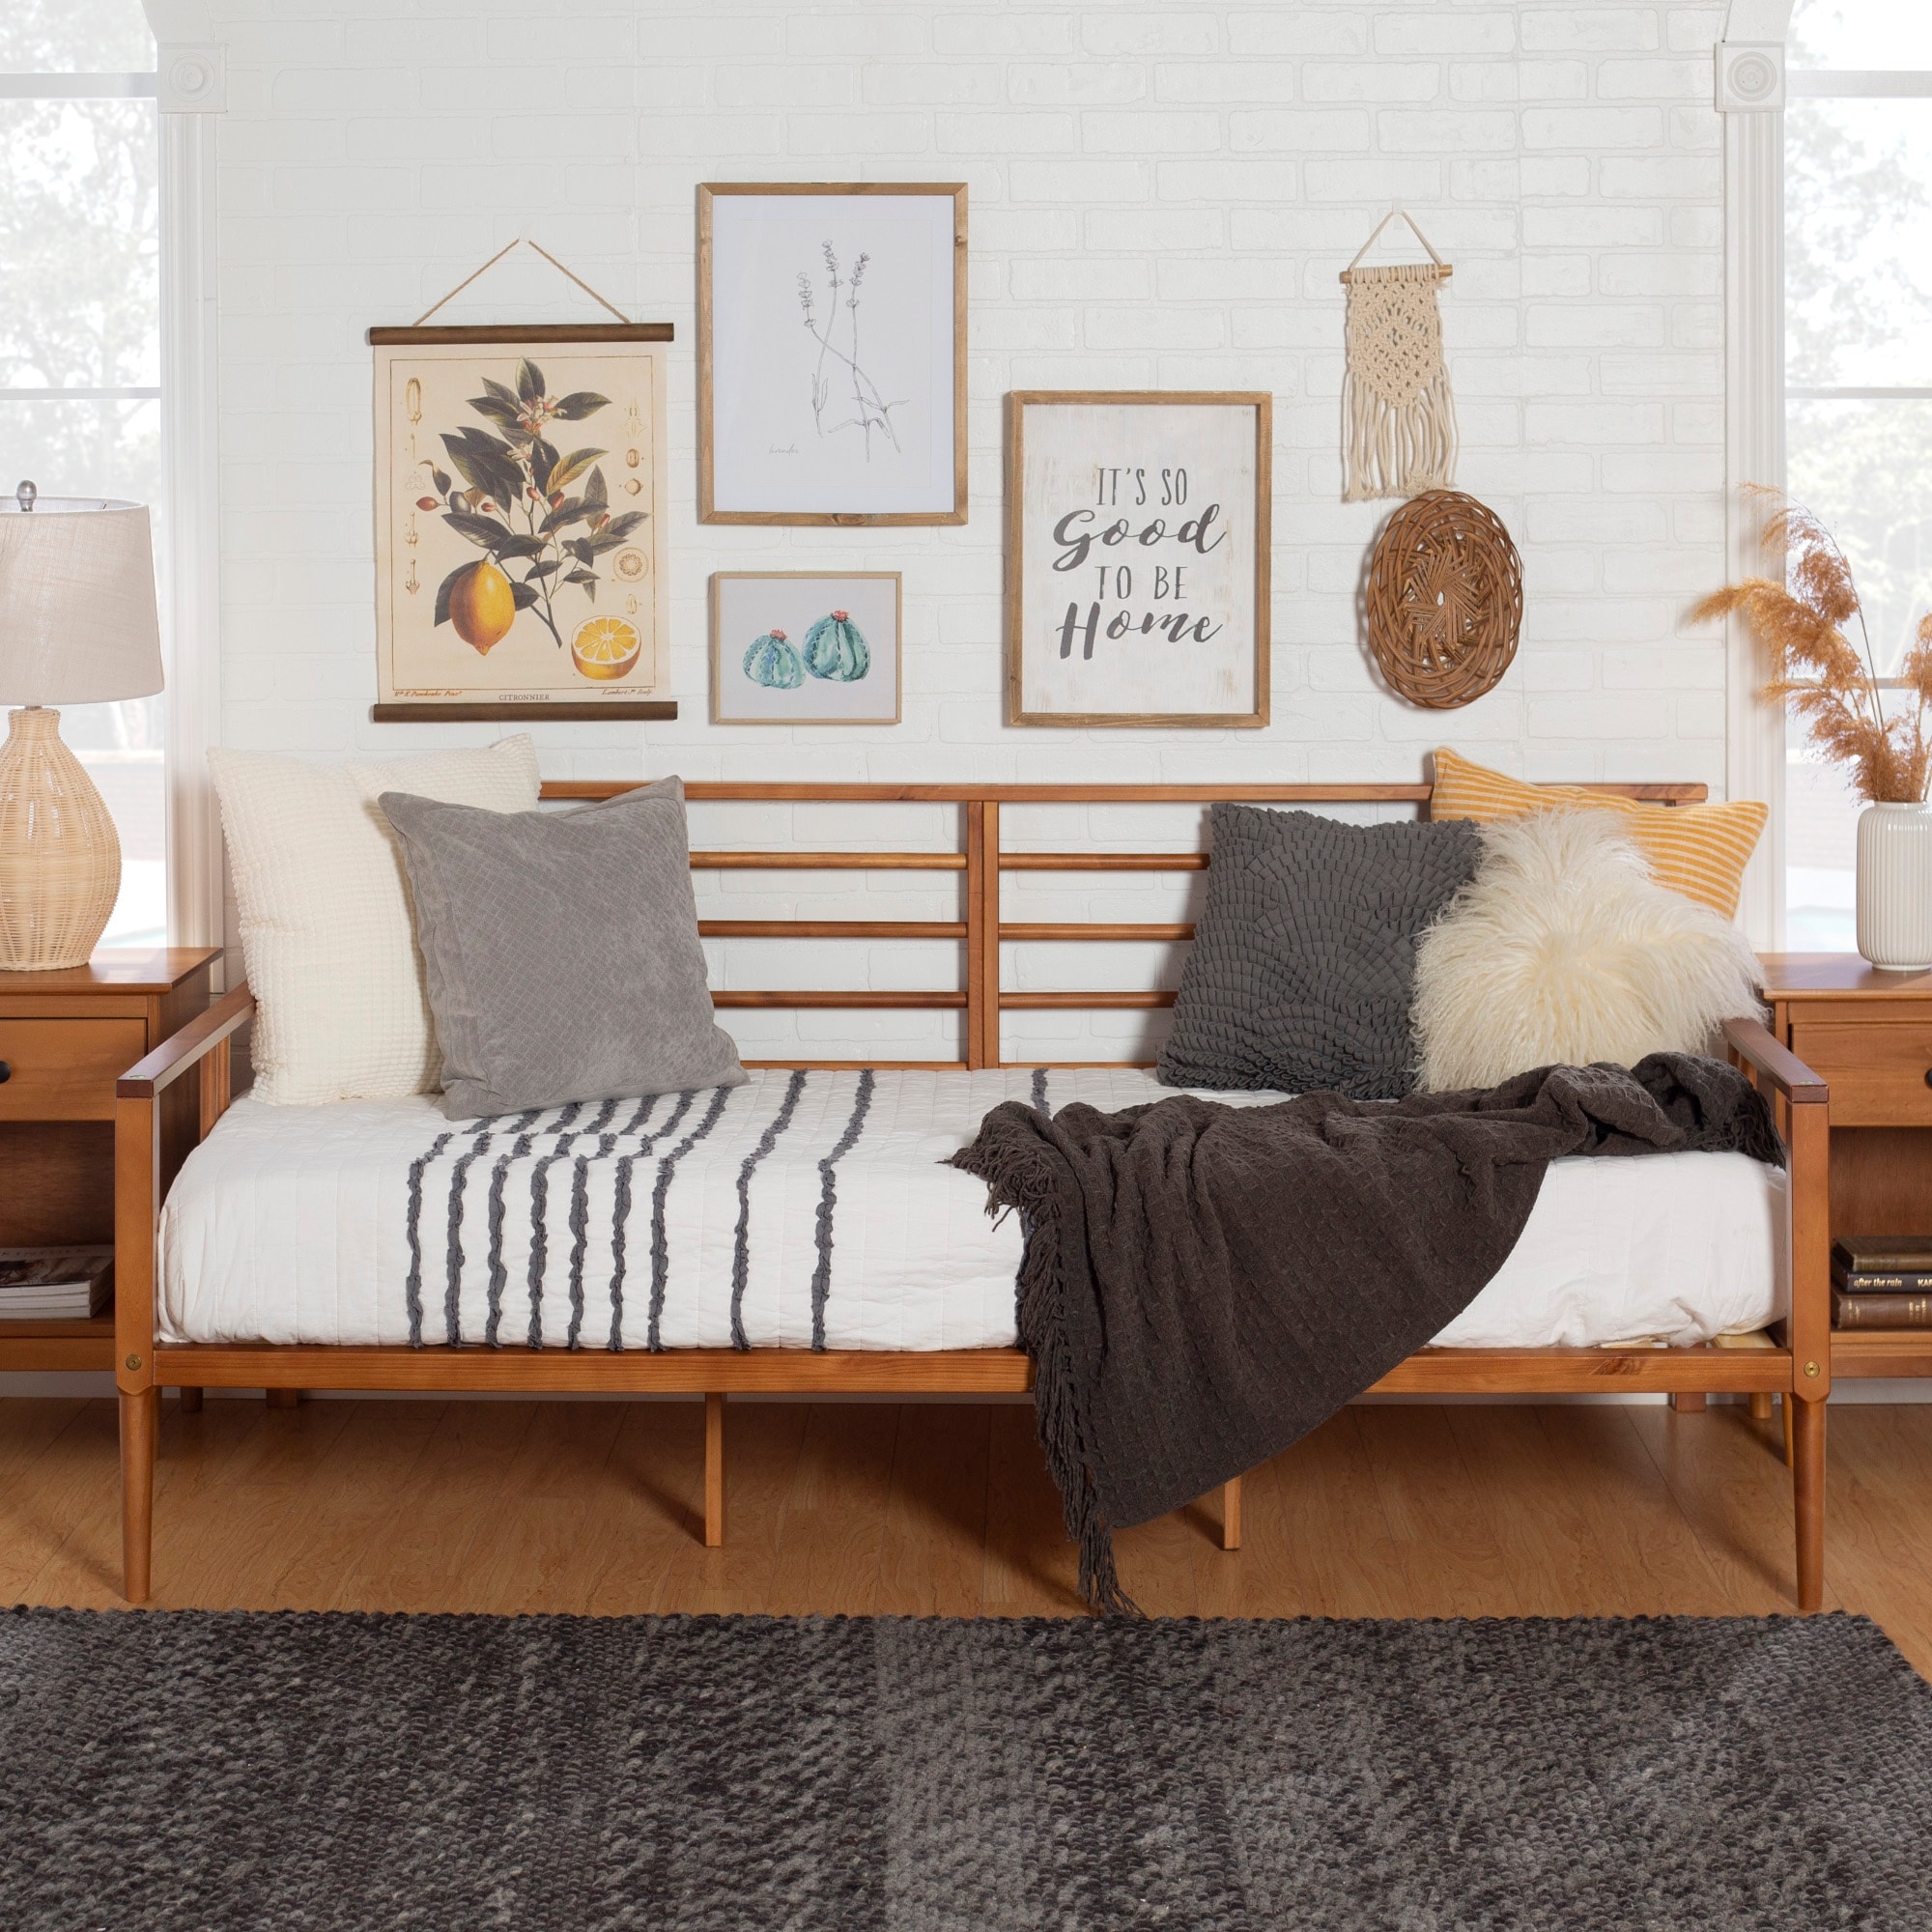
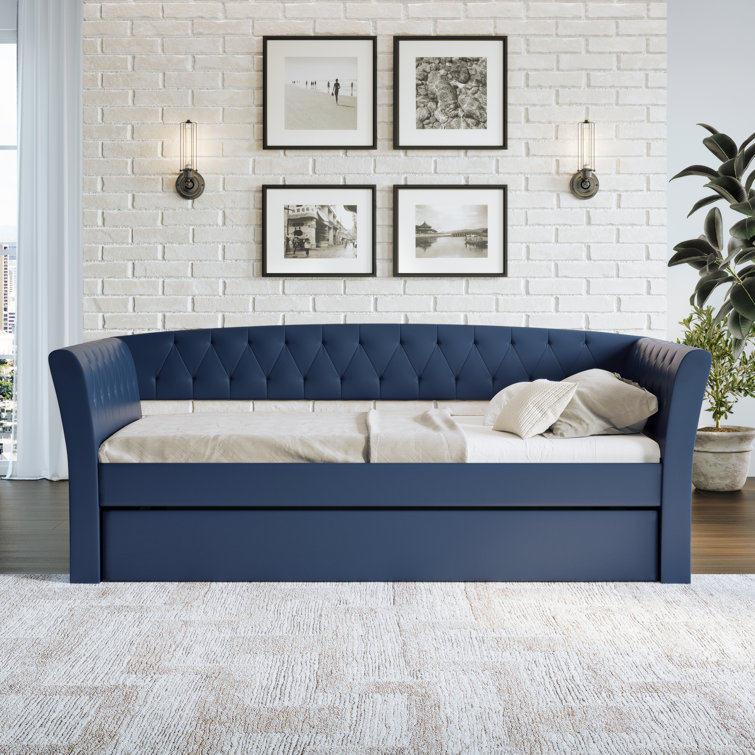
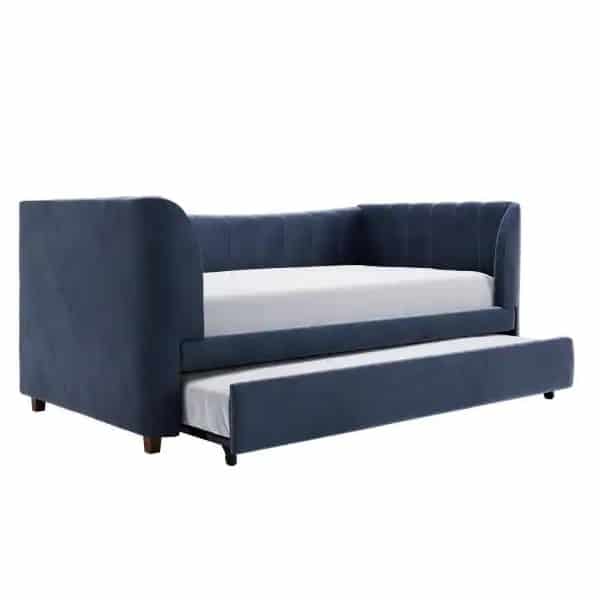
Best Bohemian Pick: Middlebrook Solid Wood Spindle Daybed
Courtesy of overstock
Specs:
Dimensions: 34 H x 78.25 L x 42.75 W inches
Material: Pine
Color Options: Walnut, caramel
The wood frame of this daybed makes it the perfect accent piece to your farmhouse or bohemian styled room. The slim wood styling helps to keep this daybed feeling light and airy, which is nice for smaller spaces. The solid wood construction and two color options bring warmth to the space.
While some would say this daybed has a mid-century modern design, it is so subtle that you wouldn’t notice. The frame is made of pine and then given a warm finish in either walnut or caramel. Add rustic warmth to this daybed by using a colorful handmade blanket. It could have rich American southwest colors, and an Apache or Navajo inspired pattern. Or it could have the bright colors of India.
Unfortunately, this daybed looks a bit plain. The wide gaps between the spindles create large gaps that blankets, pillows, or someone sleeping can start to slip through. There is also a lack of functionality underneath the daybed with support legs. This means you can’t add a trundle and are limited with the storage bins you can use.
This daybed may look simple, but that is the beauty of it. This is a piece to invest in to last you a lifetime. The solid mahogany frame is strong and durable, making it ready for many years of use. The simple design of the frame and the smooth upholstery means the design will look contemporary throughout changing trends.
You can choose from two sizes, twin and full. There are also several colors and fabrics to choose from. The saddle-colored faux leather creates a sightly masculine and sophisticated look. While the velvet is soft and plush, the basketweave is perfect for busy families with pets and children. The soft neutral color options mean you will be able to blend it into a wide range of color schemes.
Unfortunately, this daybed is not ideal for smaller spaces. Because the design is solid, it will add a visual heaviness to the room. This can be overpowering in small spaces.
Add a touch of vintage with this iron framed daybed. The crafted tubular metal frame is solid, harkening back to a time when furniture was handmade and designed to last. The frame’s main tubes are larger in size with smaller accent tubes throughout.
Choose from white, black, or brown for the color of the frame. A plastic cap is on the bottom of each leg to protect your floors from scratching. Style this daybed with a vintage accent blanket to highlight the vintage styling of the frame. Then you can arrange a few handmade throw pillows with a crocheted or knitted design.
The drawback of this daybed is that it does not have wide supportive slats. There are metal bars that support the mattress, but they are spaced out, which can create ridges of support. there is also an open gap on the back, so there is no support on either side of the mattress to hold it in place.
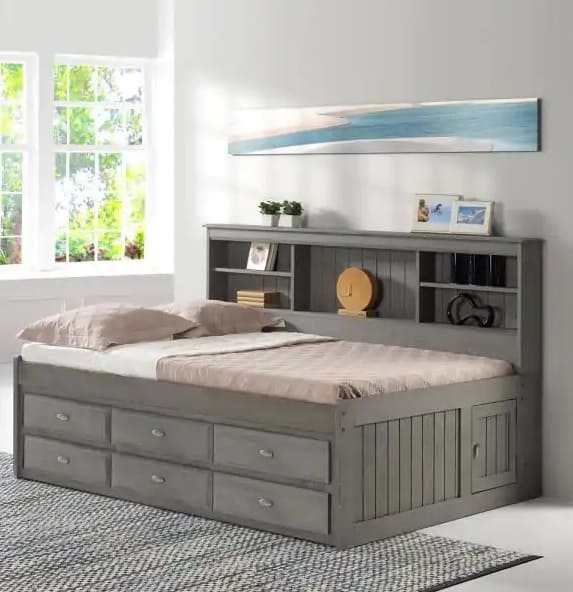
Best Built-In Pick: Charcoal Gray Series Full Size Daybed
Courtesy of Home Depot
Specs:
Dimensions: 50 H x 82 L x 21 W inches
Material: Wood
Color Options: Charcoal gray
Create a whole statement piece with this daybed that comes with an entire built-in bookshelf. This is not just a small furniture piece; it is for placing against a wall and creating a display piece. The entire unit is made out of wood with bookshelves that are located above the bed and storage drawers underneath.
There are an impressive six storage drawers located on the front of the daybed. The charcoal gray finish gives the daybed a weathered look that is slightly rustic and farmhouse. The added framework around the bed gives this furniture piece a more solid and custom feel as if it were built into the wall of the home and not bought after the fact. Embrace the cozy feel of the space it creates with plenty of plush accent blankets and throw pillows.
Unfortunately, you can’t get this daybed with a trundle bed option. This can limit the number of sleeping spaces you have. The large size and additional bookshelves make this piece quite large and visually imposing. This makes it best for a larger room, as it can look imposing and cramped in a small space.
Best Industrial Pick: Barrett Twin Solid Wood Daybed
Courtesy of wayfair
Specs:
Dimensions: 25.8 H x 78 L x 39 W inches
Material: Solid Wood
Color Options: Black/Brown
This daybed proves that you do not have to add an ornate or large piece of furniture. The simple black metal frame and wood panels create a combination of materials that adds structure and warmth to the room. The steel frame is strong and secure, giving this daybed longevity.
A unique feature of this daybed is that it comes with a trundle bed, but it is not connected or attached to the day bed. The mattress lays on a metal frame that is supported by swiveling metal casters.
A nice design touch to this daybed is the detailing in the wood with natural wood knots and grain color variation. This gives the wood a touch of rustic and industrialism. You could embrace this look with leather pillows and neutral-colored sheets. Or you can soften the look of the daybed with more delicate fabrics.
One potential issue with this daybed is that there is not a lot of space underneath. This means you will need a low-profile mattress for the trundle bed frame. Otherwise, you won’t be able to fit it underneath the daybed frame.
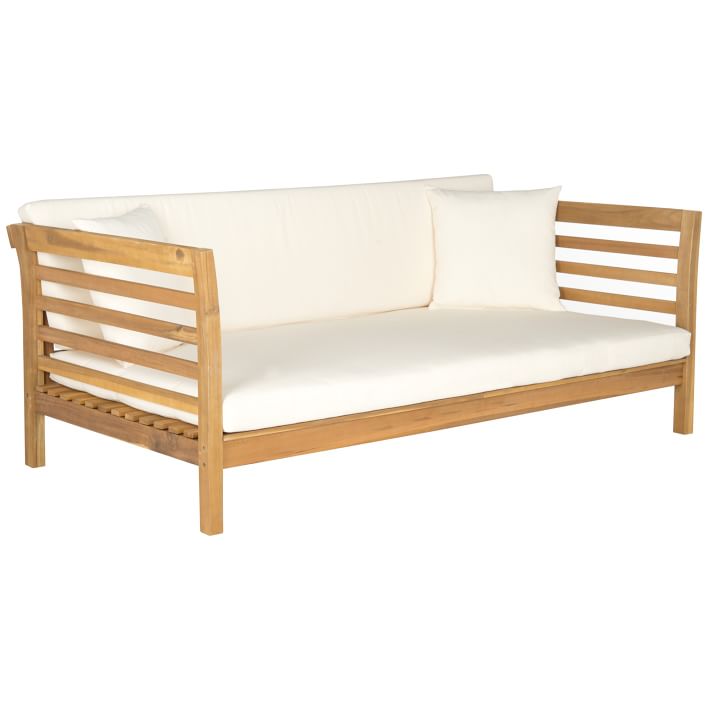
Daybeds are not just for the interior of your home. You can place this daybed in your outdoor living space for more comfort and seating areas. The frame is a durable acacia wood with a teak finish. This gives the daybed a classic outdoor furniture look while also being durable enough to last.
This daybed stands out because the cushions are included, making this daybed usable upon purchase. The cushions are made from 100% polyester that is moisture resistant, so you do not have to worry about maintaining the daybed. The narrow and close-together slats give the seat cushion plenty of support. The light wood and white cushions give this daybed a contemporary feel that will help your outdoor space look fresh and modern.
Unfortunately, this is not a daybed for sleeping. it is a bed for lounging because the included seat cushion is quite thin, so it lacks enough support for sleeping on it for an entire night.
The classic design of this daybed gives it a timeless style that will blend into a contemporary home. The faux leather finish gives the daybed a sense of quality and sophistication. The tufted design emulates traditional furniture. The solid styling of the frame creates a sense of presence. Combine this with the trundle bed, and you have a solid furniture piece with plenty of sleeping capacity. A nice subtle touch to this daybed is the shaping. The gentle curve of the back and armrests softens the look of the daybed and keeps it in line with current furniture trends.
One potential drawback of this daybed is that the leather is smooth, which can feel cold. The slats are also oddly placed, which can make them less supportive if you have a memory foam mattress.
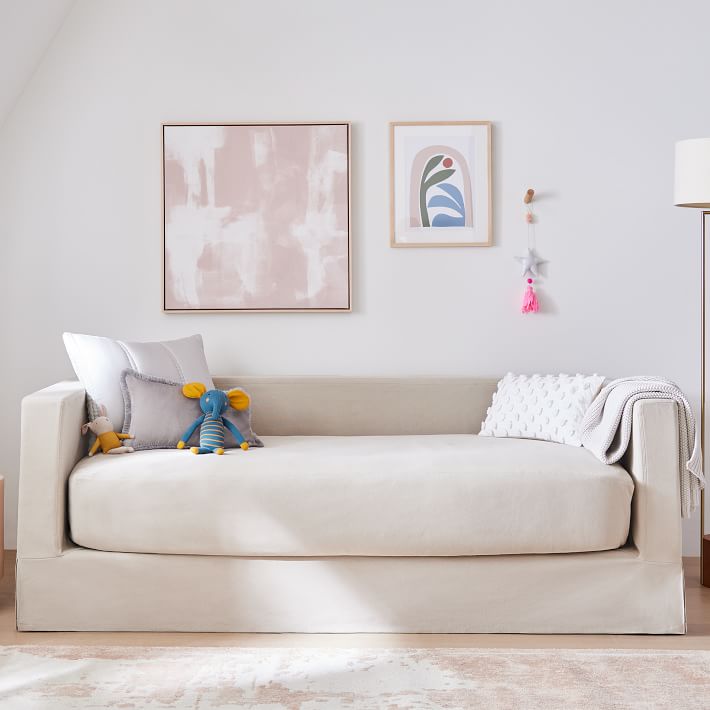
Best Glamorous Pick: Little Seeds Valentina Velvet Daybed
Courtesy of Home Depot
Specs:
Dimensions: 36 H x 83.5 L x 45 W inches
Material: Composite and velvet
Color Options: Blue, gray, or pink
The elegant and sophisticated styling of this daybed makes it the perfect accent to any room in your home. Bring it out of the spare bedroom and place it in your formal entertaining space or living room. The high sides and back add a touch of drama, helping this daybed to make a statement and become a focal point. The velvet upholstery comes in three colors, blue, gray, and pink. Hidden underneath the daybed is a trundle. This gives you space for two mattresses. The smooth-rolling casters make it easy to move the trundle in and out.
One issue with this daybed is that it is designed for kids. This can make it too small for use by adults. It can still be a small sofa in a hallway or entry area. However, because it is meant for kids, this daybed is the perfect piece for your children’s room. Sleepovers become a breeze as you pull out the trundle and everyone gets a comfortable sleeping space.
The frame material is crucial because it dictates the strength, stability, and durability of the daybed. Metal is the traditional material, but can be expensive and typically comes in a vintage or ultra-modern style. Wood is another popular material that is more versatile. Depending on the quality of the wood, it can be more affordable or more expensive than metal. Solid hardwood is expensive, but the highest quality. MDF has pressed particles that are more affordable than metal.
Trundle
A trundle is an extra bed that is underneath the daybed. Not all daybeds have a trundle bed. For some, it is an optional addition that you can purchase. For others, it is a built-in piece. You may not need the trundle part of the daybed. Instead of a trundle bed, you could leave the underside of the daybed open, which helps the room to feel lighter and bigger. If you need more storage space, you could look for a daybed that has cabinets or drawers underneath.
Upholstery Material
The upholstery material can transform the look and style of your daybed. This is the material that is attached to the frame, similar to a sofa or armchair. Not all daybeds have upholstery, such as a metal frame. A cotton or linen fabric upholstery will give the daybed a more casual feel. Fabrics like velvet or silk will give the daybed an elegant and sophisticated feel. If you have pets or children, look for a fabric that is easy to clean.
Style
The style of daybed that you buy should make sense with the rest of the furniture in your home. A metal frame makes sense if you have a rustic, farmhouse, or vintage style. A mid-century modern design works well in a contemporary, modern, or Scandinavian style. A daybed with a built-in bookshelf will make sense in an American craftsman-styled home.
Mattress
Typically, the mattress won’t come with the daybed. it is sold separately, which gives you the opportunity to buy your preferred type of mattress. You won’t need a box spring because most daybeds come with slats to support the mattress. If your daybed does come with a mattress, you will want to look at its quality. Often, the daybed will be high quality and the included mattress won’t be nearly as nice.
Conclusion
Our top pick for the best daybed is the Chadlee Daybed with its simple yet classic styling that gives this mid-century modern daybed a timeless appeal. The three richly saturated colors and light wood accents give this daybed a clean design. The Vecelo Classic Metal Daybed is a more affordable alternative with its farmhouse inspired metal frame that features slender tubular supports and an extra frame design.
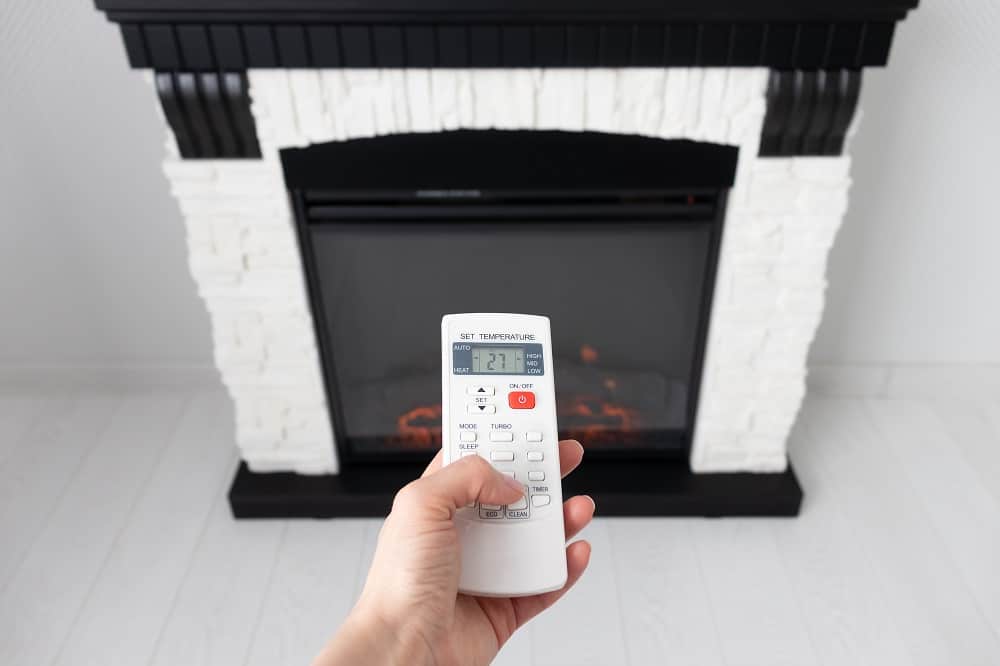
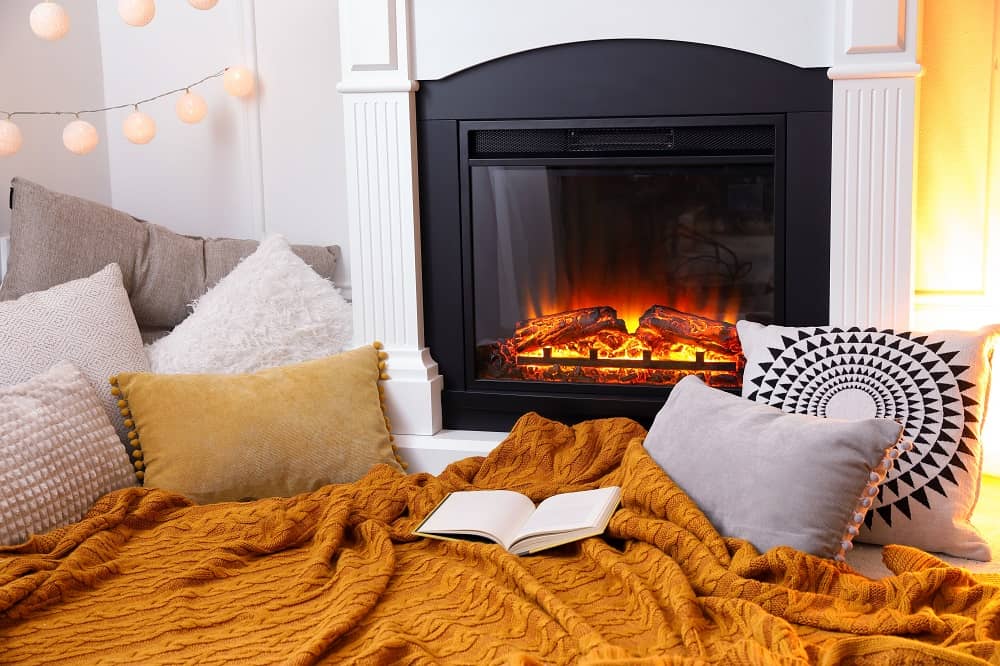
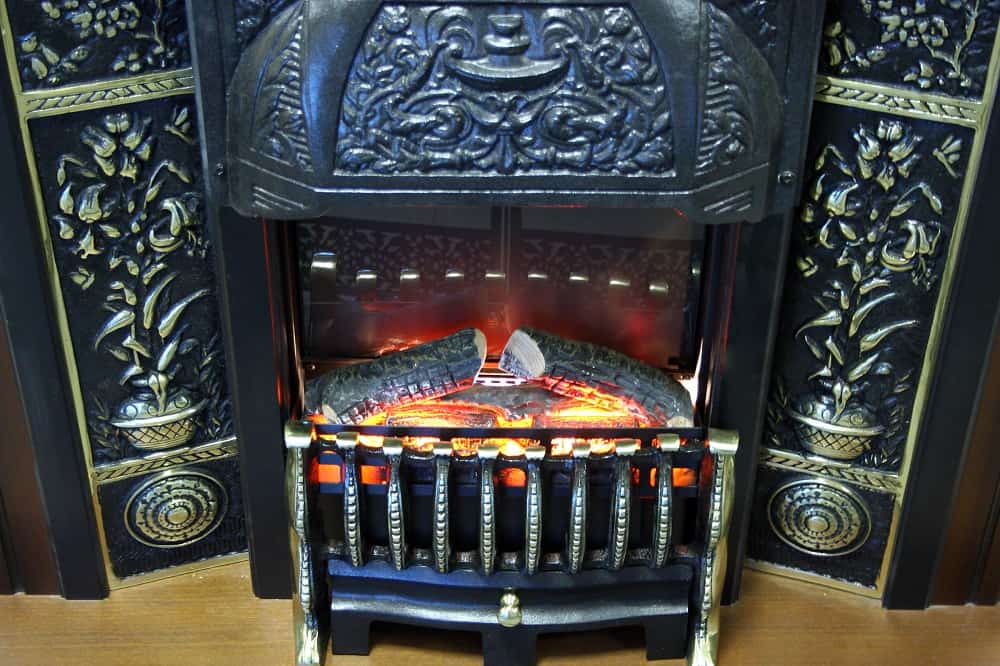
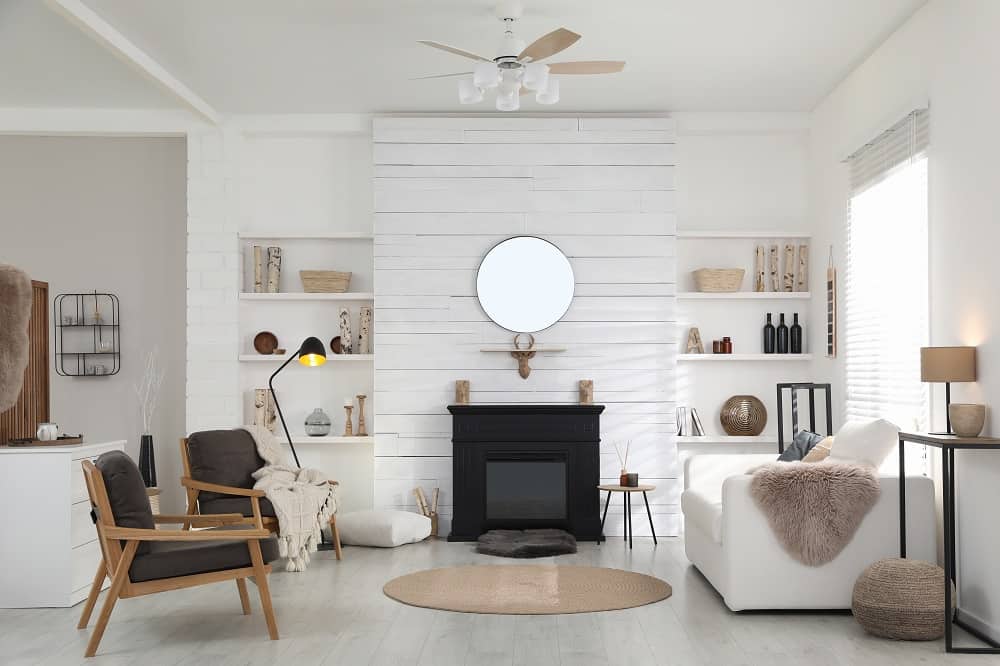
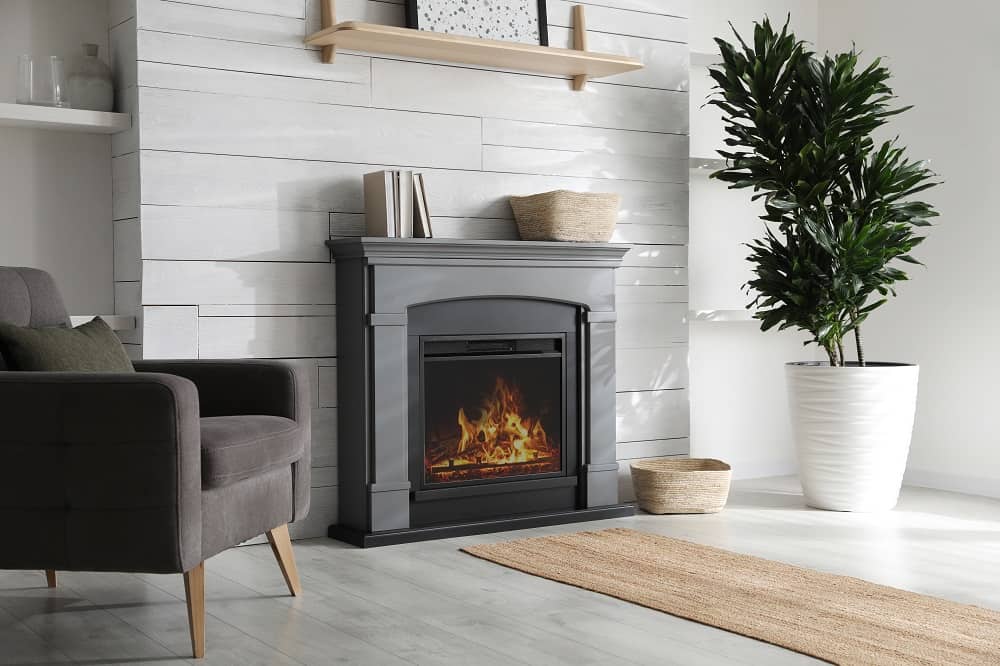
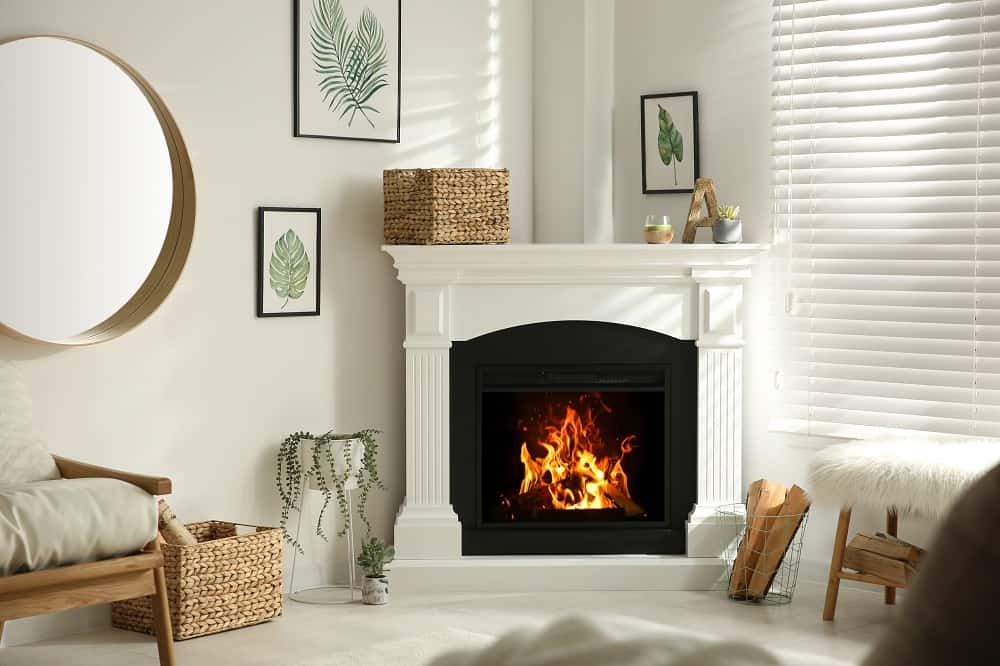
Adding an electric fireplace to your living room or bedroom is a perfect way to create ambiance and add a bit of extra warmth to the space. Electric fireplaces are easy to add to an already built home because you do not have to add a chimney or make any other major home remodeling projects. Electric fireplaces are also much more affordable to run and have many more options than a traditional fireplace. However, their biggest drawback is that electric fireplaces tend to not look realistic. This can take away from the cozy feel that you are trying to create by adding the fireplace. Use these tips to make your electric fireplace look more realistic and built into the wall.
You will quickly realize that electric fireplaces come in a wide range of dimensions. While the long and narrow fireplaces look cool and modern, they are not the best choice for creating a realistic-looking built-in fireplace. Instead, you will want to purchase an electric fireplace that has more height. A square shape will look more realistic because it will mimic the look of a traditional firebox. The size of the electric fireplace does not matter too much when it comes to creating a built-in look. It is better to tailor the size based on the size of the room.
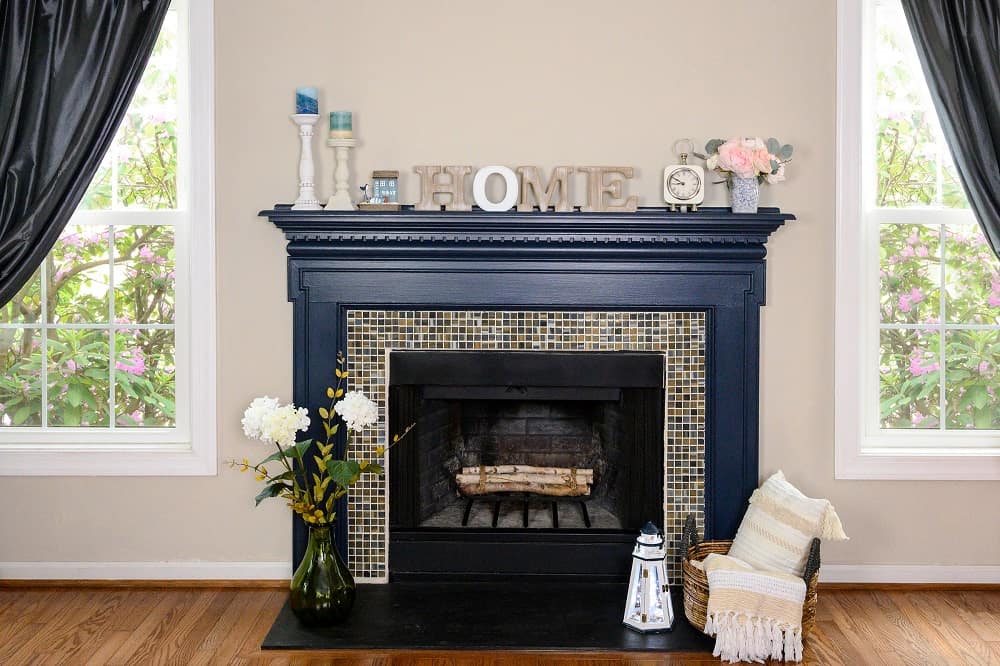
Add a Mantel
The hallmark of a traditional fireplace is the mantel. If you want your electric fireplace to look built-in, then you need to add a mantel to the wall above the fireplace. Once the mantel is in place, people will notice the fireplace but focus on the mantel. They will assume the fireplace is real and spend more time looking at the decor you have arranged on the mantel.
Just like a real fireplace, the mantel you install needs to be proportional to the size of your electric fireplace and be in a similar style. The average mantel is 60 inches long, so this is a good place to start. However, the mantle should be 3-6 inches longer than the firebox on each side. Because electric fireplaces come in a wide range of sizes, take the width of your fireplace and add 6-12 inches for the length of your mantel. The face height of the mantel will depend on the size of the room. The bigger the room, the taller the face height can be. A face of 6 inches will look nice in a large room but overpower a small room. The depth should be about 7 inches so that you have enough room to arrange decor on it. Do not let the mantle be deeper than 12 inches or you risk people accidentally walking into it.
If your electric fireplace is low on the wall, then you should place the mantel at a standard height of 4.5 feet from the floor. However, this can change if you have chosen to install your fireplace at a nontraditional height on the wall.
If you are looking to add more than just a mantel, then consider adding an entire surround. These would be the decorative pieces that are on the sides and above the fireplace box. Traditional Victorian fireplaces are a good example of this. You can use a reclaimed or salvaged surround that is full of ornamentation or build a new one with a simplified contemporary feel. Adding a surround helps your electric fireplace to blend in and look more real.
Real fireplaces produce a lot of heat, so the materials used to build them and the surrounding structures are heat resistant. To make your fireplace look authentic, use these same materials around your fireplace. Instead of using a flammable building material, use stone to build a hearth, surround, or mantel. Stacked stones create a modern feel, randomized stones look more rustic, and cut marble looks elegant. Tiles are also commonly used because of their heat resistance. Stick to these materials around your fireplace:
Masonry
Stone
Concrete
Tile
Metal
Hardy backer board
Some woods
Cement board
Calcium silicate board
Certain types of glass
Use Bigger Dimensions
Portability is associated with a smaller size. If your electric fireplace is on the smaller side, it will be viewed as less permanent, making it look less realistic. This doesn’t mean you have to upgrade to a bigger fireplace. What you can do instead is to increase the dimensions and proportions of the elements around it. Build a slightly larger hearth. Add an extra inch to the thickness and length of the mantel. Make the surround take up more visual space. Do not lose sight of your proportions when enlarging the features. All of your increased proportions need to stay in line with each other. Increasing the size of one element significantly more than others will create an unbalances design. The hearth should stick out further than the mantle to keep a realistic look.
Add Built-Ins
One way to make an electric fireplace look built-in is to add actual built-ins around it. Build cabinets that cover the wall. Leave a space where you plan to add the electric fireplace. These bookcases and cabinets should extend from the floor to the ceiling. Add decorative molding to give the built-ins a custom touch. You can also use molding to close the gap around the fireplace. For a balanced display, try to match the units on either side of the fireplace. This creates symmetry, which is a classic interior design rule.
Hang a TV
One of the most common design choices you will see in modern homes with a fireplace is to hang the TV over the fireplace. Copying this choice in your home with an electric fireplace will make yours look more realistic. The idea is that you place the faux fireplace in a setting where people expect to see a real one. Instead of focusing on the electric fireplace, the brain “fills in the gaps” and assumes the fireplace is real. The height and size of the fireplace you choose will depend on the size of the room. Typically, people mount the fireplace 60-68 inches from the
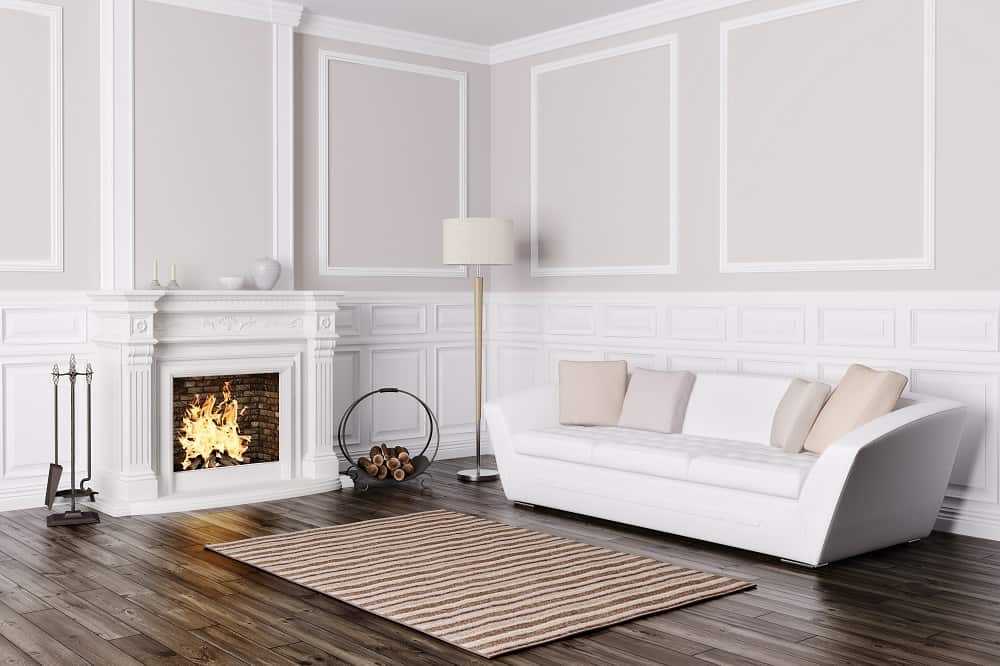
If you have a fireplace in your home, you are lucky enough to have a natural focal point. You can use the fireplace to set the tone for the rest of the room. Part of this is the design and style of the fireplace surround. Another part is the color you choose. The color you choose will influence your room’s entire design and feel. Choose the wrong color, and your fireplace design will fall flat. Choose the right color,, and it will become an eye-catching design. We will help you choose the right color for your fireplace surround.
[view_toc]
What Is the Fireplace Surround?
The fireplace surround is the decorative part of the fireplace that protrudes out from the wall that is above and on either side. Sometimes, it also includes a piece on the bottom, called the hearth.
Back in medieval times, the mantel served a functional purpose, to catch the rising smoke. However, over time, innovation and technology have made the mantle more of a decorative piece and less of a functional element of the fireplace. As a part of this development, people have added on to the mantlepiece to include the legs and hearth.
What Paint Do You Use on a Fireplace Surround?
The paint that you use on your fireplace surround needs to be able to withstand high heat. Look for a paint that is safe for use in areas that experience around 500 degrees Fahrenheit. Wood combusts at 300 degrees, which means your wood-burning fireplace can get much hotter than this. The paint you use needs to be safe for high heat because you are using it on an area that is right next to the flames in the firebox.
The type of paint that you use to paint your fireplace surround will depend on the material it is made out of. If your surround is made out of wood, then use an oil-based paint instead of latex. The oil-based paint won’t soak into the wood like water-based paint. This helps it to stick better and dry faster. It is also more durable, making it easier to maintain. If your fireplace surround is made out of stone or concrete, this is not an issue,, and you can safely use water-based paint. Vintage cast iron fireplace surrounds will get very hot, requiring them to be painted with a paint that has an even higher temperature tolerance.
If you use paint that is not specifically designed for use on fireplaces, you risk bubbling, cracking, melting, peeling, or even lighting on fire. The wrong paint can also emit harmful fumes when it gets too hot, which can endanger you and your family.
Color Ideas For Your Fireplace Surround
The color you choose for your fireplace surround will depend on its size, style, room color scheme, and room design style. You should choose a color that makes sense for all of these elements and the rest of the room. There is no one correct answer because everyone’s personal taste and home are different.
Neutrals
When talking about neutrals, we are referring to white, black, gray, and shades of tan or beige. These colors pair well with a wide range of colors, making them versatile. Choosing white is smart because you are probably already using white for the baseboards, crown molding, window trim, and door frames. Painting the surround with white creates a uniform look in the room by matching it to the rest of the accent trim pieces.
The opposite of this is using black, which, just like white, you can pair with any color. Black makes a stronger statement, and for many people, it makes a contemporary statement. For others, black is too harsh. The perfect alternative is to choose a shade of gray. Dark charcoal softens the look of black while still having a sophisticated feel.
Beige and tan are not colors that you will typically paint the fireplace surround. If these are a color that you’d like to use, consider creating the look with wood or stone instead. Then you get the color shade plus the added benefit of texture, color variation, and nature.
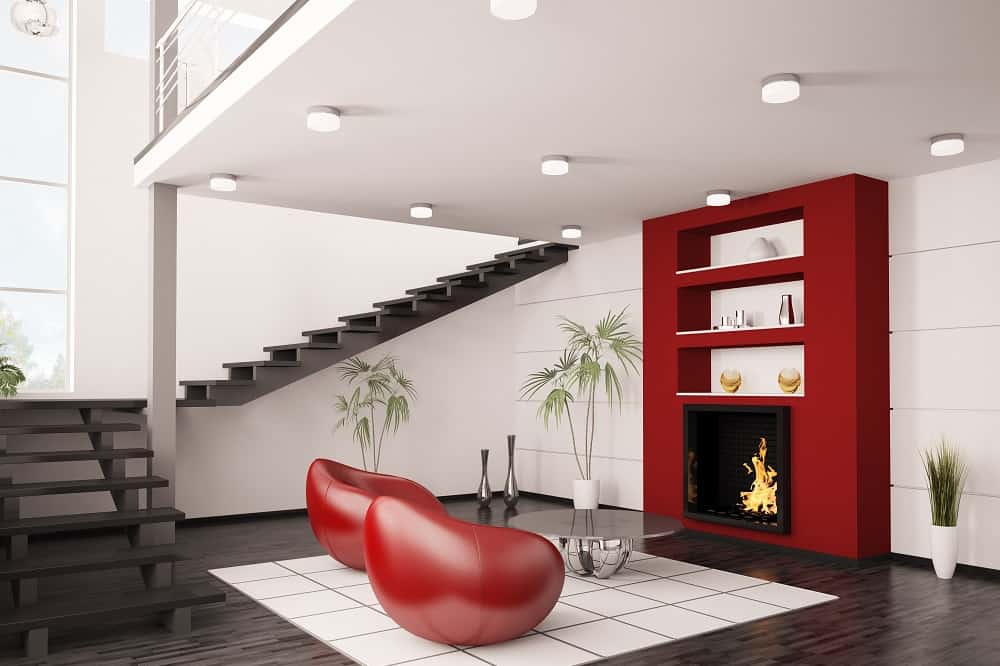
Contrasting
If you want your fireplace to take center stage in the room, choose a contrasting color. A common approach is to choose a contrast of light and dark colors. This creates a striking contrast while drawing the eye. If your walls are light or bright, choose a darker color for the fireplace surround. If your walls are darker, choose a lighter shade for your fireplace surround.
Contrasting can also be a difference in saturation. This is the amount of pigment the color has. For example, you could paint your walls a muted sage color that does not have a lot of color saturation. Then paint the fireplace surround a highly saturated plum purple, navy blue, or maroon. Not only are the two colors different, but the contrast in saturation makes a stronger contrast.
Monochrome
Taking a monochrome approach means that you will use the same color on the fireplace surround that is on the walls. Everything blends together because it is all a similar color. You can fully commit to this idea and literally paint everything the same exact color. However, this can make your wall fall flat as you lose the depth and dimension of the fireplace surround. To fix this, try using the same color but in varying shades of tint, shade, or tone. The fireplace surround can be the same color but slightly lighter or darker than the wall. This creates depth and subtly highlights the fireplace surround. It is a way of simplifying a busy design without completely losing it.
A monochrome design choice makes sense in a modern, minimalist, or even a Scandinavian-styled room. These design styles embrace simplicity and streamlined design. A monochromatic color choice highlights this by reducing the visual clutter and artfully blending the fireplace’s architectural feature into the rest of the room.
Complementary
Choosing complementary colors means you choose two colors that are on opposite sides of the color wheel, such as red and green. The strategy works well for your fireplace surround because you do not want to use complementary colors equally in your interior design. Use one colors for the walls as the primary color in the room. Then use the complementary color on the fireplace surround as the accent color. Here are some complementary color combinations.
Yellow and Purple
Blue and orange
Red and Green
Red-orange and blue-green
Yellow-green and red-purple
Consider the hue, vibrancy, tone, and saturation of each color. They need to balance each other, so try to use colors where these qualities are the same. That way, one color doesn’t overpower the other because one is more saturated or vibrant than the other.
Using a complementary color scheme is so popular because it can work in almost any interior design style. The key is choosing the right color scheme for the interior design style that you want to create. From farmhouse, rustic, and industrial to contemporary, bohemian, and maximalism, you can find the two complementary colors that will work in your room.
Adding decorative plates to your walls is an easy way of adding color and decor to your home. The three-dimensional nature of the plates allows them to protrude away from the wall, adding depth to the decor and space. There are plates for every taste, from traditional china to modern handmade designs. The real problem is, how do you get them on the wall?
Step 1: Choose the Plates
The first step is to decide which plates and platters you want to hang on the wall. Consider the size, shape, weight, and style of the plate. If you have a prized collection, this should be relatively easy because you already have plates you love. If you do not already have plates, you will need to buy some. For vintage plates, you can head to your local antique store. Local home design stores have contemporary plates with a broad appeal. Finally, check out local art fairs and websites like Etsy for handmade and one-of-a-kind art.
Try to choose plates that complement each other. They should fall in line with a chosen color scheme and style. This will help your final design to look cohesive and not cluttered. Also, selecting plates of different sizes and shapes can add interest to the final display.
Once you have your plates, it is time to decide how they will look on the wall. Do not blindly start making holes in the walls, as you will end up with a mess and a wall full of holes. Instead, get some craft or butcher paper and spread it out on a table or the floor. Place the plates on the paper in different arrangements until you find one you like. Keep in mind the available space on the wall, as your arrangement needs to fill the space but not look too cluttered. Do not be afraid of leaving some space between the plates. This is called allowing your design to breathe. The empty space creates a visual break, enabling each plate to shine.
Once you have the plates where you want them, trace around them with a pen, pencil, or marker. It can be easier to turn the plates over so that they are face down for this task. Then, you can take the template to your wall and use it as a guide for mounting the hanging hardware on the wall.
Alternative Design Arrangement Method
If you have a large wall or your hanging method won’t work with a single template, there’s an alternative. Lay out the paper and trace around the plates on the paper. Do not worry about the arrangement; you will cut out the tracings to have multiple round plate templates. Label the templates so that you can easily keep track of which template matches which plate. Then, tape the plates to the wall and design your arrangement on the wall.
Step 3: Choose the Hanging Method
YouTube/Therapy Art
The hanging method that you choose will depend on the plates’ size, shape, and weight. The method you choose needs to be strong and secure enough to hold the plates on the wall without the risk of them falling.
Adhesive Disk Plate Hangers
A popular method is to use an adhesive method. These are flat disks that adhere to the back of the plate and have a small metal loop. This method is popular because the plate will hang flat against the wall. The problem with adhesive disks is that they have weight limits, so large and heavy plates may be too much for the adhesive disk. You could use more than one disk per plate, but even this may not be enough. Another issue is that you need a flat surface for the disk to adhere to. If your plate has ridges, then this method won’t work. Finally, this method won’t work if you plan to take the plates down and occasionally use them.
What size hanging discs do you need for your plates?
1 1/4″ for plates up to 4 inches diameter
2″ for plates up to 6 inches diameter
3″ for plates up to 8 inches diameter
4″ for plates up to 12 inches diameter
5 1/2″ for plates up to 6.5 pounds in weight
Spring-Style Plate Hangers
The other most popular method is to use a spring-style plate hanger. These hangers have two metal holders that are connected by two springs. At each end, the metal holders have two hooks that will hook over the edge of the plate. There is a v-shaped metal piece that you will hook over a hook in the wall to hang the plate. These hangers come in a wide range of sizes, so you will measure the diameter of the plate to know which size hanger to use. You won’t have to worry about the hanger not being strong enough. You can also easily remove the hanger and use the plate. One thing to be careful of is potential damage to your plate. Look for a hanger that is coated with vinyl, rubber, or plastic on the hooks. This creates a cushion between the hooks and the edge of the plate to prevent scratching or chipping.
Command Strips
Be careful when using command strips to hang your plates. While they boast strong weight limits, they are not always reliable. On the other hand, their advantage is that you can remove them from the wall without leaving any damage or marks. If you have very small or lightweight plates, they might be an option, but use them with caution.
DIY Methods
There are some DIY plate hanging methods out there. While people claim that they are useful and creative methods for hanging their plates, many are more work than they are worth. For example, some use paperclips, but this is dangerous. Paperclips are not designed for holding the weight of plates and will eventually bend or break. Another uses hot glue, felt, and safety pins. This requires you to buy more materials, and the end result is not as stable. Ultimately, if you are going to hang cherished plates on the wall, invest in the proper equipment to hang them. This will prevent damage to your plates and give you a polished final display.
Step 4: Hang the Plates
When it is time to hang your plates, start by cleaning them. They could have dust or grease from your fingers on them. If you are using an adhesive method, these will prevent the adhesive from effectively sticking. If you are using another method, the dust and grease will make the plates look dingy.
Attach your chosen hanging method to your plates. First, confirm that you have your template where you want it on the wall. Then, begin adding the appropriate hooks where you need them.
Choose the Right Hook
The size of the hook you use will depend on the size of the plate. The larger and heavier the plate is, the larger and stronger the hook needs to be. Otherwise, the hook may not be able to hold the weight of the plate, and the plate will pull the hook out of the wall. If you have especially heavy plates, you may also need to use a wall anchor. This arm goes through the hole in the wall and braces the hook from the backside.
Hook Placement
When adding the hooks, keep in mind the hook’s location in relation to the edge of the plate. You do not want to put the hook at the top of the template, or your entire arrangement will ship upward. Instead, measure down from the top of the plate and then place the hook here. This will keep your plates from unintentionally shifting during hanging.